


 20Likes
Project: Break in Dutch machine

 04-21-2016 | 07:11 AM
#62
Thread Starter
Tech Lord

Joined: Aug 2007
Posts: 14,044
From: Holland
Thanks!
I have not been on the track yet. I hope to do it this or the next weekend because within 14 days the 1st national is there. Richard has allready written in his topic about his and some other experiences and they are good.
I have not been on the track yet. I hope to do it this or the next weekend because within 14 days the 1st national is there. Richard has allready written in his topic about his and some other experiences and they are good.
04-21-2016 | 11:58 PM
#65
Thread Starter
Tech Lord
Joined: Aug 2007
Posts: 14,044
From: Holland
There is no difference, with both ways an open backplate is needed to keep the rod on its place alhough with the horizontal placement it seems not needed but you do not want to have the rod going its own way.
His OS as a nice compare came out in the same way as my OS.
His OS as a nice compare came out in the same way as my OS.
 04-22-2016 | 05:04 PM
#67
Tech Fanatic
iTrader: (1)
Joined: Jan 2009
Posts: 786
From: Poland, Warsaw
Awesome job!
Can you share RPMS, time and type of oil?
It looks like 100revs per min ...
I can give big OK for your job!
ps: still no time for my own device and engines
A small movie:
The one thing I have to do is add some screws to mount the controlpanel, 4 bolts for the cap ant tighten some screws.
Can you share RPMS, time and type of oil?
It looks like 100revs per min ...
I can give big OK
for your job!ps: still no time for my own device and engines
A small movie:
| + YouTube Video | |
The one thing I have to do is add some screws to mount the controlpanel, 4 bolts for the cap ant tighten some screws.
04-23-2016 | 02:29 AM
#68
Thread Starter
Tech Lord
Joined: Aug 2007
Posts: 14,044
From: Holland
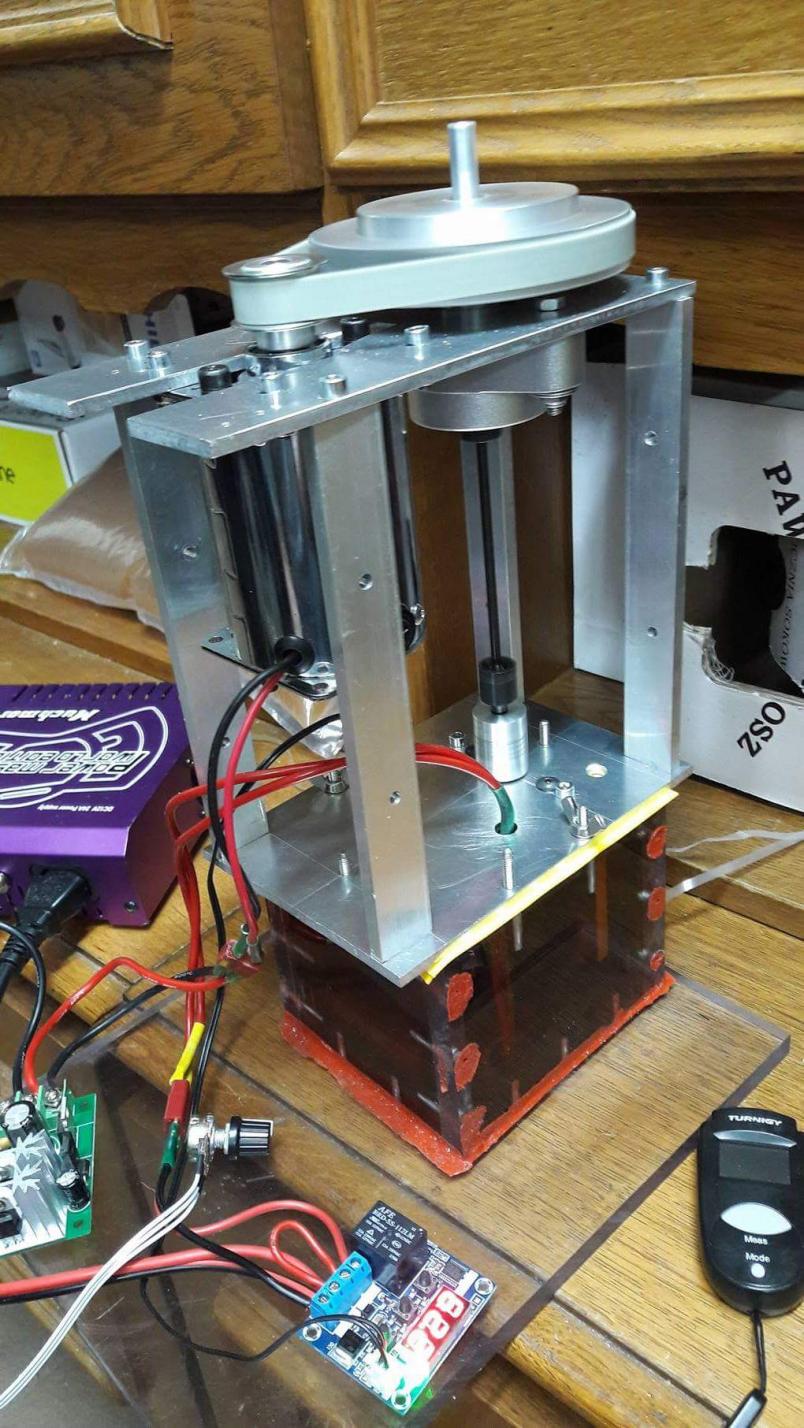
The used motor on this one:
http://www.conrad.com/ce/en/product/...tor-Modelcraft
Powered on a 13.8 volt power supply It will run about 370rpm and when the pinch is going less it will be arround 400rpm
As an oil I use Shell 0w20 oil
1st start I heat it up until 95 degrees to have some heat for a low pinch. You have to warm it up for about 20 minutes when the bath on all sides feels hand warm before starting the motor.
After a half hour running you will notice the rpm did raise a bit and the current is much lower than at the 1st start.
Then I set it to 85 degrees and you will notice the current is going up a tiny bit and the rpm lowers a tiny bit.
Then I let it run for several hours and after that I lower the temp to 65~70 degrees and let it run for 1 hour.
Then stop, cool it down, take it out and clean it with brake cleaner and a towel.
04-25-2016 | 03:15 AM
#69
Tech Apprentice
Joined: Apr 2007
Posts: 60
From: The Netherlands
My initial design was similar to Roelof’s unit, actually for this 2nd unit he is building for an RC friend, Roelof is using my old components. But during my design and making process, which initially was going on quite simultaneously, I streamlined my ideas and thoughts … Finally I was convinced that breaking-in the RC engine in the same position as it is in the RC car is crucial, so I decided that mine had to be a horizontal design, similar to Roy’s (Break In Dutch) first and personal unit, and not like his later commercial version where the RC engine shaft is in vertical position. My main doubt with the RC engine in that vertical situation is that the conrod can slide sideways from the bigend end possibly pushing the piston in the same way sideways with unknown theoretical consequences. The vertical design is easier and cheaper to produce, because no complicated oil seal system is required in the wall of the oil bath tub, but personally I had no good feeling about breaking in my highend RC engines in that vertical position.
By the way, I have never used any backplate in my horizontal EBIS unit.
And for your information, just a copy of my text in my "Building the EBIS" topic:
Actually YES guys, thanks for asking, there are some things really really worth mentioning.
No.1: Meanwhile I have performed 25+ customer break-ins of RC engines in my prototype EBIS unit. Without any exception, ALL customers were very happy with the result. Just an example, there was 1 customer from Austria who sent me 2 Novarossi engines, 1x Novarossi 3.5ccm Elite 80FF + 1x Novarossi 3.5ccm Mito 70FFA. This customer had a race within 2 weeks so he had no time for break in and the weather forecasts were rain for the coming weeks. So I had to do it within 1 week, including from and to shipping. Now the interesting part… Where the normal factory pinch ends about 4.4-5.8mm below the sleeve top side, that specific MITO engine did 7.7 (!) mm. I just wondered how it would be possible to do a normal break-in fur such an engine?? … Anyway, he subsequently used the engines directly and was so enthusiastic with the result. Such an easy break-in at the track without the normal break-in issues and TOP results on the track and race. When I told him about the extreme factory pinch he gave me the feedback that actually THAT was the reason that he didn’t use Novarossi engines during many years.
That is just 1 typical example of the so many enthusiastic reactions that I got.
No. 2: Since season has started here in Europe, I personally had the same track experience. After EBIS break in, I went to the track with my OS Speed 2102 engine. I properly warmed up my engine with a hair dryer, did � tank indle, then � tank WOT, and then I went within 2.1/2 tank on the track in race trim, really amazing. And after inspection of the engine at home, the piston looks still exactly the same as directly after EBIS, just added with the normal combustion colour change… Ready To Race !!
The power of my OS 2102 is impressive. During the race at my home track my colleague RC racers asked me if I used a different gearing, because the acceleration and RPM is amazing. Actually NOT, on my 977evo I use exactly the same “old” 977 gearbox, not yet the new 977evo. Next weekend I am going to run the Xceed Pro Stock series in the German Nitro-West Series, since these are the only allowed engine, together with the Novarossi N21-5T. The PSS has been in EBIS already, let’s wait and see the performance. I am full confidence.
As stated in my "Building the EBIS" topic, I am about to do a limited production series really soon, identical to my prototype EBIS unit, but designed for, and made by professional CNC mill and CNC lathe machining, with exactly the same components. This will be based on Pre Order, and I can tell you that meanwhile there are already more than enough requests. I case anyone else is interested, let me know (PM), then I can possibly still include.
05-05-2016 | 11:48 AM
#70
Thread Starter
Tech Lord
Joined: Aug 2007
Posts: 14,044
From: Holland
Today I fired up the 1st Ielasi Tuned 9cl engine. This one did run for 4 hours in the oil bath and I was amazed how easy it did start (after a pre-heat). When hitting the throttle the engine did not show any signs of a tight fit. Did run 1 tank with a slight rich setting and the 2nd tank was straigh on a sharp tuning without any issues.
Yes, this is the future!
Yes, this is the future!

 05-31-2016 | 03:55 AM
#74
Thread Starter
Tech Lord
Joined: Aug 2007
Posts: 14,044
From: Holland
Looks a bit... large. But hey, if it works 
It is a nice build!
Shell 0w30 has a viscosity of 11. That could be tricky... Be aware that the low speed and the tight fit of the piston needs a thin oil to crawl between piston and sleeve. It can result in some small scratches from what I have seen with thicker oils.
It is a nice build!
Shell 0w30 has a viscosity of 11. That could be tricky... Be aware that the low speed and the tight fit of the piston needs a thin oil to crawl between piston and sleeve. It can result in some small scratches from what I have seen with thicker oils.