


 649Likes
Team Associated B6 & B6D thread

 06-07-2017, 10:46 AM - Wikipost
|
|||
|
|||


 07-30-2016, 04:28 AM
#2101
Tech Regular
I looked around the best I could, but I could not find... I have the aluminum "D" mount in my B6D. Is there a chart that shows the different settings (with corresponding toe/anti-squat) of pill settings for the "D" mount like they have for the "C" mount". I realize that having both, the combinations are endless, but just wondering if there was an additional chart with the "D". Thanks!
 07-30-2016, 05:03 AM
#2102

I looked around the best I could, but I could not find... I have the aluminum "D" mount in my B6D. Is there a chart that shows the different settings (with corresponding toe/anti-squat) of pill settings for the "D" mount like they have for the "C" mount". I realize that having both, the combinations are endless, but just wondering if there was an additional chart with the "D". Thanks!
The .5 pills make a certain amount of change, whether it's on the c or the d. The 1 pills make a larger change.
07-30-2016, 05:10 AM
#2103
07-30-2016, 05:46 AM
#2104
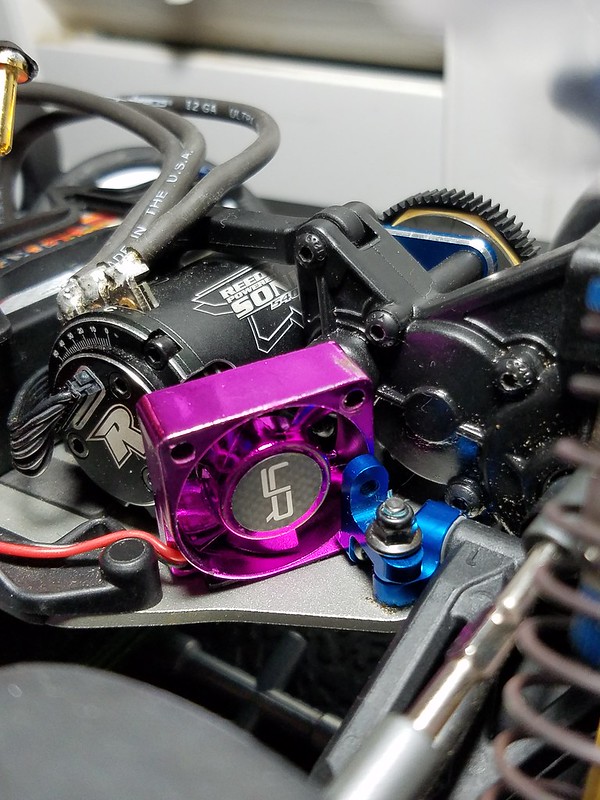
What is the part that is holding the fan? I need 2 them for my 2 kits thank you sir
 07-30-2016, 05:54 AM
#2105
Those are b5m servo mounts. If you want the fan away from the motor more, use b6 mounts.
07-30-2016, 08:44 AM
#2107

That's the big problem with setup, which end is causing us trouble? Which way to go?
In the end, removing a shim (-1mm for a start) from the front bulkhead would be much better than a longer camber link. BTW, I've handled and analysed dozens of cars and most of them suffer from front suspension collapsing because of low RC height and generally too soft a spring too, that's why most tend to run too soft a spring and lower(or more roll) roll centers in the rear, compounding the issue.
Hope it helps!
07-30-2016, 09:20 AM
#2109
And you know why? The front suspension was collapsing more than the rear, now with the longer camber link the rear collapses as much as the front. It's like Usain Bolt having a sore knee so the medic would bang the good knee with a hammer so they're both hurting
That's the big problem with setup, which end is causing us trouble? Which way to go?
In the end, removing a shim (-1mm for a start) from the front bulkhead would be much better than a longer camber link. BTW, I've handled and analysed dozens of cars and most of them suffer from front suspension collapsing because of low RC height and generally too soft a spring too, that's why most tend to run too soft a spring and lower(or more roll) roll centers in the rear, compounding the issue.
Hope it helps!
07-30-2016, 09:25 AM
#2110
Well, you obviously need to reset your static camber after adjusting the length. The length adjusts the camber gain as the suspension compresses, but you would want to set your static camber the same as before the change.
07-30-2016, 09:27 AM
#2111
http://users.telenet.be/elvo/
look in "setup guide" for info on camber links/link length and what does what.
I have other links on the first page that make for a good reading.
look in "setup guide" for info on camber links/link length and what does what.
I have other links on the first page that make for a good reading.
07-30-2016, 09:59 AM
#2112
Tech Regular
iTrader: (8)
Making my way through the build and everything has been going very well. Kudos to Associated for making a pretty killer manual for this car. One problem I have run into though is my steering knuckles are pretty tight inside the c blocks. Did any of you run into this and did you loosen them up with a 3mm reamer?
07-30-2016, 10:25 AM
#2114
Making my way through the build and everything has been going very well. Kudos to Associated for making a pretty killer manual for this car. One problem I have run into though is my steering knuckles are pretty tight inside the c blocks. Did any of you run into this and did you loosen them up with a 3mm reamer?
07-30-2016, 10:35 AM
#2115
He's not just lengthening the link -- that would be referred to as adding "X degrees of camber".