1387Likes
Tamiya TT02 Thread
 11-30-2021 | 11:12 AM
#3001
Tech Adept
Joined: Nov 2021
Posts: 133
From: Central Florida
If you are damaging the interal diff gears, GPM makes metal gears for inside the stock? diff. Here is a link for this product on Amazon - https://www.amazon.com/Tamiya-TT-02-.../dp/B00YA7R5PC
The diff I got is the case, spur and pinion; However I run a modified metal WR02 driveshaft pinion on both ends of the driveshaft.
They appear to be the same screws as the WR02 standard diff? I have leftovers of those.
I feel the metal gears with the pin drive cups would be more robust here. I've got the metal lock block in the front diff so it's not an issue up front.
I'll see if it's worth it to build or buy complete. Either way would work.
 11-30-2021 | 12:41 PM
#3002

It is always good to create a shopping list before buying. I sometimes use the online shopping cart on TamiyaUSA.com to help keep an eye on costs. Sometimes Amazon or online shipping can be cheaper but don't forget to factor in taxes & shipping costs/time.
In case anyone is having difficulty describe the different gears in a TT02, this info might help.
- Small Bevel Gear - the smaller gear that is inside the differential.
- Large Bevel Gear - the larger gear that is inside the differential. The gearbox joints are connected to the Large Bevel Gears
- Beveled Ring Gear - the large plastic gear that is on the outside & part of the differential assembly
- Beveled Pinion Gear - the smaller plastic or metal gear that attaches to the propeller joint
- Spur Gear - the typically plastic gear that attaches to the rear propeller joint
- Pinion Gear - the typically smaller gear (metal or plastic) that attaches to the motor shaft.
- Propeller Shaft - the long plastic or metal shaft that connects the front & rear propeller joint (to the differentials).
I am using terms that Taimiya uses in their manuals. Some of these gears have different names depending on the part of the world you may be in or the person you are talking to. For example some people refer to the small and large gears inside of a differental as planetary and sun gear. Other people might refer to a propeller shaft as a drive shaft where Tamiya uses the term drive shaft to describe something different
Hope this info helps
12-08-2021 | 04:14 AM
#3003
Joined: Aug 2001
Posts: 7,664
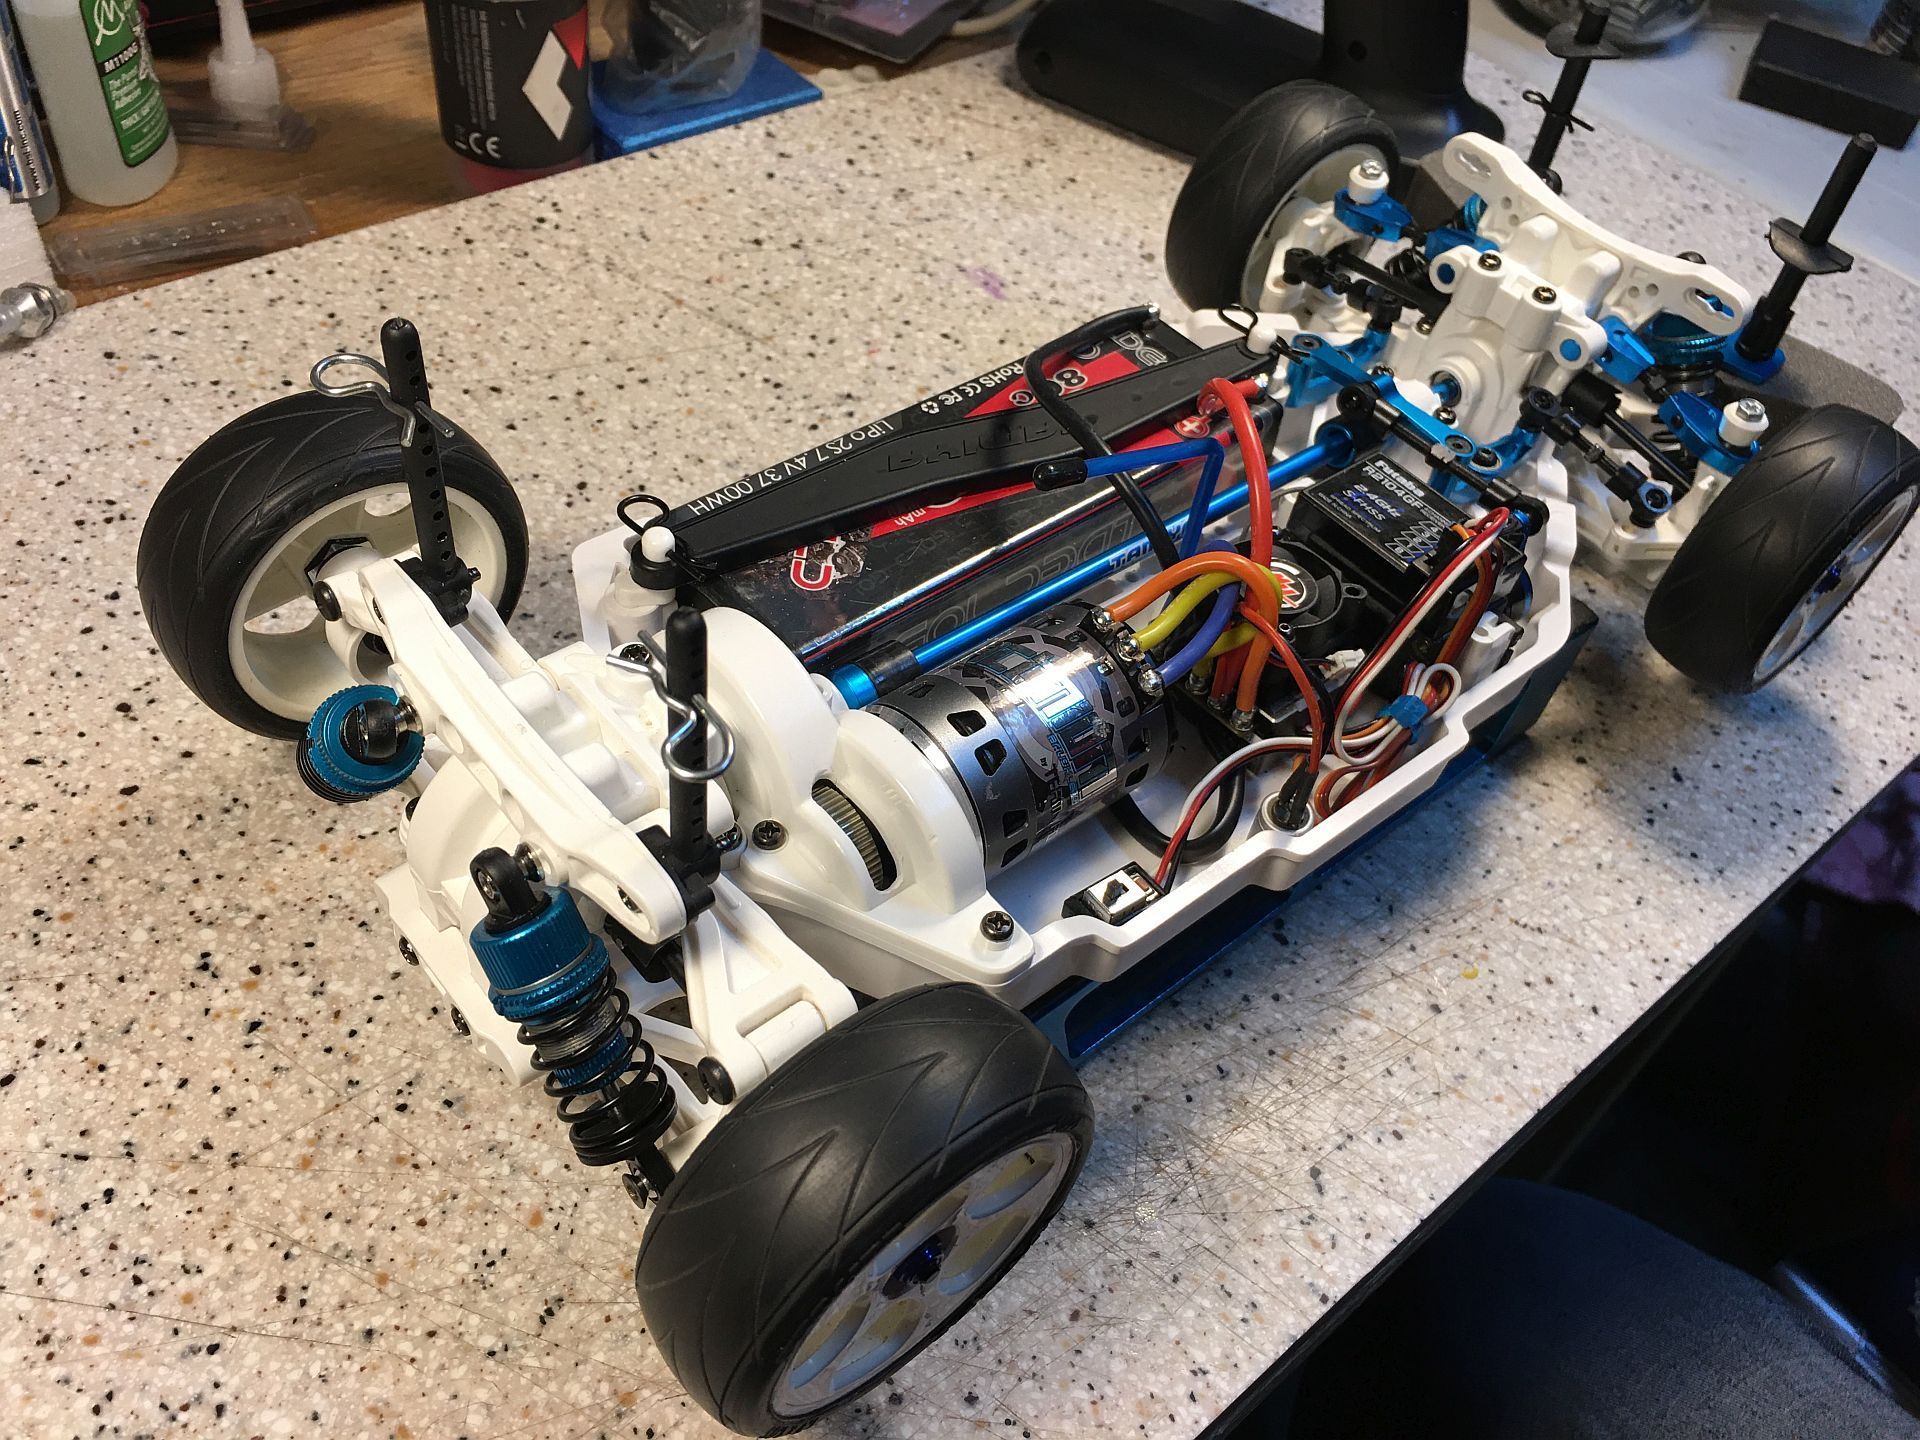
My TT-02 club racer is coming together nicely, but I am still waiting on just a few more parts to make it complete. Coming soon is a nice 25.5 brushless motor, the 3 degree rear hubs and the adjustable upper rear arms. Here is the chassis for now. My gearing is 75/51 that gives an FDR of 3.82 and as you can see I needed to modify the motor cover to allow for the large pinion gear. The motor installed is a Team Powers Actinium 21.5


12-08-2021 | 04:34 AM
#3004
Tech Regular
Joined: Oct 2018
Posts: 306
From: Braunschweig
My TT-02 club racer is coming together nicely, but I am still waiting on just a few more parts to make it complete. Coming soon is a nice 25.5 brushless motor, the 3 degree rear hubs and the adjustable upper rear arms. Here is the chassis for now. My gearing is 75/51 that gives an FDR of 3.82 and as you can see I needed to modify the motor cover to allow for the large pinion gear. The motor installed is a Team Powers Actinium 21.5
12-08-2021 | 04:43 AM
#3005
Joined: Aug 2001
Posts: 7,664
Thanks Eotz, looks to be this part;
https://www.thingiverse.com/thing:4946454
I don't have a 3D printer but will ask around to see if I can get someone local to print this for me.
If anyone out there in TT-02 Land happens to have a stock white motor cover that they'd sell please contact me.
https://www.thingiverse.com/thing:4946454
I don't have a 3D printer but will ask around to see if I can get someone local to print this for me.
If anyone out there in TT-02 Land happens to have a stock white motor cover that they'd sell please contact me.
Last edited by SteveM; 12-08-2021 at 05:00 AM.
12-08-2021 | 07:37 AM
#3007
Joined: Aug 2001
Posts: 7,664
12-09-2021 | 03:47 AM
#3008
Tech Adept
Joined: Nov 2021
Posts: 133
From: Central Florida
Thanks Eotz, looks to be this part;
https://www.thingiverse.com/thing:4946454
I don't have a 3D printer but will ask around to see if I can get someone local to print this for me.
If anyone out there in TT-02 Land happens to have a stock white motor cover that they'd sell please contact me.
https://www.thingiverse.com/thing:4946454
I don't have a 3D printer but will ask around to see if I can get someone local to print this for me.
If anyone out there in TT-02 Land happens to have a stock white motor cover that they'd sell please contact me.
EDIT- I have printed countless other parts for my TT02s that fit without issue, but it is a cheaper printer.
So I printed another and cut only what I needed off of it. Cut the stock cover where it needed to be cut, and used super glue and baking soda to fill the gaps and mount. Added a little PS-5 Black to a paintbrush and added to the glue/baking soda.
Now it's not pretty, but it works 😂
Will post a few pics when the sun comes up. Also got the Rallye TT02 buttoned up as well!
12-09-2021 | 03:59 AM
#3009
Tech Adept
Joined: Nov 2021
Posts: 133
From: Central Florida
It is always good to create a shopping list before buying. I sometimes use the online shopping cart on TamiyaUSA.com to help keep an eye on costs. Sometimes Amazon or online shipping can be cheaper but don't forget to factor in taxes & shipping costs/time.
In case anyone is having difficulty describe the different gears in a TT02, this info might help.
- Small Bevel Gear - the smaller gear that is inside the differential.
- Large Bevel Gear - the larger gear that is inside the differential. The gearbox joints are connected to the Large Bevel Gears
- Beveled Ring Gear - the large plastic gear that is on the outside & part of the differential assembly
- Beveled Pinion Gear - the smaller plastic or metal gear that attaches to the propeller joint
- Spur Gear - the typically plastic gear that attaches to the rear propeller joint
- Pinion Gear - the typically smaller gear (metal or plastic) that attaches to the motor shaft.
- Propeller Shaft - the long plastic or metal shaft that connects the front & rear propeller joint (to the differentials).
I am using terms that Taimiya uses in their manuals. Some of these gears have different names depending on the part of the world you may be in or the person you are talking to. For example some people refer to the small and large gears inside of a differental as planetary and sun gear. Other people might refer to a propeller shaft as a drive shaft where Tamiya uses the term drive shaft to describe something different
Hope this info helps
In case anyone is having difficulty describe the different gears in a TT02, this info might help.
- Small Bevel Gear - the smaller gear that is inside the differential.
- Large Bevel Gear - the larger gear that is inside the differential. The gearbox joints are connected to the Large Bevel Gears
- Beveled Ring Gear - the large plastic gear that is on the outside & part of the differential assembly
- Beveled Pinion Gear - the smaller plastic or metal gear that attaches to the propeller joint
- Spur Gear - the typically plastic gear that attaches to the rear propeller joint
- Pinion Gear - the typically smaller gear (metal or plastic) that attaches to the motor shaft.
- Propeller Shaft - the long plastic or metal shaft that connects the front & rear propeller joint (to the differentials).
I am using terms that Taimiya uses in their manuals. Some of these gears have different names depending on the part of the world you may be in or the person you are talking to. For example some people refer to the small and large gears inside of a differental as planetary and sun gear. Other people might refer to a propeller shaft as a drive shaft where Tamiya uses the term drive shaft to describe something different
Hope this info helps
Hence I always try my best to simplify but clearly explain geartrain parts.
I'll always refer to the smaller gear as the pinion, and the larger gear as the spur(even when the pinion is larger than the spur on the motor 😂
 , but I usually call out location too, IE driveshaft, motor or diff.
With the things I've learned personally I refer to diff internals as spider gears, pinion and spur on the driveshaft (diff), and pinion and spur on the motor. I feel these descriptions to be hard to confuse.
I have yet to see a true planetary gear set at these scales, though I am absolutely sure they exist.
12-09-2021 | 11:40 AM
#3010
Joined: Aug 2001
Posts: 7,664
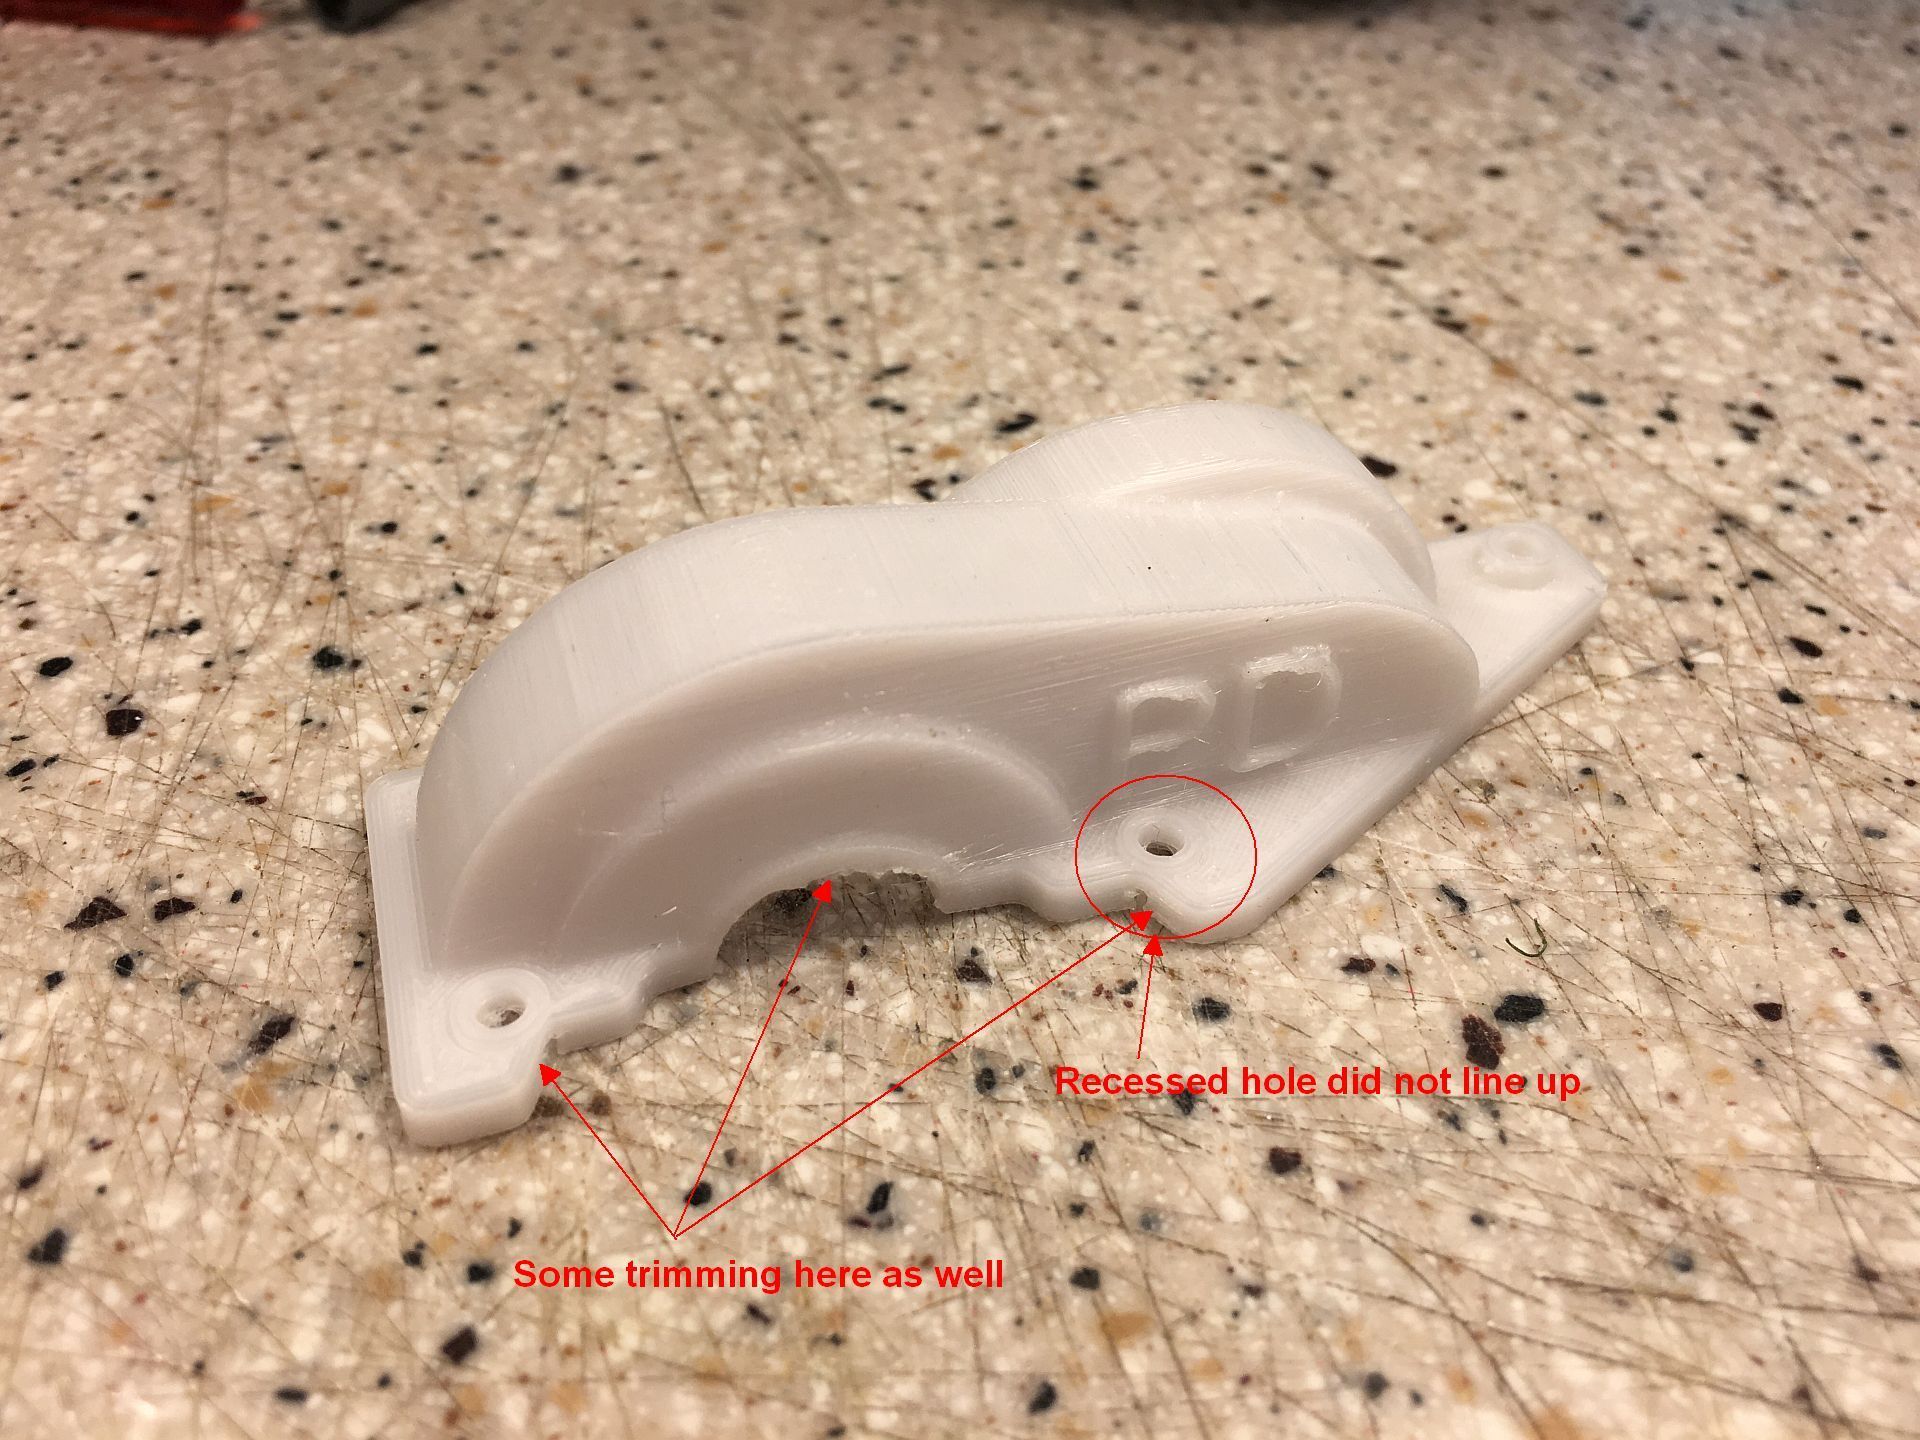
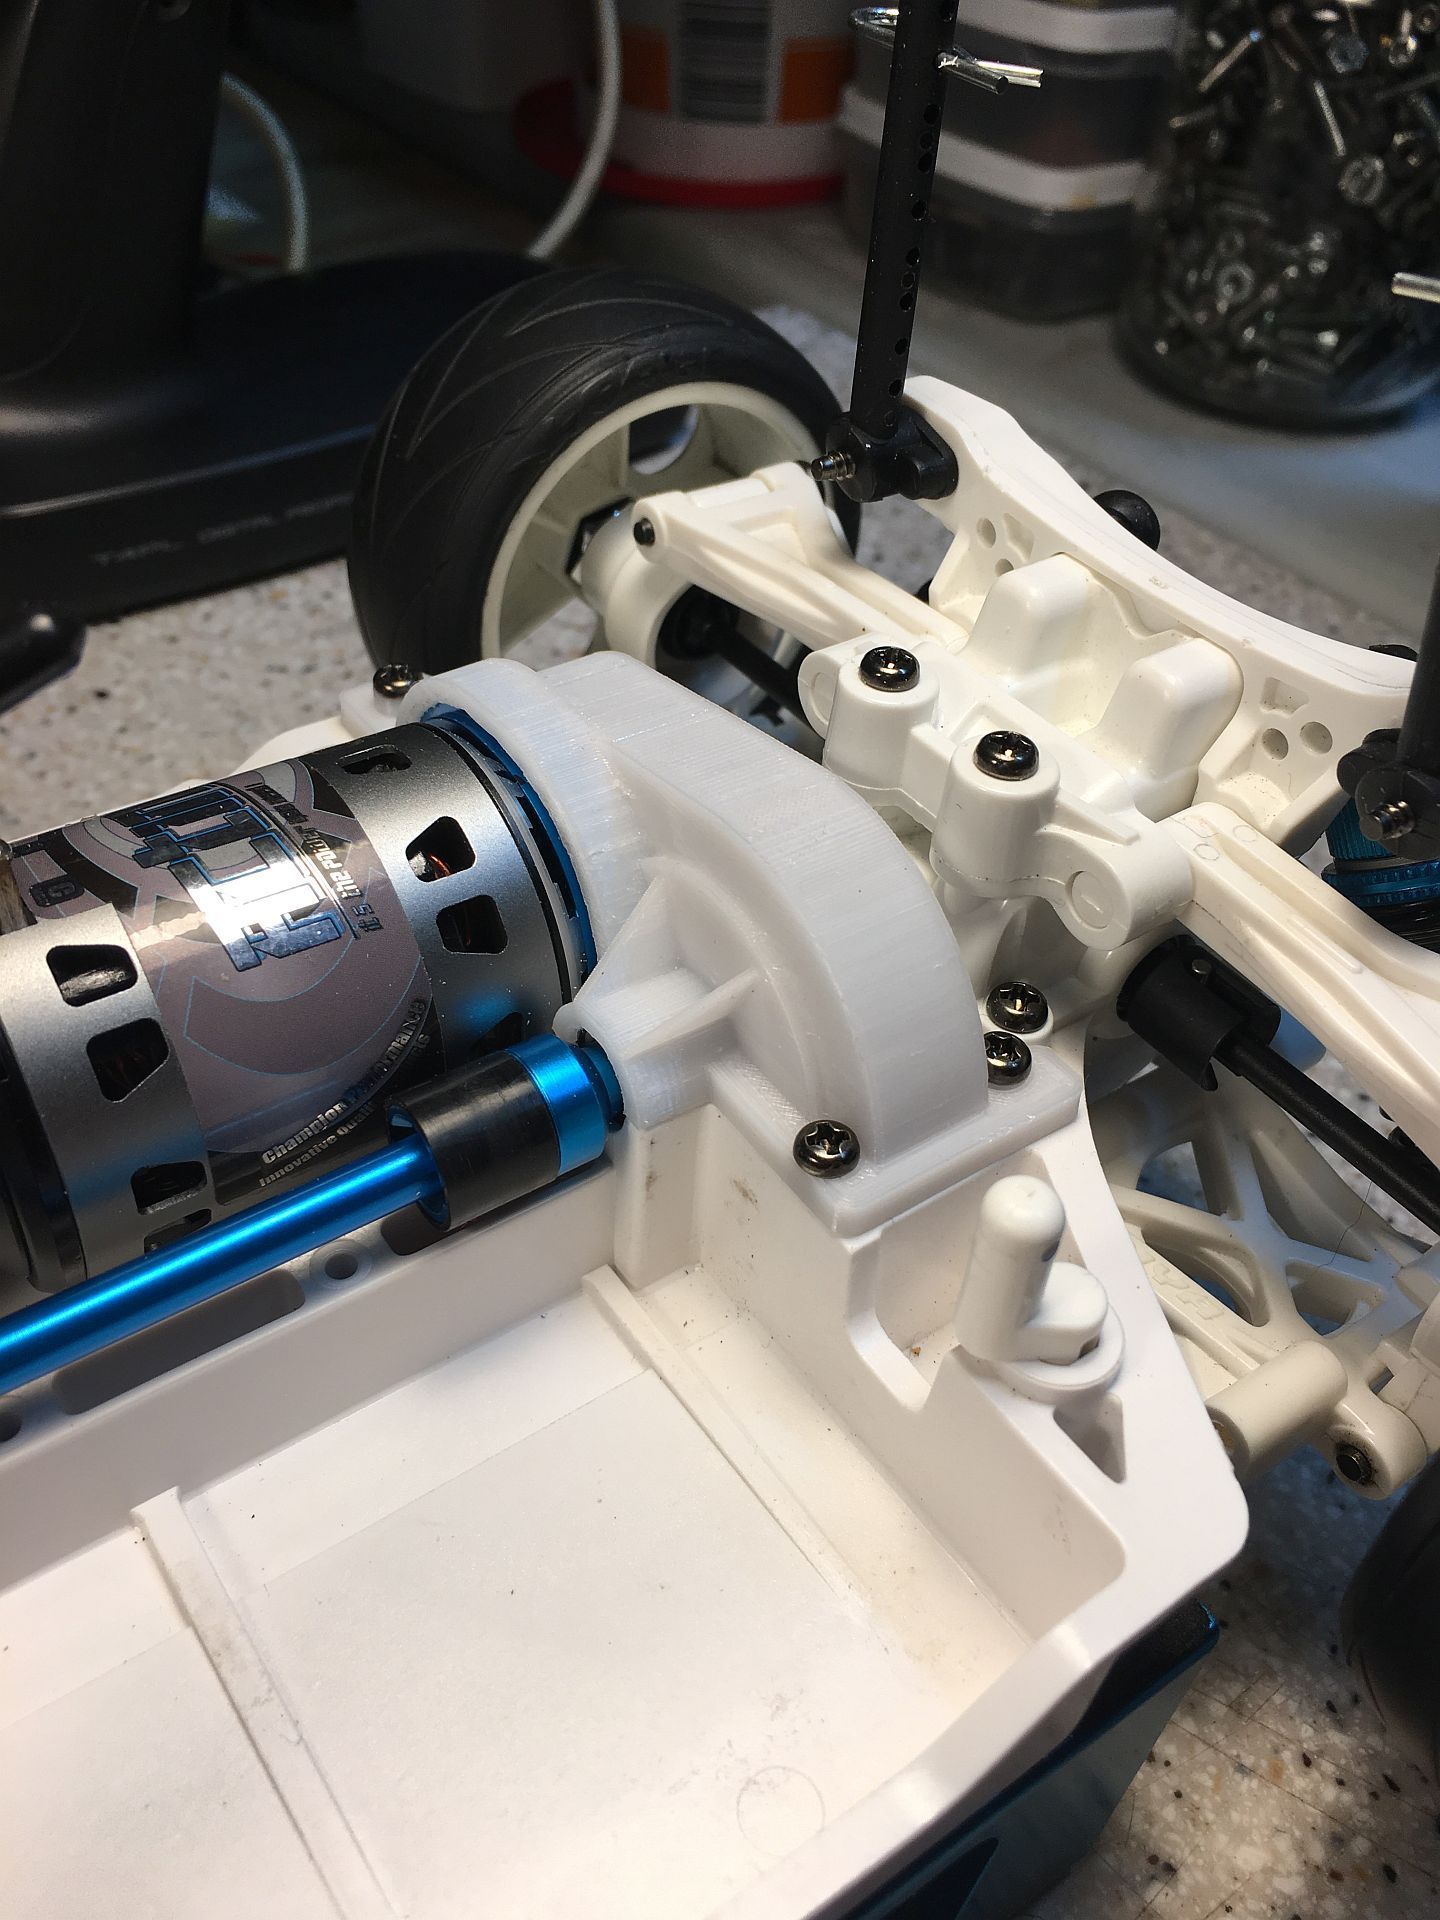
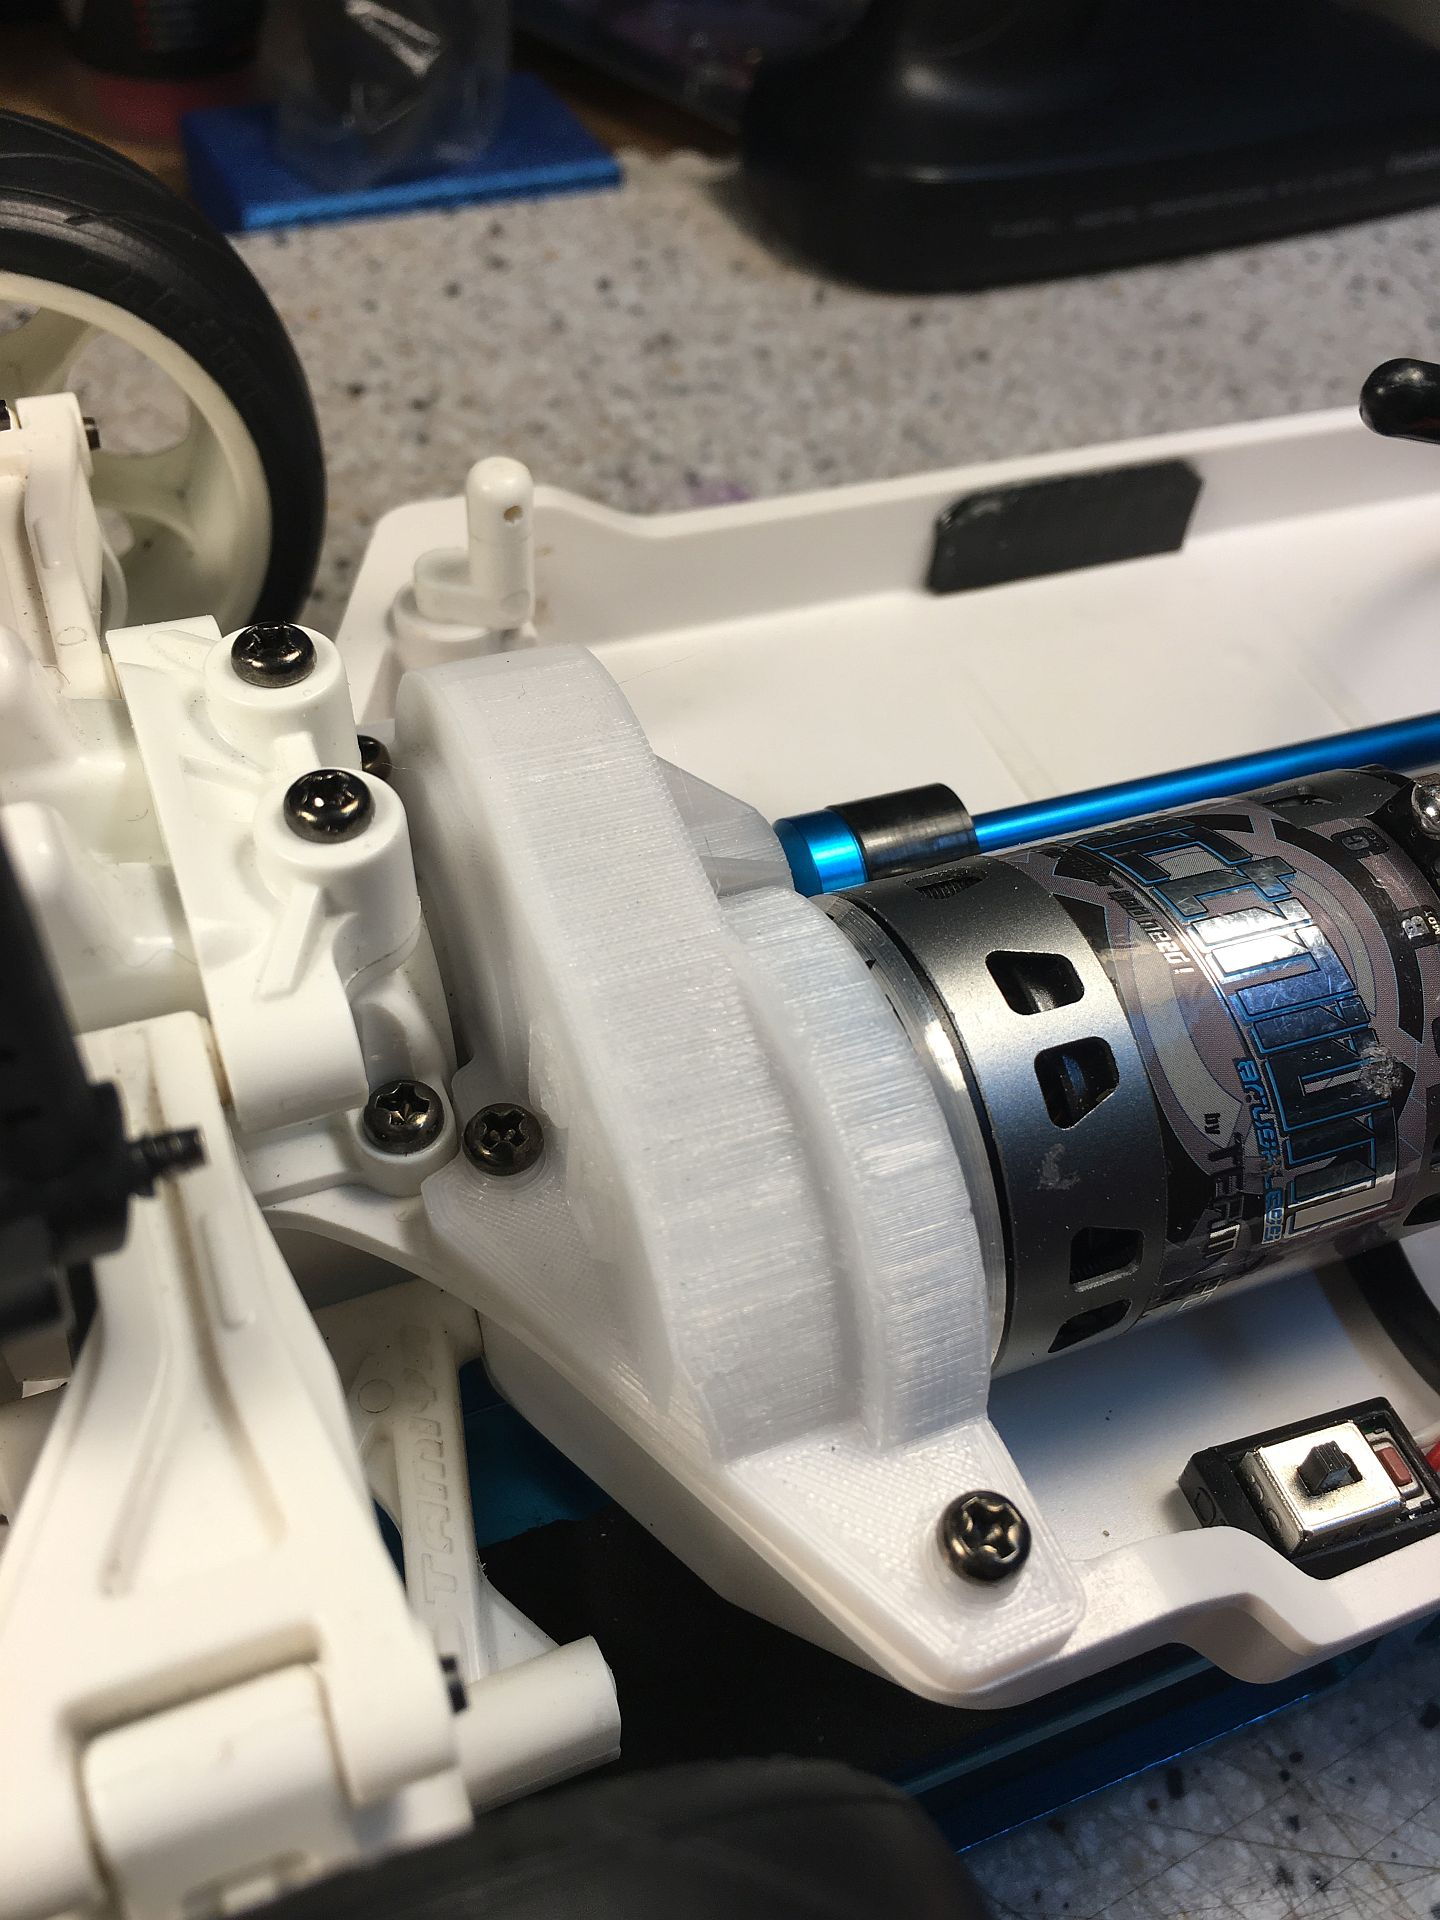
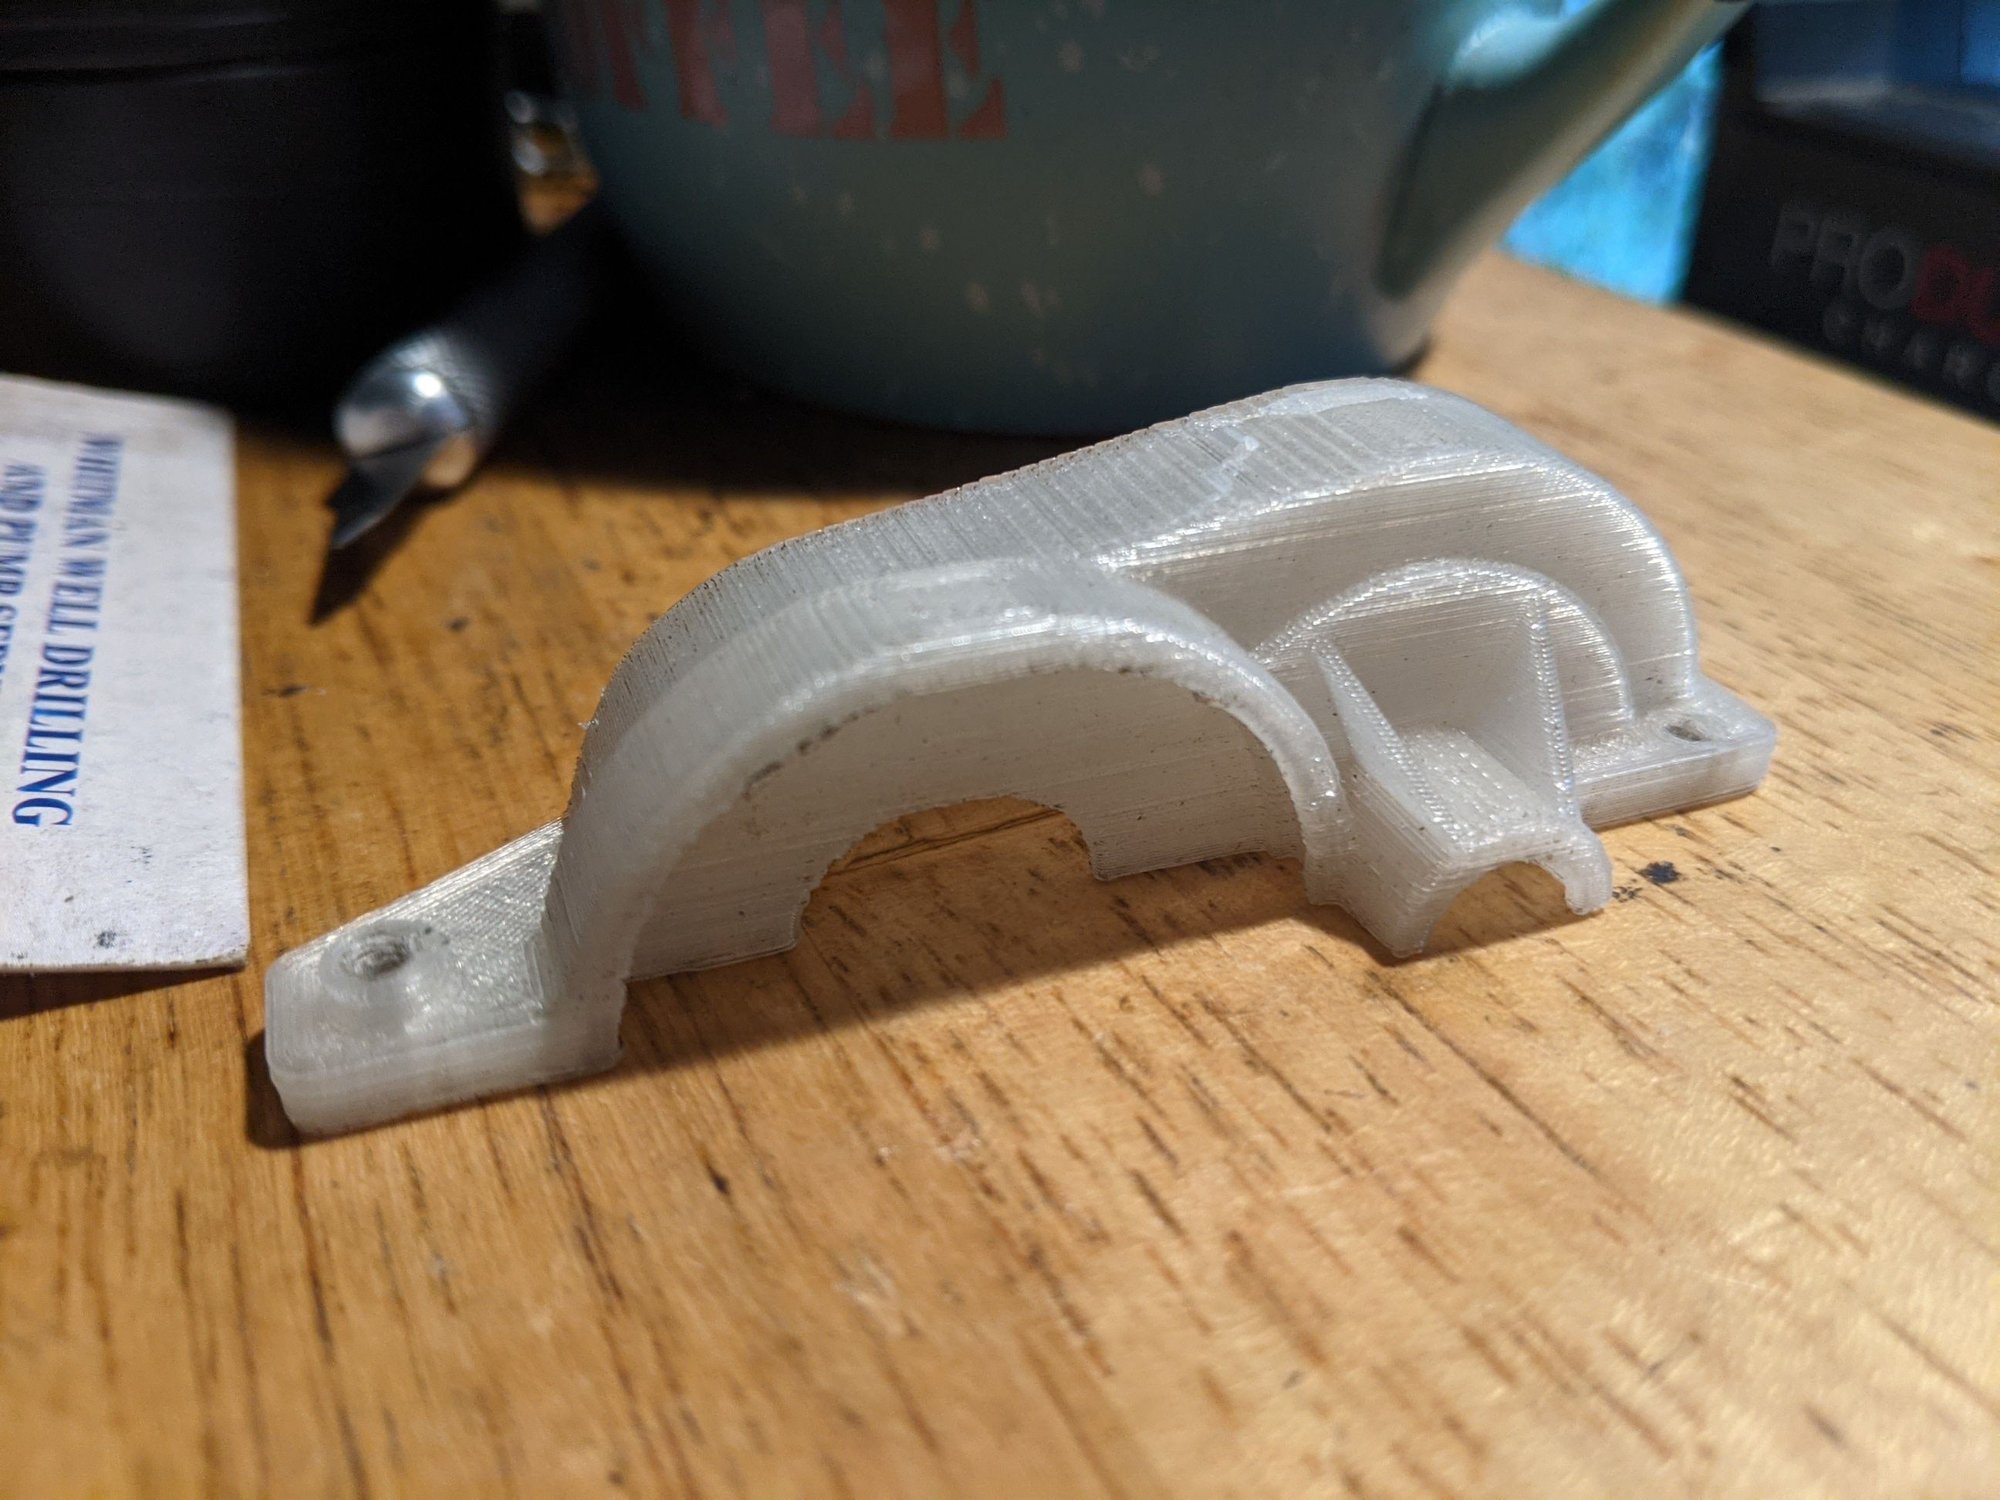
The motor cover part was printed and I picked it up today. It was pretty rough, but that might be due to the material and printer used, no clue. The 4 mounting holes did not match up with the chassis and I had to do some milling with my Dremel to get it to fit. Still not perfect and definitely not a 'drop fit' like the kit stock part. It was an experiment and I will run it to see what happens.


12-10-2021 | 05:11 AM
#3012
Joined: Aug 2001
Posts: 7,664
12-10-2021 | 05:35 AM
#3013
Tech Adept
Joined: Nov 2021
Posts: 133
From: Central Florida
The motor cover part was printed and I picked it up today. It was pretty rough, but that might be due to the material and printer used, no clue. The 4 mounting holes did not match up with the chassis and I had to do some milling with my Dremel to get it to fit. Still not perfect and definitely not a 'drop fit' like the kit stock part. It was an experiment and I will run it to see what happens.
Mind if I ask which areas you trimmed to get a better fit? I printed mine in PLA, for the area it shouldn't be an issue with heat except where it's close to the motor. Yours looks like PETG, and the printer could use some retraction setting tuning to clean up the print.
Ignore the crack. Took a good bit of force to crack. After it broke upon installation, I figured a proper stress test was in order. 100% infill with glow in the dark filament.

 12-10-2021 | 05:53 AM
#3014
Tech Adept
Joined: Nov 2021
Posts: 133
From: Central Florida
Man this thing has some miles on it already LOL.
This is an eBay 13.5T adjustable timing no name brushless with the TBLE-04s ESC and a Surpass Hobbies low-pro metal gear servo. 30/64 48p gearing, locked rear diff open front diff.
Got spare rims and rally blocks cause running the 4000kv brushless setup at 40+mph in the dirt is a terrible, fun idea LOL. 13.5T on 2s is much more enjoyable in the dirt, 25-30mph depending on timing.
Removed the gyro for a more "authentic" rally experience, and put the FGR4 Rx in so I could use the super low latency NB4 for better control. It drives better with toned down steering and throttle mixes.


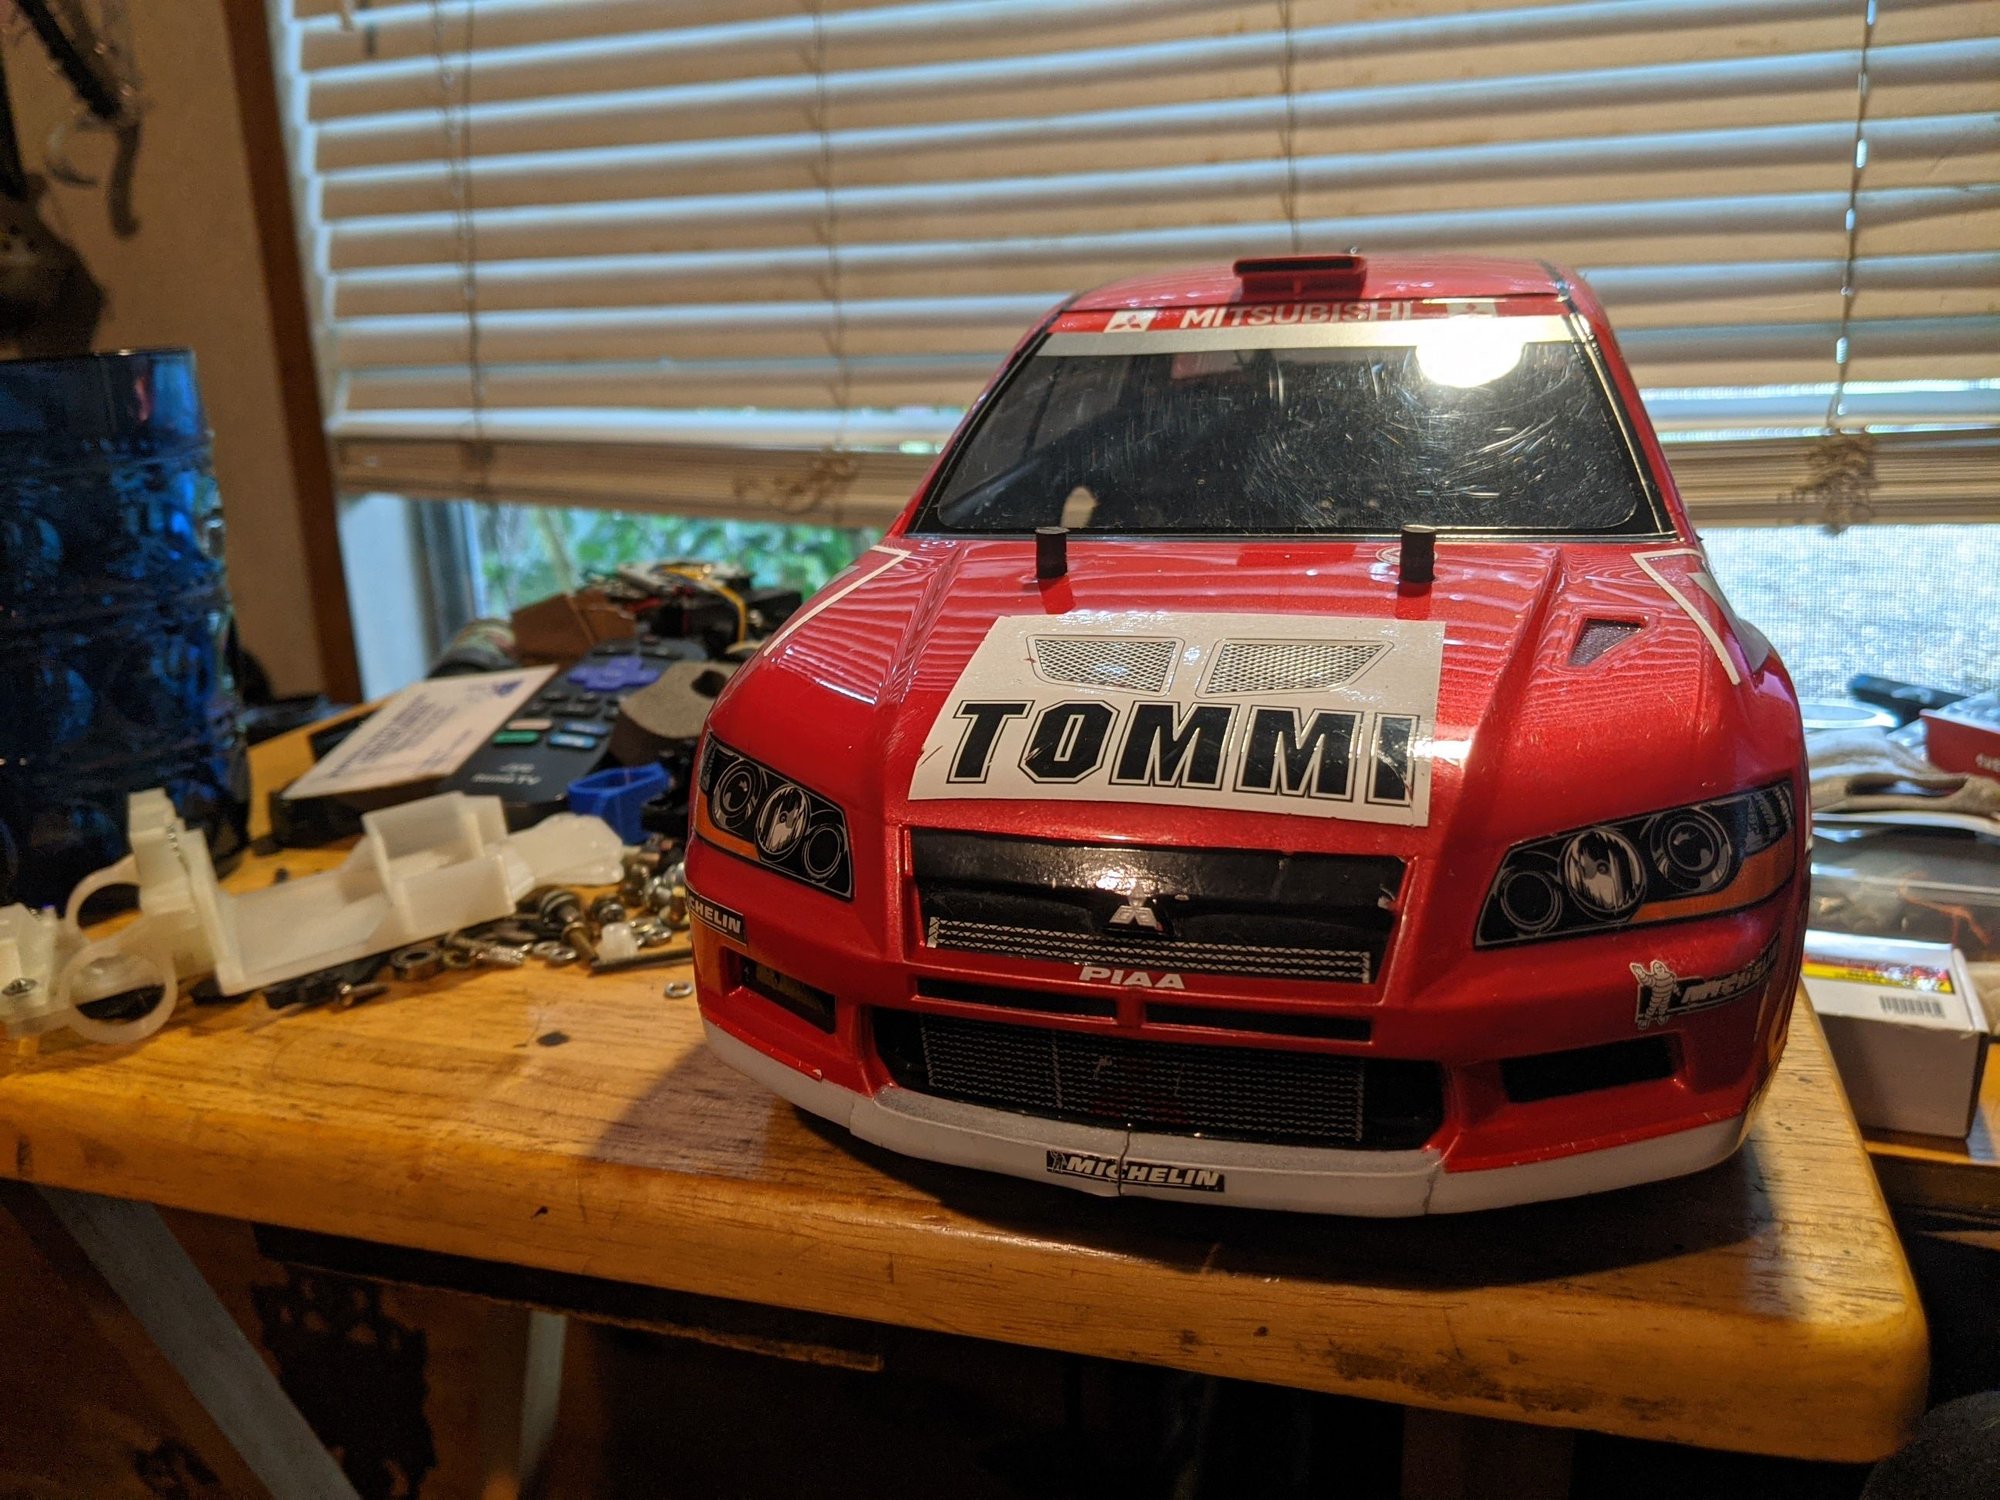
Came across Tamiya 22023 chassis cover set and jumped on it like flies on, well this is a family forum, use your imagination lol.
This is the chassis cover with the partial front wheel well, so a pretty good starting point for a full rally cover with ducting and screens for airflow.
Going to be picking up the 1992 Audi TT02 kit for the drift build( got the 1991 Audi for the rally/drift build), because now I'm doing dedicated chassis being I picked up Tamiya 51543 911 Carrera RSR and it's a short wheelbase body. Now looking to find Tamiya 84399 tall 911 wing to go with the body but not having much luck there. Going for GM Tuxedo Black from a few years of classic Corvettes. Deepest Darkest Blue I have ever seen. Doing the side panels by the wheel wells in carbon fiber vinyl and a few other things.
This is an eBay 13.5T adjustable timing no name brushless with the TBLE-04s ESC and a Surpass Hobbies low-pro metal gear servo. 30/64 48p gearing, locked rear diff open front diff.
Got spare rims and rally blocks cause running the 4000kv brushless setup at 40+mph in the dirt is a terrible, fun idea LOL. 13.5T on 2s is much more enjoyable in the dirt, 25-30mph depending on timing.
Removed the gyro for a more "authentic" rally experience, and put the FGR4 Rx in so I could use the super low latency NB4 for better control. It drives better with toned down steering and throttle mixes.
Came across Tamiya 22023 chassis cover set and jumped on it like flies on, well this is a family forum, use your imagination lol.
This is the chassis cover with the partial front wheel well, so a pretty good starting point for a full rally cover with ducting and screens for airflow.
Going to be picking up the 1992 Audi TT02 kit for the drift build( got the 1991 Audi for the rally/drift build), because now I'm doing dedicated chassis being I picked up Tamiya 51543 911 Carrera RSR and it's a short wheelbase body. Now looking to find Tamiya 84399 tall 911 wing to go with the body but not having much luck there. Going for GM Tuxedo Black from a few years of classic Corvettes. Deepest Darkest Blue I have ever seen. Doing the side panels by the wheel wells in carbon fiber vinyl and a few other things.
12-10-2021 | 06:15 AM
#3015
Joined: Aug 2001
Posts: 7,664
Yup. That's the one. Dremel or exacto knife and I couldn't get it to fit. Got it close but it always snapped once tightened down.
Mind if I ask which areas you trimmed to get a better fit? I printed mine in PLA, for the area it shouldn't be an issue with heat except where it's close to the motor. Yours looks like PETG, and the printer could use some retraction setting tuning to clean up the print.
Ignore the crack. Took a good bit of force to crack. After it broke upon installation, I figured a proper stress test was in order. 100% infill with glow in the dark filament.