Go Back  R/C Tech Forums > General Forums > Electric Off-Road
Xray XB2 2WD Buggy Thread >

Xray XB2 2WD Buggy Thread

Community
Wiki Posts
Search
Like Tree333Likes

Xray XB2 2WD Buggy Thread

    Hide Wikipost
Old 05-04-2019, 06:44 PM   -   Wikipost
R/C Tech ForumsThread Wiki: Xray XB2 2WD Buggy Thread
Please read: This is a community-maintained wiki post containing the most important information from this thread. You may edit the Wiki once you have been a member for 90 days and have made 90 posts.
 
Last edit by: dgrobe2112
Instruction manuals: (C/O BentKa)

Xray XB2 Carpet Edition Instruction Manual
http://www.teamxray.com/xb2/2016/dow...ual_v2_low.pdf

Xray XB2 Dirt Edition Instruction Manual
http://www.teamxray.com/xb2/2016/dow...w.pdf?update=2

BentKa: Carpet Edition 4 gear to 3 gear laydown conversion parts:
  • Gearbox #323014
  • Motorplate #324012
  • 36T idler gear #324236
  • Brace for waterfall #324031


Socket: Bodies Available:

Xray has two OEM bodies, the .75mm and the .50mm light weight:
light weight: https://www.amainhobbies.com/xray-xb...329701/p492942

OEM .75mm: https://www.amainhobbies.com/xray-0....329700/p477762

Also, I've fitted the yz2 body, both the light and regular fit fine, just make your own cut lines:
https://www.amainhobbies.com/yokomo-...z2-101/p417674


[i] J Concepts S2 Body [i]


Penguin Racing makes a high grip body that fits the DE and CE:
http://www.ebay.com/itm/X-Ray-Xb2-Hi...oAAOSw1S9WewHV


Socket: Wheel fitment:

According to some, you'll require different offset rear hexes to use B5M wheels. According to my Hudy setup board, B5M wheels are the same offset. I measured the overall width of the car with XB2 wheels, and then again with B5M wheels, same measurement.

On the front, B5M wheels were 1.5mm wider. Xray offers hexes to reduce width -.75 on each side, or you could spend 3-5 minutes and sand your OEM hexes down .75mm.

edit by dgrobe2112
here are the hubs for losi and AE

for AE Front 365354 -0.75
for Losi rear 365358 +3.00 (4 stripe)
for AE rear 365359 +3.75 (5 stripe) or add 1.5mm carbon avid spacers


Socket: Flex and the XB2:

Flex screws are as follows:

Plastic bulkhead between motor and waterfall. Can remove screw in chassis, or remove bulkhead altogether.

Waterfall has 4 screws, can remove the inner two or outer two. IIRC, removing the inner two provides more flex, and thus more bite.

Removing the battery brace. This gives a tremendous amount of flex on the middle of the car, and can sometimes be inconsistent. I do this for outdoor racing on low bite. I like the feel over the 4 gear in 17.5 racing, since the 4 gear will take some snap away off the corner.

Rear C block - has inner and outer screws. I haven't played with this, as it's a crucial pivot point of the car.

Medium arms and towers -> I don't believe the carpet car has the rear medium tower available, however the DE DOES have an optional hard part. I think the hard parts are more consistent, especially when it gets hot (90+ degrees F). However, the medium parts do NOT break unless you're severely talented. They also don't wear out.


Socket: Avid/Schelle Slipper mod:

Credit to WillS, Matt Trimmings, and myself for figuring this out months ago.

Parts you'll need:

B5M V2 3gear compatible top shaft.
TKO Special 5x13x5 bear OR 5x13x6 bearing Either can work. This replaces the spur side bearing on the top shaft.
5mm shims, same shims used in 1/8th scale clutch bells. Look for protek .1mm and .2mm kit.
Avid or Schelle b5m top shaft kit, with spur gears of your choosing. (DE can't handle a 69, the CE can)

Shimming: You'll need to install the bearing in the front portion of the removable piece for the shaft. Make sure the bearing is pushed all the way in. With the TKO bearing, you'll need to shim approximately 1.4mm on the front side of the top shaft. Roughly .3-.5mm with the other bearing. This is a "feel" and tolerance setting. I urge you to watch videos about setting clutch bell play in 1/8th scale to get an idea of what yield you want for end play. Too tight, it'll eat bearings.

Outside of trans case: Use Avid/Schelle top shaft spacer plus .2mm shim to offset slipper from motor plate perfectly. Install slipper as instructed, and use Avid/Schelle spring and XB2 slipper nut.

- NEW - Schelle now sells Xb2 Topshafts. They include a spacer, so no need for shims in gearbox, and comes with the smaller bearing. Both methods work.

Socket: Yokomo Differential or MIP pucks:

Credit to: WillS for figuring out pucks, and as well fitting the Losi 22 diff with the same mods.

Parts needed: Yokomo Bmax2 or YZ2 complete diff OR Mip PUCKS outdrives
Xb2 diff gear
Bmax2 V3 Worlds rear dog bones, or Bmax 2 pucks dog bones
You'll use XB2 axles, and will require no other mods for the axles or dog bones.
You'll need .2mm outdrive/diff shims. Shim approximately .5mm on each side of the diff, behind the bearings. The top portion of the transmission is what "sets" the diff in place, not the bottom half. A little play back and forth is fine, the stock diff has some play from the factory.

dgrobe2112: CE to DE conversion:
along with the parts needed.. you MUST have these following hardware, or it wont work

https://www.teamxray.com/xb2/2016/do...conversion.pdf

(3) XRAY 902340 M3x40 button head screws. these are the screws that mount the motor mount to the tranny
(4) XRAY 903322 M3x22 counter sunk screws. these are for the rear diff case, to mount to the chassis. i think i used some M3x18 and they worked ok.

Socket: Best method for setting up the XB2 ball diff:

The XB2 diff is stellar when setup correctly. The spring is too short and soft, allowing the diff to slip. You'll need to glue the rings to the outdrives with just a drop of CA, then add a 1mm shim between the spring and the outdrive. This preloads the spring and stops the diff from slipping so easily.

OR, you can run the AE diff spring, which is both slightly longer, and stiffer. The overwhelming issue is the stock spring allows the nut to bottom out on the outdrive before the diff is tight enough.

This shim:
https://www.amainhobbies.com/xray-al...a303122/p12070

This diff spring (don't need a shim, then.)

https://www.teamassociated.com/parts...thrust_spring/

Functional Aftermarket parts: (Not just bling!)

Servo Horn: (The B5M sized horns are too short to get full throw)
https://www.amainhobbies.com/protek-...800-bk/p273496


Socket: Exotek has a full suite of parts, some bling, some not. Here's a list (all fit DE and CE, unless otherwise noted):

Titanium front axles: http://www.exotekracing.com/xb2-titanium-front-axles-2/

Rear Hanger, HD (Adds 4 grams): http://www.exotekracing.com/xb2-rear...75-heavy-duty/

Brass C block, 18 grams added: http://www.exotekracing.com/xb2-rear...-brass-weight/

Alloy front camber mount: http://www.exotekracing.com/xb2-fron...er-mount-7075/

Carbon Fiber Chassis: http://www.exotekracing.com/xb2-carb...m-plate-2-5mm/

Alloy rear hubs:http://www.exotekracing.com/xb2-allo...ub-set-2-7075/

Alloy servo mounts, allow for use of LP servo:http://www.exotekracing.com/xb2-xb4-...-alloy-1-pair/

Titanium shock mounts: http://www.exotekracing.com/xb2-xb4-...shock-posts-2/

Slipper Eliminator: http://www.exotekracing.com/xb2-direct-spur-mount/
Xray eliminator is #324100

dgrobe2112: 2016-2017 new 3 gear laydown
Gearbox #323014
Motor plate #324012
36T idler gear #324236
Brace for waterfall #324031

dgrobe2112: Xray Spring Rate Conversion:
front C WHT
368174 2 str 0.65-0.85 3.71-4.85

358184 2 dot 0.65 3.71
368185 3 dot 0.72 4.11
368186 4 dot 0.80 4.57


Rear
368273 2 str 0.35-0.45 2.00-2.57

368284 1 Dot 0.35 2.00
368285 2 Dot 0.40 2.28
368286 3 Dot 0.45 2.57
368287 4 Dot 0.50 2.86

Print Wikipost

Thread Tools
 
Search this Thread
 
Old 12-04-2019, 07:56 AM
  #6166  
Tech Regular
iTrader: (21)
 
dave-man's Avatar
 
Join Date: Jul 2010
Posts: 461
Trader Rating: 21 (100%+)
Default

Originally Posted by Agro_pelo
Hi guys, i just got myself a new xb2 2019 Dirt edition. The price has dropped so i couldn't resist
Tested it last saturday and i noticed the differential was slipping too much...At first i thought it was the slipper clutch but then i realise i was the diff.
This is my first time with a ball differential so i don't know exactly what to do.
As the manual says, i thighten fully the set screw and the unscrew it about 1/8 of screwdriver turnr counterclowise.
I did a test on my workshop table and now it dosen't slip but it seems a little to tight, to me (again, this is my first ball diff, so maybe i'm worried to nothing).
Anyone can tell me if there's a basic diff setup for this model running on a dirt/grass track?
thank you very much
Not sure if this fix applies to the 2019 but read the wiki at the top of the page. Look for a section called Socket: Best method for setting up the XB2 ball diff:

Hopefully that will help.
dave-man is offline  
Old 12-04-2019, 08:31 AM
  #6167  
Tech Initiate
 
Join Date: Jun 2018
Posts: 26
Default

Originally Posted by dave-man
Not sure if this fix applies to the 2019 but read the wiki at the top of the page. Look for a section called Socket: Best method for setting up the XB2 ball diff:

Hopefully that will help.
uh i missed the wiki because the thread is self-refreshing always to the last post

Mmmmh the wiki told to glue the rings to the outrdrives...you know, maybe this will help but i don't like to do this kind of modification. L'll start adding a shim on the spring. And maybe tryng a stiffer spring too. Gluing the rings will be the last option
Agro_pelo is offline  
Old 12-04-2019, 10:25 AM
  #6168  
Tech Regular
iTrader: (21)
 
dave-man's Avatar
 
Join Date: Jul 2010
Posts: 461
Trader Rating: 21 (100%+)
Default

Originally Posted by Agro_pelo
uh i missed the wiki because the thread is self-refreshing always to the last post

Mmmmh the wiki told to glue the rings to the outrdrives...you know, maybe this will help but i don't like to do this kind of modification. L'll start adding a shim on the spring. And maybe tryng a stiffer spring too. Gluing the rings will be the last option
I hate ball diffs. Mainly because I suck at building them and setting them up. I wouldn't glue the rings either (for what it's worth).

Good luck sir!
dave-man is offline  
Old 12-04-2019, 02:43 PM
  #6169  
Tech Addict
iTrader: (4)
 
Join Date: Oct 2011
Posts: 600
Trader Rating: 4 (100%+)
Default

On the xb2c 20, what hop ups are needed to run the car or are most just running the box setup.
shark2288 is offline  
Old 12-04-2019, 03:06 PM
  #6170  
Tech Initiate
 
Join Date: Jun 2018
Posts: 26
Default

Originally Posted by dave-man
I hate ball diffs. Mainly because I suck at building them and setting them up. I wouldn't glue the rings either (for what it's worth).

Good luck sir!
thank you!
Agro_pelo is offline  
Old 12-04-2019, 06:11 PM
  #6171  
Tech Regular
iTrader: (4)
 
Join Date: Mar 2019
Posts: 371
Trader Rating: 4 (100%+)
Default Diff oil

The latest team driver setups for the '19 on the Xray website show very thick diff oils... bruno and Martin where using 150k, and Alexander 60k. What is the reason behind that? Is it just so they are able to go through a corner on full throttle? The impression I have is that one would be sacrificing a lot of steering for that
m3rcfh is offline  
Old 12-05-2019, 12:51 AM
  #6172  
Tech Initiate
 
Join Date: Jun 2018
Posts: 26
Default

Originally Posted by m3rcfh
The latest team driver setups for the '19 on the Xray website show very thick diff oils... bruno and Martin where using 150k, and Alexander 60k. What is the reason behind that? Is it just so they are able to go through a corner on full throttle? The impression I have is that one would be sacrificing a lot of steering for that
Probably because they race on VERY high grip carpet or stuff like that.
Agro_pelo is offline  
Old 12-05-2019, 10:23 AM
  #6173  
Tech Regular
 
El Tigre's Avatar
 
Join Date: Aug 2008
Posts: 332
Default

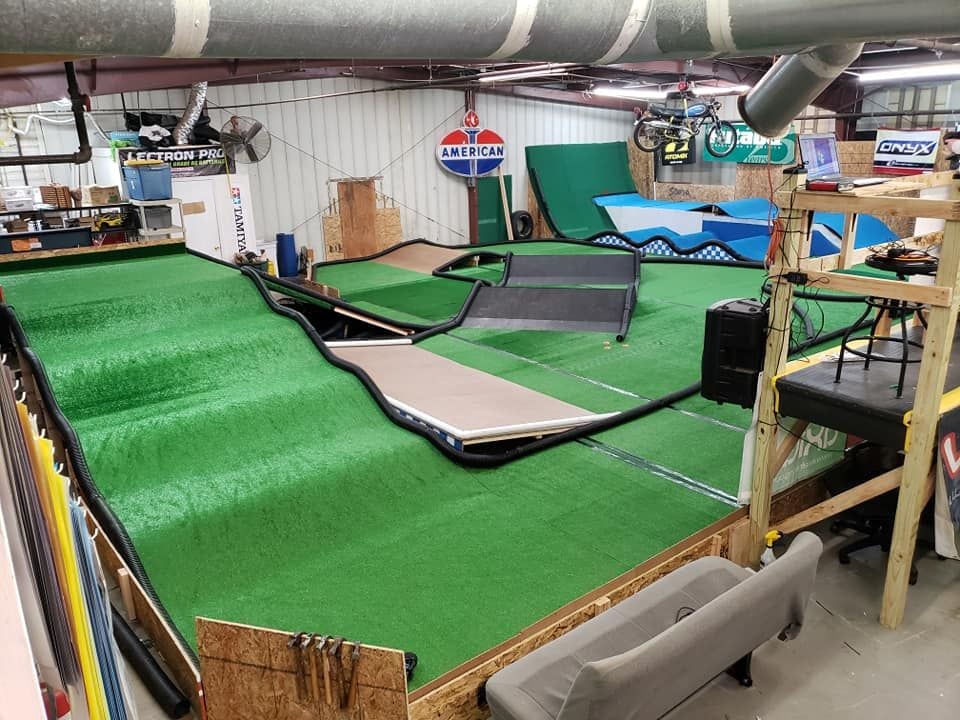
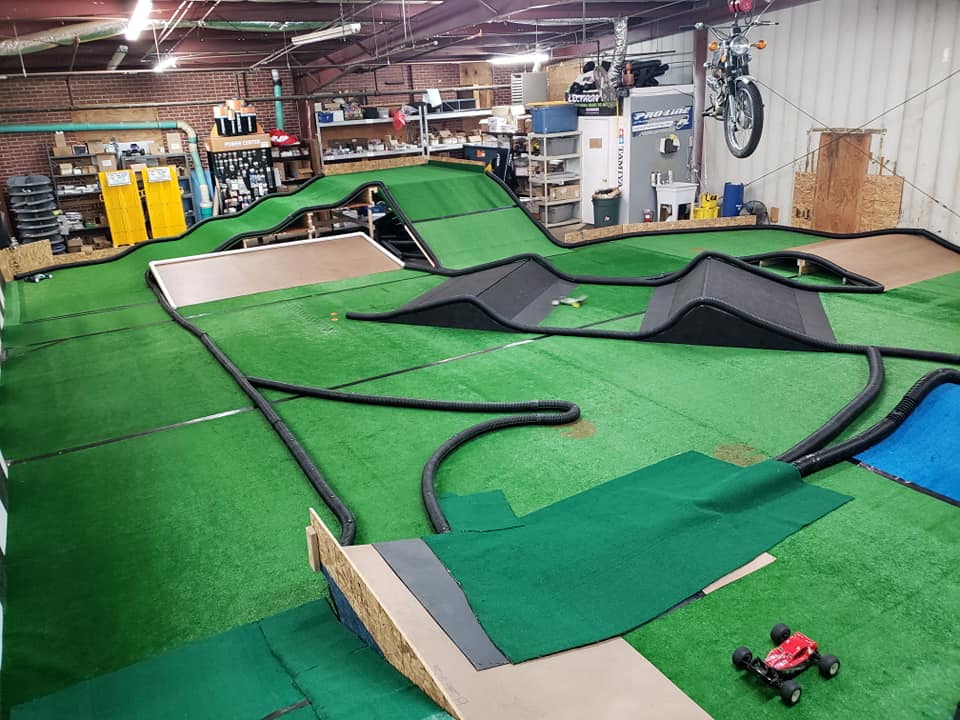
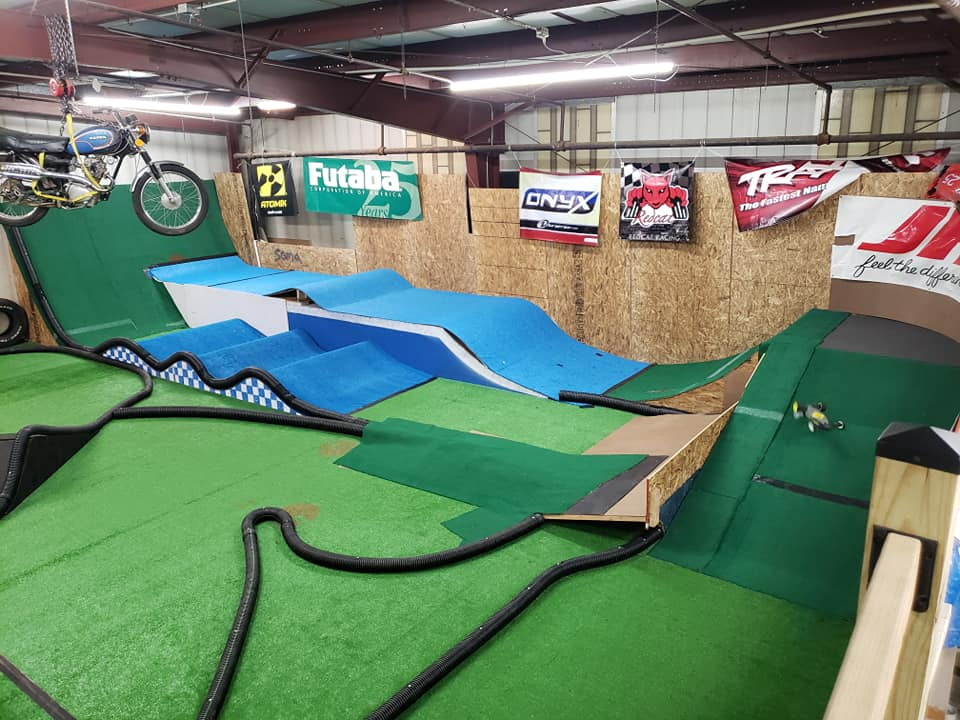
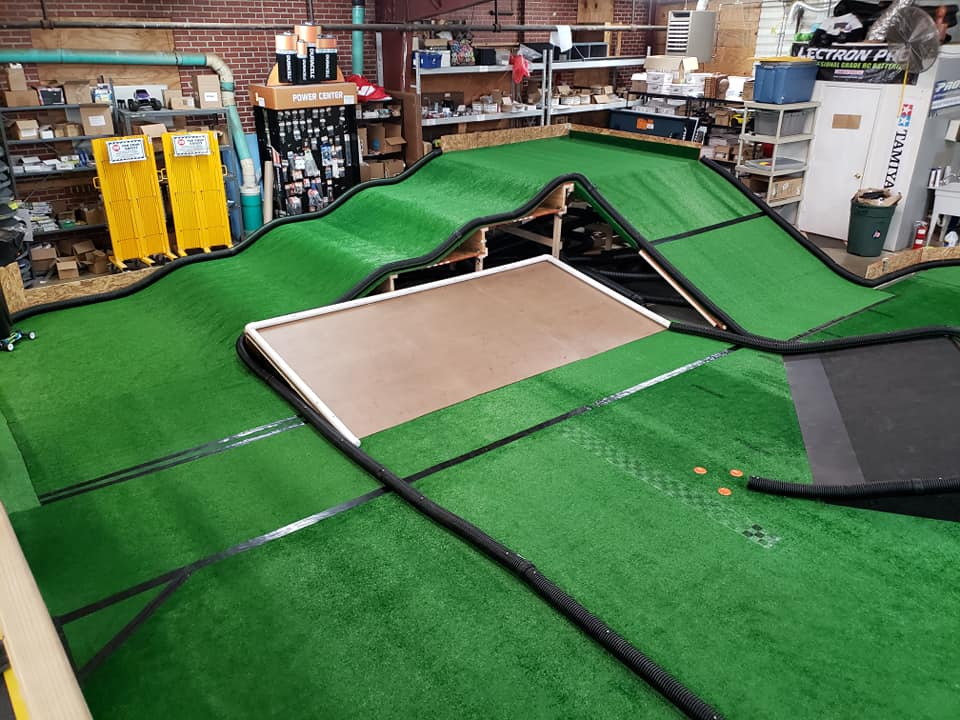
Still building out my brand new XB2 19 spec. Below is the track that I will be running on. Would be great to get your insights on setup tips and mods/hop ups based on track configuration. Need to make the car manageable so I'm not fighting the car in addition to the track. Thanks!


Cain likes this.
El Tigre is offline  
Old 12-05-2019, 01:45 PM
  #6174  
Tech Initiate
 
Join Date: Jun 2018
Posts: 26
Default

i really like the bike hanging from the ceiling
Agro_pelo is offline  
Old 12-06-2019, 04:29 PM
  #6175  
Tech Elite
iTrader: (41)
 
Anthony.L's Avatar
 
Join Date: Oct 2005
Location: Boise, Idaho
Posts: 2,920
Trader Rating: 41 (100%+)
Default

That track looks like a nightmare to corner marshall!
Anthony.L is offline  
Old 12-06-2019, 05:22 PM
  #6176  
Tech Master
iTrader: (17)
 
Join Date: Feb 2015
Location: Michigan
Posts: 1,134
Trader Rating: 17 (100%+)
Default

Originally Posted by Anthony.L
That track looks like a nightmare to corner marshall!
agreed but it looks fun as hell to drive on,
MrLean is offline  
Old 12-06-2019, 06:11 PM
  #6177  
Tech Master
iTrader: (16)
 
Join Date: Oct 2008
Posts: 1,578
Trader Rating: 16 (100%+)
Default

***

Last edited by zipperfoot; 02-11-2020 at 04:24 AM.
zipperfoot is offline  
Old 12-08-2019, 06:13 AM
  #6178  
Tech Adept
 
D1360's Avatar
 
Join Date: Nov 2017
Posts: 222
Default

Does the rear tower from a '18 carpet fit on a '19 carpet?
D1360 is offline  
Old 12-08-2019, 11:36 AM
  #6179  
Tech Elite
iTrader: (41)
 
Anthony.L's Avatar
 
Join Date: Oct 2005
Location: Boise, Idaho
Posts: 2,920
Trader Rating: 41 (100%+)
Default

Originally Posted by D1360
Does the rear tower from a '18 carpet fit on a '19 carpet?
Yes, but know the 19 tower is lower, so putting a 18 tower will not be the same geometry. They do "fit".
Anthony.L is offline  
Old 12-10-2019, 08:13 AM
  #6180  
Tech Rookie
 
Join Date: Jan 2018
Posts: 6
Default very low ride height?

Hey guys, Im running the XB2 2017 carpet edition as a oval modified car my local track on CRC carpet. Im wanting to get the ride heights as low as possible, down to about 6-7mm range and Im curious if you have tips on the "most correct" way to go about this? Thanks!
mcscott is offline  


Contact Us - Archive - Advertising - Cookie Policy - Privacy Statement - Terms of Service -

Copyright © 2024 MH Sub I, LLC dba Internet Brands. All rights reserved. Use of this site indicates your consent to the Terms of Use.