


 1089Likes
Team Associated B6.1 & B6.1D thread

 03-24-2020, 06:21 PM - Wikipost
|
|||
|
|||


 03-04-2019, 07:54 AM
#2506

How is the box setup on carpet? Should I throw in a different setup right away or will I be ready to go with the box setup?
 03-04-2019, 07:59 AM
#2507
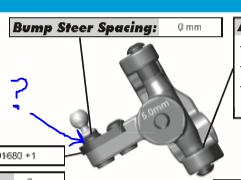
what does removing this spacer do? I know it changes bump steer hence the name bump steer spacing, but what are the effects of having it or not.
03-04-2019, 08:02 AM
#2508
Changes bump-steer. Having a little bit of "bump-out" (wheels toe out as suspension compresses) can help with jump landing and rough track stability (was especially beneficial on the old Mugen 1/8 cars). If you aren't interested in changing bump steer, then you'd change this spacer to more or less to keep the ball stud in the same position after changing spindle height or caster angle, both of which will alter the height of the steering arm.
03-04-2019, 08:06 AM
#2509
I found it to be pretty easy to drive with the kit setup, but very neutral. I felt it didn't respond well to aggressive driving, nor was it a "slower is faster" kind of thing if that makes sense. I added some weight with the steel servo plate and the brass bulkhead, and took out some rear toe. I also am running white front and gray rear springs.
03-04-2019, 09:41 AM
#2510
Tech Addict
Toe-in bumpsteer - lower the ballstud on the steering plates. On throttle will be pushy and very stable because you lose steering angle the more you accelerate and lift the front end. When you brake and enter a corner it will be very responsive and may even hook in and oversteer because it will gain more steering angle the more it leans onto the front wheels. This can be beneficial for flat tracks that require more off throttle steering. The buggy can steer through corners with less braking potentially carrying more corner speed, at the expense of stability.
Toe-out bumpsteer - raise the ballstud on the steering plate. On throttle will have more steering and be more responsive because as the front lifts you will gain more steering angle. As you slow down and enter a corner it will be more stable and might be pushy because it loses steering angle the more it compresses the front suspension. This can be easier to drive on a track with lots of bumps and jumps because the buggy will push a little more instead of hooking and oversteering.
Bumpsteer on jumps. It also affects the steering as you go off jumps. The weight is shifted off the front wheels entering a jump and as you drive up the face of the jump the front end compresses suddenly. If you are hitting the jumps straight on 100% of the time, you won't really notice a difference as there is no steering involved however if there is any steering involved you will notice a big difference. Having toe in bumpsteer causes the buggy to steer more as you go up the jump. This can make it harder to predict where your buggy is going to end up. Having toe out bumpsteer causes the buggy to lose steering as you go up the jump, which can be more stable and you can drive harder without worrying about flying off in some new direction.
Bumpsteer landing jumps. Same thing happens when you land the jump. Having toe in bumpsteer will cause the buggy to gain more steering and front grip when you land. If you have too much, the front grip can overpower the rear when landing a jump, making it much easier to oversteer and spin out upon landing. Having toe out bumpsteer will make the front grip less upon landing helping create a push on the front when you land, helping stability.
Sorry for the long post. Hope it helps in some way.
Last edited by trf211; 03-04-2019 at 07:35 PM.
03-04-2019, 10:08 AM
#2511
thanks for the explanation, I have changed my 6.1D setup to match the Rivkin setup he used when he raced at my track and did everything but this and I really likes how it handled. I was running the box setup before this< think Ill leav the spacer in there for now.
03-04-2019, 10:12 AM
#2512
Bumpsteer is the relation between the angle of the steering link and camber link. When they are parallel to eachother, there is no bumpsteer. Zero bumpsteer will give equal on throttle and off throttle steering and is a good starting point. The tires keeps the same steering angle throughout the suspension stroke.
Toe-in bumpsteer - lower the ballstud on the steering plates. On throttle will be pushy and very stable because you lose steering angle the more you accelerate and lift the front end. When you brake and enter a corner it will be very responsive and may even hook in and oversteer because it will gain more steering angle the more it leans onto the front wheels. This can be beneficial for flat tracks that require more off throttle steering. The buggy can steer through corners with less braking potentially carrying more corner speed, at the expense of stability.
Toe-out bumpsteer - raise the ballstud on the steering plate. On throttle will have more steering and be more responsive because as the front lifts you will gain more steering angle. As you slow down and enter a corner it will be more stable and might be pushy because it loses steering angle the more it compresses the front suspension. This can be easier to drive on a track with lots of bumps and jumps because the buggy will push a little more instead of hooking and oversteering.
Bumpsteer on jumps. It also affects the steering as you go off jumps. The weight is shifted off the front wheels entering a jump and as you drive up the face of the jump the front end compresses suddenly. If you are hitting the jumps straight on 100% of the time, you won't really notice a difference as there is no steering involved however if there is any steering involved you will notice a big difference. Having toe in bumpsteer causes the buggy to steer more as you go up the jump. This can make it harder to predict where your buggy is going to end up. Having toe out bumpsteer causes the buggy to lose steering as you go up the jump, which can be more stable and you can drive harder without worrying about flying off in some new direction.
Bumpsteer landing jumps. Same thing happens when you land the jump. Having toe in bumpsteer will cause the buggy to gain more steering and front grip when you land. If you have too much, the front grip will always overpower the rear when landing a jump, making it much easier to oversteer and spin out upon landing. Having toe out bumpsteer will make the front grip less upon landing helping create a push on the front when you land, helping stability.
Sorry for the long post. Hope it helps in some way.
 03-04-2019, 10:15 AM
#2513
Tech Addict
I won't say with any certainty as that is determined more by what you want out of the vehicle, I may prefer something different. Best thing you can do is try and find out. It's a quick adjustment!
03-04-2019, 10:56 AM
#2515
I think they are the medium downforce ones..
https://www.amainhobbies.com/team-lo...caAg_8EALw_wcB
03-04-2019, 11:15 AM
#2516
anyone know off hand what a 17.5 stock buggy is supposed to weight to be legal I cant find it on the ROAR site
03-04-2019, 11:20 AM
#2517
Tech Addict
1499g minimum.
To add to what David mentioned earlier. Anytime you adjust axle height, camber link height at the tower, caster angle at the hub and kickup on the bulkhead your bumpsteer will change. It's important to reset your bumpsteer whenever you make these adjustments to the front end so you can isolate changes and not end up changing two things at once.
To add to what David mentioned earlier. Anytime you adjust axle height, camber link height at the tower, caster angle at the hub and kickup on the bulkhead your bumpsteer will change. It's important to reset your bumpsteer whenever you make these adjustments to the front end so you can isolate changes and not end up changing two things at once.
Last edited by trf211; 03-04-2019 at 04:07 PM.
03-04-2019, 07:33 PM
#2518
Just got done setting up my new buggy, i want to post pics but i can't till i make 10 posts which is dumb lol
03-04-2019, 07:42 PM
#2519
03-05-2019, 08:57 AM
#2520