Go Back  R/C Tech Forums > General Forums > Electric Off-Road
Team Associated B6 & B6D thread >

Team Associated B6 & B6D thread

Community
Wiki Posts
Search
Like Tree649Likes

Team Associated B6 & B6D thread

    Hide Wikipost
Old 06-07-2017, 10:46 AM   -   Wikipost
R/C Tech ForumsThread Wiki: Team Associated B6 & B6D thread
Please read: This is a community-maintained wiki post containing the most important information from this thread. You may edit the Wiki once you have been a member for 90 days and have made 90 posts.
 
Last edit by: RCBuddha
Welcome to the B6 Wiki!

Quick links to all the sections on the first page!

Frequently asked questions - the most common questions you may have answered here!

Aftermarket Parts - parts for the B6 and B6D

Tech Tutorials- tuning guides, ball diff and shock building videos and tutorials

How to's and build-specific posts

Team Associated Laydown transmission conversion for B6D:
Laydown conversion

Instruction Manuals:

B6: B6 Manual and setup sheets

B6D: B6D Manual and setup sheets

How to Sand and Seal carbon fiber:
Sanding and sealing carbon fiber
Sanding and sealing carbon fiber 2
Sanding and sealing carbon fiber 3
Sanding and sealing carbon fiber 4

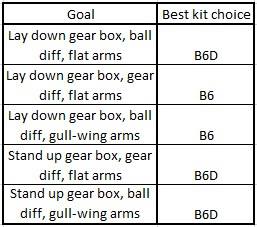
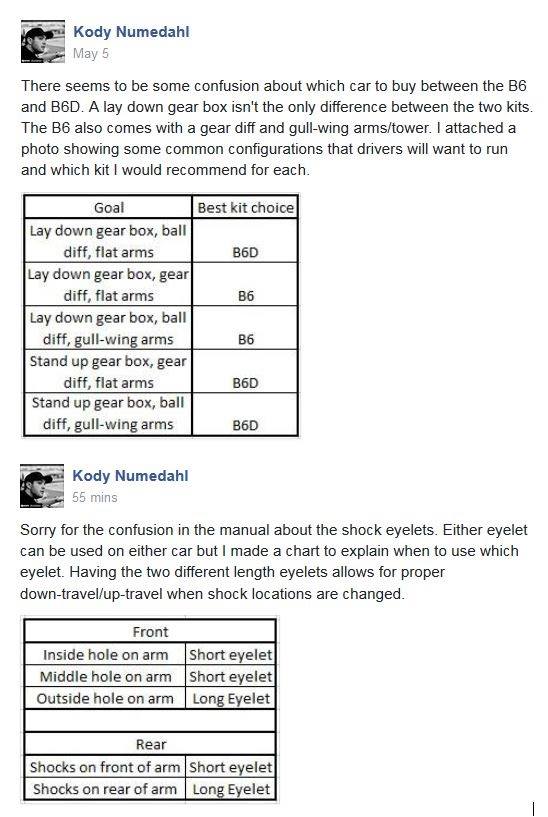
Charts for Quick reference:


1) put inner bearing in hub
2) slide large shim over axle all the way up to the back of the axle
3) slide axle/bone into hub carrier
4) slide small shim onto axle through hub carrier
5) push outter bearing into hub carrier

using that i'm able to put my normal male silverback gorilla wheel nut tightening job and there's no binding. in the pictures that come with the shims (the pic socket posted) it seems like they want you to slide both shims onto the axle before sliding the axle into the hub carrier and like i said, that doesn't work.


I've traditionally done the diff screw head on the left side (driver's side), but have since switched to the Right side (passenger side) regardless of transmission type (3 gear RM vs 3 gear MM and 4 gear MM).

Kdub (Kurt Wenger, former AE designer) had this to say on the matter:

Originally Posted by kdub
I think I count as an authority on the matter. I always run my diff screw on the right side (when sitting "inside" the car). I take off the tire and pull the outer hinge pin to get to the adjustment screw.

The right rear is the way the AE manuals state (or used to state). It really shouldn't matter since you go around turns both left and right.
B6D 3-gear:

Print Wikipost

Thread Tools
 
Search this Thread
 
Old 08-27-2016, 02:48 PM
  #2881  
Tech Initiate
 
Join Date: Dec 2015
Posts: 24
Default

Awesome, thank you! Am also considering getting a steel gear for added weight in the back...
microjam is offline  
Old 08-27-2016, 02:49 PM
  #2882  
Tech Fanatic
iTrader: (24)
 
mellow's Avatar
 
Join Date: Aug 2009
Location: Central CA
Posts: 931
Trader Rating: 24 (100%+)
Default

Probably best to add weight outside of the drivetrain if you're running stock. Hence the plastic pinion used by Layton.
mellow is offline  
Old 08-27-2016, 02:54 PM
  #2883  
Tech Regular
 
Join Date: Feb 2012
Location: Louisiana
Posts: 326
Default

Yeah try to keep weight as low as possible in your rotating parts. The brass C block would be a better alternative.
boucher is offline  
Old 08-27-2016, 05:44 PM
  #2884  
Tech Regular
 
Join Date: Jan 2015
Location: Franklin, TN
Posts: 349
Default

Originally Posted by suby723
My b6 was very good at thunder. I placed 6th in the Amain at the sizzler race. You will need a ball diff. Remove the waterfall to push the battery back as far as possible, 25gram brass weight and white front springs and green rear should be a good baseline setup.
In my frustration about Matt being passive aggressive on not racing, I ordered a b6d and will be racing at thunder a lot more.
Thanks for the reply. What 25 gram weight are you talking about? I see a 24g steel chassis weight. Do you happen to have a part #? I might try the gear diff with 4k oil in it for a couple of practice nights.
BruceR. is offline  
Old 08-27-2016, 11:48 PM
  #2885  
Tech Fanatic
iTrader: (24)
 
mellow's Avatar
 
Join Date: Aug 2009
Location: Central CA
Posts: 931
Trader Rating: 24 (100%+)
Default

Uh oh...
mellow is offline  
Old 08-28-2016, 06:05 AM
  #2886  
Tech Regular
 
Join Date: Feb 2012
Location: Louisiana
Posts: 326
Default

Here's a cool motor plate design by VRP. Incorporates the spur protector idea into the plate.


http://www.neobuggy.net/2016/08/24/v...-motor-plates/
boucher is offline  
Old 08-28-2016, 07:02 AM
  #2887  
Tech Master
iTrader: (21)
 
suby723's Avatar
 
Join Date: May 2011
Location: Spring Hill Tennessee
Posts: 1,378
Trader Rating: 21 (100%+)
Default

Originally Posted by BruceR.
Thanks for the reply. What 25 gram weight are you talking about? I see a 24g steel chassis weight. Do you happen to have a part #? I might try the gear diff with 4k oil in it for a couple of practice nights.
https://www.teamassociated.com/parts...m_mount_c_25g/
suby723 is offline  
Old 08-28-2016, 12:08 PM
  #2888  
Tech Adept
 
Cuebulon's Avatar
 
Join Date: Sep 2014
Location: Oklahoma
Posts: 213
Default

I know its early but has anyone installed the MIP top shaft yet and notice a difference?
Cuebulon is offline  
Old 08-28-2016, 12:55 PM
  #2889  
Tech Apprentice
 
Join Date: Mar 2013
Posts: 51
Default Link didn't work

Trying to post a photo and I'm struggling. Any help?

Last edited by NCOHOG; 08-28-2016 at 12:59 PM. Reason: Photo link didn't work
NCOHOG is online now  
Old 08-28-2016, 01:07 PM
  #2890  
Tech Regular
 
Join Date: Feb 2012
Location: Louisiana
Posts: 326
Default

[img] *image address* [/img]
boucher is offline  
Old 08-28-2016, 01:16 PM
  #2891  
Tech Apprentice
 
Join Date: Mar 2013
Posts: 51
Default


Thanks for the help. Finally figured it out.

Finished up a little work in the awesome factory today.
Just need to do a little deburr work.

Last edited by NCOHOG; 08-28-2016 at 01:30 PM.
NCOHOG is online now  
Old 08-28-2016, 01:37 PM
  #2892  
Tech Adept
iTrader: (10)
 
Join Date: Nov 2014
Posts: 239
Trader Rating: 10 (100%+)
Default

Originally Posted by NCOHOG


Thanks for the help. Finally figured it out.

Finished up a little work in the awesome factory today.
Just need to do a little deburr work.
Those look great. Great job!
mgers75 is offline  
Old 08-28-2016, 01:45 PM
  #2893  
Tech Elite
iTrader: (15)
 
JEFFs SC10's Avatar
 
Join Date: Sep 2010
Location: Orlandooooo, Fl
Posts: 4,044
Trader Rating: 15 (100%+)
Default

was anyone missing the little tiny orings that go on the outdrives?

The manual didn't show them so I figured it was ok but someone said his diff leaked all over the place without them.
JEFFs SC10 is offline  
Old 08-28-2016, 02:16 PM
  #2894  
Tech Regular
 
Join Date: Feb 2012
Location: Louisiana
Posts: 326
Default

Get some MIP outdrives and lighten those. Money.
boucher is offline  
Old 08-28-2016, 07:14 PM
  #2895  
Tech Champion
iTrader: (146)
 
RC*PHREAK's Avatar
 
Join Date: Dec 2010
Posts: 5,361
Trader Rating: 146 (100%+)
Default

I know it was discussed but I can't remember. Is there a difference on the alum hubs if you put the zero degree etching facing forward or back?
RC*PHREAK is offline  


Contact Us - Archive - Advertising - Cookie Policy - Privacy Statement - Terms of Service -

Copyright © 2024 MH Sub I, LLC dba Internet Brands. All rights reserved. Use of this site indicates your consent to the Terms of Use.