


Team Associated RC8Be Thread

 07-29-2010 | 05:27 AM
#77

I'm not sure, but my guess is that it's because they're tapered and the holes are 1.1mm instead of the standard 1.3mm.
With the 10 x 1.1mm pistons, I use 30wt in front and rear at outdoor tracks and 25wt in rear and 30 wt in front at indoor tracks and I never felt like I needed heavier oil.
With the 10 x 1.1mm pistons, I use 30wt in front and rear at outdoor tracks and 25wt in rear and 30 wt in front at indoor tracks and I never felt like I needed heavier oil.
Last edited by Leodis; 07-29-2010 at 05:43 AM.
07-29-2010 | 06:36 AM
#78
I was told to go that heavy by someone that knew I was running the tapered, So I will try it. He is also pretty knowledgeable unless he popped off and wasn't thinking. I have been reading about the tapered and how a thinner oil packs faster than a heavier oil will with the more surface area. Forgot where I read it probably on RCtech somewhere. I'll probably go lower after I run a few. Thanks for the feed back!
07-29-2010 | 07:12 AM
#79
Tech Initiate
Joined: Jul 2010
Posts: 23
From: Brandon, FL
TC3MIKE, that is a sweet paint job,
Almost finished.
I have to say this is one of the best kits I have ever built.
All the upgrades FT stuff is awesome. Big upgrade from the SC8e build.
Starting my paint, of course I am going for a Dallas Stars theme.
Setup:
Shocks;
10 hole tapered pistons, accordion boots, 45AE oil #3 hole and O/B in front, 40AE oil, #6 hole and O/B in rear,
Battery:
Cut the battery tray to accept Nano-tech 6000mah 3s packs. will post picture tomorrow.
Motor/ ESC:
Tekin Rx8 with 208 update and timing advance 10 with 2010k final rpm 5445 start rpm, Tekin T8 2650kv motor with 15t (stock) Still testing!
The motor fits funny with the stock mount, really tight against the chassis.
New mount on the way
Big track with big jumps.
Additional:
Put drive boots on the front and rear drive knuckles at the diffs.
Vp pro k wing
Elite RC motor mount on the way thanks B.W.
Attention
Big thing to remember is the steering bushings in the front knuckles use red loctite.
Put the loctite in the hole carefully (little bit will do) then put the knuckle in the C' hub with the bushing and screw.
They will fall out keep an eye on them
This thing was fun to build and it was hard as hell to go to work tonight LOL
Pics tomorrow!!!
speaking of red loctite, i dunno if anyone else is running a 25pinion, but I cannot keep it on at all to save my life. I was going to buy some and use it on the pinion unless anyone else has a good ideas?
07-29-2010 | 09:11 AM
#81
Tech Initiate
Joined: Jul 2010
Posts: 23
From: Brandon, FL
the blue stuff wont hold the pinion screw or pinion on the MMm2200 motor. I dunno whats the problem. Im using a metal 44t spur with a mod 1 25 pinion and the car tears ass for 1 min and then the pinion comes off
07-29-2010 | 10:52 AM
#84
Tech Master
iTrader: (12)
Joined: May 2007
Posts: 1,104
From: Texas
what is it doing to come off? Is the set screw just coming loose?
take a dremel with a cutting wheel and lightly score the set screw where it would touch the flat part of the shaft. This will create a slight serrated tip that will grab the shaft. You can also use blue loctite.
take a dremel with a cutting wheel and lightly score the set screw where it would touch the flat part of the shaft. This will create a slight serrated tip that will grab the shaft. You can also use blue loctite.
07-29-2010 | 01:45 PM
#86
Tech Adept
Joined: Jul 2010
Posts: 154
07-29-2010 | 10:55 PM
#87
Got to run today,
Started with 15t, Rx8 advance to 20 and my top speed was way to slow.(120temp)
Advanced to 80 still to slow with longer curve, (110temp)
So I geared up to 18t advanced to 65 with a start rpm around 1400 and a end rpm around 18000. (temp 140)
Just about right before Sun went down. My top speed was around 40
Will probably go to a 19 or advance another 5 to 10.
Not quite sure yet what ya'll think?
Oh and by the way 45/40 weight oils were great with the 10 holes.
Very rough loamy track took the bumps well and the pack was great on landings.
I am also running slightly above level on the dogbones did not measure so don't know ride height.
This thing is awesome in my opinion.
Finished pic's \My paint job blew up in my face had my star all masked off and painted when I removed the mask the star came with it should have let the paint dry a little more? Dooh!
Last edited by kaisertrip; 07-29-2010 at 11:07 PM.
 07-30-2010 | 11:14 AM
#90
Tech Adept
Joined: Jul 2010
Posts: 154
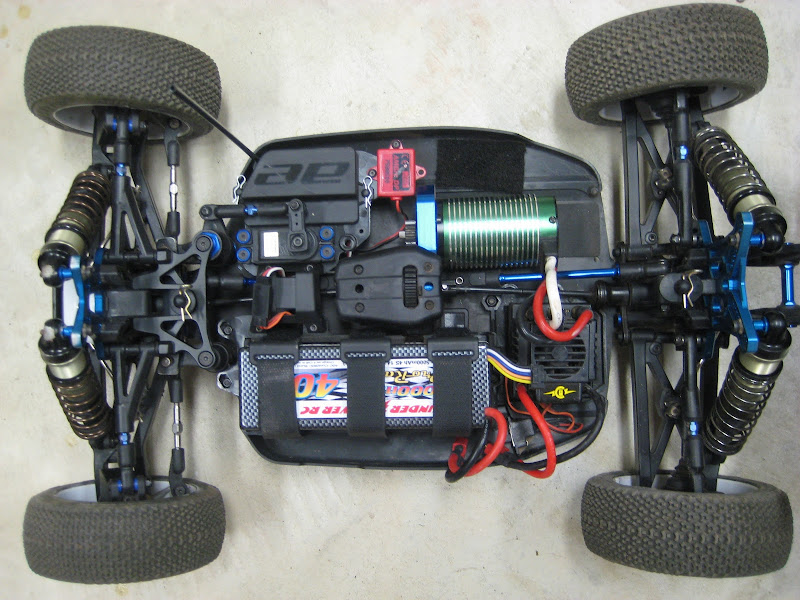
Question, on some of the photos of the RC8Be here there is a rail attached to the chassis from the shock tower (front and back). On some trucks it is a black rail yet on some others it's a blue rod with black supports on either end. Why are these different when the trucks are both new models?