

![U.S. Vintage Trans-Am [PICS & PAINT Discussion ONLY!!!]](https://www.rctech.net/forum/iconimages/painting-designs-graphics-photography/u-s-vintage-trans-am-%5Bpics-paint-discussion-only-%5D_ltr.gif)
 294Likes
U.S. Vintage Trans-Am [PICS & PAINT Discussion ONLY!!!]


 02-02-2011, 12:45 PM
#1757
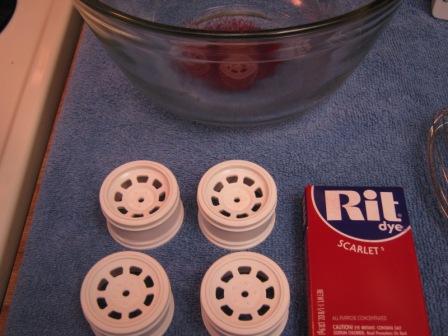
I needed to dye another set of wheels to match a body I'm going to paint (for another racer). This time the wheels are going to be a shade of red. I decided to photograph my progress.
As before, I boiled water on the stove in a separate pot. I poured the boiling water into a glass bowl with 1 teaspoon (1 tsp) of dye. After letting the wheels soak for 5 minutes, I removed them from the hot solution and placed into a small container of cold water. I moved the small container to the sink and thoroughly rinsed the wheels with cold water.
A few notes:
- The pictures were taken with a point and shoot Canon camera in a small kitchen with flourescent lighting from the ceiling and incadescent from the stove. The end result is slightly darker than what the photos show.
- I am using a 4qt bowl with 1 teaspoon (tsp) of dry dye. Going forward I will probably use less water/dye so that the bowl is easier to empty.
- I dyed the white wheels for 5 minutes.
- After I removed the white wheels, I threw a pair of HPI Vintage Brushed Aluminum wheels into the water. Since they had tires mounted to them, they floated on top. I let them float for about 10 minutes before removing them from the solution.
Last edited by IndyRC_Racer; 02-02-2011 at 01:21 PM.
02-02-2011, 01:20 PM
#1758
Here is one more quick picture. I took the wheels I dyed red and blacked out the center with a Sharpie marker. I did this quickly just for demonstration purposes. I now have a set of custom redline wheels.

There are other ways to color r/c wheels:
- Paint. I have painted R/C wheels in the past. I used lexan paint and it bonded fairly well to the wheel. Eventually the paint would start to chip, but it lasted longer than I expected. The advantage to paint is that you know exactly what the color is going to be when you apply it. The disadvantages are added weight and mess during application. You might also be able to use hardware store paint that is made for plastic lawn furniture.
- Marker. As you can see in the photo, a marker actually works fairly well on the brushed aluminum. However if you want any other color than black, I haven't had great success with an even application (looked splotchy). The advantages to markers are easy clean-up if you make a mistake (body wash, goo gone, general household cleaners) and easy to re-apply if the application wears off. The main disadvantage is that this process is time consuming. You may also need to buy thin tipped marker (or modify the tip of a normal marker) to reach into tight areas where the spokes meet the outer wheel. Expect to spend at least 5 minutes per wheel to get a result that looks good up close.
- Dye. As I have shown, dyeing nylon wheels/parts is fairly simple. The main disadvantage is that this is a trial and error process to get the exact result you are wanting. However, the biggest advantage is that the wheel will look better longer than paint. One thing to note though, is that using dye is similar to anodizing metal. The dye doesn't penetrate the nylon completely. If you cut/sand/chip the nylon you will eventually expose the original color.
02-02-2011, 02:32 PM
#1759
could you dye the wheel red then apply wax or something to the part you want to stay red then dye them black and remove the wax?
02-04-2011, 10:24 PM
#1763
Speaking of decals, I never throw any decals out. Periodically I do go through and organize what I have though.
I'm thankful that some of the HPI VTA bodies come with extra headlights/driving lights. Those have come in handy when painting up the Pegasus Mustang, since that comes with no decals at all.
I've also used the Camaro SS stripes to help mask the door strips on my Pegasus Mustang as well. The scraps from the HPI vinyl window masks come in handy when masking off small areas, such as the rear tail lights on the Pegasus Mustang.
And if you are wanting a more modern tail light decals for any of the Mustangs, the modern HPI Mustang has an extra set of tail light decals as well.
 )
)So here is the big decal question:
Should we stick with the "chrome" window trim decals like some of the "newer" decals (ie. 69 Camaro etc) or go back to the silver/white/black faux "illustration" style chrome effect like the earlier Hpi Vintage decal sets (ie. GT350 etc)
Thanks,
AndyH
Hpi Racing
02-04-2011, 11:39 PM
#1764
Hpi decals on a Pegasus Mustang...noooooooooo haha (...yes I made most of the Vintage decals )
So here is the big decal question:
Should we stick with the "chrome" window trim decals like some of the "newer" decals (ie. 69 Camaro etc) or go back to the silver/white/black faux "illustration" style chrome effect like the earlier Hpi Vintage decal sets (ie. GT350 etc)
Thanks,
AndyH
Hpi Racing
)So here is the big decal question:
Should we stick with the "chrome" window trim decals like some of the "newer" decals (ie. 69 Camaro etc) or go back to the silver/white/black faux "illustration" style chrome effect like the earlier Hpi Vintage decal sets (ie. GT350 etc)
Thanks,
AndyH
Hpi Racing
I would stick with the chrome it looks a lot better . That being from a painters view point.
02-05-2011, 05:50 AM
#1765
Or, let me phrase it differently—if it adds to the cost of the body, then keep it like the old ones that are black and white. It looks fine.
Last edited by squarehead; 02-05-2011 at 06:06 AM.
 02-05-2011, 09:03 AM
#1770