


Capricorn LAB-C01
 10-13-2010, 03:34 PM
#496
Thank you. 
Thanks, good to hear you're liking the car. 
If you have any future questions you can always contact me.
The only special tool you need is a pair of outer C-clip pliers for a 10mm C-clip, the clip which is securing the wheelaxle to the upright.
Building wise everything was very straightforward and easy if you ask me. I had the entire car ready to race within 6 hours.
The only difference compared to let's say an Xray is how Capricorn made the plastics fit.
When you build an Xray everything is completely bind free from the start, it actually has a little play on each part.
Capricorn decided to have every part bind a little when you first build the car. When you sand the parts just a little with a 400 grit piece of sandpaper all the parts will fit beautifully and with no slop at all.
Same thing goes for all the ball links, Xray parts have slop from the start, especially the steering assembly, Capricorn parts are a little tight but slop free.
This Capricorn approach I prefer, it makes the car more direct and predictable.
If you decide to purchase the car and run into some problems during the build or running the car you can contact me and I will help you out within 24 hours.
Now outdoor racing season is over I have the time to write and post the build report I promised to make about the Lab. In this report you can see all the quality pieces in detail and I will describe some mods I did.
Hope to have this done by this friday.
Good Job congrats!
I also had a very good day with the car on sat just club racing but hey its a blast no matter what the level the car handles great now after softening it up abit for the low traction parking lot with crazy amounts of small turns.
i won my race and was only 2 laps down from the fast guys usually 3or 4 with the mugen my little wasp motor excellerates like that car just like the faster motors those guys are running. just need to work on skillz now the car couldnt be better
If you have any future questions you can always contact me.
Building wise everything was very straightforward and easy if you ask me. I had the entire car ready to race within 6 hours.
The only difference compared to let's say an Xray is how Capricorn made the plastics fit.
When you build an Xray everything is completely bind free from the start, it actually has a little play on each part.
Capricorn decided to have every part bind a little when you first build the car. When you sand the parts just a little with a 400 grit piece of sandpaper all the parts will fit beautifully and with no slop at all.
Same thing goes for all the ball links, Xray parts have slop from the start, especially the steering assembly, Capricorn parts are a little tight but slop free.
This Capricorn approach I prefer, it makes the car more direct and predictable.
If you decide to purchase the car and run into some problems during the build or running the car you can contact me and I will help you out within 24 hours.
Now outdoor racing season is over I have the time to write and post the build report I promised to make about the Lab. In this report you can see all the quality pieces in detail and I will describe some mods I did.
Hope to have this done by this friday.
 10-13-2010, 08:35 PM
#497
Tech Adept
The only difference compared to let's say an Xray is how Capricorn made the plastics fit.
When you build an Xray everything is completely bind free from the start, it actually has a little play on each part.
Capricorn decided to have every part bind a little when you first build the car. When you sand the parts just a little with a 400 grit piece of sandpaper all the parts will fit beautifully and with no slop at all.
Same thing goes for all the ball links, Xray parts have slop from the start, especially the steering assembly, Capricorn parts are a little tight but slop free.
I don't know about the Xray. All i know is that for us Americans having to file, sand down parts, etc is actually not practical and in my opinion means a poor finish in the product.
Thanks for the info DS, anybody else has feedback?
10-14-2010, 02:03 AM
#498
So you mean that the pins are free in the holes but actually the arms have too much material and they need to be sanded down to fit between the bulkheads, for instance?
I don't know about the Xray. All i know is that for us Americans having to file, sand down parts, etc is actually not practical and in my opinion means a poor finish in the product.
Thanks for the info DS, anybody else has feedback?
I don't know about the Xray. All i know is that for us Americans having to file, sand down parts, etc is actually not practical and in my opinion means a poor finish in the product.
Thanks for the info DS, anybody else has feedback?
Capricorn did this on purpose, has nothing to do with a poorly finished product.
When you want to work with tolerances tighter as 0.05-0.10mm costs will go through the roof.
With other brands all the plastics have about 0.1mm of play from the start, this has to be shimmed out in order to have a perfect fit.
Instead of sanding the parts in order to have the perfect fit you can also choose to just go out and run the car and all parts will be bind free after one day of running it.
When you see all the machined aluminum and steel parts you will realize you're not dealing with a poorly finished product.

I was very impressed with the quality of the machined parts, while I'm used off working with motorsport spec parts.
 10-14-2010, 07:24 PM
#500
I will be visiting US soon. Yesterday sent an e-mail to Epic asking about Capricorn parts, I want to buy a bunch of it...
So, what now?
Taxation for imports to my country is upward 60%. I was hopping to get those parts while there, would save a lot...
10-15-2010, 09:00 AM
#501
Epic lists complete rear diff #CAP-16067 $48.00. Complete Front #CAP-16080 $48.99.
A couple months ago, I tried to buy a complete rear diff from Epic, along with a diff case. Epic, at first, took my money for the entire order, then after a couple days, refunded $48.00, (didn't explain why), and then sent everything else.
It would appear that within the last few months, Team Epic only lists Capricorn Tires, Clutches, and Car Parts, and removed the listing for the complete Car Kit.
Kamikaze Racing lists the Car Kits, Clutches, and seperate Clutch Shoes, all of which they are Out of Stock! Speed World, (I think), at One point offered the Car Kits, not so sure now.
I sure hope that someone from Capricorn RC will come on here and "Clear Up" all this uncertainty. I continue to recieve email notices from their Italian Website, which offers all kinds of hopups, Spare Parts, and other items not offered in the USA directly.
As our Outdoor Nitro Season comes to an end, I'm not sure how concerned I should be?
Oh well, at least I answered one of your questions, and essentially, asked more questions.
 10-16-2010, 01:46 AM
#502
Tech Adept
Dear All
We are going to announce our new importer really soon
We are going to announce our new importer really soon
10-16-2010, 02:03 PM
#504
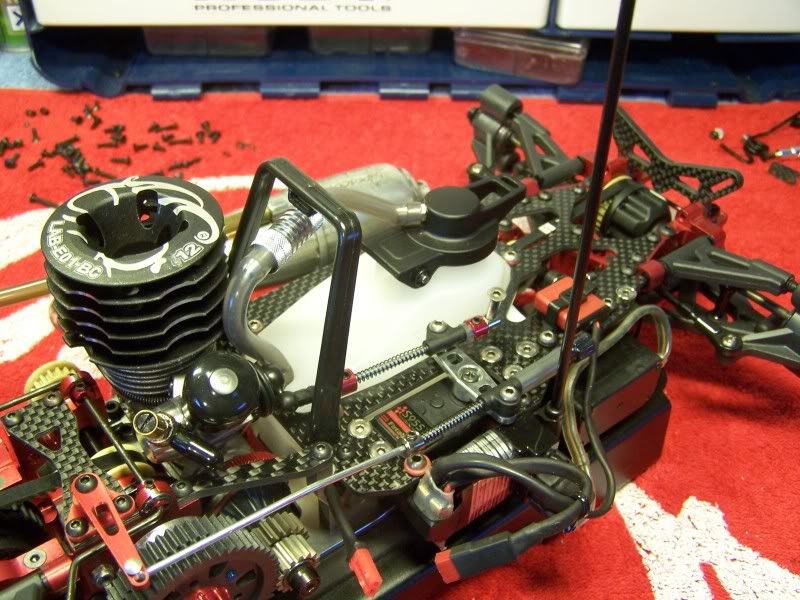
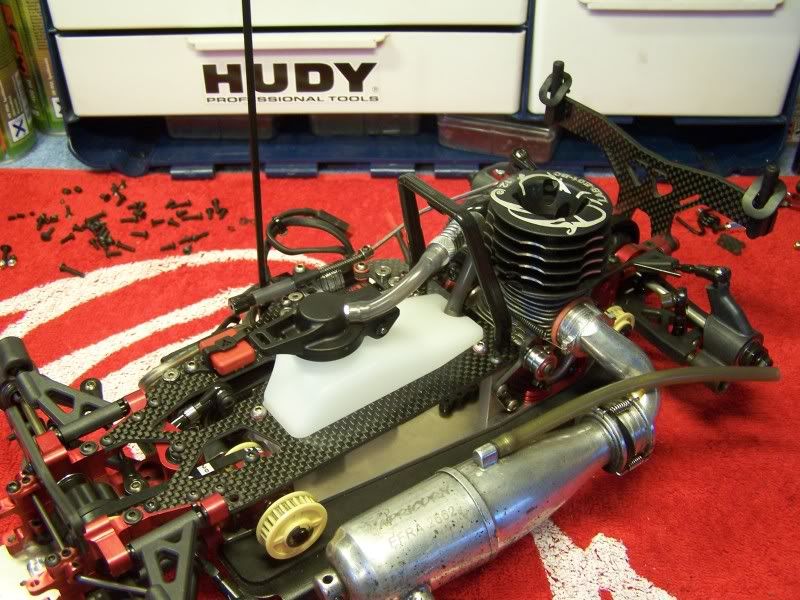
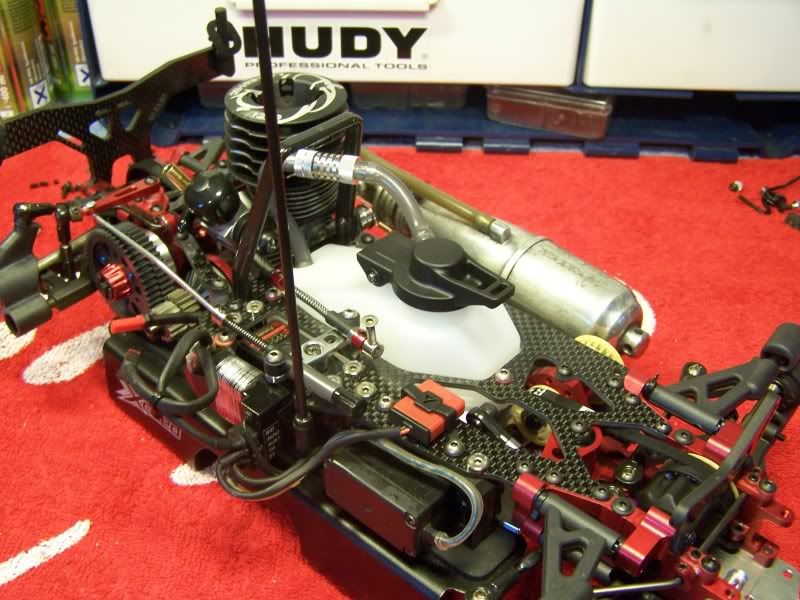
As promised the build report on the Lab C01
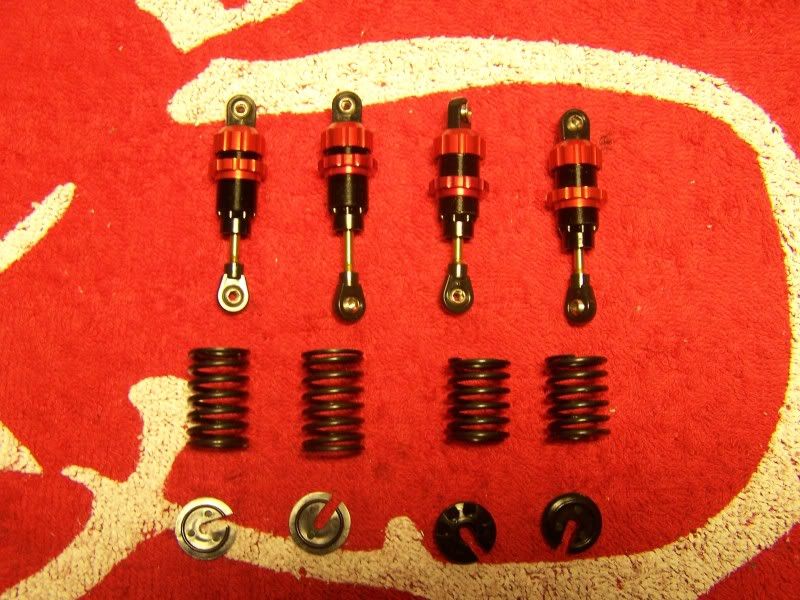
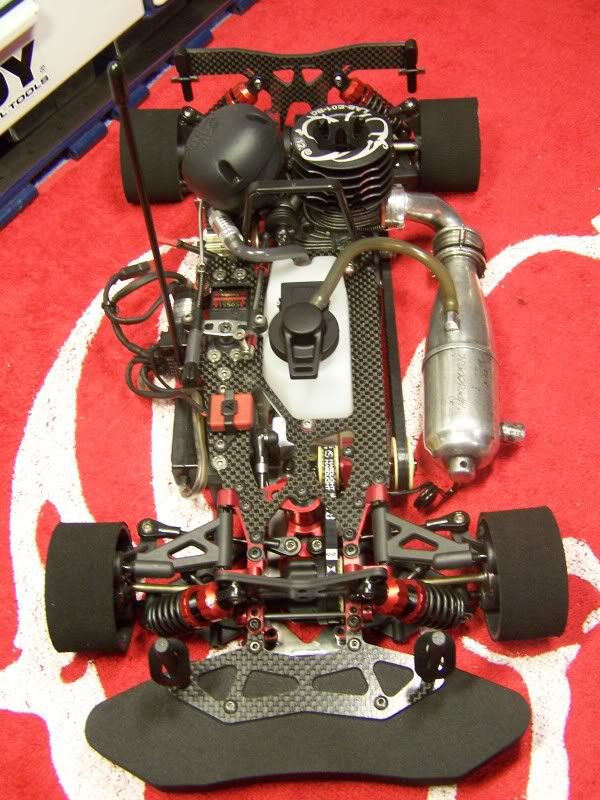
Step 1, Shockabsorbers.
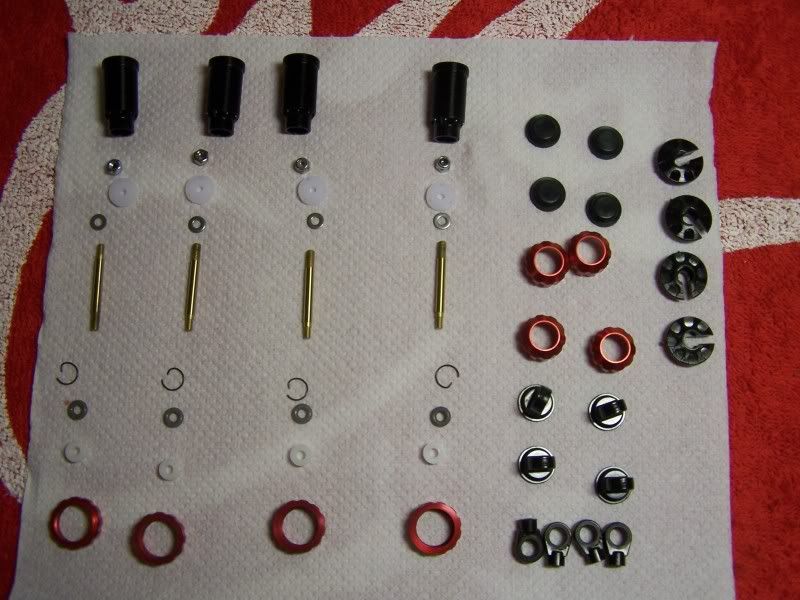
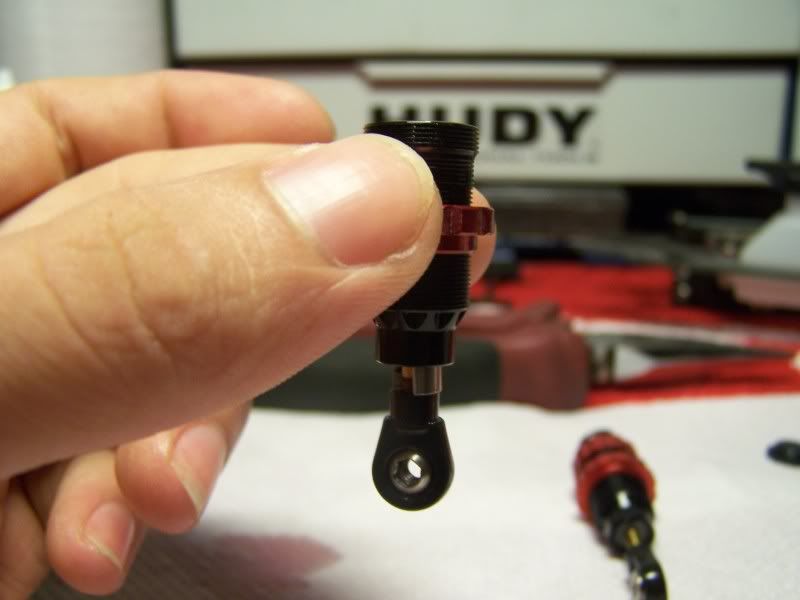
The quality of the shocks is amazing, standard they come with TiNi coated shafts and a mono O-ring design. The pistons and shaft guide are machined nylon which makes for the smoothest shock I ever build.
All shocks were perfectly matched in bound and rebound on the first try.
Bleeding the shocks with a vacuum pump, this makes for a perfect air-free shock.
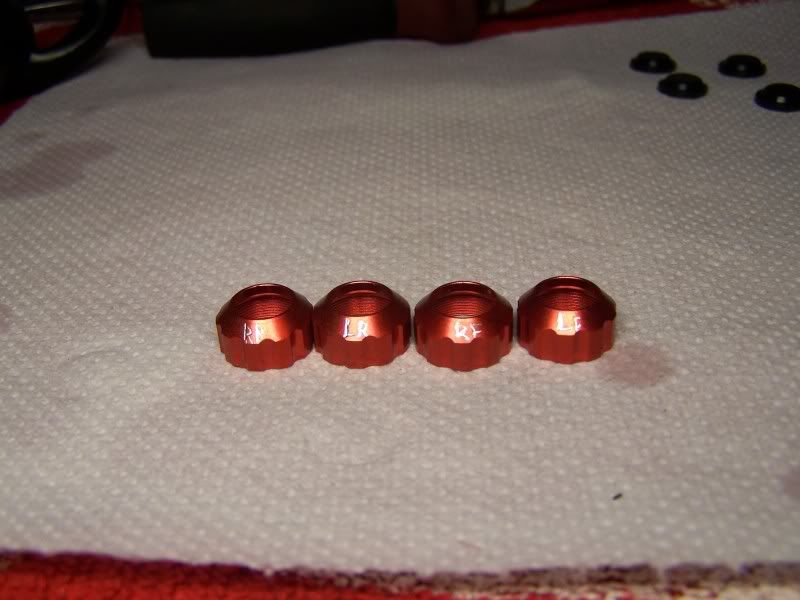
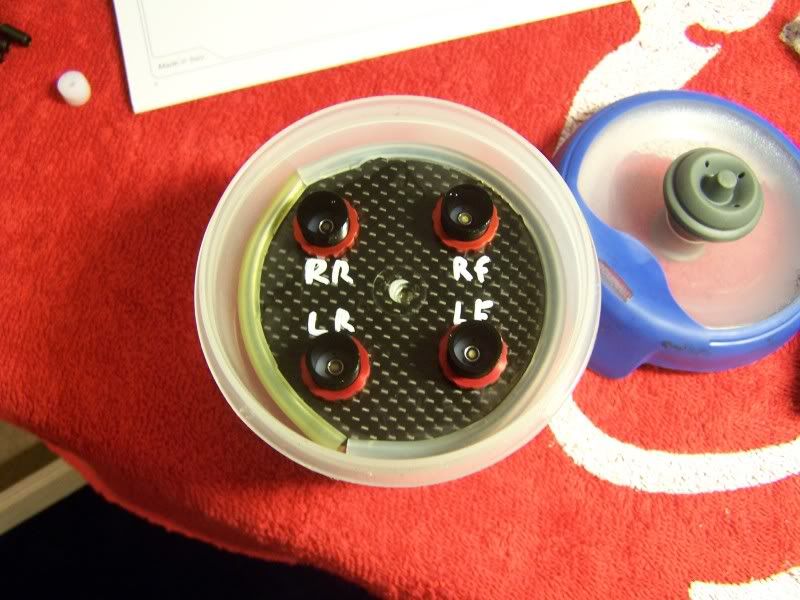
Meanwhile I engraved the shockcaps, this makes it easy to have the same shock on the same corner of the car every time.
I used the following method while building the shocks:
1. Put a 4mm spacer between the damperhousing and the balljoint, this sets the amount of rebound. A small spacer will mean less rebound, a big spacer more rebound.
2. While pushing the shockshaft into the housing( with the spacer in place) place the membrane on top of the shockhousing. All excess oil will come out of the shock.
3. Screw the cap on top of the housing.
4. Check if both front and both rear dampers are equal, this is very important in terms of car balance.
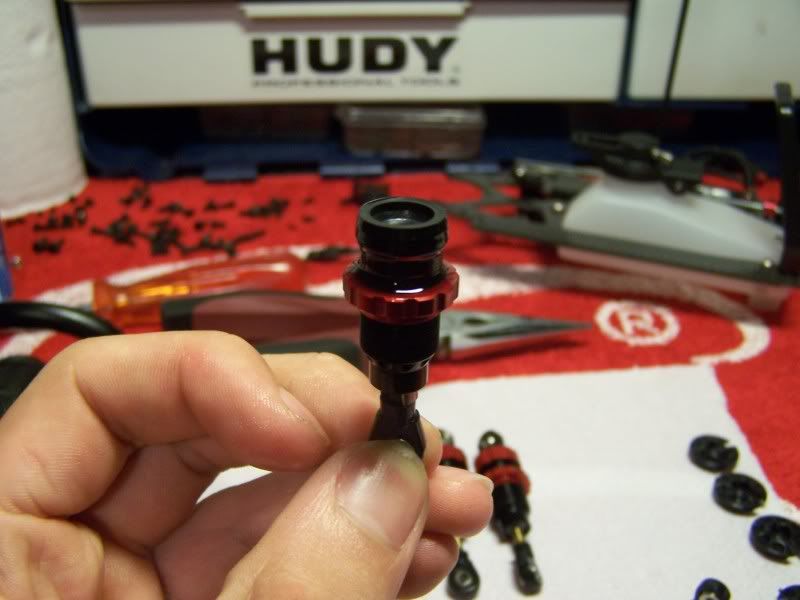
I've build the dampers with 550cst in the front and 450cst in the rear, used 3 holed pistons all around.
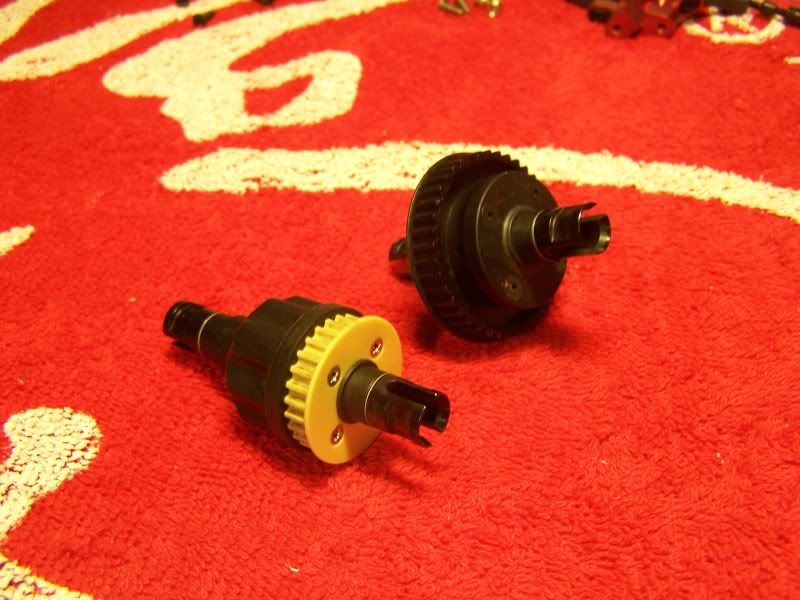
Step 2 and 3, differentials
I don't have any pictures from actually builing the diffs, only the end product.
Messed up with the oil and didn't want it to be all over my camera.
As standard the diffs are supplied with composite gears, aluminum axles and lightweight outdrives.
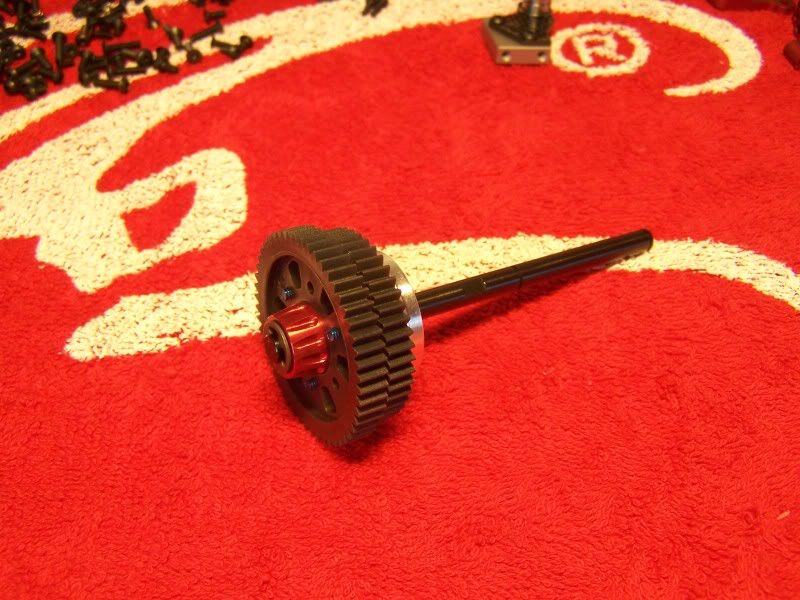
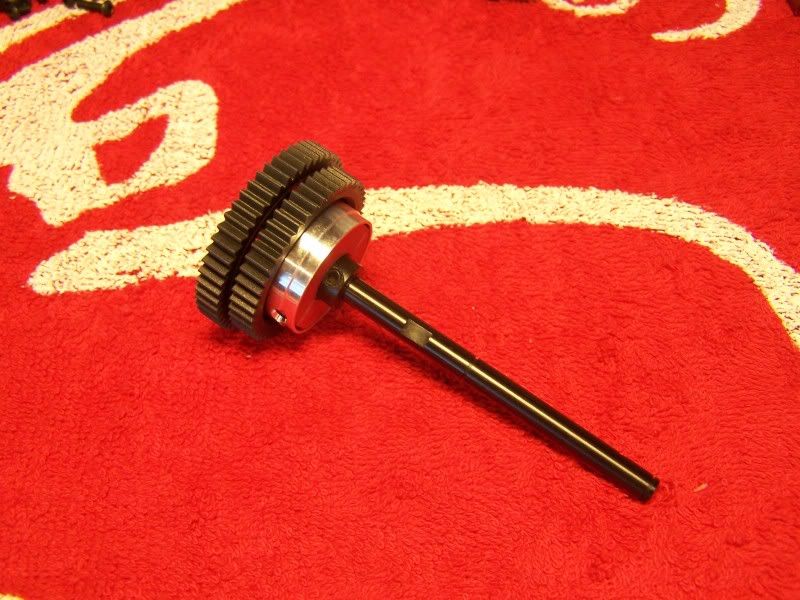
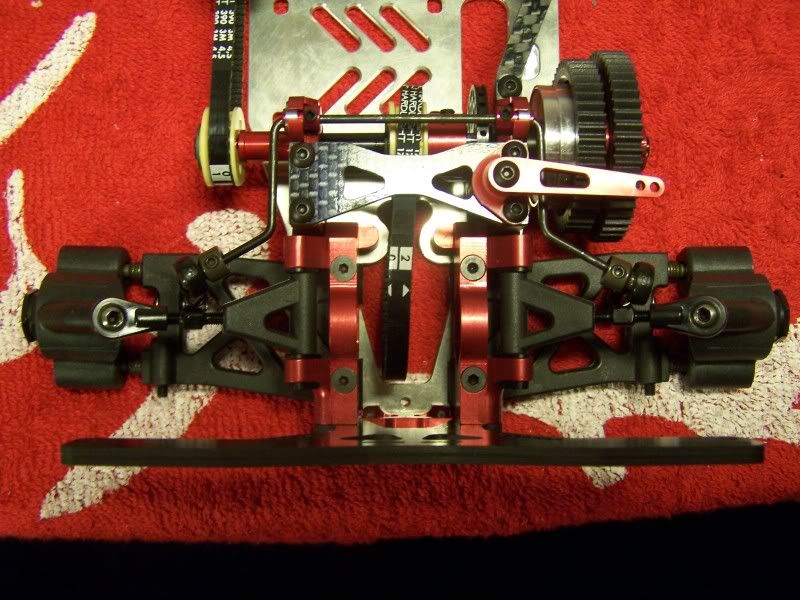
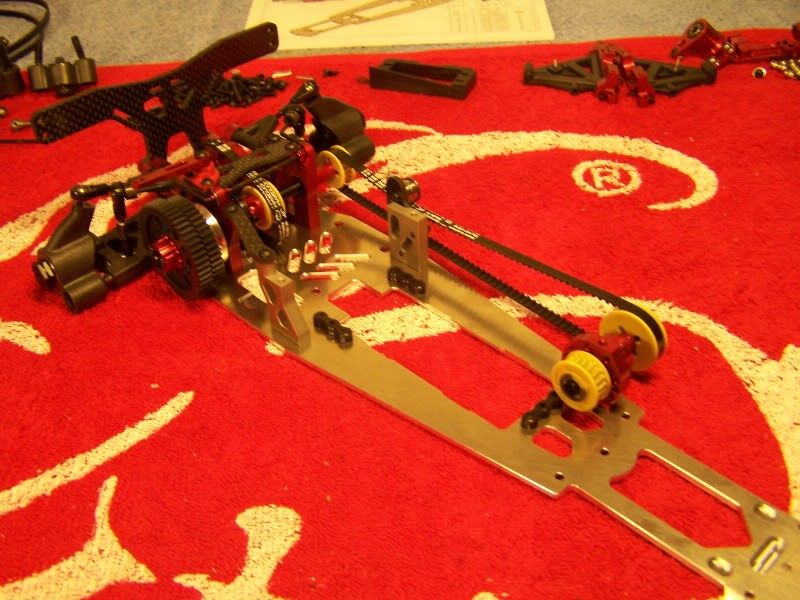
Step 4, the gearbox.
The gearbox is made up out of lightweight parts as well, the one-way and the 2 speed housing are both heavily machined as to safe as much weight as possible.
The gearbox is the smallest one currently available on a competition car.
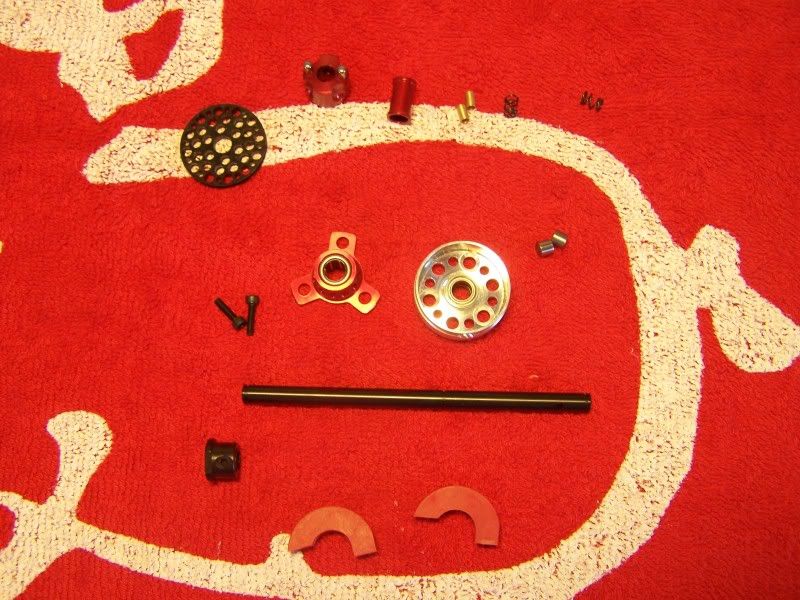
All individual parts.
And everything assembled.
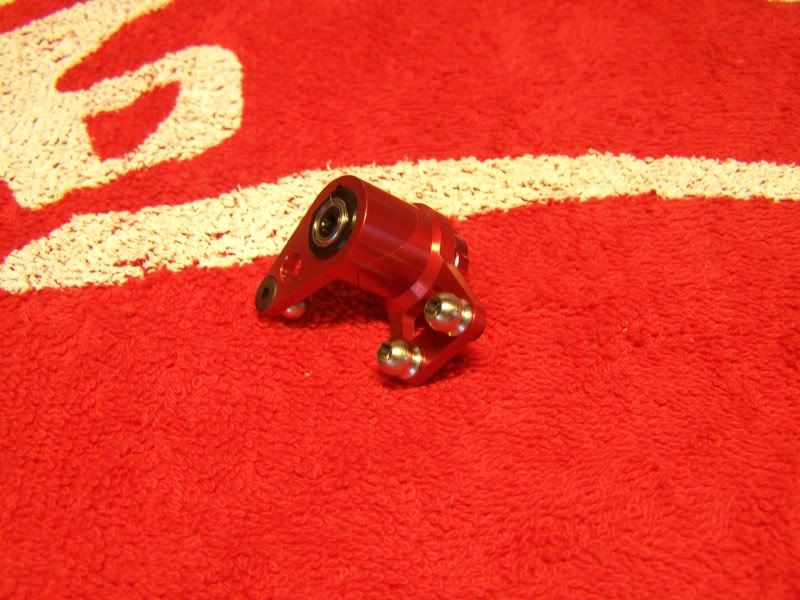
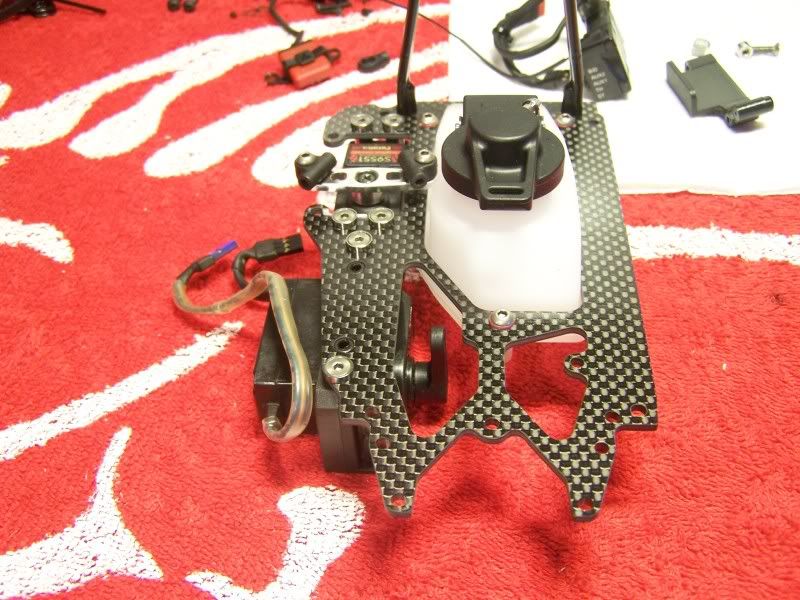
Step 5, servosaver.
Entirely made out of aluminum and the possibility to adjust ackermann by changing carbon inserts.
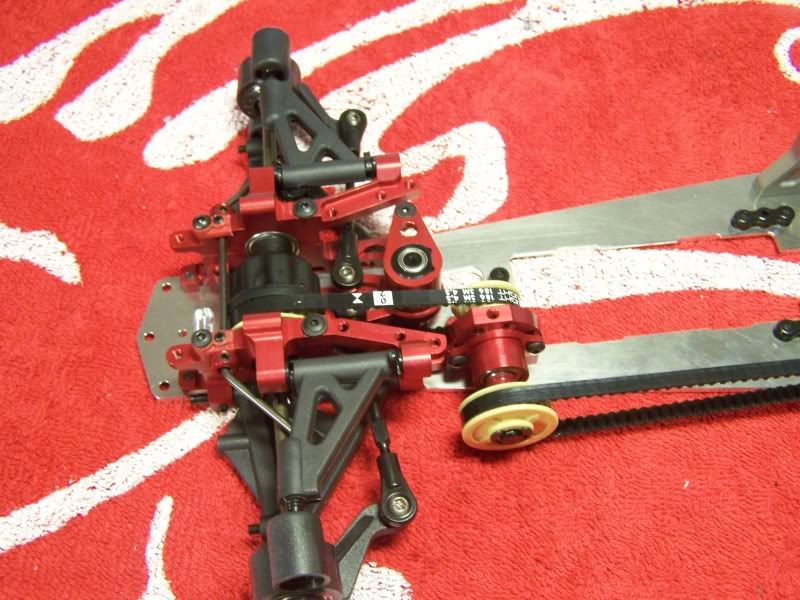
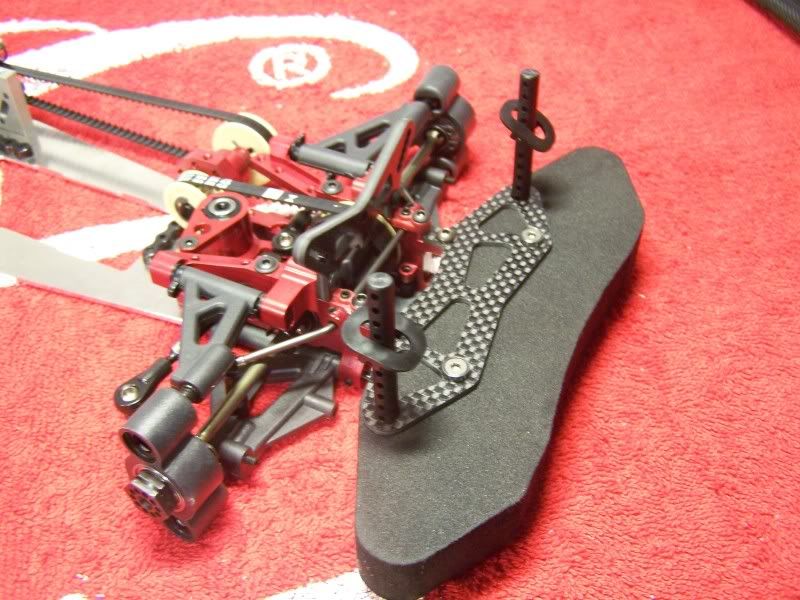
Step 6 Radiotray supports and middleaxle
The radiotray supports are made out of magnesium, this makes them even lighter as plastic parts, but still a lot stronger.
And it's pretty cool to have some F1 style parts on your R/C car.

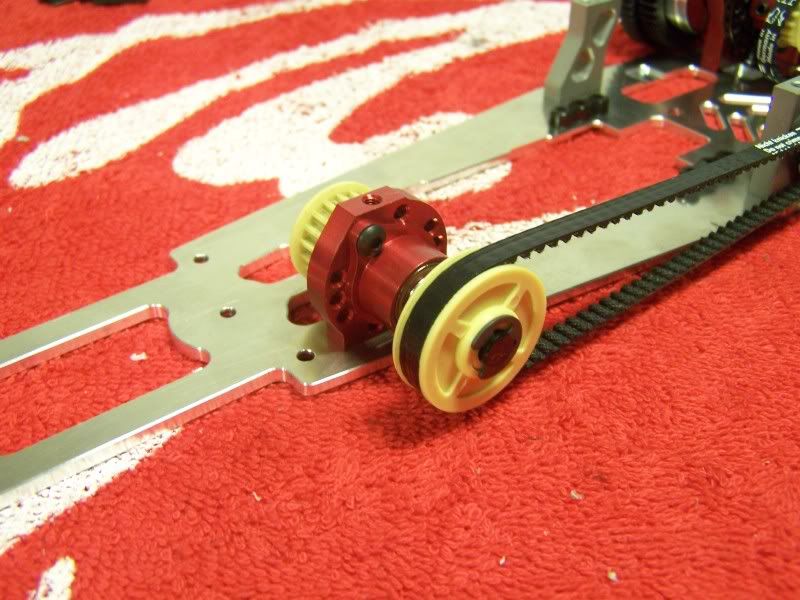
The middleaxle assembly has been made out of aluminum, as many other parts on the car. The axle itself is aluminum as well.
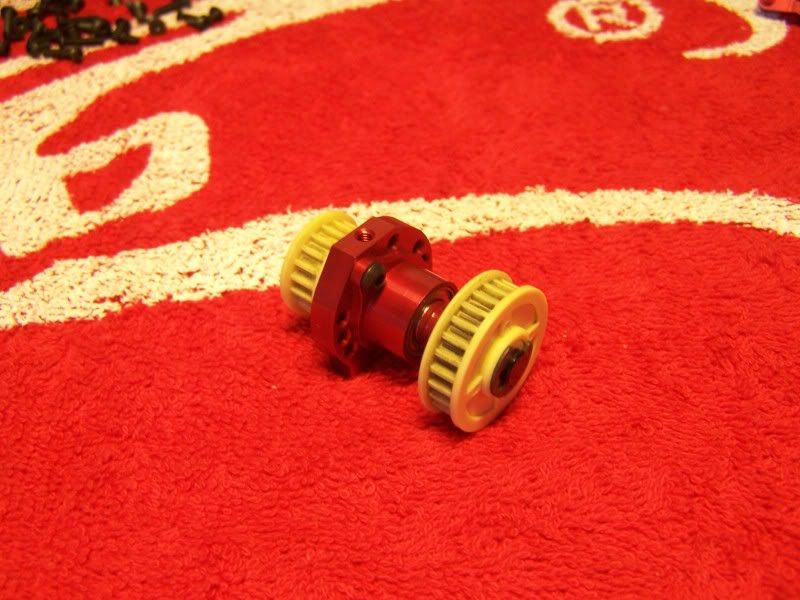
The middle axle also houses the eccentre for tensioning the front belt.
For the driveline I used the optional kevlar pulley's, these are really good as they don't attract dirt and provide for a much smoother drivetrain.
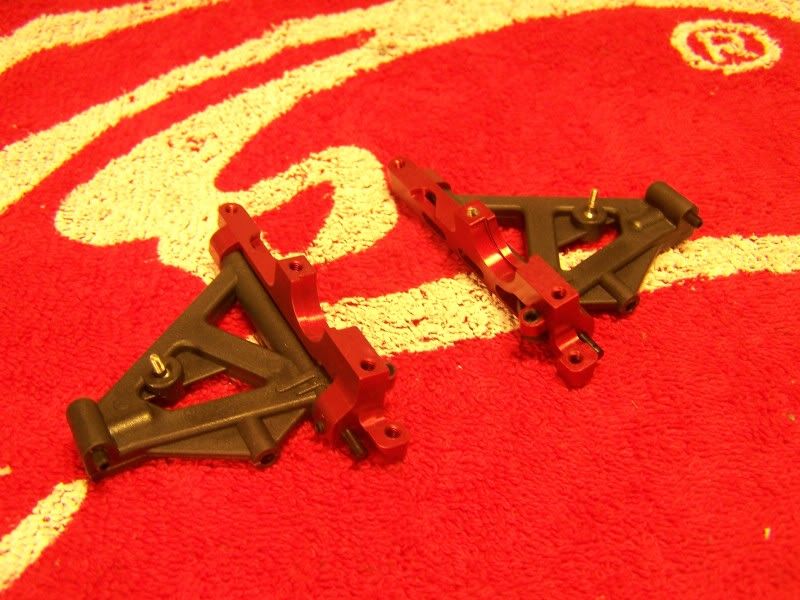
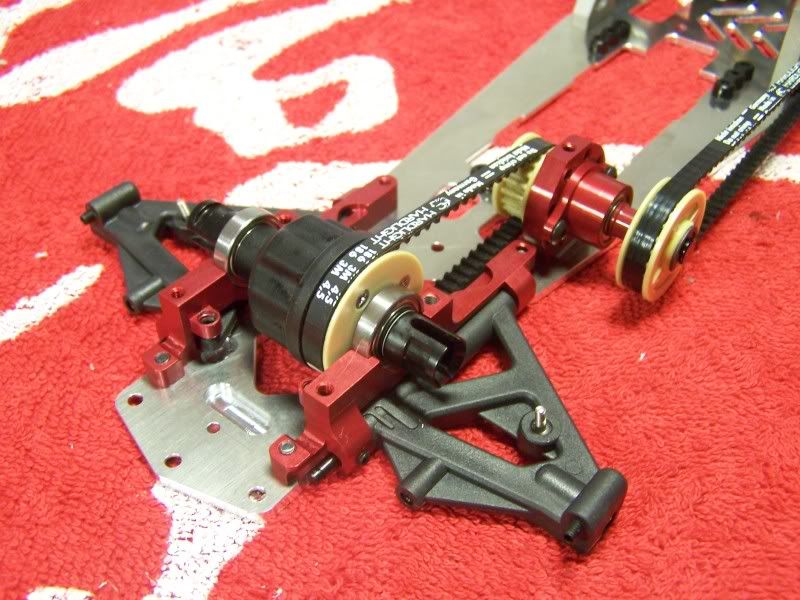
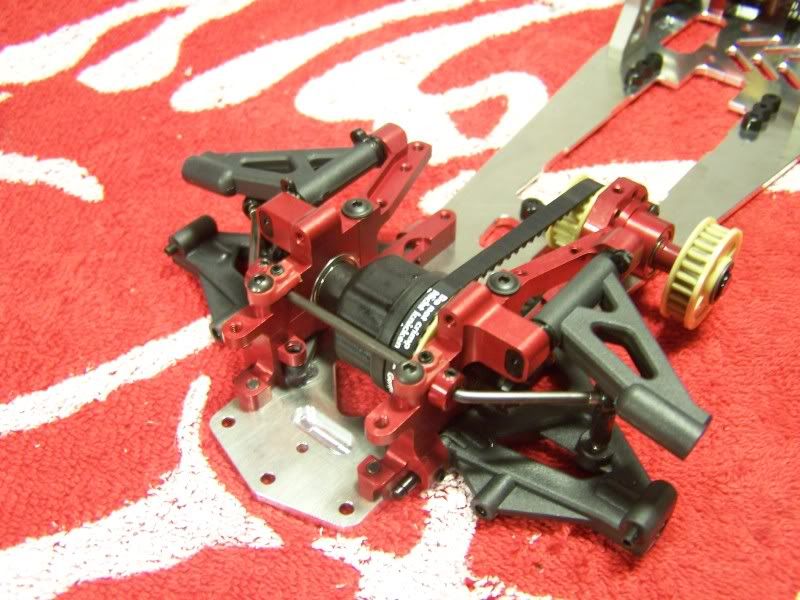
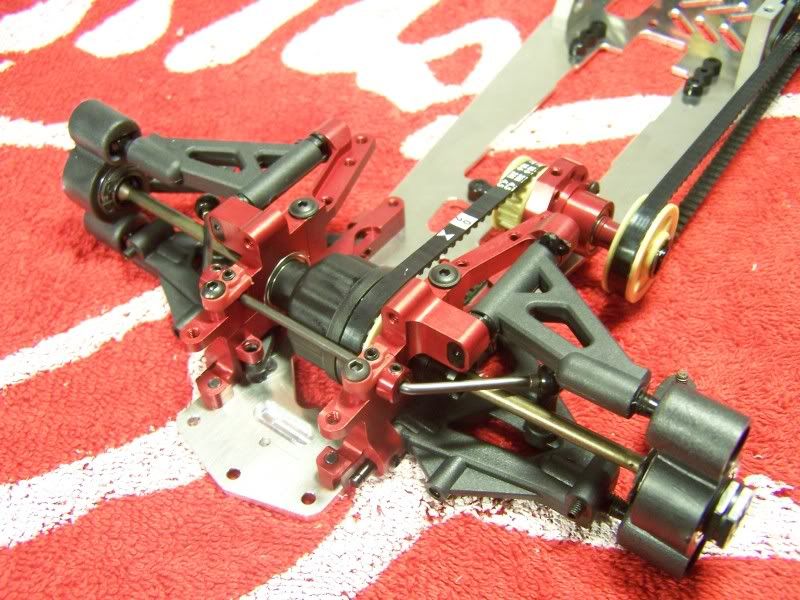
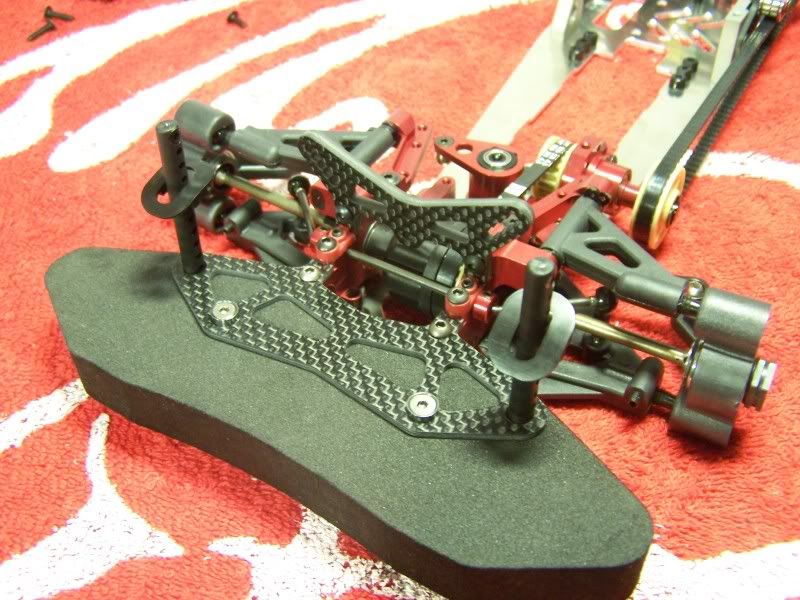
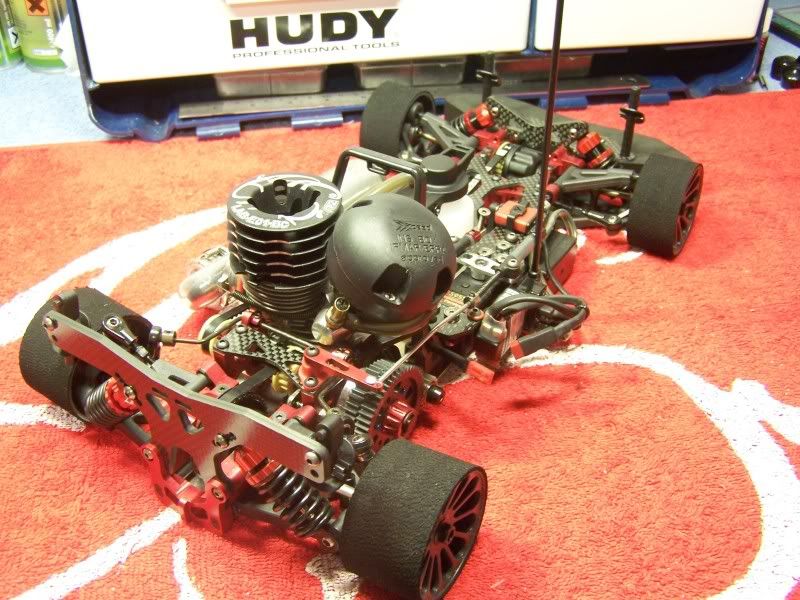
Step 8, Rear suspension
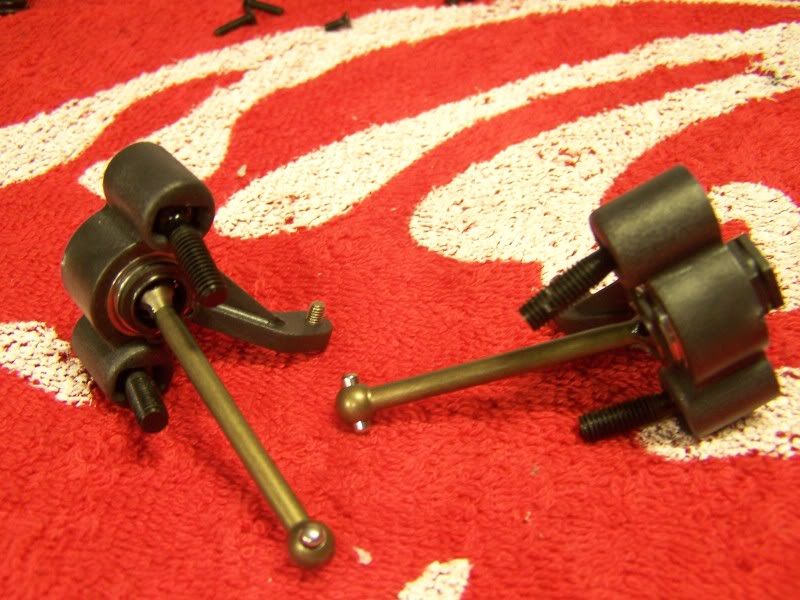
You start out with the rear uprights. As standard the car is supplied with lightweight steel pivotballs. These give an increased steering throw and are more durable for the US style tracks.
Since I will only be running on euro style tracks I opted so save some additional weight and used aluminum pivotballs.
The wheelhexes and wheelaxles are made out of one piece. The wheelaxles are placed into the upright from the upside and secured by a C-clip on the inside. By using shims you're able to change the offset.
In the rear aluminum dogbones are used, compared to CVD's these provide more steering.
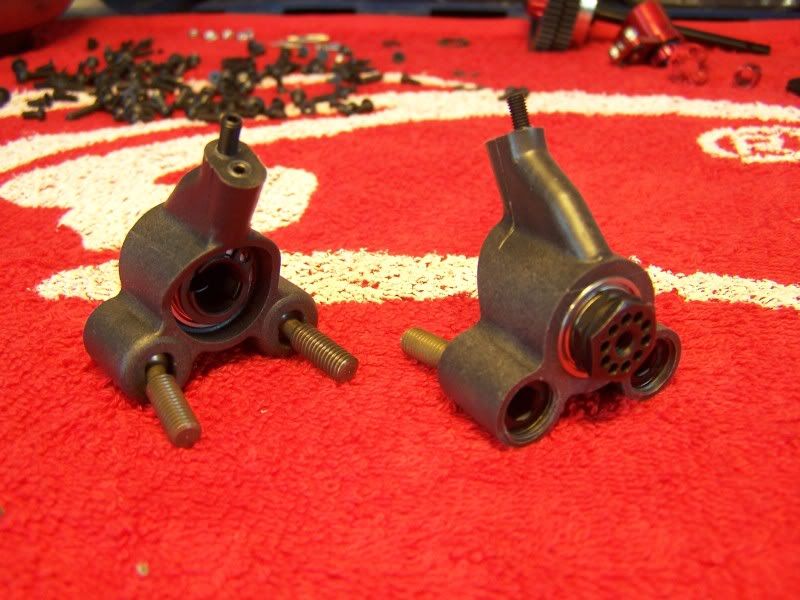
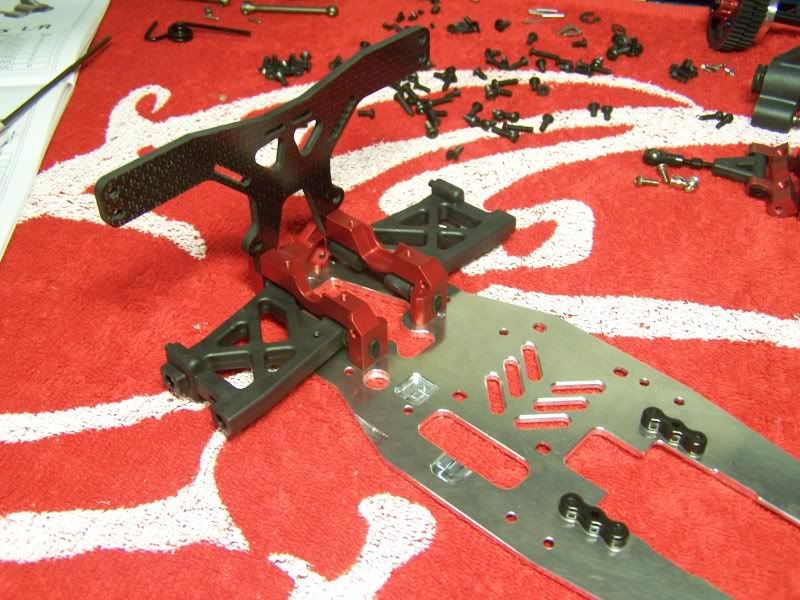
Wishbones, bulkheads and rear shocktower fitted. Shocktower is made out of 4mm carbon and is fitted to the bulkhead very securely.
I don't have any pictures from all the different steps of mounting the diff, gearbox supports, 2-speed axle and rear uprights.
Building went very quick and easy and I simply forgot to take pictures.

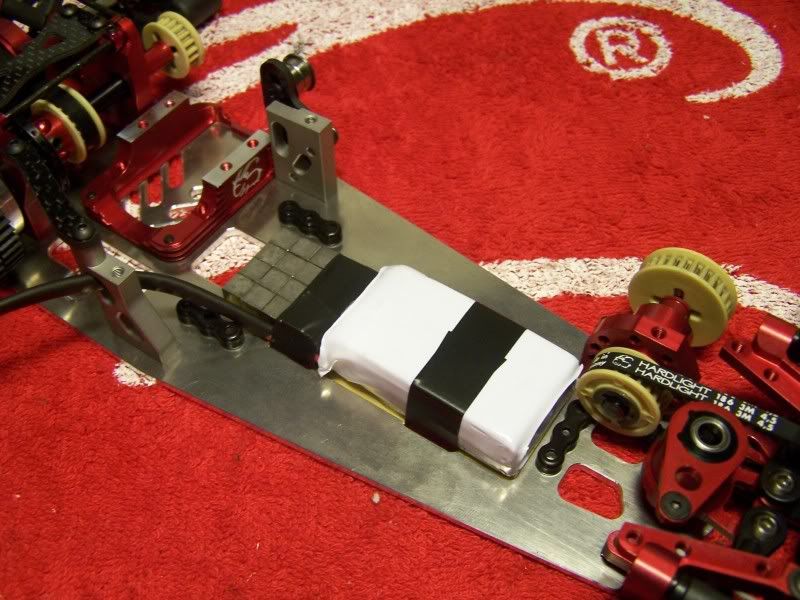
Step 11, Battery
For a battery I used a 900Mah Lipo pack combined with a regulator.
I've been using this combination for over 2 years and never had an electronic failure since. Also the Lipo pack with a regulator makes for a very consistent car as all electrics are always getting 6.4 volts, even under higher loads.
The battery pack is very thin which allows the tank to be lowered as much as 5mm.
Behind the battery there is space to put some very needed additional weight.
As the car is 100grams below minimum weight I used Tungsten. This material has a density 4 times as high as lead. With just some plain lead I wouldn't have been able to fit all of it to the car.
The brass battery tray is supplied as standard and helps getting close to the minimum weight
Step 12, Middle axle
Tensionor integrated into the middle axle, all drivebelts are low-friction versions as standard.
Step 13, front suspension
For the front suspension I choosed to use a wire type anti rollbar instead of the standard blade type ARB. A wire type ARB is more consistent and very easy to get tweak-free. Disadvantage is that you have to change the entire wire in order to change the hardness, but this is a 5 minute job.
Downstop screws are pushing straight onto the wishbone, this is very nice as you won't have any changed downstops anymore when you're de-tweaking the ARB.
Front bumper mounted
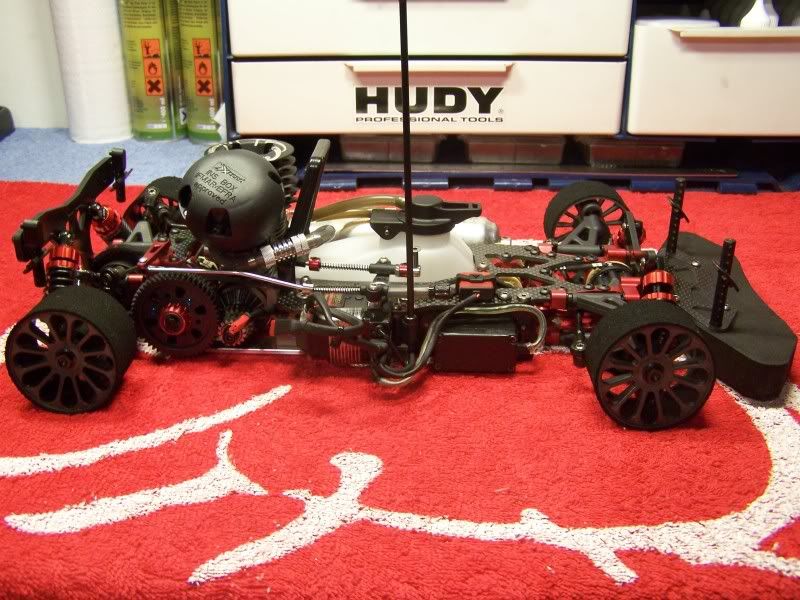
Step 16, Radiotray
The fueltank is the same as the on the Xray NT1 uses, this is a good thing as it is the best fueltank available.
As a throttle servo I uses a low-profile version from futaba, this allowed me to mount the servo 5mm below the radiotray.
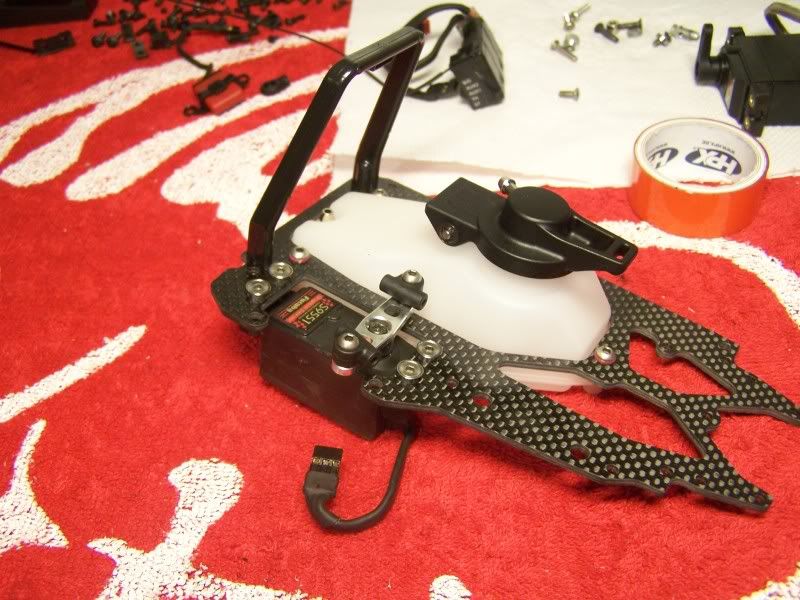
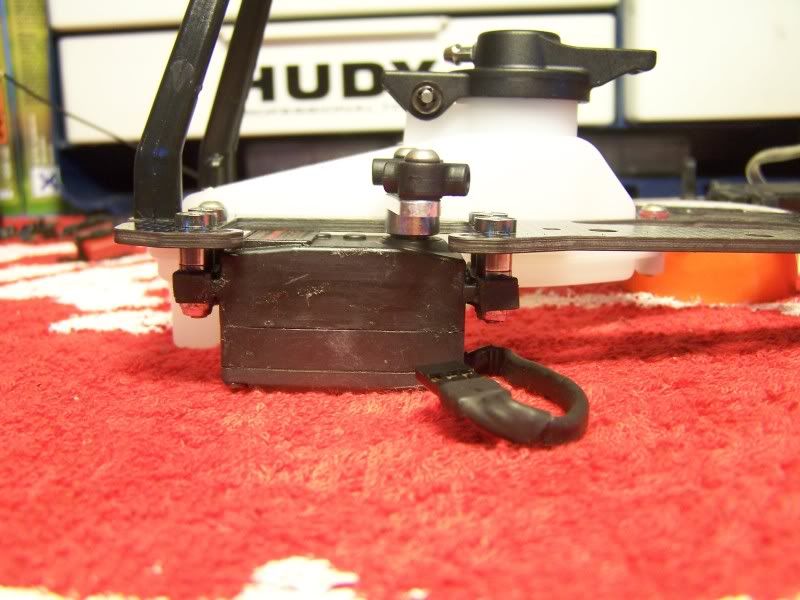
De steering servo is a normal one from Sanwa, have been using this for 5 years now and it is still going strong.
Shortened all the wiring for looks and a little more weight saving.
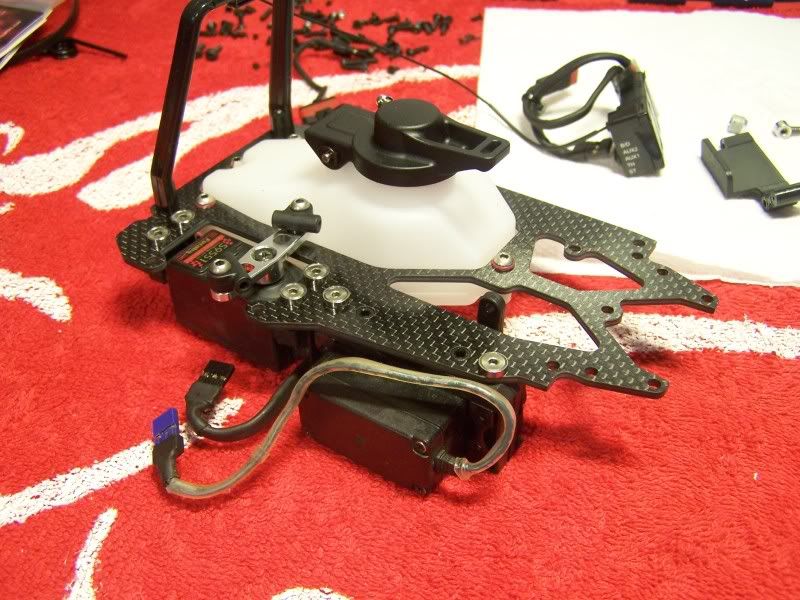
Step 17, Final assembly
I don't have any pictures yet from the lasts steps of the radiotray assembly or assembling the clutch. These will be added later on.
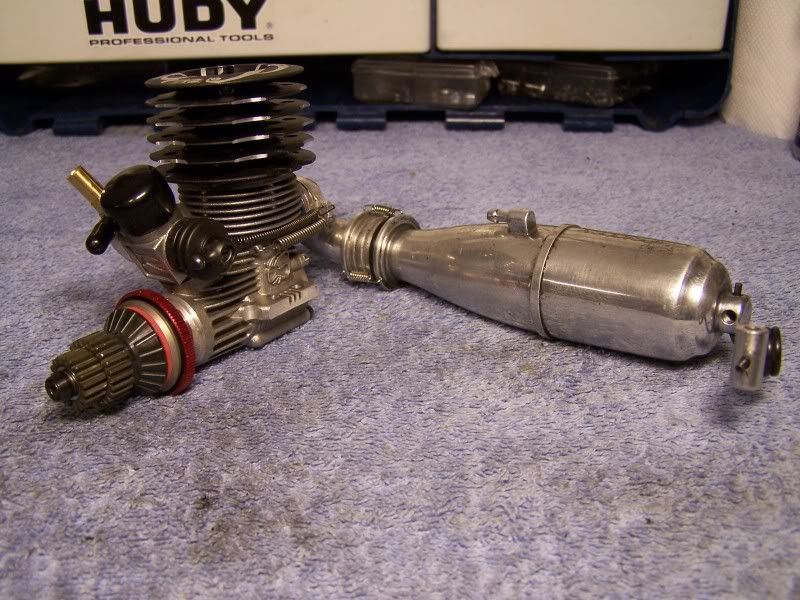
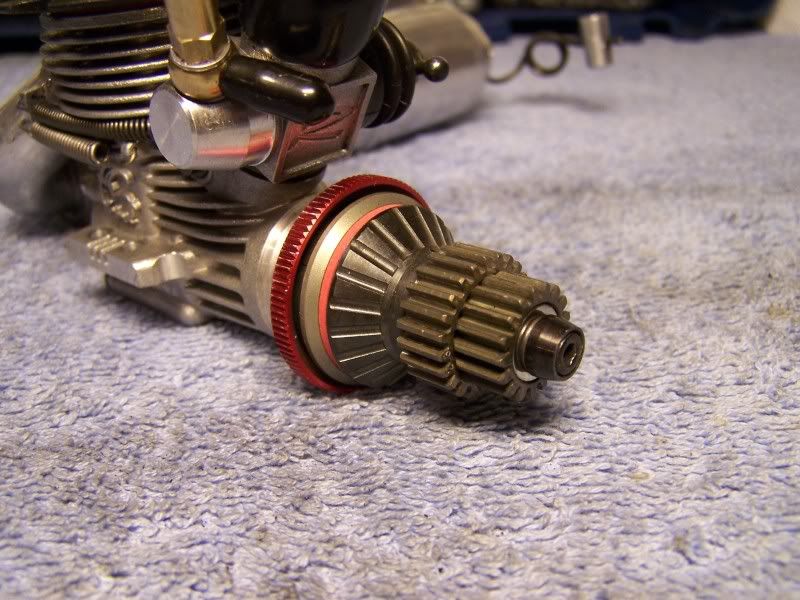
The engine is also from Capricorn, a Lab-E01 BC. This is one of the fastest, if not the fastest engine currently available, 108.4 km/h (67.3 m/ph) on the backstraight.
Clutch
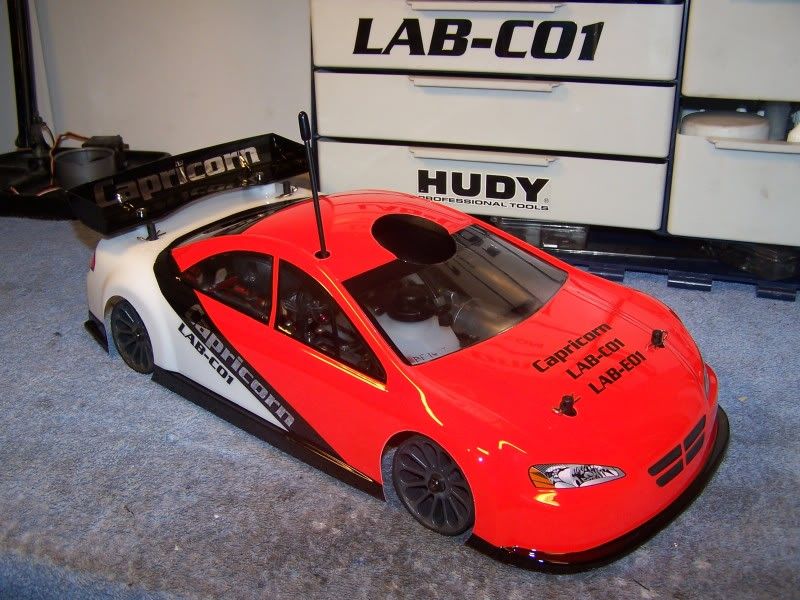
Tires fitted, and a completed car.
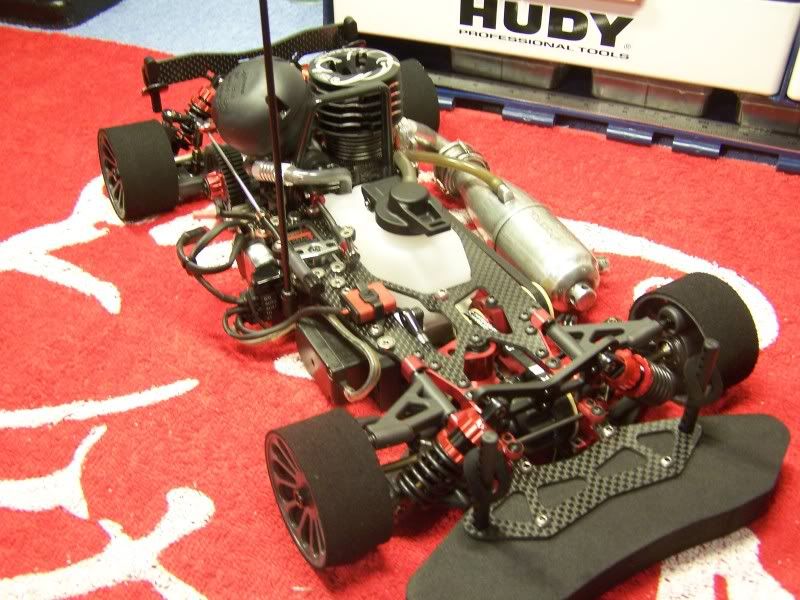
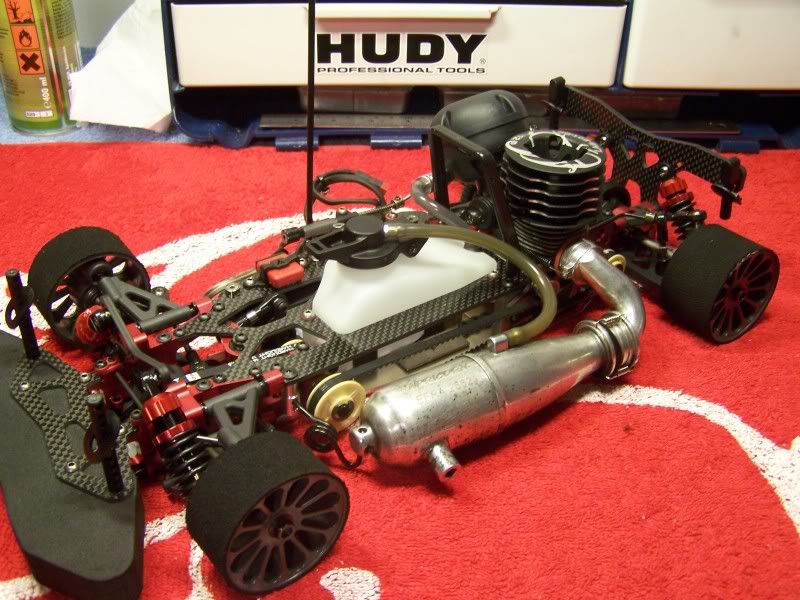
Body shell painted:

Step 1, Shockabsorbers.
The quality of the shocks is amazing, standard they come with TiNi coated shafts and a mono O-ring design. The pistons and shaft guide are machined nylon which makes for the smoothest shock I ever build.
All shocks were perfectly matched in bound and rebound on the first try.
Bleeding the shocks with a vacuum pump, this makes for a perfect air-free shock.
Meanwhile I engraved the shockcaps, this makes it easy to have the same shock on the same corner of the car every time.
I used the following method while building the shocks:
1. Put a 4mm spacer between the damperhousing and the balljoint, this sets the amount of rebound. A small spacer will mean less rebound, a big spacer more rebound.
2. While pushing the shockshaft into the housing( with the spacer in place) place the membrane on top of the shockhousing. All excess oil will come out of the shock.
3. Screw the cap on top of the housing.
4. Check if both front and both rear dampers are equal, this is very important in terms of car balance.
I've build the dampers with 550cst in the front and 450cst in the rear, used 3 holed pistons all around.
Step 2 and 3, differentials
I don't have any pictures from actually builing the diffs, only the end product.
Messed up with the oil and didn't want it to be all over my camera.
As standard the diffs are supplied with composite gears, aluminum axles and lightweight outdrives.
Step 4, the gearbox.
The gearbox is made up out of lightweight parts as well, the one-way and the 2 speed housing are both heavily machined as to safe as much weight as possible.
The gearbox is the smallest one currently available on a competition car.
All individual parts.
And everything assembled.
Step 5, servosaver.
Entirely made out of aluminum and the possibility to adjust ackermann by changing carbon inserts.
Step 6 Radiotray supports and middleaxle
The radiotray supports are made out of magnesium, this makes them even lighter as plastic parts, but still a lot stronger.
And it's pretty cool to have some F1 style parts on your R/C car.
The middleaxle assembly has been made out of aluminum, as many other parts on the car. The axle itself is aluminum as well.
The middle axle also houses the eccentre for tensioning the front belt.
For the driveline I used the optional kevlar pulley's, these are really good as they don't attract dirt and provide for a much smoother drivetrain.
Step 8, Rear suspension
You start out with the rear uprights. As standard the car is supplied with lightweight steel pivotballs. These give an increased steering throw and are more durable for the US style tracks.
Since I will only be running on euro style tracks I opted so save some additional weight and used aluminum pivotballs.
The wheelhexes and wheelaxles are made out of one piece. The wheelaxles are placed into the upright from the upside and secured by a C-clip on the inside. By using shims you're able to change the offset.
In the rear aluminum dogbones are used, compared to CVD's these provide more steering.
Wishbones, bulkheads and rear shocktower fitted. Shocktower is made out of 4mm carbon and is fitted to the bulkhead very securely.
I don't have any pictures from all the different steps of mounting the diff, gearbox supports, 2-speed axle and rear uprights.
Building went very quick and easy and I simply forgot to take pictures.
Step 11, Battery
For a battery I used a 900Mah Lipo pack combined with a regulator.
I've been using this combination for over 2 years and never had an electronic failure since. Also the Lipo pack with a regulator makes for a very consistent car as all electrics are always getting 6.4 volts, even under higher loads.
The battery pack is very thin which allows the tank to be lowered as much as 5mm.
Behind the battery there is space to put some very needed additional weight.
As the car is 100grams below minimum weight I used Tungsten. This material has a density 4 times as high as lead. With just some plain lead I wouldn't have been able to fit all of it to the car.
The brass battery tray is supplied as standard and helps getting close to the minimum weight
Step 12, Middle axle
Tensionor integrated into the middle axle, all drivebelts are low-friction versions as standard.
Step 13, front suspension
For the front suspension I choosed to use a wire type anti rollbar instead of the standard blade type ARB. A wire type ARB is more consistent and very easy to get tweak-free. Disadvantage is that you have to change the entire wire in order to change the hardness, but this is a 5 minute job.
Downstop screws are pushing straight onto the wishbone, this is very nice as you won't have any changed downstops anymore when you're de-tweaking the ARB.
Front bumper mounted
Step 16, Radiotray
The fueltank is the same as the on the Xray NT1 uses, this is a good thing as it is the best fueltank available.
As a throttle servo I uses a low-profile version from futaba, this allowed me to mount the servo 5mm below the radiotray.
De steering servo is a normal one from Sanwa, have been using this for 5 years now and it is still going strong.
Shortened all the wiring for looks and a little more weight saving.
Step 17, Final assembly
I don't have any pictures yet from the lasts steps of the radiotray assembly or assembling the clutch. These will be added later on.
The engine is also from Capricorn, a Lab-E01 BC. This is one of the fastest, if not the fastest engine currently available, 108.4 km/h (67.3 m/ph) on the backstraight.
Clutch
Tires fitted, and a completed car.
Body shell painted:
10-16-2010, 02:51 PM
#505
very nice Daan, good qualty pictures also.
See you soon.
JW
See you soon.
JW
10-22-2010, 02:37 PM
#507
There will be an announcement about a new US distributer soon.
If you really want a kit as soon as possible contact capricorn directly ([email protected]), I'm sure they will help you out as their service is outstanding.
If you really want a kit as soon as possible contact capricorn directly ([email protected]), I'm sure they will help you out as their service is outstanding.