Go Back  R/C Tech Forums > General Forums > Nitro Off-Road
Kyosho Inferno MP9 TKI4 1/8 Buggy Kit >

Kyosho Inferno MP9 TKI4 1/8 Buggy Kit

Community
Wiki Posts
Search
Like Tree321Likes

Kyosho Inferno MP9 TKI4 1/8 Buggy Kit

    Hide Wikipost
Old 11-05-2018, 09:06 AM   -   Wikipost
R/C Tech ForumsThread Wiki: Kyosho Inferno MP9 TKI4 1/8 Buggy Kit
Please read: This is a community-maintained wiki post containing the most important information from this thread. You may edit the Wiki once you have been a member for 90 days and have made 90 posts.
 
Last edit by: 30Tooth
Picked up a TKI3 and want to upgrade to TKI4 ? Here are all the updated parts:

Shocks

IF347-155 1.5X5 Pistons
IF471-01 Front Shock Body
IF470-01 Rear Shock Body
IF470-03BK Shock Adjust Dial
IFW154 Boots
IF346-05C Shock End Set

Wing

IF491BK Wing
IFW460B Wing Mount/Stay

Rear End

IFH006W Wheel
IF490 HUB
IF490-01 Hub Insert
IF492 Shock Pin
IF423HB Rear Arm
IF287 Hard Upper Rod Rear

Front End

IF489 Steering Rod Set
IF488 Knuckles
IF487H Front Arm
IFW458 Hard Lower Pin
IFW425 93MM CVD
IF286 Hard Upper Rod
IF486 Lower Susp Holder
IFW459 Servo Saver (Hard)
IF446B Ackerman Arm
IF426-64.5 Susp Shaft


Other

IF469B Filter
97035LW-13 Clutch Bell
IF453B Body Mount
IFW107GM Hexes
W300910 Washer
IF443B Center Diff Plate
IF444C Tank
IF479B Radio Box
96772 13x16x0.15mm Shim
IF481B Fuel Tank Stay
IFW336GM Wheelnut
IFB008 TKI4 Body
IFD403W TKI4 Decal

---------------------------

Another option if you want TKI4 Durability but TKI3 geometry of the front arm is :

IF493 Front Arm (Updated MP9 front arms replaces IF427B as a direct fit. Left and right.)

They use the older TKI3 captured outer hinge pin and screw. But if you just reem out the the outer hole you can use TKI hinge-pin/nut (IFW458)
---------------------------

Optional Updates / New Parts:

IFW469 IFW469 Aeration Cap Set(Threaded Big Shock/MP9)

IFW473 New Brake Pads (Sept 2017)

Optional Alu front hubs:
- IFW412 - 13 deg (like stock plastic ones)
- IFW436 - 16 deg
- IFW474 - 17.5 deg
- IFW461 - 19deg

M2C 1mm engine spacer: M2C9610

Body Options
New Bitty Force Body

Tebo's Build Videos

Video #1

Video #2

Video #3

Video #4

Video #5

Video #6

Original Kyosho MP9 TKI Thread
_____________________

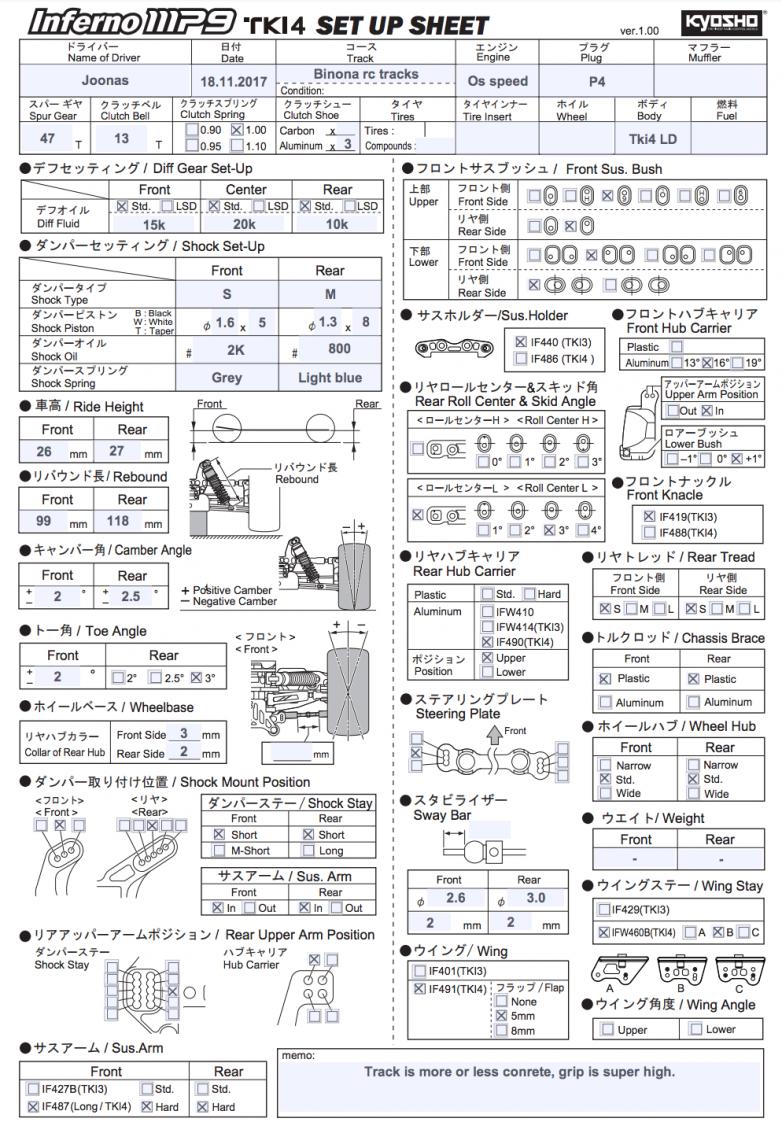
Baseline setups from Joonas.


_____________________

Shock build with vented cap and compensator.

You have to use the HC diaphragms (if346-09,stock TKI3 and if not mistaken TKI4 too, yes the thin ones no one likes), aeration caps without the bleeder screw or mod the stock caps by drilling a 1.5 or 2mm hole on the top facing up or at an angle (doesn't matter the size or angle, it just for bleeding pressure behind the diaphragm and allow the foam compensator to breathe) and a 10mm width x 3.5mm height dome shaped foam compensator made from old open cell inserts or dishwasher sponge. The foam compensator has to be soft enough not to add rebound but allow the diaphragm to regain it's shape.

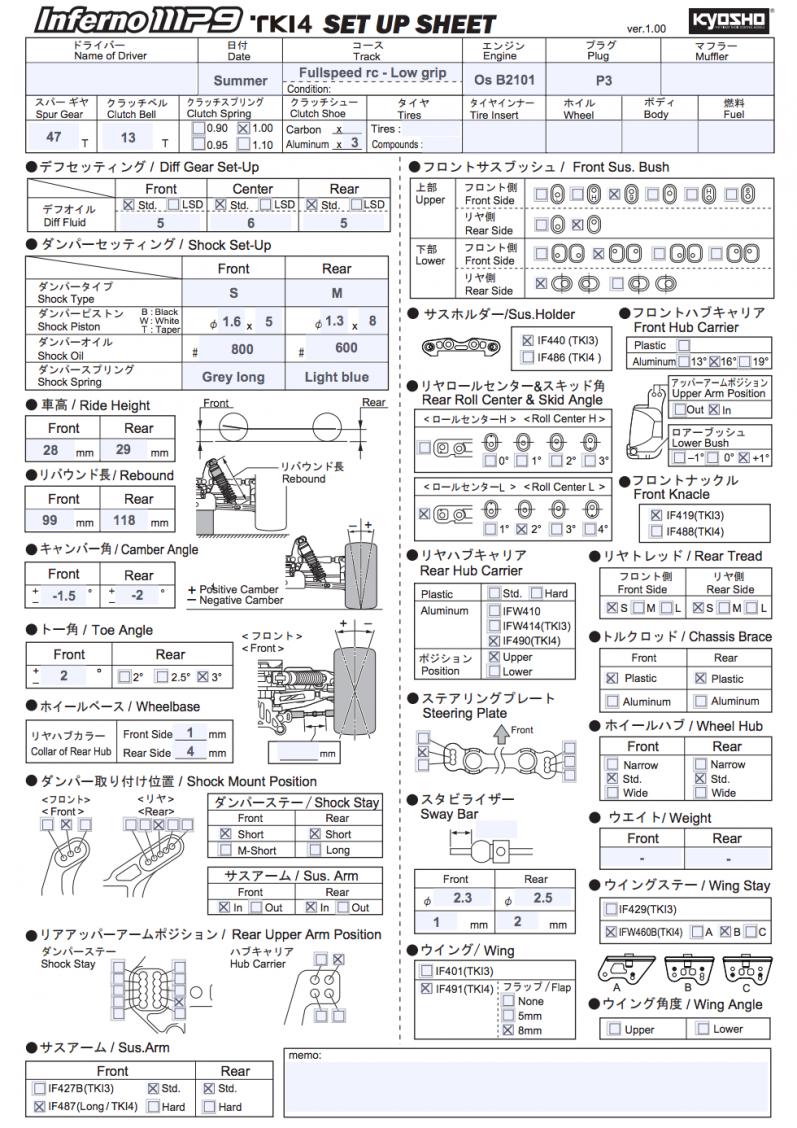
Setup Sheet and Tuning

The setup sheet is getting crowded with all options but don't worry once you get acquainted with the parts will make sense.
Run the car as is, more than probably you won't need anything else. Using my setup as an example:

Diff gear has two options, normal and LSD. LSD stands for limited slip differential and is like using thick oils because you can't tune coast from locked.

Shock setup is a bit more confusing, you have two shock body sizes (S and M and truggy sized rear shocks that only the first version had so forget this one), three types of pistons (flat holes and surfaces, flat holes tapered surface and tapered holes with tapered surface): tapered have most pack, then black(simple piston) and then white because length of the holes. Then you have different length springs to account for different shock sizes, for a standard wheelbase/no weights car a good combo is Light Blue front and Orange rear, if you extend the wheelbase then I expect the included Light Blue rear springs be money instead of Orange.

Ride height is self explanatory, start always with lower arms parallel because good suspension geometry will be far easier to achieve. Rebound is used as total shock length no idea why they call it rebound, either use total shock length or maximum exposed shock shaft length. Camber self explanatory, run more camber in the front than the rear to make the car oversteer and more rear than front to make it understeer(grossly oversimplified).

Toe same deal as camber(again grossly oversimplified) but this you have to run the least amount you can. I use around 2º-2.5º on my cars, never more as I can find traction by other means with way less impact on performance.

Wheelbase is a powerful setting, changes a lot of stuff. Let's just say that it can make the car behave neutral or not in that small range. Try for yourself. I like to use the longest setting and tune from there.

Shock position self explanatory, something most don't change and I don't play around with it. I do have a method but involves much work (with the car bottomed out, see which position places the shock 90º to the lower arm and then chose spring from a couple equations and bam done, I can do it easily so anyone interested just ask.

Rear upper arm position is again an important setting, you change both camber gain and roll centre. The rear roll centre should be higher than the front, that's why I use the middle hole inner row as a starting setup.

Suspension arm, self explanatory: there are two different length arms and each has a hard and a normal flex plastic.

Front suspension bushing is for upper arm alignment, also same deal as rear upper arm position changes both camber gain and roll centre.

Suspension holder is for kick up (pro dive is the correct naming). I believe tki4 9º of kick up to be better than 9º of kick up using the tki3 parts because you can run the car lower (26mm front ride height) and use the +2mm front shock tower if there's too much camber gain or it's stiff in roll. So use +2mm lowered roll centre to keep most stuff unchanged or use the bushings with the dot up to lower the roll centre a bit more, doesn't hurt anything.

Front hub carrier, self explanatory. I am trying to use the out hole on top of the carrier as it is better during braking and accelerating. Together with the higher front roll centre on the tki4 should provide enough camber gain during cornering if not then more caster will do.

Rear roll centre and anti squat(wrongly called skid angle). Again same thinking as the front, lower the car and keep roll centre in the same height as before(that will need a change in upper arm position which my setup does). Anti squat is changed only if the pitching motion causes too much camber to be gained by the rear tires on power, nothing more.

Front knuckle, apparently there's a difference in the Ackerman arm. Can't say anything about them as I don't know enough about both.

Rear hub carrier,there is one made of plastic (which doesn't have offset apparently so it's suited to long arm setting) and three aluminium versions. One similar to the plastic one, other with offset and a new one with offset and adjustable hub height.

Rear tread can be used as arm length and outboard toe(never seen it being used but the possibility is there). Longer is better most of the time (only on really low traction).

Chassis brace, wheel hub, sway bars and weight are self explanatory. No need to use weights nor other hubs. A couple of roll bars would be a nice addition. About the aluminium braces I am torn, I guess the car doesn't need flex with this setup but won't recommend the stiffer braces but the lower engine mount is very nice to deal with flex around the clutch.

Wing and wing stay are like the d81x had regarding height and position. The wing should be as low and have free airflow as possible.

Print Wikipost

Thread Tools
 
Search this Thread
 
Old 04-28-2016, 08:34 PM
  #391  
Tech Master
 
cczjordan's Avatar
 
Join Date: Feb 2014
Location: Malaysia, Sabah
Posts: 1,042
Default

The kit performance is undeniable, just some reliability issues n costs that will need to be extra taken care of. If i had the money sure will buy 1. Good luck guys n all the best for kyosho owners
cczjordan is offline  
Old 04-28-2016, 08:38 PM
  #392  
Tech Master
iTrader: (1)
 
carpet Carlos's Avatar
 
Join Date: Dec 2011
Posts: 1,583
Trader Rating: 1 (100%+)
Default

Originally Posted by cczjordan
The kit performance is undeniable, just some reliability issues n costs that will need to be extra taken care of. If i had the money sure will buy 1. Good luck guys n all the best for kyosho owners
What reliability issues are you talking about ?
carpet Carlos is offline  
Old 04-29-2016, 03:27 PM
  #393  
Tech Regular
iTrader: (4)
 
Join Date: Feb 2015
Location: Brookhaven PA
Posts: 476
Trader Rating: 4 (100%+)
Default

The only reliability issues i've ever had on the TKI3 were the front arms and chipping spur gear teeth, but i switched to the hard arms and havent broke one yet.
BiLL77 is offline  
Old 04-30-2016, 03:54 AM
  #394  
Tech Master
 
rosko's Avatar
 
Join Date: Mar 2007
Posts: 1,088
Default

Just stripped a hex and nylon wheel nut...not a fan of the nylon wheel nuts..gonna stick with the standard sarrated whell nuts, for a temporary replacement im using the HB d815 hexes in the rear of the car seems to be the right size but the hole for the pin to secure the hex is slightly bigger, but should wrk til the replacements come
rosko is offline  
Old 04-30-2016, 05:21 AM
  #395  
Tech Champion
 
Pulse_'s Avatar
 
Join Date: May 2010
Location: Brussels, Belgium
Posts: 5,100
Default

Originally Posted by cczjordan
The kit performance is undeniable, just some reliability issues n costs that will need to be extra taken care of. If i had the money sure will buy 1. Good luck guys n all the best for kyosho owners
There are no reliability issues on the TKI4. Cost of the kit is higher because you need no upgrade and you will be able to keep your kit for years in the future.. so it's justified.

I don't say the car perfect. But I don't know of any car which is nearer from perfect. If someone has heard of another car able to compete with the TKI4 all aspects considered, let us know.
Pulse_ is offline  
Old 04-30-2016, 05:45 AM
  #396  
Tech Regular
iTrader: (1)
 
Join Date: Dec 2002
Posts: 304
Trader Rating: 1 (100%+)
Default

Originally Posted by rosko
Just stripped a hex and nylon wheel nut...not a fan of the nylon wheel nuts..gonna stick with the standard sarrated whell nuts, for a temporary replacement im using the HB d815 hexes in the rear of the car seems to be the right size but the hole for the pin to secure the hex is slightly bigger, but should wrk til the replacements come
Yep i have stripped 2 of them. Moved over to standard serrated ones now as well.
rfree02 is offline  
Old 04-30-2016, 07:48 AM
  #397  
Tech Master
iTrader: (1)
 
carpet Carlos's Avatar
 
Join Date: Dec 2011
Posts: 1,583
Trader Rating: 1 (100%+)
Default

Originally Posted by rosko
Just stripped a hex and nylon wheel nut...not a fan of the nylon wheel nuts..gonna stick with the standard sarrated whell nuts, for a temporary replacement im using the HB d815 hexes in the rear of the car seems to be the right size but the hole for the pin to secure the hex is slightly bigger, but should wrk til the replacements come
That just happened to me now !! Lol no more lock nuts. Never had any problems with the original ones.lock nuts garbage can
carpet Carlos is offline  
Old 04-30-2016, 07:54 AM
  #398  
Tech Champion
 
Pulse_'s Avatar
 
Join Date: May 2010
Location: Brussels, Belgium
Posts: 5,100
Default

just glue the damn wheels on the hubs!

j/k
Pulse_ is offline  
Old 04-30-2016, 08:15 AM
  #399  
Tech Master
iTrader: (1)
 
carpet Carlos's Avatar
 
Join Date: Dec 2011
Posts: 1,583
Trader Rating: 1 (100%+)
Default

Originally Posted by Pulse_
just glue the damn wheels on the hubs!

j/k
lol I have Never had issues with my cars. My tki3 is awesome.most the issues I read about are only on the internet lol.
carpet Carlos is offline  
Old 04-30-2016, 04:25 PM
  #400  
Tech Master
iTrader: (46)
 
mourinho's Avatar
 
Join Date: Jun 2013
Posts: 1,003
Trader Rating: 46 (100%+)
Default

Originally Posted by carpet Carlos
That just happened to me now !! Lol no more lock nuts. Never had any problems with the original ones.lock nuts garbage can
just curious, did you grease the threads before the first time you tightened the locknuts?

what actually stripped?
mourinho is offline  
Old 04-30-2016, 04:56 PM
  #401  
Tech Master
iTrader: (1)
 
carpet Carlos's Avatar
 
Join Date: Dec 2011
Posts: 1,583
Trader Rating: 1 (100%+)
Default

Originally Posted by mourinho
just curious, did you grease the threads before the first time you tightened the locknuts?

what actually stripped?
No i didnt. didnt know i was supposed to do that.
carpet Carlos is offline  
Old 04-30-2016, 04:58 PM
  #402  
Tech Master
 
rosko's Avatar
 
Join Date: Mar 2007
Posts: 1,088
Default

I stripped both....the plastic placers on the upper a arm for spacing when do u move them my upper arm is centered but ive seen pics with all spacers in front with upper arm all the way back...clueless can someone please explain..
rosko is offline  
Old 04-30-2016, 06:26 PM
  #403  
Tech Master
iTrader: (46)
 
mourinho's Avatar
 
Join Date: Jun 2013
Posts: 1,003
Trader Rating: 46 (100%+)
Default

Originally Posted by carpet Carlos
No i didnt. didnt know i was supposed to do that.
Yeah the manual calls for it, you only have to do it once the first time, then you wont have problems
mourinho is offline  
Old 04-30-2016, 06:31 PM
  #404  
Tech Master
iTrader: (46)
 
mourinho's Avatar
 
Join Date: Jun 2013
Posts: 1,003
Trader Rating: 46 (100%+)
Default

Originally Posted by rosko
I stripped both....the plastic placers on the upper a arm for spacing when do u move them my upper arm is centered but ive seen pics with all spacers in front with upper arm all the way back...clueless can someone please explain..
It all depends on which inserts you are running for the upper and lower arms and also the hub insert. The kit comes with a setting guide, have a look at that.
mourinho is offline  
Old 04-30-2016, 09:25 PM
  #405  
Tech Master
iTrader: (1)
 
carpet Carlos's Avatar
 
Join Date: Dec 2011
Posts: 1,583
Trader Rating: 1 (100%+)
Default

Originally Posted by mourinho
Yeah the manual calls for it, you only have to do it once the first time, then you wont have problems
Hahaha to late for that.
Oh well my new nuts are prettier any way.Built so many mp9s didn't even look at the manual
carpet Carlos is offline  


Contact Us - Archive - Advertising - Cookie Policy - Privacy Statement - Terms of Service -

Copyright © 2024 MH Sub I, LLC dba Internet Brands. All rights reserved. Use of this site indicates your consent to the Terms of Use.