Go Back  R/C Tech Forums > General Forums > Electric Off-Road
Team Associated B6 & B6D thread >

Team Associated B6 & B6D thread

Community
Wiki Posts
Search
Like Tree649Likes

Team Associated B6 & B6D thread

    Hide Wikipost
Old 06-07-2017, 10:46 AM   -   Wikipost
R/C Tech ForumsThread Wiki: Team Associated B6 & B6D thread
Please read: This is a community-maintained wiki post containing the most important information from this thread. You may edit the Wiki once you have been a member for 90 days and have made 90 posts.
 
Last edit by: RCBuddha
Welcome to the B6 Wiki!

Quick links to all the sections on the first page!

Frequently asked questions - the most common questions you may have answered here!

Aftermarket Parts - parts for the B6 and B6D

Tech Tutorials- tuning guides, ball diff and shock building videos and tutorials

How to's and build-specific posts

Team Associated Laydown transmission conversion for B6D:
Laydown conversion

Instruction Manuals:

B6: B6 Manual and setup sheets

B6D: B6D Manual and setup sheets

How to Sand and Seal carbon fiber:
Sanding and sealing carbon fiber
Sanding and sealing carbon fiber 2
Sanding and sealing carbon fiber 3
Sanding and sealing carbon fiber 4

Charts for Quick reference:


1) put inner bearing in hub
2) slide large shim over axle all the way up to the back of the axle
3) slide axle/bone into hub carrier
4) slide small shim onto axle through hub carrier
5) push outter bearing into hub carrier

using that i'm able to put my normal male silverback gorilla wheel nut tightening job and there's no binding. in the pictures that come with the shims (the pic socket posted) it seems like they want you to slide both shims onto the axle before sliding the axle into the hub carrier and like i said, that doesn't work.


I've traditionally done the diff screw head on the left side (driver's side), but have since switched to the Right side (passenger side) regardless of transmission type (3 gear RM vs 3 gear MM and 4 gear MM).

Kdub (Kurt Wenger, former AE designer) had this to say on the matter:

Originally Posted by kdub
I think I count as an authority on the matter. I always run my diff screw on the right side (when sitting "inside" the car). I take off the tire and pull the outer hinge pin to get to the adjustment screw.

The right rear is the way the AE manuals state (or used to state). It really shouldn't matter since you go around turns both left and right.
B6D 3-gear:

Print Wikipost

Thread Tools
 
Search this Thread
 
Old 07-17-2016, 04:24 PM
  #1651  
Tech Adept
 
Will27's Avatar
 
Join Date: Aug 2010
Location: New Zealand
Posts: 147
Default

Originally Posted by awidz
Anyone know where I can find this, I just got my b6 and can only find cavaliers setup, ANY help would be appreciated. Cavalieri ran rear shocks in back of arm and rivkin ran them in front of arm. I want to put rivkin setup on my car.....thanks
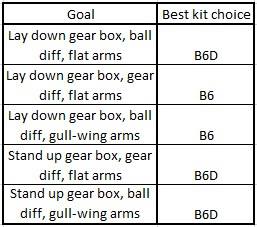
I haven't seen any photos showing Cavalieri's shocks on the rear, all the photos I've seen show on the front of the arm... maybe an error on the setup sheet?
Will27 is offline  
Old 07-17-2016, 04:40 PM
  #1652  
Tech Master
iTrader: (21)
 
suby723's Avatar
 
Join Date: May 2011
Location: Spring Hill Tennessee
Posts: 1,378
Trader Rating: 21 (100%+)
Default

Originally Posted by awidz
Anyone know where I can find this, I just got my b6 and can only find cavaliers setup, ANY help would be appreciated. CavaLirI ran rear shocks in back of arm and rivkin ran them in front of arm. I want to put rivkin setup on my car.....thanks
http://www.reedyrace.com/ae/spotligh...aRC/index.html
suby723 is offline  
Old 07-17-2016, 04:53 PM
  #1653  
Tech Addict
 
Join Date: Jan 2005
Posts: 505
Default

Originally Posted by Socket
It's no longer available on the AE website and PEtitRC direct linked to their website IIRC.
Originally Posted by awidz
So it cannot be found?
http://site.petitrc.com/setup/associ...oma2016051215/

Available from here: http://site.petitrc.com/setup/associ...tedRC10B6.html
Arn0 is offline  
Old 07-17-2016, 04:59 PM
  #1654  
Suspended
iTrader: (61)
 
Join Date: Jan 2011
Posts: 4,121
Trader Rating: 61 (100%+)
Default

Arno - he wants this one.

http://site.petitrc.com/setup/associ...gring20160430/
Socket is offline  
Old 07-17-2016, 05:01 PM
  #1655  
Tech Master
iTrader: (21)
 
suby723's Avatar
 
Join Date: May 2011
Location: Spring Hill Tennessee
Posts: 1,378
Trader Rating: 21 (100%+)
Default

Originally Posted by Socket
That would be this link..

http://www.reedyrace.com/ae/spotligh...EOS/index.html
suby723 is offline  
Old 07-17-2016, 05:02 PM
  #1656  
Tech Addict
 
Join Date: Jan 2005
Posts: 505
Default

Correction done: http://site.petitrc.com/setup/associ...gring20160430/
And Ryan's one as well: http://site.petitrc.com/setup/associ...gring20160429/
Arn0 is offline  
Old 07-17-2016, 07:16 PM
  #1657  
Tech Master
iTrader: (77)
 
Join Date: Oct 2008
Location: Mars, PA
Posts: 1,057
Trader Rating: 77 (100%+)
Default

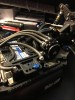
The JConcepts Aluminum wing mounts from the B5M do NOT fit the B6D. The B6D wing mounts are longer and have a narrower taper at the end to fit inside the CF shock tower. Also, the JConcepts front axle with clamping hex does NOT fit the B6D. The JConcepts axle is too short and the hole for the hex pin does not clear the B6D caster block bushing.
Wease is offline  
Old 07-17-2016, 07:23 PM
  #1658  
Tech Prophet
iTrader: (84)
 
Wildcat1971's Avatar
 
Join Date: Apr 2012
Location: Arizona
Posts: 17,388
Trader Rating: 84 (100%+)
Default

Finally got to run my b6. The car is really good. Great corner speed and the car is easy to work on.
Wildcat1971 is offline  
Old 07-17-2016, 08:40 PM
  #1659  
R/C Tech Elite Member
Thread Starter
iTrader: (40)
 
RCBuddha's Avatar
 
Join Date: Mar 2003
Location: SoCal
Posts: 2,094
Trader Rating: 40 (100%+)
Default

http://www.redrc.net/2016/07/mip-b65...t/#more-116069


RCBuddha is offline  
Old 07-17-2016, 09:12 PM
  #1660  
Tech Initiate
iTrader: (2)
 
PolarRoller's Avatar
 
Join Date: Mar 2014
Location: Slidell, Louisiana
Posts: 37
Trader Rating: 2 (100%+)
Default

Originally Posted by abailey21
Just finished wiring mine. I'm by no means good but i've found I don't like the battery strap or the waterfall for clean wiring.

I see you are using a protek 160T servo, as am I. I can't tell from the pictures but did you leave out the plastic spacers on the servo mounts?
PolarRoller is offline  
Old 07-17-2016, 09:31 PM
  #1661  
R/C Tech Elite Member
iTrader: (37)
 
abailey21's Avatar
 
Join Date: Aug 2007
Location: ATX
Posts: 5,410
Trader Rating: 37 (100%+)
Default

Originally Posted by PolarRoller
I see you are using a protek 160T servo, as am I. I can't tell from the pictures but did you leave out the plastic spacers on the servo mounts?
I did leave them out. I found it moved the servo just too far fwd and the link was level without them
abailey21 is offline  
Old 07-17-2016, 09:52 PM
  #1662  
Tech Apprentice
iTrader: (11)
 
Join Date: Oct 2015
Posts: 94
Trader Rating: 11 (100%+)
Default

Originally Posted by Chris Gierse
The B6 manual is incorrect on the cut lines. On the diagram it lists Cut Line A as the solid line. It should be the long dash. Cut Line C should be the solid line.

I have found a few other mistakes and haven't even built the kit yet. Just been looking through it.
I cut the body following line A (laydown w/shocks in rear) which looks wrong to me considering the spur gear is now completely exposed. I contacted AE and they said the manual is correct. how can that be possible?


Thank you for contacting Team Associated's Customer Support.
Based on what you are telling me the diagram is actually correct.
Cutline A shows least amount of cutting of the body to cover the spur gear while Cultine C shows the cut out for the spurgear.


just trying to confirm I am not taking crazy pills


shdwboxn is offline  
Old 07-17-2016, 09:59 PM
  #1663  
Suspended
iTrader: (61)
 
Join Date: Jan 2011
Posts: 4,121
Trader Rating: 61 (100%+)
Default

Cut line "a" is only the rear portion. You do not cut towards the spur gear, that's for cut line C.

A on the left, C on the right

Socket is offline  
Old 07-17-2016, 10:28 PM
  #1664  
Tech Apprentice
iTrader: (11)
 
Join Date: Oct 2015
Posts: 94
Trader Rating: 11 (100%+)
Default

i see now what they're getting at, but essentially A and C are backwards; the key/legend shows line A as the solid line, which in the picture shows the cutout for the gear cover/stand up transmission.
shdwboxn is offline  
Old 07-17-2016, 11:34 PM
  #1665  
Tech Regular
iTrader: (18)
 
Allen Drebi's Avatar
 
Join Date: Sep 2011
Location: Scottsdale, AZ
Posts: 337
Trader Rating: 18 (100%+)
Default

Just finished building all of this and found out our track is closing for good next week


Allen Drebi is offline  


Contact Us - Archive - Advertising - Cookie Policy - Privacy Statement - Terms of Service -

Copyright © 2024 MH Sub I, LLC dba Internet Brands. All rights reserved. Use of this site indicates your consent to the Terms of Use.