Go Back  R/C Tech Forums > General Forums > Electric Off-Road
Xray XB2 2WD Buggy Thread >

Xray XB2 2WD Buggy Thread

Community
Wiki Posts
Search
Like Tree333Likes

Xray XB2 2WD Buggy Thread

    Hide Wikipost
Old 05-04-2019, 06:44 PM   -   Wikipost
R/C Tech ForumsThread Wiki: Xray XB2 2WD Buggy Thread
Please read: This is a community-maintained wiki post containing the most important information from this thread. You may edit the Wiki once you have been a member for 90 days and have made 90 posts.
 
Last edit by: dgrobe2112
Instruction manuals: (C/O BentKa)

Xray XB2 Carpet Edition Instruction Manual
http://www.teamxray.com/xb2/2016/dow...ual_v2_low.pdf

Xray XB2 Dirt Edition Instruction Manual
http://www.teamxray.com/xb2/2016/dow...w.pdf?update=2

BentKa: Carpet Edition 4 gear to 3 gear laydown conversion parts:
  • Gearbox #323014
  • Motorplate #324012
  • 36T idler gear #324236
  • Brace for waterfall #324031


Socket: Bodies Available:

Xray has two OEM bodies, the .75mm and the .50mm light weight:
light weight: https://www.amainhobbies.com/xray-xb...329701/p492942

OEM .75mm: https://www.amainhobbies.com/xray-0....329700/p477762

Also, I've fitted the yz2 body, both the light and regular fit fine, just make your own cut lines:
https://www.amainhobbies.com/yokomo-...z2-101/p417674


[i] J Concepts S2 Body [i]


Penguin Racing makes a high grip body that fits the DE and CE:
http://www.ebay.com/itm/X-Ray-Xb2-Hi...oAAOSw1S9WewHV


Socket: Wheel fitment:

According to some, you'll require different offset rear hexes to use B5M wheels. According to my Hudy setup board, B5M wheels are the same offset. I measured the overall width of the car with XB2 wheels, and then again with B5M wheels, same measurement.

On the front, B5M wheels were 1.5mm wider. Xray offers hexes to reduce width -.75 on each side, or you could spend 3-5 minutes and sand your OEM hexes down .75mm.

edit by dgrobe2112
here are the hubs for losi and AE

for AE Front 365354 -0.75
for Losi rear 365358 +3.00 (4 stripe)
for AE rear 365359 +3.75 (5 stripe) or add 1.5mm carbon avid spacers


Socket: Flex and the XB2:

Flex screws are as follows:

Plastic bulkhead between motor and waterfall. Can remove screw in chassis, or remove bulkhead altogether.

Waterfall has 4 screws, can remove the inner two or outer two. IIRC, removing the inner two provides more flex, and thus more bite.

Removing the battery brace. This gives a tremendous amount of flex on the middle of the car, and can sometimes be inconsistent. I do this for outdoor racing on low bite. I like the feel over the 4 gear in 17.5 racing, since the 4 gear will take some snap away off the corner.

Rear C block - has inner and outer screws. I haven't played with this, as it's a crucial pivot point of the car.

Medium arms and towers -> I don't believe the carpet car has the rear medium tower available, however the DE DOES have an optional hard part. I think the hard parts are more consistent, especially when it gets hot (90+ degrees F). However, the medium parts do NOT break unless you're severely talented. They also don't wear out.


Socket: Avid/Schelle Slipper mod:

Credit to WillS, Matt Trimmings, and myself for figuring this out months ago.

Parts you'll need:

B5M V2 3gear compatible top shaft.
TKO Special 5x13x5 bear OR 5x13x6 bearing Either can work. This replaces the spur side bearing on the top shaft.
5mm shims, same shims used in 1/8th scale clutch bells. Look for protek .1mm and .2mm kit.
Avid or Schelle b5m top shaft kit, with spur gears of your choosing. (DE can't handle a 69, the CE can)

Shimming: You'll need to install the bearing in the front portion of the removable piece for the shaft. Make sure the bearing is pushed all the way in. With the TKO bearing, you'll need to shim approximately 1.4mm on the front side of the top shaft. Roughly .3-.5mm with the other bearing. This is a "feel" and tolerance setting. I urge you to watch videos about setting clutch bell play in 1/8th scale to get an idea of what yield you want for end play. Too tight, it'll eat bearings.

Outside of trans case: Use Avid/Schelle top shaft spacer plus .2mm shim to offset slipper from motor plate perfectly. Install slipper as instructed, and use Avid/Schelle spring and XB2 slipper nut.

- NEW - Schelle now sells Xb2 Topshafts. They include a spacer, so no need for shims in gearbox, and comes with the smaller bearing. Both methods work.

Socket: Yokomo Differential or MIP pucks:

Credit to: WillS for figuring out pucks, and as well fitting the Losi 22 diff with the same mods.

Parts needed: Yokomo Bmax2 or YZ2 complete diff OR Mip PUCKS outdrives
Xb2 diff gear
Bmax2 V3 Worlds rear dog bones, or Bmax 2 pucks dog bones
You'll use XB2 axles, and will require no other mods for the axles or dog bones.
You'll need .2mm outdrive/diff shims. Shim approximately .5mm on each side of the diff, behind the bearings. The top portion of the transmission is what "sets" the diff in place, not the bottom half. A little play back and forth is fine, the stock diff has some play from the factory.

dgrobe2112: CE to DE conversion:
along with the parts needed.. you MUST have these following hardware, or it wont work

https://www.teamxray.com/xb2/2016/do...conversion.pdf

(3) XRAY 902340 M3x40 button head screws. these are the screws that mount the motor mount to the tranny
(4) XRAY 903322 M3x22 counter sunk screws. these are for the rear diff case, to mount to the chassis. i think i used some M3x18 and they worked ok.

Socket: Best method for setting up the XB2 ball diff:

The XB2 diff is stellar when setup correctly. The spring is too short and soft, allowing the diff to slip. You'll need to glue the rings to the outdrives with just a drop of CA, then add a 1mm shim between the spring and the outdrive. This preloads the spring and stops the diff from slipping so easily.

OR, you can run the AE diff spring, which is both slightly longer, and stiffer. The overwhelming issue is the stock spring allows the nut to bottom out on the outdrive before the diff is tight enough.

This shim:
https://www.amainhobbies.com/xray-al...a303122/p12070

This diff spring (don't need a shim, then.)

https://www.teamassociated.com/parts...thrust_spring/

Functional Aftermarket parts: (Not just bling!)

Servo Horn: (The B5M sized horns are too short to get full throw)
https://www.amainhobbies.com/protek-...800-bk/p273496


Socket: Exotek has a full suite of parts, some bling, some not. Here's a list (all fit DE and CE, unless otherwise noted):

Titanium front axles: http://www.exotekracing.com/xb2-titanium-front-axles-2/

Rear Hanger, HD (Adds 4 grams): http://www.exotekracing.com/xb2-rear...75-heavy-duty/

Brass C block, 18 grams added: http://www.exotekracing.com/xb2-rear...-brass-weight/

Alloy front camber mount: http://www.exotekracing.com/xb2-fron...er-mount-7075/

Carbon Fiber Chassis: http://www.exotekracing.com/xb2-carb...m-plate-2-5mm/

Alloy rear hubs:http://www.exotekracing.com/xb2-allo...ub-set-2-7075/

Alloy servo mounts, allow for use of LP servo:http://www.exotekracing.com/xb2-xb4-...-alloy-1-pair/

Titanium shock mounts: http://www.exotekracing.com/xb2-xb4-...shock-posts-2/

Slipper Eliminator: http://www.exotekracing.com/xb2-direct-spur-mount/
Xray eliminator is #324100

dgrobe2112: 2016-2017 new 3 gear laydown
Gearbox #323014
Motor plate #324012
36T idler gear #324236
Brace for waterfall #324031

dgrobe2112: Xray Spring Rate Conversion:
front C WHT
368174 2 str 0.65-0.85 3.71-4.85

358184 2 dot 0.65 3.71
368185 3 dot 0.72 4.11
368186 4 dot 0.80 4.57


Rear
368273 2 str 0.35-0.45 2.00-2.57

368284 1 Dot 0.35 2.00
368285 2 Dot 0.40 2.28
368286 3 Dot 0.45 2.57
368287 4 Dot 0.50 2.86

Print Wikipost

Thread Tools
 
Search this Thread
 
Old 12-13-2016, 10:18 PM
  #4246  
JAE
Tech Master
iTrader: (30)
 
Join Date: Jun 2015
Posts: 1,974
Trader Rating: 30 (100%+)
Default

Difference between 3k - 5k diff oil on clay? Wondering what practical effects are with minor changes in diff oil for this buggy. Thx!
Originally Posted by symmetricon
Thanks
JAE is offline  
Old 12-14-2016, 06:50 AM
  #4247  
Tech Regular
iTrader: (4)
 
Pville Stig's Avatar
 
Join Date: Feb 2016
Location: Texas
Posts: 401
Trader Rating: 4 (100%+)
Default

Originally Posted by JAE
Difference between 3k - 5k diff oil on clay? Wondering what practical effects are with minor changes in diff oil for this buggy. Thx!
It gives the car more low speed steering and rotation in corners. You can get into the throttle earlier coming out of the corners.
Pville Stig is offline  
Old 12-14-2016, 09:49 AM
  #4248  
Tech Regular
iTrader: (5)
 
Join Date: Nov 2003
Location: Venice Beach
Posts: 363
Trader Rating: 5 (100%+)
Default

Originally Posted by JAE
Difference between 3k - 5k diff oil on clay? Wondering what practical effects are with minor changes in diff oil for this buggy. Thx!
3k to 5k will have less steering in the middle of the turn, but more forward traction exiting. And vice-versa.
LAGuy is offline  
Old 12-14-2016, 11:52 PM
  #4249  
JAE
Tech Master
iTrader: (30)
 
Join Date: Jun 2015
Posts: 1,974
Trader Rating: 30 (100%+)
Default

Thx! 5k did not rotate very well. Will try 3k

Originally Posted by LAGuy
3k to 5k will have less steering in the middle of the turn, but more forward traction exiting. And vice-versa.
JAE is offline  
Old 12-16-2016, 06:56 AM
  #4250  
Tech Elite
iTrader: (27)
 
symmetricon's Avatar
 
Join Date: Jun 2009
Location: houston
Posts: 4,882
Trader Rating: 27 (100%+)
Default

Any of you guys play around with running the xb4 alu hubs? They allow you to shim the hubs forward an extra 2 mm, however they move the axle inwards 2mm also so you need to consider that...
symmetricon is offline  
Old 12-16-2016, 09:35 AM
  #4251  
Tech Addict
iTrader: (7)
 
RedBMaster's Avatar
 
Join Date: Jul 2011
Location: Nashville, TN
Posts: 506
Trader Rating: 7 (100%+)
Default

Originally Posted by KyJoe340
RedBMaster,
Could you post the setup you have for your XB2 at Thunder Raceway. I get there just a few times a year but in the past whatever you're driving looks spot on. Thanks
Yeah, I'll post what I ran for TISOC, tho it still needs a bit of work. I have a feeling the kit 3 pad slipper is a bit much. Going to try to convert it to a 2 pad. Hoping to take away the initial force needed to engage the slipper.
RedBMaster is offline  
Old 12-17-2016, 08:02 PM
  #4252  
Tech Master
iTrader: (5)
 
mustangkillaz's Avatar
 
Join Date: May 2004
Posts: 1,155
Trader Rating: 5 (100%+)
Default

I just installed a slipper eliminator kit, this will be interesting. Xray pinion gears are priced out of this world, went with something half price, still high grade 7075-T6.

I have yet to get mine out in the track. I've gotta finish painting the body.

I have a rear sway bar I wanna install, but I'll run it first and see how it goes without.
mustangkillaz is offline  
Old 12-18-2016, 06:31 AM
  #4253  
Tech Elite
iTrader: (27)
 
symmetricon's Avatar
 
Join Date: Jun 2009
Location: houston
Posts: 4,882
Trader Rating: 27 (100%+)
Default

Alright, it has been a while since I ran this car, I could never really get it how I wanted truth be told. It was either fast but hard to drive or easy to drive but not on pace. Watching the new rb6.6 and b6 3 gear laydown cars I knew it was possible to get the XB2 hooked. After spending some time looking at the differences between the b6 and rb6.6s, I applied what they were doing to get their cars hooked up to my XB2.

I spent most of Friday and all of Saturday testing and can now say my car is excellent and am more than satisfied with my 3gear laydown XB2. I'll do an in depth write-up later. I'm heading to the track in a bit to optimize my setup but I am super excited with the performance thus far.
symmetricon is offline  
Old 12-18-2016, 06:40 AM
  #4254  
Tech Champion
iTrader: (76)
 
tony montana's Avatar
 
Join Date: Aug 2002
Location: Leonardtown Md.
Posts: 6,409
Trader Rating: 76 (100%+)
Default

Yes please share your findings
tony montana is offline  
Old 12-18-2016, 07:58 PM
  #4255  
Tech Elite
iTrader: (27)
 
symmetricon's Avatar
 
Join Date: Jun 2009
Location: houston
Posts: 4,882
Trader Rating: 27 (100%+)
Default

Alright, when I first built the 4 gear laydown and scaled it I thought that the weight bias might be an issue.

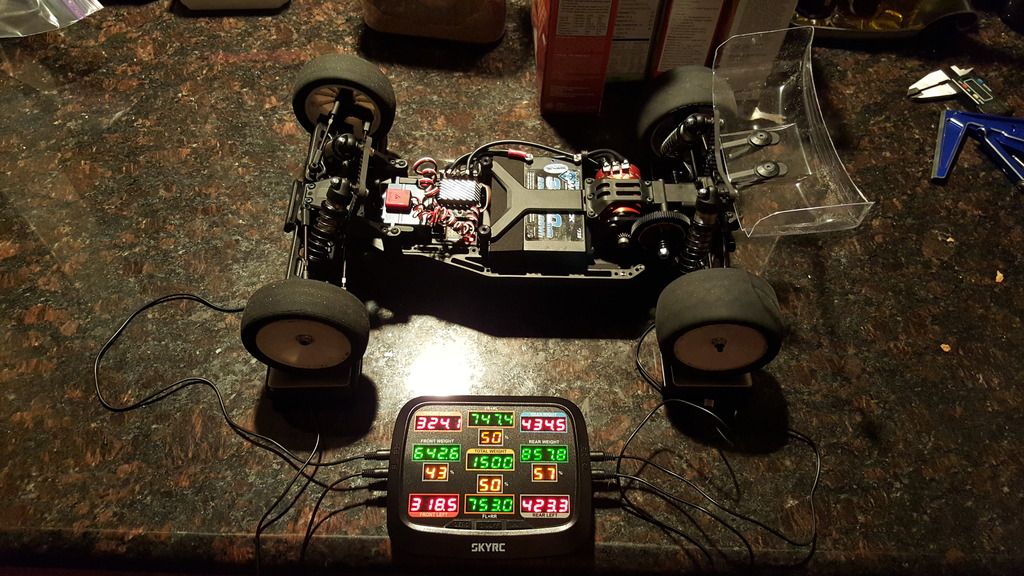
43/57 is too light in the rear imo for clay. From what I've seen, most the standard mid motor configurations are around 40/60.
On the track it was difficult to get a balanced setup.
symmetricon is offline  
Old 12-18-2016, 08:07 PM
  #4256  
Tech Elite
iTrader: (27)
 
symmetricon's Avatar
 
Join Date: Jun 2009
Location: houston
Posts: 4,882
Trader Rating: 27 (100%+)
Default

I then tried the standard dirt mid motor configuration and got the weight bias I want but with the amount of traction we had it was on the edge of traction rolling and didn't corner as fast as some of the laydown cars.
symmetricon is offline  
Old 12-18-2016, 08:07 PM
  #4257  
Tech Elite
iTrader: (27)
 
symmetricon's Avatar
 
Join Date: Jun 2009
Location: houston
Posts: 4,882
Trader Rating: 27 (100%+)
Default

On top of that, all the laydown cars at my track were running 3 gear laydown not 4 gear. So my goal was to get the 3 gear laydown and get 40/60 weight bias.
symmetricon is offline  
Old 12-18-2016, 08:17 PM
  #4258  
Tech Elite
iTrader: (27)
 
symmetricon's Avatar
 
Join Date: Jun 2009
Location: houston
Posts: 4,882
Trader Rating: 27 (100%+)
Default

I started to look at the b6, the new serpent, the rb6.6 laydown cars, ect ect. They seemed to have that 40/60 weight bias. All the cars were relatively the same in terms of motor placement. How did they get that weight bias? Well, there seemed to be 2 distinct ways, either the car had forward arm sweep giving a greater rear bias, i.e. the serpent or b6, or the a-arms and hubs could be shimmed forward more so than the forward swept arms i.e. the 22 3.0 and rb6.6, the rb6.6 could be shimmed 6mm front to back.
symmetricon is offline  
Old 12-18-2016, 08:21 PM
  #4259  
Tech Elite
iTrader: (27)
 
symmetricon's Avatar
 
Join Date: Jun 2009
Location: houston
Posts: 4,882
Trader Rating: 27 (100%+)
Default

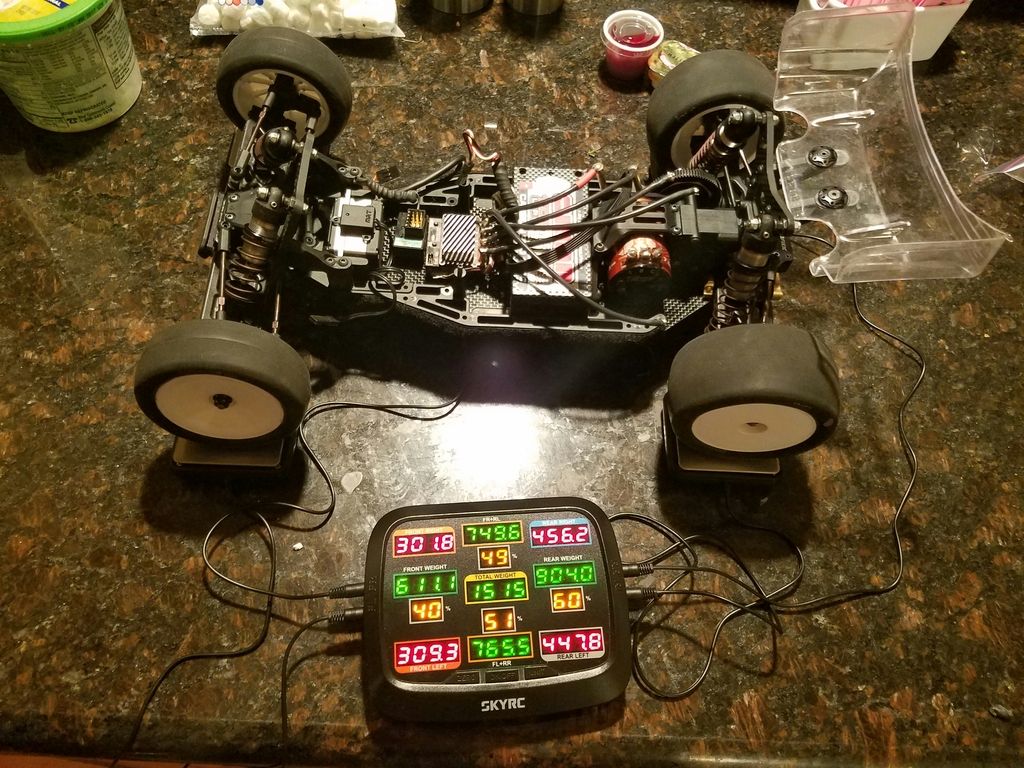
I was able to get my 40/60 weight bias without adding any more weight than the C and D block, some minor dremel work and the XB4 aluminum rear hubs and a 25g weight plate under the battery.


I dremeled 1mm off the front of the rear a-arms to shim them forward.


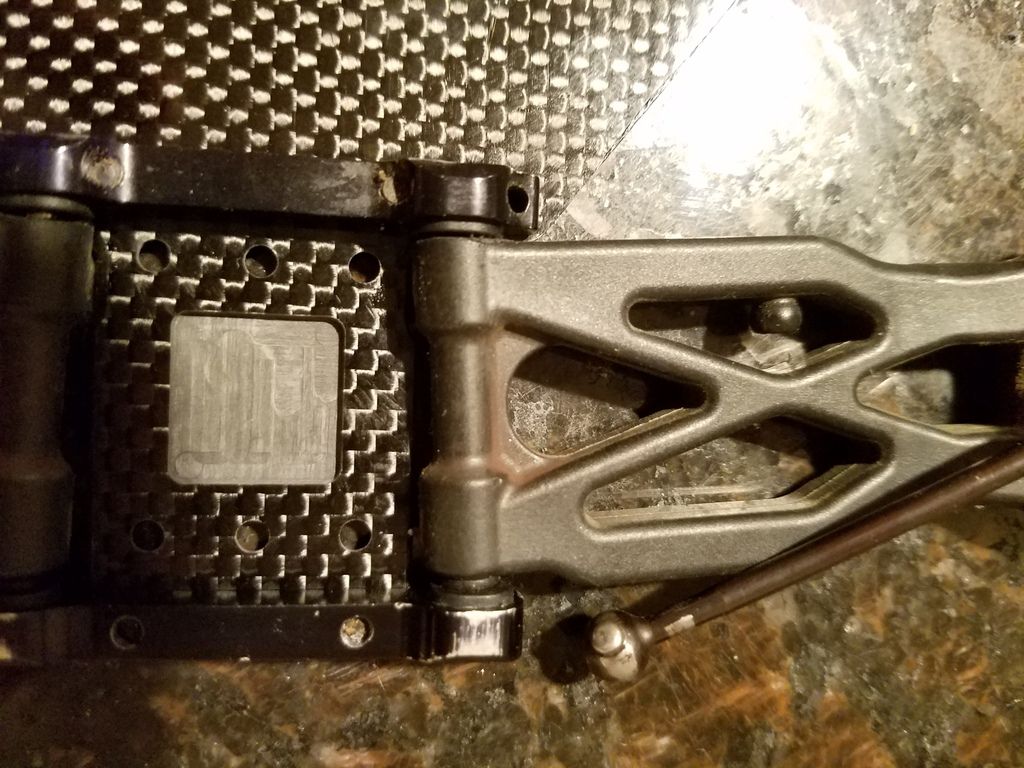
And then added the xb4 or XB2 hubs to gain an additionall 2mm.


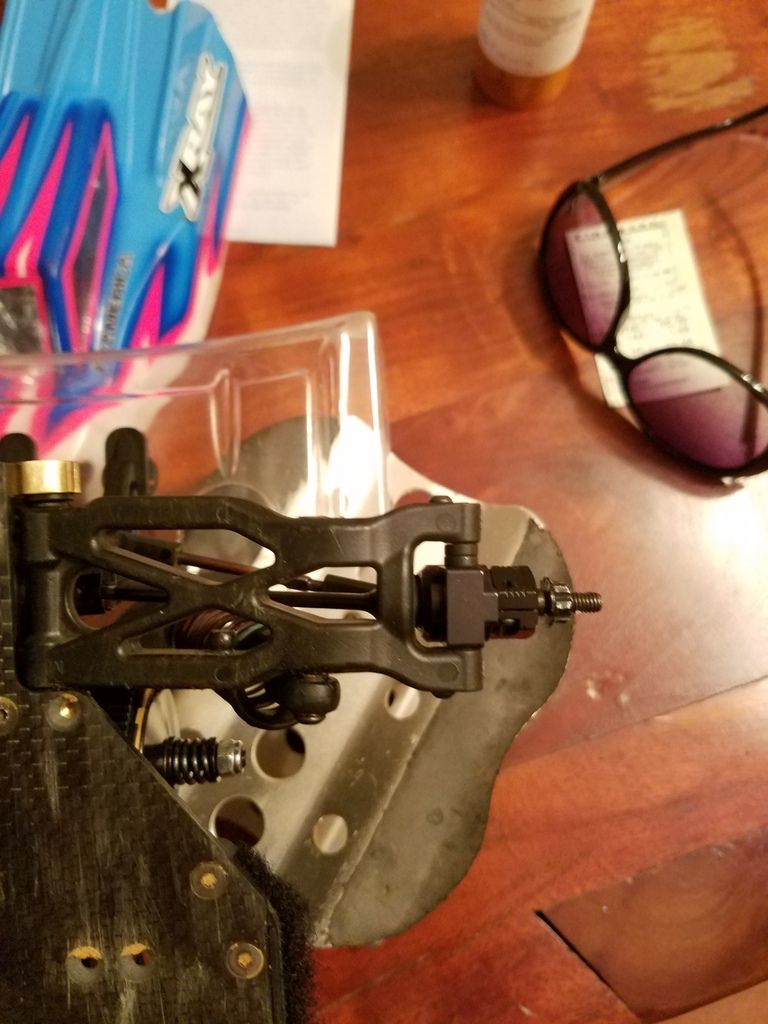
The xb4 hubs move the driveshafts approx 2mm in torwards the diff and would bottom out at full compression so I had to widen the track width at the C and D block to offset the driveshat plunge.

FYI, it was confirmed that the XB2 aluminum hubs offer the same additional 2mm of shimming that the XB4 hubs have, I had the XB4 hubs on hand so I used them but will be getting the XB2 aluminum hubs...

Last edited by symmetricon; 12-19-2016 at 08:52 PM.
symmetricon is offline  
Old 12-18-2016, 08:43 PM
  #4260  
Tech Elite
iTrader: (27)
 
symmetricon's Avatar
 
Join Date: Jun 2009
Location: houston
Posts: 4,882
Trader Rating: 27 (100%+)
Default

I picked up a suspension setup off the Xray XB2 Fakebook page. The setup called for the front to have yok yatabe orange 1.6x2 500cst front upper position 2 lower 3, and the rear to have yok yatabe green 1.7x2 450cst. It was good and close to how I'd want it to be. Tons of steering and great rear grip, no traction rolling either.

From here I did a bunch of testing and fine tuning with the car to get it on point, the car is on pace and drives excellently now. I'm extremely satisfied with how it drives and cant wait to wheel it more will full confidence in the car. I'll post a full setup tomorrow...
symmetricon is offline  


Contact Us - Archive - Advertising - Cookie Policy - Privacy Statement - Terms of Service -

Copyright © 2024 MH Sub I, LLC dba Internet Brands. All rights reserved. Use of this site indicates your consent to the Terms of Use.