


 219Likes
Tekno RC SCT410.3 Thread

 09-05-2022, 08:19 AM - Wikipost
|
|||
|
|||


 05-13-2015, 06:44 AM
#781
I have not used them yet. I run Fioroni pistons in my .1 though.
Last edited by rjohn929; 05-13-2015 at 07:30 AM.
 05-13-2015, 07:04 AM
#782
I think somewhere else in this thread someone put the Lunsford 410 links and EB ends (same as SCT410) on his kid's .3 for more durability.
Last edited by Tijuana_Taxi; 05-13-2015 at 07:15 AM.
05-13-2015, 07:14 AM
#784
http://www.teknorc.com/shop/tkr5187-...nbetnt48-8pcs/
and the bent ones
http://www.teknorc.com/shop/tkr5051-...er-links-8pcs/
since the .3 has a couple of those on the camber links.
The steering links and ends are the same between the two.
05-13-2015, 08:07 AM
#785
Tech Apprentice
I know some peeps will be sick to hear this,
But after 3 wks from receiving this kit im starting the build.
Is there anything, not listed on page 1 concerning the build. Plan on racing Sun n don't want to screw up haha
But after 3 wks from receiving this kit im starting the build.
Is there anything, not listed on page 1 concerning the build. Plan on racing Sun n don't want to screw up haha
05-13-2015, 08:47 AM
#786

I had no issues on building the kit. My only recommendation is to use a reamer to open up the rod end holes to get the rods started easier. A little black grease or chapstick will make it easier to adjust them later as well.
Other than that it's a great build.
Other than that it's a great build.
05-13-2015, 09:06 AM
#787
Tech Master
I also use a drill/power driver to start the screws threaded for the diffs, and other long screws, just make sure if using a drill the clutch is VERY weak so you don't strip out the hole. Do this before assembling any of the diffs. It'd suck to realize it after you have oil in, and trying to assemble.
I also use the drill on the camber & steering links, just pay attention to the thread direction.
 a little grease helps in the hole.
05-13-2015, 09:18 AM
a little grease helps in the hole.
05-13-2015, 09:18 AM
#788
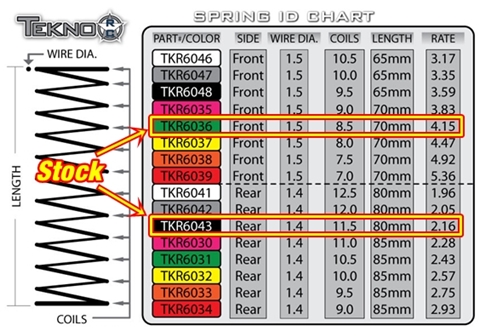
So i was wondering what colar is the shock springs both front and rear are same coler ,black ,i have seen some say pink came with there set. Am i missing somthing?
05-13-2015, 09:31 AM
#789
The kit springs are green frt, black rear. There should be a little bit of green paint on one end or the other of the frt springs.
05-13-2015, 09:31 AM
#790
Tech Apprentice
Thx for replys, a reamer is my bff during builds....but still managed to strip to diff screws....n thx for the greasing rod ends tip....
05-13-2015, 11:01 AM
#791
You need the SCT410 rod ends, the .3 are smaller diameter links and ends. To make it exactly like the .3 you would probably want to get these
http://www.teknorc.com/shop/tkr5187-...nbetnt48-8pcs/
and the bent ones
http://www.teknorc.com/shop/tkr5051-...er-links-8pcs/
since the .3 has a couple of those on the camber links.
The steering links and ends are the same between the two.
http://www.teknorc.com/shop/tkr5187-...nbetnt48-8pcs/
and the bent ones
http://www.teknorc.com/shop/tkr5051-...er-links-8pcs/
since the .3 has a couple of those on the camber links.
The steering links and ends are the same between the two.
05-13-2015, 11:19 AM
#792
Well i think i striped all 3 out 4 front ones so will order more when i change the fluid after i run it for a bit along with gaskets ,im glad that I'm not the only ones to have the same issuie
05-13-2015, 11:25 AM
#793
05-13-2015, 11:28 AM
#794
A 4mm reamer will come in handy to make sure there's no binding of the arms. I didn't have the issue on my first one, but many did. I did have that issue here through.
I also use a drill/power driver to start the screws threaded for the diffs, and other long screws, just make sure if using a drill the clutch is VERY weak so you don't strip out the hole. Do this before assembling any of the diffs. It'd suck to realize it after you have oil in, and trying to assemble.
I also use the drill on the camber & steering links, just pay attention to the thread direction. a little grease helps in the hole.
Whoa, Mr Pike has a tekno. Can't wait to see your future posts. Your tips have came in very helpful.
I also use a drill/power driver to start the screws threaded for the diffs, and other long screws, just make sure if using a drill the clutch is VERY weak so you don't strip out the hole. Do this before assembling any of the diffs. It'd suck to realize it after you have oil in, and trying to assemble.
I also use the drill on the camber & steering links, just pay attention to the thread direction.
a little grease helps in the hole.Whoa, Mr Pike has a tekno. Can't wait to see your future posts. Your tips have came in very helpful.
Thanks
05-13-2015, 01:01 PM
#795
Tech Adept
iTrader: (3)
Built shocks to kit specs as emulsion. Ran for the first time yesterday and noticed the rear is slapping on take off from our biggest jump. Ride height was put to 28mm rear. When going over rough portions of the track, you can see the rear not rebounding fast enough to stay in contact.
I'm thinking i should build rear as sealed bladder type with 50% rebound built in. What do you guys think?
I'm thinking i should build rear as sealed bladder type with 50% rebound built in. What do you guys think?