


 24Likes
SC10 Thread Part 2
 09-03-2018 | 07:12 PM
#4321
Shock oil, ramp approach, lip of jump, body, throttle control...lots of possibilities. I recently had a day at the track with headwinds kicking up...I was outside of course. Having two SC10 platforms to run, each with a different body, gave me a chance to compare. One SC10, with stock Contender body and no vent holes, flew like doo doo. The other SC10 with Pro-Line EVO SC body gave me much better attitude during flight. Those vents on the EVO body helped immensely. I will confess, running outdoors is a gamble. At times no amount of body venting, or throttle control will help when a big breeze comes at your ride...hang on and hope for the best.
 09-06-2018 | 09:01 PM
#4323
Tech Rookie
Joined: Mar 2016
Posts: 5
Using the ballast weight is a tuning option, but it is almost always used in setups that I've seen. Depending on the track's bumpiness, additional weight may be needed to smooth out the ride. I haven't raced on hard packed clay in years, but my backyard track is a rough riders joy. My SC10, running the FT ballast weight, is night/day with 3.75 oz 3 oz. additional weight added to it. I'm in the process of adding weight to my SC10.2 to try and get it to feel like my smoother handling SC10FT with non big-bore shocks.
If I was running a 17.5T motor, then I'd be looking to dump all the extra weight that I had, and work with suspension tuning.
If I was running a 17.5T motor, then I'd be looking to dump all the extra weight that I had, and work with suspension tuning.
09-07-2018 | 06:03 AM
#4324
Tech Regular
iTrader: (1)
Joined: Nov 2012
Posts: 267
From: NE Illinois
Thank you for the ballast advice. I will try with and without and report my average lap times on the High Traction clay track. I am not running Stock Class but that does make sense about removing weight. I always wondered why there was this big ballast weight at the same time trying to shave weight from every part you can. The only thought I had was that maybe stock class has a weight restriction like in pine wood racing, and that you wanted to be able to move the most amount of weight where you needed it most.
09-07-2018 | 12:46 PM
#4325
I've seen all kinds of places where people would put added weight to their SC. The one that got me scratching my head was the added weight off of one guy's rear bumper. To me, that would have me thinking it would act like a pendulum, and kick your SC's rear end out more often than not. Like I said before, it's just a way of fine tuning. Different driving styles need different setups. For me, it's not that important, but I try and keep my stick on weights as low and centralized as possible.
09-20-2018 | 01:05 AM
#4326
Is there a guide to weight tuning somewhere? Maybe it's just because this is my first SCT and I only had experience with buggies and stadium trucks before that, but my SC10 seems very sensitive to inputs. A tiny bit too much or too little throttle, or a tiny bit too early or too late, and the truck is slamming its tail or nose on the ground when landing.
09-20-2018 | 06:16 AM
#4327
Tech Fanatic
iTrader: (9)
Joined: Aug 2015
Posts: 778
Is there a guide to weight tuning somewhere? Maybe it's just because this is my first SCT and I only had experience with buggies and stadium trucks before that, but my SC10 seems very sensitive to inputs. A tiny bit too much or too little throttle, or a tiny bit too early or too late, and the truck is slamming its tail or nose on the ground when landing.
Last edited by a1; 09-20-2018 at 09:21 AM.
09-20-2018 | 10:37 AM
#4328
I have never see a guide to weight tuning, had sc10 for 5 years. Best i can tell you is go to petitrc. Look up their setup pages on sc10. Find a similar track ,grip ,smooth, bumpy. Open up a couple of different set ups and compare where using weight. The great thing about sc10 is that there are tons of set up sheets. Sc10 . Folks usually like weight below tower, weight at triangles, my trucks have responded nicely to added weight
09-20-2018 | 02:10 PM
#4329
Tech Fanatic
iTrader: (9)
Joined: Aug 2015
Posts: 778
RC10 B4 - Charlie Perez' Setup Hints
R/C Car Handling - An Introduction To Vehicle Dynamics
Indoor Tire Prep 101
09-23-2018 | 09:47 PM
#4330
ok, so I shredded my idler last week (that was fun, picking bits of gear tooth out of the other gears) and was looking up why. Comments here and on other sites suggest the slipper was too tight. How do I tell how tight to set it? I put a new idler in and reassembled the tranny, and now I need to adjust the diff so it doesn't do that again.
09-24-2018 | 03:30 AM
#4331
First, when tightening down the tranny bolts, I make sure there is no unnecessary force needed to turn tranny by hand. I like to adjust the slipper clutch at the track/surface I'm running on. Or if my RC is clean, I'll adjust slipper in house; on the carpet for a great baseline setting...slipping for about 2' when pulling trigger to full throttle. This way, when I go to the track and get into some loose conditions, I can still induce some rear end fishtailing fun on my 2wd platforms.
You'll see some folk holding down both rear tires, and trying to get the front end lift off the ground when pulling the trigger full throttle. Not the best idea, especially for 2wd short course trucks as the front end is considerably heavier than a buggy, or stadium truck. Doing so puts too much unneeded stress on diffs/tranny. I push my RCs away from me, then yank on the throttle while listening for the slippage I want. The video below (@ 7:28) is basically how I always set my slipper clutch on all my RCs.
You'll see some folk holding down both rear tires, and trying to get the front end lift off the ground when pulling the trigger full throttle. Not the best idea, especially for 2wd short course trucks as the front end is considerably heavier than a buggy, or stadium truck. Doing so puts too much unneeded stress on diffs/tranny. I push my RCs away from me, then yank on the throttle while listening for the slippage I want. The video below (@ 7:28) is basically how I always set my slipper clutch on all my RCs.
Last edited by rustyus; 09-24-2018 at 01:53 PM.
09-24-2018 | 10:44 AM
#4332
Thanks. I did make sure the tranny could be turned easily by hand, although I was surprised at just how loose that required the screws to be. I'll be checking a few times when I get to the track to make sure they don't come out, and maybe picking up some purple Loctite. I'll see if I can get it to slip for about 2'. I should have expected that it was too tight from the factory with how easily it pulled wheelies. Thanks again!
09-27-2018 | 02:35 PM
#4333
Another question: Does anyone else run DE Trinidad wheels? If so, what socket or nut driver do you use? I can't get any of mine to fit inside the recess of the wheel, except for the plastic one that came with the truck, and that's only if I push hard enough to squish the plastic down a little. Might try trimming it away a little.
01-20-2020 | 01:26 PM
#4335
So, parts are drying up fast. The good stuff is gone, unless you want to pay dearly to have an essential part shipped/imported from different parts of the world. I am currently trying to extend the life of parts that I have for my SC10s. Finally got around to replacing a few dogbone pins on my CVA/CVDs.
I was going to go with a RC specific tool for removing 2.5mm pins, but was told, by the company, there was a greater risk of breaking the tool while trying to use it on T4/B4/SC10 3/32 (2.38mm) pins. I opted to use a lower cost motorcycle chain breaker for my first go around at removing pin. Worked real well. After receiving the chain breaker in the mail, and setting it up,I was able to press a worn out pin through the ball of the dogbone within 30 seconds.
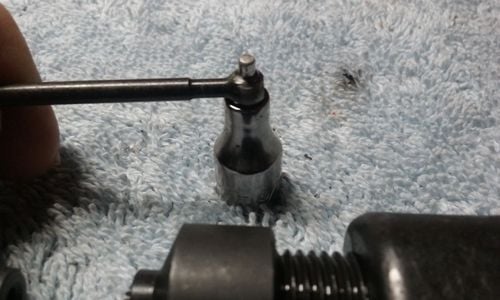
Putting new pin in...I took a different approach. I placed the dogbone on top of 5/32 (or 4mm) socket, and used a hammer to tap new pin in.


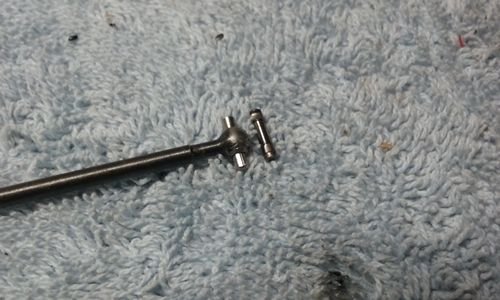
I was going to go with a RC specific tool for removing 2.5mm pins, but was told, by the company, there was a greater risk of breaking the tool while trying to use it on T4/B4/SC10 3/32 (2.38mm) pins. I opted to use a lower cost motorcycle chain breaker for my first go around at removing pin. Worked real well. After receiving the chain breaker in the mail, and setting it up,I was able to press a worn out pin through the ball of the dogbone within 30 seconds.
Putting new pin in...I took a different approach. I placed the dogbone on top of 5/32 (or 4mm) socket, and used a hammer to tap new pin in.