Go Back  R/C Tech Forums > General Forums > Electric Off-Road
Team Associated B6 & B6D thread >

Team Associated B6 & B6D thread

Community
Wiki Posts
Search
Like Tree649Likes

Team Associated B6 & B6D thread

    Hide Wikipost
Old 06-07-2017, 10:46 AM   -   Wikipost
R/C Tech ForumsThread Wiki: Team Associated B6 & B6D thread
Please read: This is a community-maintained wiki post containing the most important information from this thread. You may edit the Wiki once you have been a member for 90 days and have made 90 posts.
 
Last edit by: RCBuddha
Welcome to the B6 Wiki!

Quick links to all the sections on the first page!

Frequently asked questions - the most common questions you may have answered here!

Aftermarket Parts - parts for the B6 and B6D

Tech Tutorials- tuning guides, ball diff and shock building videos and tutorials

How to's and build-specific posts

Team Associated Laydown transmission conversion for B6D:
Laydown conversion

Instruction Manuals:

B6: B6 Manual and setup sheets

B6D: B6D Manual and setup sheets

How to Sand and Seal carbon fiber:
Sanding and sealing carbon fiber
Sanding and sealing carbon fiber 2
Sanding and sealing carbon fiber 3
Sanding and sealing carbon fiber 4

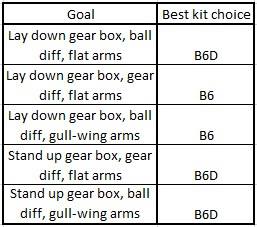
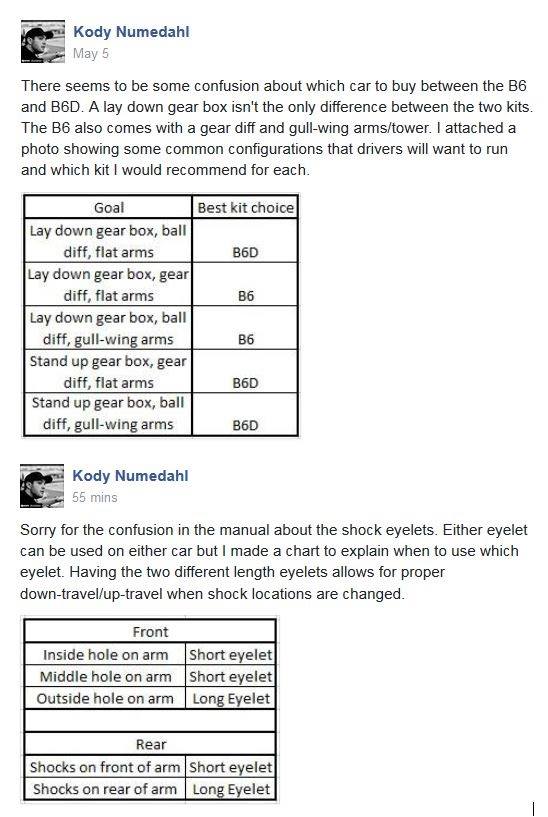
Charts for Quick reference:


1) put inner bearing in hub
2) slide large shim over axle all the way up to the back of the axle
3) slide axle/bone into hub carrier
4) slide small shim onto axle through hub carrier
5) push outter bearing into hub carrier

using that i'm able to put my normal male silverback gorilla wheel nut tightening job and there's no binding. in the pictures that come with the shims (the pic socket posted) it seems like they want you to slide both shims onto the axle before sliding the axle into the hub carrier and like i said, that doesn't work.


I've traditionally done the diff screw head on the left side (driver's side), but have since switched to the Right side (passenger side) regardless of transmission type (3 gear RM vs 3 gear MM and 4 gear MM).

Kdub (Kurt Wenger, former AE designer) had this to say on the matter:

Originally Posted by kdub
I think I count as an authority on the matter. I always run my diff screw on the right side (when sitting "inside" the car). I take off the tire and pull the outer hinge pin to get to the adjustment screw.

The right rear is the way the AE manuals state (or used to state). It really shouldn't matter since you go around turns both left and right.
B6D 3-gear:

Print Wikipost

Thread Tools
 
Search this Thread
 
Old 04-22-2017, 01:30 PM
  #6421  
Tech Regular
iTrader: (5)
 
Join Date: Apr 2012
Location: okc,ok
Posts: 483
Trader Rating: 5 (100%+)
Default

Our track is clay but a car that is aroud 1540 grms works a Lot better than a car at min weight. 30 grms makes a big differance on our traks in 2wd stock buggy.
sgtlt is offline  
Old 04-22-2017, 02:33 PM
  #6422  
Tech Initiate
 
Join Date: Oct 2016
Posts: 28
Default

You could skip the c and D mounts and just move the battery back, I run the brass bulkhead and steel plate under the electronics and didn't have issues with it being nose heavy, but I'm not running stock. I also have the aluminum rack and Bell cranks.
mike101 is offline  
Old 04-22-2017, 03:07 PM
  #6423  
Tech Master
iTrader: (19)
 
Slapjack's Avatar
 
Join Date: Dec 2014
Posts: 1,065
Trader Rating: 19 (100%+)
Default

Originally Posted by Thrifty
Use your practice days to see what setup weight wise works for your driving style.
Thing is I don't have the weights. All those weights I mentioned would run me like $70 and that's a lot just to spend On weights so wanted to see if anyone has had a Similar setup for tighter track and whether or not it worked good. But I guess It's going to be different for everybody's driving style so I may just have to bite the bullet And buy all the weights And just test and tune
Slapjack is offline  
Old 04-22-2017, 04:42 PM
  #6424  
Tech Regular
iTrader: (11)
 
Thrifty's Avatar
 
Join Date: Jul 2016
Posts: 285
Trader Rating: 11 (100%+)
Default

A lot of the issue would be solved with setup.. but if I read your post right, you haven't run the track yet... I'd pick up some of those stick on weights and after running as is, use a couple of those in the areas where you think one of those weights would work for you,.. then you can buy the ones specifically made for the area...
Thrifty is offline  
Old 04-22-2017, 04:42 PM
  #6425  
Regional Moderator
iTrader: (48)
 
Jon Carlson's Avatar
 
Join Date: Jun 2002
Location: North Dakota
Posts: 2,918
Trader Rating: 48 (100%+)
Default

Personally I would start with the chassis weights. It also depends on what your car is doing now, is it loose? Do you have the battery all the way back already? If yes, try the brass C block. If you like the way it drives now, try the steel speedo plate. That will be the smallest weight bias change you could make. And of course if you want steering, try the brass or aluminum front bulkhead. I hope that helps.
Jon Carlson is offline  
Old 04-23-2017, 02:33 AM
  #6426  
Tech Adept
 
3n90t's Avatar
 
Join Date: Apr 2014
Location: Sydney
Posts: 125
Default

Originally Posted by Slapjack
Thing is I don't have the weights. All those weights I mentioned would run me like $70 and that's a lot just to spend On weights so wanted to see if anyone has had a Similar setup for tighter track and whether or not it worked good. But I guess It's going to be different for everybody's driving style so I may just have to bite the bullet And buy all the weights And just test and tune
Try making your own weights. I buy brass sheets from the hobby shop. They are available in various thickness.
freezeframe007 likes this.
3n90t is offline  
Old 04-23-2017, 06:00 AM
  #6427  
Tech Lord
iTrader: (86)
 
Davidka's Avatar
 
Join Date: Oct 2004
Posts: 10,883
Trader Rating: 86 (100%+)
Default

Originally Posted by sgtlt
Our track is clay but a car that is aroud 1540 grms works a Lot better than a car at min weight. 30 grms makes a big differance on our traks in 2wd stock buggy.
A car is never faster simply because it's heavier. If adding 30g somewhere improves the balance, it's be better to remove weight from somewhere else (standard to low-profile servo?) to achieve the right balance.
Davidka is offline  
Old 04-23-2017, 07:20 AM
  #6428  
Tech Regular
iTrader: (5)
 
Join Date: Apr 2012
Location: okc,ok
Posts: 483
Trader Rating: 5 (100%+)
Default

I agree a heavier car isn't faster but on our track they get better traction and turn better. I would love to run my car at min weight but I don't have enough tuning experience to get it to work when it's light. Also I am the only one running associated, all the fast guys are Tlr 3.0 and will be Tlr 22 4.0 next week. Would love to get any advice. Thanks
sgtlt is offline  
Old 04-23-2017, 07:54 AM
  #6429  
Tech Fanatic
iTrader: (13)
 
Join Date: Dec 2005
Posts: 908
Trader Rating: 13 (100%+)
Default

My B6D is still going strong. I don't even fuss with the setup at all anymore. Normal setup on med- high clay is the middle battery position. If things get loose over time, I move it back one spot. I'm running the laydown, so this requires removing the waterfall for these two battery positions.

Doesn't get any easier than that!
Jason B is offline  
Old 04-23-2017, 08:53 AM
  #6430  
Tech Master
iTrader: (48)
 
rgrg2's Avatar
 
Join Date: Aug 2008
Location: SOCAL
Posts: 1,019
Trader Rating: 48 (100%+)
Default setup

Originally Posted by Jason B
My B6D is still going strong. I don't even fuss with the setup at all anymore. Normal setup on med- high clay is the middle battery position. If things get loose over time, I move it back one spot. I'm running the laydown, so this requires removing the waterfall for these two battery positions.

Doesn't get any easier than that!
Are you still using the setup you posted here not too long ago?
rgrg2 is offline  
Old 04-23-2017, 09:34 AM
  #6431  
Tech Elite
iTrader: (43)
 
Join Date: Mar 2009
Location: Santa Clarita, CA
Posts: 2,907
Trader Rating: 43 (100%+)
Default

Anybody running gullwing arms in their b6d in medium traction dirt tack? How does it run in corners?
Phillip F is offline  
Old 04-23-2017, 01:45 PM
  #6432  
Tech Initiate
iTrader: (3)
 
Join Date: Jun 2008
Location: Ontario, Calif.
Posts: 34
Trader Rating: 3 (100%+)
Default

Need help with setting my shock stroke on my B6D. Front is calling for 20.5 mm and the rear is calling for 27.5 mm. When i measure the exposed shock shaft on both front and rear i only have about 1 mm(2 threads) left to install the end. I have taken the shocks apart 2-3 times thinking i did something wrong and i cant figure this out. I am measuring from the end of the blue cap to the shafts end. Am i measuring from the wrong area? I am using a dial caliper. Help,,,,,,,,,,,please.
FISHNFOOL9 is offline  
Old 04-23-2017, 02:59 PM
  #6433  
Tech Fanatic
iTrader: (24)
 
mellow's Avatar
 
Join Date: Aug 2009
Location: Central CA
Posts: 931
Trader Rating: 24 (100%+)
Default

Originally Posted by FISHNFOOL9
Need help with setting my shock stroke on my B6D. Front is calling for 20.5 mm and the rear is calling for 27.5 mm. When i measure the exposed shock shaft on both front and rear i only have about 1 mm(2 threads) left to install the end. I have taken the shocks apart 2-3 times thinking i did something wrong and i cant figure this out. I am measuring from the end of the blue cap to the shafts end. Am i measuring from the wrong area? I am using a dial caliper. Help,,,,,,,,,,,please.
Measure from the bottom of the blue cap to the flat on the eyelet.
Attached Thumbnails Team Associated B6 & B6D thread-stroke.jpg  
mellow is offline  
Old 04-23-2017, 03:04 PM
  #6434  
Tech Initiate
iTrader: (3)
 
Join Date: Jun 2008
Location: Ontario, Calif.
Posts: 34
Trader Rating: 3 (100%+)
Default

Originally Posted by mellow
Measure from the bottom of the blue cap to the flat on the eyelet.
If I do I only have 1 or 2 threads to screw the eyelet to. It won't hold this way.
FISHNFOOL9 is offline  
Old 04-23-2017, 03:53 PM
  #6435  
Tech Elite
iTrader: (3)
 
aeRayls's Avatar
 
Join Date: Nov 2007
Posts: 2,257
Trader Rating: 3 (100%+)
Default

Originally Posted by FISHNFOOL9
If I do I only have 1 or 2 threads to screw the eyelet to. It won't hold this way.
You have built something incorrectly then.
aeRayls is offline  


Contact Us - Archive - Advertising - Cookie Policy - Privacy Statement - Terms of Service -

Copyright © 2024 MH Sub I, LLC dba Internet Brands. All rights reserved. Use of this site indicates your consent to the Terms of Use.