


 254Likes
Tamiya TRF419
 08-14-2019, 02:21 PM
#4441
Tech Master
iTrader: (32)
i am after lateral flex specificaly at rear to gain rear grip and not affect steering much, which is why i assumed i can manipulate flex at the rear of the chassis...
not quite sure what it is to slow rear end action? We race mod 6.5t, i just dont find my car's rear as planted as other racers cars be it tamiya or not..
Im after rear grip as well as high speed sweeper turn on throttle steering
not quite sure what it is to slow rear end action? We race mod 6.5t, i just dont find my car's rear as planted as other racers cars be it tamiya or not..
Im after rear grip as well as high speed sweeper turn on throttle steering
- Jose
 08-14-2019, 02:38 PM
#4442
Gotcha... there is so much that goes into a loose condition. You can try narrowing the rear a touch to lock it down and this will give you more rotation (steering) at the same time. You can also try lowering the roll center in the rear, but that won't really give you steering. You may have to do both to get to your desired state. If your car is close, you'll be able to feel small, small changes... like going one block smaller, front (rf) and rear (rr), or removing .5mm spacers from the axles/hubs. Give it a try... it could also be your choice of body and how you cut the wing.
- Jose
- Jose
Great suggestions, will give them a go!
08-23-2019, 09:11 AM
#4444

Some info here on next car.. from the parts list it appears it�s entirely new.. even new C hubs
https://www.thercracer.com/2019/08/4...-info.html?m=0
ps.. I guess everyone on RCtech was right after all... there will not be anymore TRF cars.
oh but wait for it.. they will say the 420 will be the last one ever
https://www.thercracer.com/2019/08/4...-info.html?m=0
ps.. I guess everyone on RCtech was right after all... there will not be anymore TRF cars.
oh but wait for it.. they will say the 420 will be the last one ever
08-23-2019, 01:55 PM
#4445
Tech Initiate
54886 TRF419 Suspension Upgrade Set
Maybe we can upgrade our 419s to something like 419'5
will see.
Maybe we can upgrade our 419s to something like 419'5
will see.
08-27-2019, 05:37 PM
#4447
Lol ok well on trying all the tips of getting a leak free diff (I should have left it alone lol)
I seem to be making it worse.
Maybe i am over looking something simple or it needs to be a special place for this .1 shim
are you putting the shim before the O-ring or after the O-ring or even after the main shim?
i tried with axon O-rings and I tried with red TAmiya O-rings all seem to be worse then if I just build it normal.
I am using a fair amount of arrowmax green lube on the O-rings
Like now I am on a mission to get this to work lol.
08-27-2019, 09:17 PM
#4448
Tech Adept
Lol ok well on trying all the tips of getting a leak free diff (I should have left it alone lol)
I seem to be making it worse.
Maybe i am over looking something simple or it needs to be a special place for this .1 shim
are you putting the shim before the O-ring or after the O-ring or even after the main shim?
i tried with axon O-rings and I tried with red TAmiya O-rings all seem to be worse then if I just build it normal.
I am using a fair amount of arrowmax green lube on the O-rings
Like now I am on a mission to get this to work lol.
I seem to be making it worse.
Maybe i am over looking something simple or it needs to be a special place for this .1 shim
are you putting the shim before the O-ring or after the O-ring or even after the main shim?
i tried with axon O-rings and I tried with red TAmiya O-rings all seem to be worse then if I just build it normal.
I am using a fair amount of arrowmax green lube on the O-rings
Like now I am on a mission to get this to work lol.
08-28-2019, 06:58 AM
#4449
Level to the bevel gears as per manual this is also how I was doing it building it regular
and having minimal leaking.
Hoping someone that has a zero leak diff can tell me the spot they put the .1 shim in
and I’ll try again., would very much like to build one of these zero leak diff’s
On an upside trf420 has a new diff lol
and having minimal leaking.
Hoping someone that has a zero leak diff can tell me the spot they put the .1 shim in
and I’ll try again., would very much like to build one of these zero leak diff’s
On an upside trf420 has a new diff lol
08-28-2019, 01:41 PM
#4450
Hey Sno. The shim goes under the big bevel gear above the o-ring.The idea is to create as little slop as possible between the outdrive and the pin holding the outdrive to the gear diff. The trick is to not make it too tight because that creates friction. Sometimes people think their diff is leaking when in reality they accidently put diff fluid inside the openings between the two diff housings. Make sure that when you are building the diff, those holes don't get diff fluid in them. Additionally, make sure to very gently sand down flat the edges of the diff housings. Do you put green slime on both sides of the gasket? Do you use the alignment marks on the outside of the gear diff housings? Also, make sure you do not cover the entirety of the gears with diff fluid. You should only fill up to the cross joint. If you go above that amount, you will leak. One last question, what does it look like when your diff leaks. Does it get all over your body? Or does it stick around the outdrives?
08-28-2019, 08:02 PM
#4451
Yes I put slime on both sides of the gasket, I filed my normal case , now I am trying the alloy case. I line up the marks for diff lhalves .
My leakage since I have been trying these tips for a leak free diff have been fluid on belt and right in front of the diff.
Tomlrrow i will rebuild , you make a great point about the diff holes very easily during the many rebuilds
i could have gotten some in i became more frustrated and less careful I am sure. I will clean build proper and test it out.
Thanks hopefully was just me being careless in frustration searching for a leak free diff
08-30-2019, 08:35 PM
#4452
Just sharing a bit of my thoughts about gear diff assembly and types of orings, it's just my personal experience so feel free to discuss.
Parts Preparation
Parts Preparation
- Drill the 4 screw holes with 2mm bit to release any trapped oil that may escape during assembly (although there shouldn't be any if filled right).
- Pre-tap the holes with the supplied screws, then chamfer the edges around the holes with a hobby knife as they may bulge slightly after tapping.
- Lightly wet sand the flat surface of the bottom case where the gasket is seated to remove any irregularities, I aim for a uniform matte finish.
- Lightly wet sand the diff case bearing surfaces for the 10mm bearings, sometimes they might be too tight and cause binding.
- Lightly sand the flat side of all gears to remove any irregularities.
- Bearing Holders/Cams: I find that the 10mm bearings sit quite tightly on the bearing holders/cams and since the hole on the plastic part is about the same diameter as the inner bearing race, it makes it difficult to pull apart. I used a body reamer to enlarge the hole by around 0.5-1mm, this allows me to fit a 7mm nut driver to push the bearings out.
- Xray 972050 Orings: the silicone on these have a larger cross sectional diameter than regular P5 orings. When inserted it is compressed to form a seal. As mentioned, due to this there is more drag. Since the oring protrudes slightly above the recess, only a 0.1mm large shim is required to take up the play, any thicker will bring more drag. As you can see from the sketch below, the oring is thicker so the only purpose of the shim is to retain the oring, the bottom of the shim doesn't sit completely on the case. With these orings I have not experienced any leak from the outdrives (5,000 / 7,500 / 10,000).
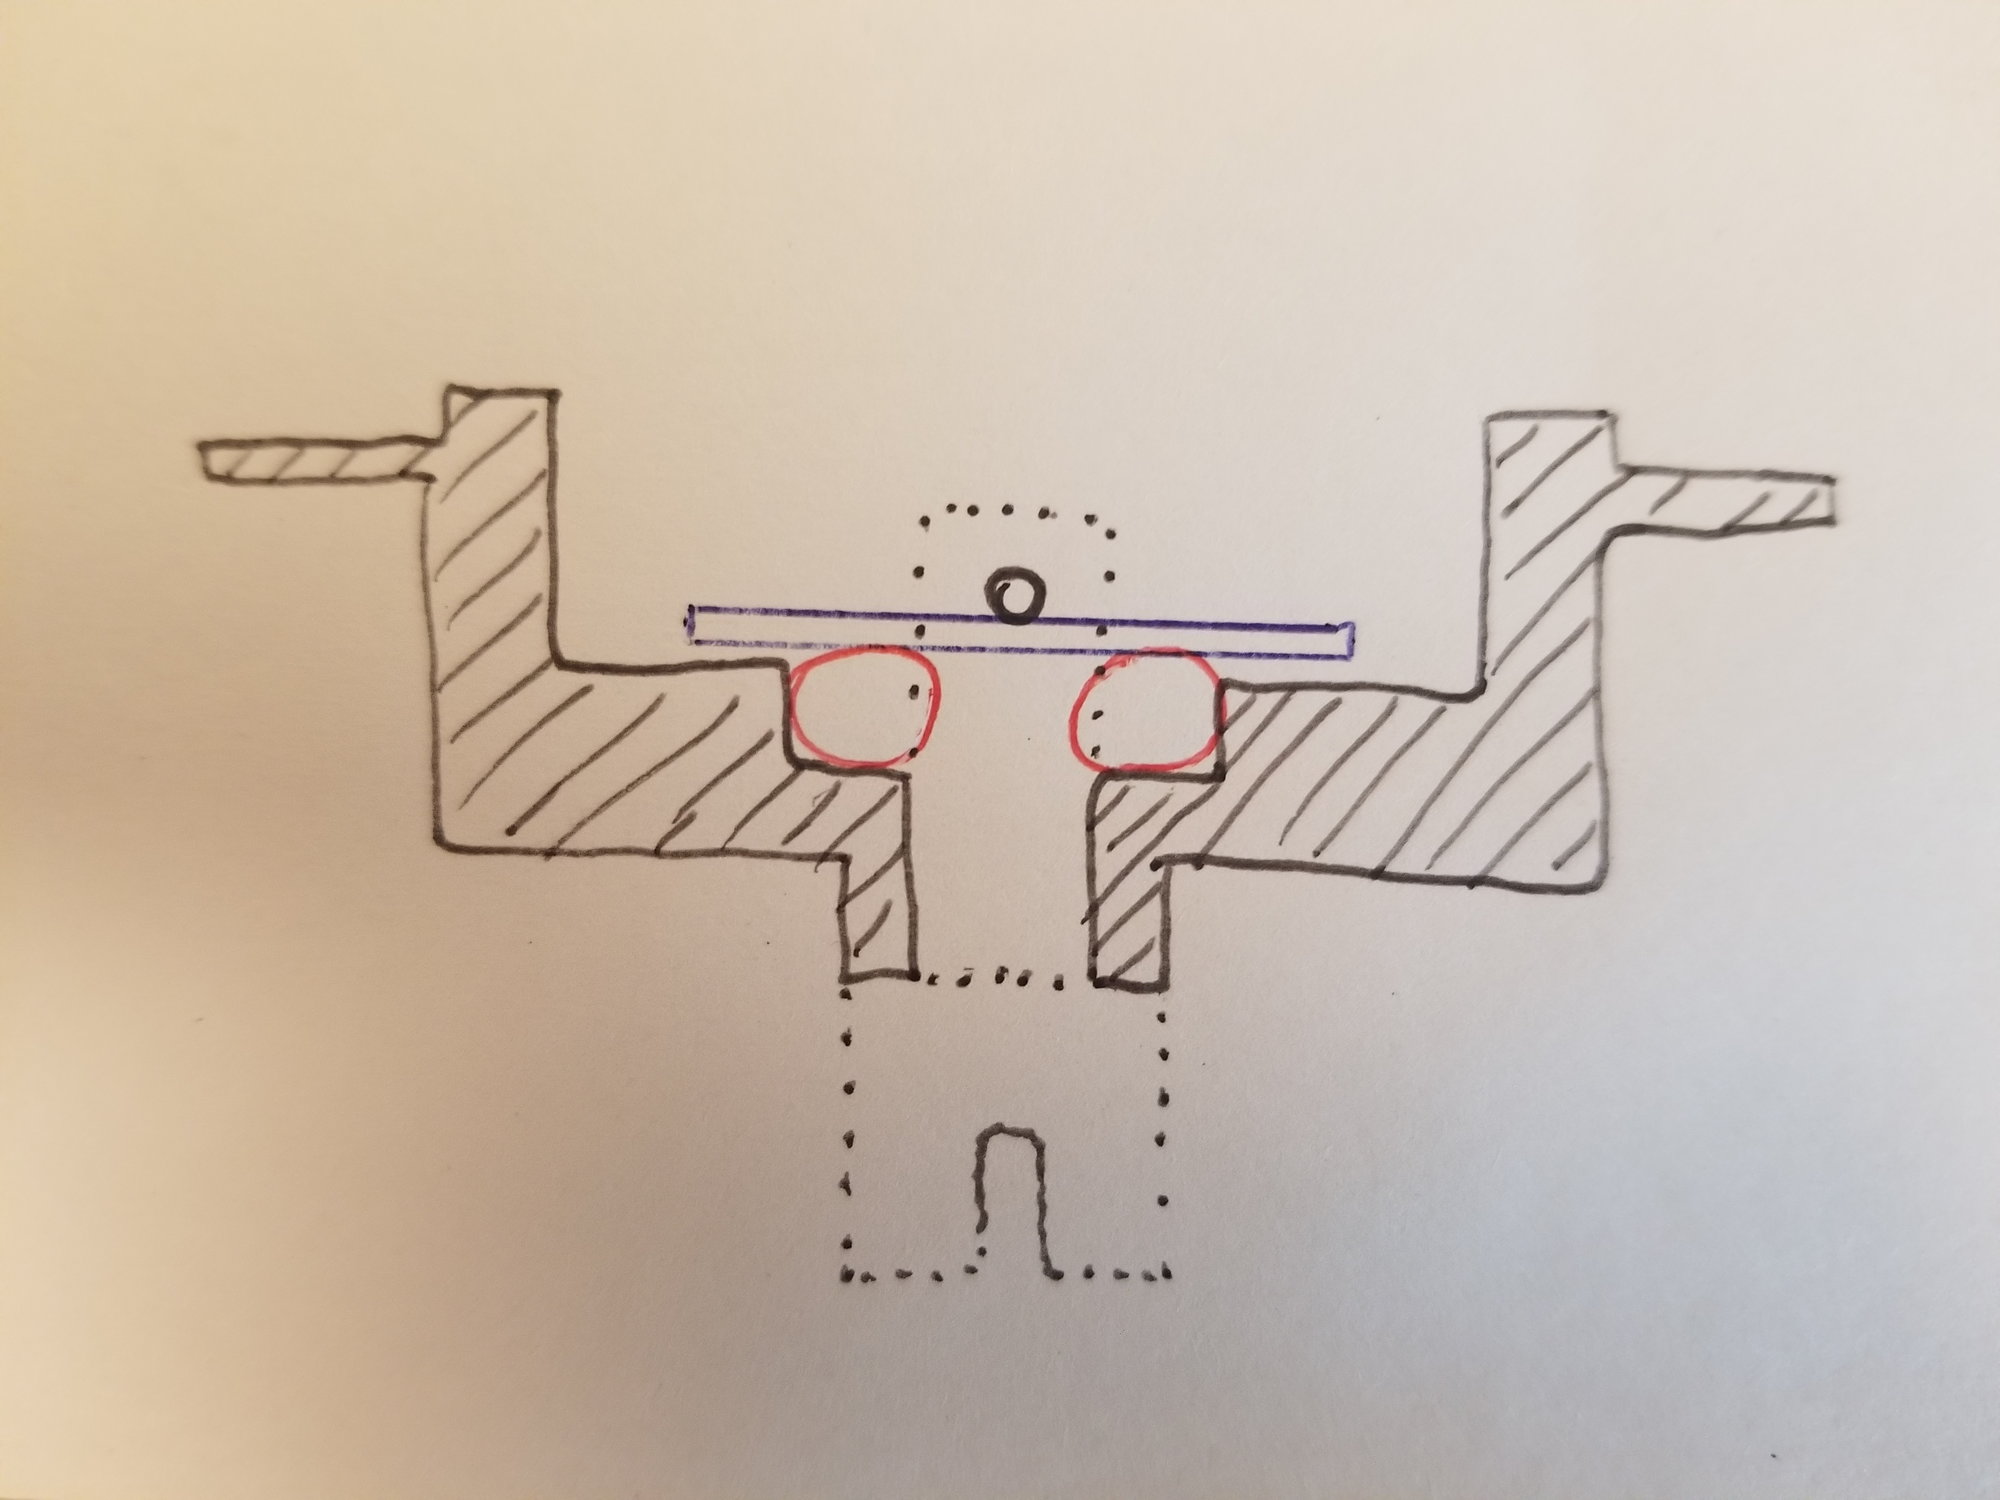
- Tamiya (Red 42259) / Axon (Clear OR-GD-004/ Black OR-GD-001) Orings: As sketched below, the overall dimensions of these orings are smaller than the recess of the case, so adding shims above the recess (as per manual) does not compress the oring to form a seal (the inner edge grabs around the shaft but the outer edge has no contact against the wall of the recess, and the top of oring does not protude above the recess). For this, first shim the outdrive without the oring to reduce the play of the outdrive, usually 0.2mm is enough, then place a regular 0.1mm or 0.13mm shim (5mm wheel axle shim) above the oring (between large shim and oring, not shown in sketch) until you feel a slight drag (which means its compressing the oring to form a top/bottom seal). With this combination I have no leaks as well so far (3 runs), but I need more runs to confirm (10,000).

- Lube up the parts (oring, recess, shaft, bushing), I use Axon Gear Diff Grease but any thick grease should do.
- If using Xray orings, since they are much larger I recommend to first push the greased oring into the recess and place the shim over it to keep in place, then insert the outdrive and retain with the pin.This prevents the oring from popping out when the outdrive is inserted.
- Use a scale to fill oil into the case with only the bottom large bevel installed, and only after 1.5g of oil is filled and settled I drop in the cross shaft and small gear assembly to reduce the amount of trapped air. Tap the cross shafts a bit, when settled the oil should end up more or less around the top level of the cross shafts.
- If your scale has auto-off function, it's good to note the weight of the dry assembly to keep track of the oil weight in case it turns off during filling.
- Dab some grease on the lid to prevent the gasket from falling off, with the top bevel installed. Place over the case, spin the outdrive slightly to seat and mesh the gears, fasten screws evenly in a cross pattern, do not over-tighten as the lid may distort and leak.
- With 1.5g of oil I have no overflow during assembly or oil seeping out on the pulley teeth.
- I use 0.2mm shims between the bulkhead and it's top cap (damper stay assembly) to prevent binding/compression on the bearing holders.
Last edited by rc_square24; 11-08-2020 at 08:34 PM. Reason: Added Axon Part#
08-30-2019, 08:45 PM
#4453
Yes I put slime on both sides of the gasket, I filed my normal case , now I am trying the alloy case. I line up the marks for diff lhalves .
My leakage since I have been trying these tips for a leak free diff have been fluid on belt and right in front of the diff.
Tomlrrow i will rebuild , you make a great point about the diff holes very easily during the many rebuilds
i could have gotten some in i became more frustrated and less careful I am sure. I will clean build proper and test it out.
Thanks hopefully was just me being careless in frustration searching for a leak free diff
My leakage since I have been trying these tips for a leak free diff have been fluid on belt and right in front of the diff.
Tomlrrow i will rebuild , you make a great point about the diff holes very easily during the many rebuilds
i could have gotten some in i became more frustrated and less careful I am sure. I will clean build proper and test it out.
Thanks hopefully was just me being careless in frustration searching for a leak free diff
Did any excess oil ooze out during assembly? In your situation it may be the excess oil stuck between crevices that are flinging out when the car is run (but gasket is sealing properly), or an actual leak between the gasket. Overfilling may also cause leaks as the internal pressure builds up during diff action.
08-31-2019, 07:36 AM
#4454
Just sharing a bit of my thoughts about gear diff assembly and types of orings, it's just my personal experience so feel free to discuss.
Parts Preparation
Parts Preparation
- Drill the 4 screw holes with 2mm bit to release any trapped oil that may escape during assembly (although there shouldn't be any if filled right).
- Pre-tap the holes with the supplied screws, then chamfer the edges around the holes with a hobby knife as they may bulge slightly after tapping.
- Lightly wet sand the flat surface of the bottom case where the gasket is seated to remove any irregularities, I aim for a uniform matte finish.
- Lightly wet sand the diff case bearing surfaces for the 10mm bearings, sometimes they might be too tight and cause binding.
- Lightly sand the flat side of all gears to remove any irregularities.
- Bearing Holders/Cams: I find that the 10mm bearings sit quite tightly on the bearing holders/cams and since the hole on the plastic part is about the same diameter as the inner bearing race, it makes it difficult to pull apart. I used a body reamer to enlarge the hole by around 0.5-1mm, this allows me to fit a 7mm nut driver to push the bearings out.
- Xray 972050 Orings: the silicone on these have a larger cross sectional diameter than regular P5 orings. When inserted it is compressed to form a seal. As mentioned, due to this there is more drag. Since the oring protrudes slightly above the recess, only a 0.1mm large shim is required to take up the play, any thicker will bring more drag. As you can see from the sketch below, the oring is thicker so the only purpose of the shim is to retain the oring, the bottom of the shim doesn't sit completely on the case. With these orings I have not experienced any leak from the outdrives (5,000 / 7,500 / 10,000).
- Tamiya (Red 42259) / Axon (Clear / Black) Orings: As sketched below, the overall dimensions of these orings are smaller than the recess of the case, so adding shims above the recess (as per manual) does not compress the oring to form a seal (the inner edge grabs around the shaft but the outer edge has no contact against the wall of the recess, and the top of oring does not protude above the recess). For this, first shim the outdrive without the oring to reduce the play of the outdrive, usually 0.2mm is enough, then place a regular 0.1mm or 0.13mm shim (5mm wheel axle shim) above the oring (between large shim and oring, not shown in sketch) until you feel a slight drag (which means its compressing the oring to form a top/bottom seal). With this combination I have no leaks as well so far (3 runs), but I need more runs to confirm (10,000).
- Lube up the parts (oring, recess, shaft, bushing), I use Axon Gear Diff Grease but any thick grease should do.
- If using Xray orings, since they are much larger I recommend to first push the greased oring into the recess and place the shim over it to keep in place, then insert the outdrive and retain with the pin.This prevents the oring from popping out when the outdrive is inserted.
- Use a scale to fill oil into the case with only the bottom large bevel installed, and only after 1.5g of oil is filled and settled I drop in the cross shaft and small gear assembly to reduce the amount of trapped air. Tap the cross shafts a bit, when settled the oil should end up more or less around the top level of the cross shafts.
- If your scale has auto-off function, it's good to note the weight of the dry assembly to keep track of the oil weight in case it turns off during filling.
- Dab some grease on the lid to prevent the gasket from falling off, with the top bevel installed. Place over the case, spin the outdrive slightly to seat and mesh the gears, fasten screws evenly in a cross pattern, do not over-tighten as the lid may distort and leak.
- With 1.5g of oil I have no overflow during assembly or oil seeping out on the pulley teeth.
- I use 0.2mm shims between the bulkhead and it's top cap (damper stay assembly) to prevent binding/compression on the bearing holders.