


 254Likes
Tamiya TRF419
 07-29-2019, 03:24 PM
#4396
Tech Apprentice
I use shims,maybe need thinker ones(using 0.1).I have tried,the clear,blue an Xrings,all the same for me,all leaked..
Will give it another try,Can't stand it,that I still have leaks.
 08-03-2019, 11:12 PM
#4397
Tech Apprentice
if i want to use the new 3�rear hub . What arm mount should i use to keep the wheel tread same as the original XA-E?
08-03-2019, 11:34 PM
#4398
Tech Apprentice
You needto make your inner arms straight, so you to either flip your XA to A and go A-A, or get an XE/E split mount and go E-E. A-A will be 3mm narrower track than E-E, and A-A will be almost the same track width as you have now so if you want like for like handling that is probably the best option. I learnt heaps on this subject from a blog on thercracer.com.
08-04-2019, 12:15 AM
#4399
Tech Apprentice
You needto make your inner arms straight, so you to either flip your XA to A and go A-A, or get an XE/E split mount and go E-E. A-A will be 3mm narrower track than E-E, and A-A will be almost the same track width as you have now so if you want like for like handling that is probably the best option. I learnt heaps on this subject from a blog on thercracer.com.
08-04-2019, 11:13 AM
#4400

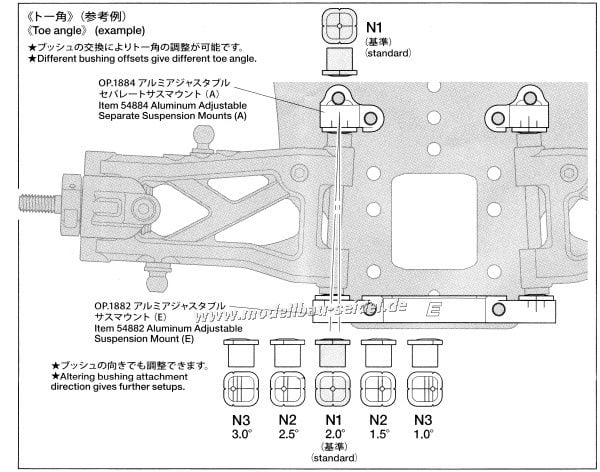
On the new blocks in the n1 position is that the same roll Center position height as the 1 blocks or the 05
blocks?
I am assuming with a new E block and insert n1 it would be the same roll Center setting as a 1E ?
creating 2 higher and 2 lower roll Center positions? Has any one measured the pin height on the regular 1E blocks and the new blocks in the n1 (middle position) pin height?
blocks?
I am assuming with a new E block and insert n1 it would be the same roll Center setting as a 1E ?
creating 2 higher and 2 lower roll Center positions? Has any one measured the pin height on the regular 1E blocks and the new blocks in the n1 (middle position) pin height?
08-04-2019, 11:42 AM
#4401
On the new blocks in the n1 position is that the same roll Center position height as the 1 blocks or the 05
blocks?
I am assuming with a new E block and insert n1 it would be the same roll Center setting as a 1E ?
creating 2 higher and 2 lower roll Center positions? Has any one measured the pin height on the regular 1E blocks and the new blocks in the n1 (middle position) pin height?
blocks?
I am assuming with a new E block and insert n1 it would be the same roll Center setting as a 1E ?
creating 2 higher and 2 lower roll Center positions? Has any one measured the pin height on the regular 1E blocks and the new blocks in the n1 (middle position) pin height?
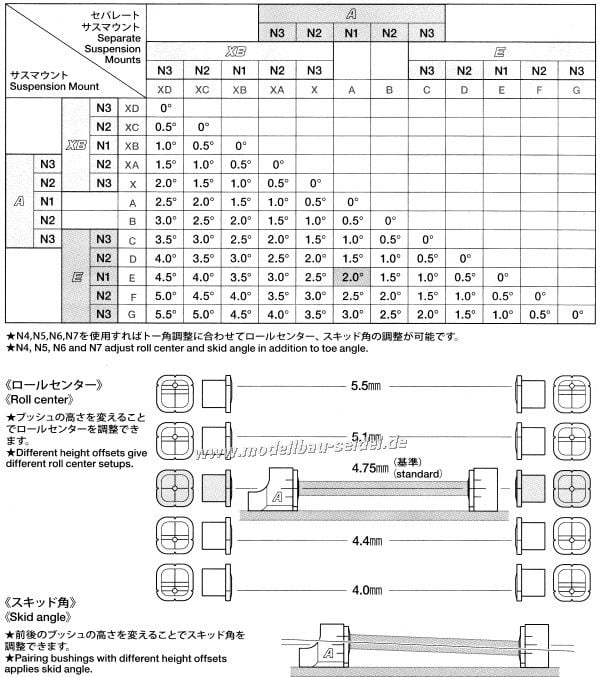
Standard setting 4.75mm is equal to 1xx blocks.
-4.4mm setting is equal to 05xx blocks.
-4.0mm is new setting.
+5.1mm is equal to pre 416 blocks era (TRF415/TA05).
+5.5mm is new setting.
08-05-2019, 06:29 AM
#4402
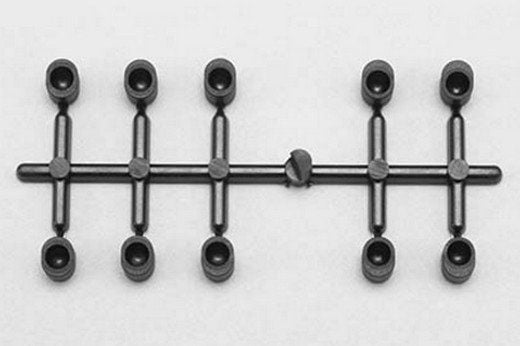
The 5.8mm plastic tree can only be used with the new SSBB blue aluminium dampercaps, because inner diameter is bigger. They will not fit on the old SSBB black aluminium caps.
Blue damper caps >>5.8mm
Black damper caps >>5.0mm
The 5.0mm plastic tree is also for all TRF dampers.
Blue damper caps >>5.8mm
Black damper caps >>5.0mm
The 5.0mm plastic tree is also for all TRF dampers.
On the new black driveshaft blades, they hold up much better than the white ones and show very little wear for about 5 packs that I've done. The fronts blades broke in after a few runs while the rear remained tight and required light sanding to free up the binding I had. I recommend them but they should be checked for any binding after assembly or initial breakin.
08-05-2019, 06:40 AM
#4403
Yes that's true. Spring retainers sit a little bit snug now. But I like it better than before with the old plastic parts, where the retainers where quite loose and spinning around the springs.
What about the tolerances with the new 5.8mm ballcups? I've some lateral play in it, which does not affect functionality but it made me wonder...
What about the tolerances with the new 5.8mm ballcups? I've some lateral play in it, which does not affect functionality but it made me wonder...
08-05-2019, 06:41 AM
#4404


Thank you for this Tamiya!!!
08-05-2019, 06:48 AM
#4405
Yes that's true. Spring retainers sit a little bit snug now. But I like it better than before with the old plastic parts, where the retainers where quite loose and spinning around the springs.
What about the tolerances with the new 5.8mm ballcups? I've some lateral play in it, which does not affect functionality but it made me wonder...
What about the tolerances with the new 5.8mm ballcups? I've some lateral play in it, which does not affect functionality but it made me wonder...
08-05-2019, 07:03 AM
#4406
I haven't checked carefully yet. When installed on the car, they are slop free in the up/down direction (of shock travel) like you mentioned, while in the front/rear direction it allows some movement, rotation is smooth so overall seems to be okay. However on the bottom ball cup, 3 of the balls seem a bit snug compared to the 4th that's very free. I have to see why it is and if it happens to my other sets.
08-05-2019, 07:08 AM
#4407
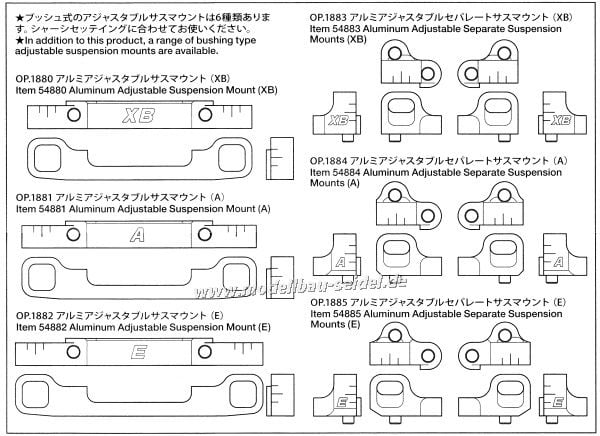
It's about darn time! Buying new mounts for every iteration and messing with shims for RC changes was one of my least favorite things with these cars. To be fair, I've only raced my 419 at one TCS race but this little change may motivate me to try it a bit more. I remember sitting in the pits at the TCS race wishing I had my Xray blocks so I could easily adjust something that wasn't so fun on the Tamiya.
Thank you for this Tamiya!!!
Thank you for this Tamiya!!!
Maybe the Yokomo style BD8 bushing mounts are a better compromise. They kept the use of suspension balls in the bushings, and the design of the bushing itself seems to be more durable (the width of the "flange" is almost the whole width of the block, opposite to what most other brands have like the new Tamiya ones.)
BD8 Style Bushings with wide flange/lip and suspension ball socket
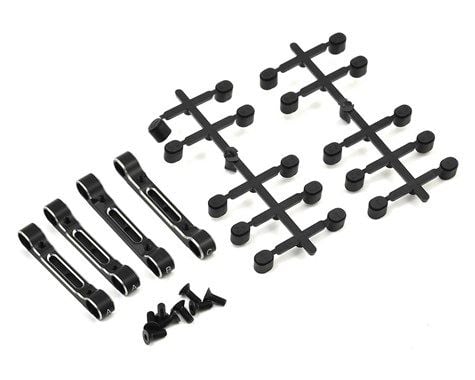
XRAY / Tamiya Style Bushings, which has a thinner flange/lip and pin socket
That said, being a sucker as I am I would still adopt them
 08-05-2019, 08:03 AM
#4408
Tech Master
iTrader: (32)
For me the new mounts are more of a cheaper way of having all the adjustments, but I don't think they make setup changes easier per se. Theres plus and minuses, for example to make a change with the new ones you would have to remove the mount, and remove the bushings as well (and it might not be a breeze if they happen to be snug and not budging), whereas previously you just remove and replace with another mount. On the other hand its nice not having to fiddle with suspension balls, but like some say it might be a step backwards as they may bind the suspension.
Maybe the Yokomo style BD8 bushing mounts are a better compromise. They kept the use of suspension balls in the bushings, and the design of the bushing itself seems to be more durable (the width of the "flange" is almost the whole width of the block, opposite to what most other brands have like the new Tamiya ones.)
BD8 Style Bushings with wide flange/lip and suspension ball socket
XRAY / Tamiya Style Bushings, which has a thinner flange/lip and pin socket
That said, being a sucker as I am I would still adopt them
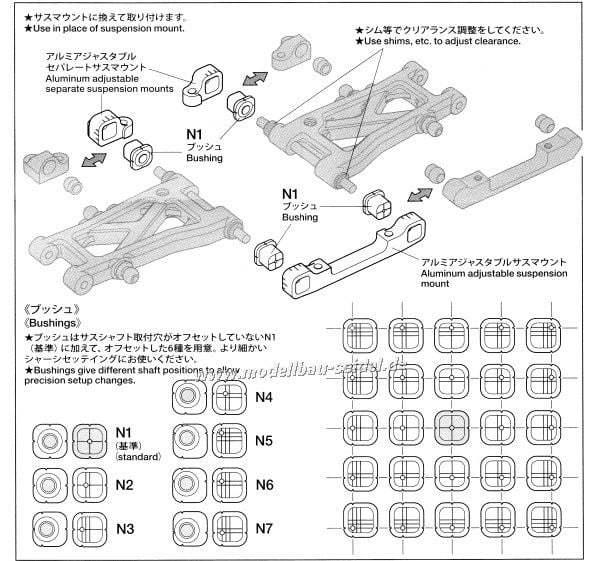
I think it has more to do with adjustability. When you have a 5mm pivot ball + insert + mount, how do you get to these new 4mm pin heights? I'm sure Tamiya would LOVE to keep selling us $20 mounts for every setting, but if they want to remain somewhat relevant and competitive they had to get with the times.
- Jose
08-05-2019, 10:50 AM
#4409
Tech Apprentice
After about 10 packs of running, the new damper part seems already solved the common problem of SSBB damper. That is, the membrane will sometimes drop into the cylinder after bump. The alum retainer is snug with the new ball end so i will pull the retainer towards the ball end to make sure that it had completely sit on the ball end.
The new adjustable arm is only benefit for the player who is well- known to the suspension theory of RC car. For me I only change the rear toe from 2 to 3 degree depend on the track layout so directly change the rear mount is faster than looking at those stupid bushing. I am more interested on the new rear hub.
The new adjustable arm is only benefit for the player who is well- known to the suspension theory of RC car. For me I only change the rear toe from 2 to 3 degree depend on the track layout so directly change the rear mount is faster than looking at those stupid bushing. I am more interested on the new rear hub.
08-05-2019, 08:06 PM
#4410
Tech Master
Ive never seen a post on it but maybe it�s known. All of the ball joints that go into brand H passenger cars are slightly too tight by design when assembled. After they are assembled the ball is spun at 10000 rpms for 10 seconds to seat the ball to the cup. The plastic cup gets just hot enough to match the ball to the cup. From that point forward they go from almost immovable to smooth as silk and slop free. Its a plastic safe white lithium grease in the cup so applying this to an rc ball cup without lube will require less time.
when I assemble ball cups and i find a tight one I do the same with a drill and no lubrication. You can apply pressure to the cup to help but be careful. You will feel allot of heat in a short amount of time and you dont want too much of that.
when I assemble ball cups and i find a tight one I do the same with a drill and no lubrication. You can apply pressure to the cup to help but be careful. You will feel allot of heat in a short amount of time and you dont want too much of that.