


 221Likes
Team CRC Xti 1/12th Scale!!

 03-02-2021, 05:42 PM - Wikipost
|
|||
|
|||
 08-27-2015, 08:42 AM
#1846
Wow that's a lot of information. Thanks for posting it. I should print that out and keep hand.
Last night I removed the aluminum shims from under the U shaped graphite front end plate. I installed the orange and white ride height shims under the lower arms and installed the 2 deg. roll center adjusters. I added an o-ring to the underside of the center shock piston and refilled with 30wt shock oil.This resulted in 0 pod droop so I backed out the ball cup a few turns to get to about 1.5-2mm pod droop. I cleaned and re-lubed the side dampers with 30k diff fluid and man are they a lot more dampened than with the kit supplied 5k. In fact the whole rear pod is way more dampened now and I wonder if I've gone too far. I measured the rear tires from the center balance hole and they are about 47mm each to the inside of the tires. The whole rear width is about 169mm. The front was closer to 165mm but I don't think anymore shims will fit on the axle to widen it. I plan on truing the tires so the are flat and will probably be about 41mm Front and about 42mm Rear when I'm done. They wore pretty even last race but are a little different from inside to outside on the measurement. My ride height is still about 4.5mm all around as this is what I was told was the track minimum. Not sure why because the track is pretty smooth and the timing loop is under the track. I also loosened the diff just a little. It was pretty tight and I had to push really hard to get the gear to slip while holding the tires. About and 1/8 of a turn and it slips easier now but I don't think it will slip under power on the track. I hope this takes away that tendency to push to the right under hard acceleration.
Couple notes or bits of feedback for CRC when packaging these kits is to include the ride height shim set for the front of the car in the kit. The little aluminum washers under the front end plate are really hard to access for changing. And front ride height adjustment shouldn't be an option but an included part. You give the different caster blocks already, which is great, but why not the ride height adjustment? Also something about installing the o-ring under the piston in the shock as an option or recommendation would be helpful. The part is included but no mention where it goes.
Thanks again for all the help and tips.
 08-27-2015, 08:45 AM
#1847

I find 20k too thick. I usually use 10k or even 5 but I'm running in pretty high bite. Low grip tracks it might work.
08-27-2015, 09:52 AM
#1848
Last night I removed the aluminum shims from under the U shaped graphite front end plate. I installed the orange and white ride height shims under the lower arms and installed the 2 deg. roll center adjusters...
Couple notes or bits of feedback for CRC when packaging these kits is to include the ride height shim set for the front of the car in the kit. The little aluminum washers under the front end plate are really hard to access for changing. And front ride height adjustment shouldn't be an option but an included part.
Couple notes or bits of feedback for CRC when packaging these kits is to include the ride height shim set for the front of the car in the kit. The little aluminum washers under the front end plate are really hard to access for changing. And front ride height adjustment shouldn't be an option but an included part.
This probably won't work if you have the servo mounted forward.
 08-27-2015, 09:59 AM
#1849
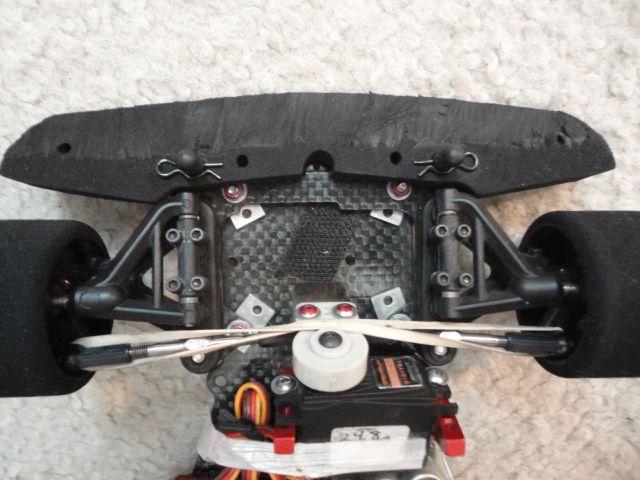
I can't decide whether to laugh at you for the rubber band or applaud your genius. 
08-27-2015, 11:14 AM
#1851
Wow that's a lot of information. Thanks for posting it. I should print that out and keep hand.
Last night I removed the aluminum shims from under the U shaped graphite front end plate. I installed the orange and white ride height shims under the lower arms and installed the 2 deg. roll center adjusters. I added an o-ring to the underside of the center shock piston and refilled with 30wt shock oil.This resulted in 0 pod droop so I backed out the ball cup a few turns to get to about 1.5-2mm pod droop. I cleaned and re-lubed the side dampers with 30k diff fluid and man are they a lot more dampened than with the kit supplied 5k. In fact the whole rear pod is way more dampened now and I wonder if I've gone too far. I measured the rear tires from the center balance hole and they are about 47mm each to the inside of the tires. The whole rear width is about 169mm. The front was closer to 165mm but I don't think anymore shims will fit on the axle to widen it. I plan on truing the tires so the are flat and will probably be about 41mm Front and about 42mm Rear when I'm done. They wore pretty even last race but are a little different from inside to outside on the measurement. My ride height is still about 4.5mm all around as this is what I was told was the track minimum. Not sure why because the track is pretty smooth and the timing loop is under the track. I also loosened the diff just a little. It was pretty tight and I had to push really hard to get the gear to slip while holding the tires. About and 1/8 of a turn and it slips easier now but I don't think it will slip under power on the track. I hope this takes away that tendency to push to the right under hard acceleration.
Couple notes or bits of feedback for CRC when packaging these kits is to include the ride height shim set for the front of the car in the kit. The little aluminum washers under the front end plate are really hard to access for changing. And front ride height adjustment shouldn't be an option but an included part. You give the different caster blocks already, which is great, but why not the ride height adjustment? Also something about installing the o-ring under the piston in the shock as an option or recommendation would be helpful. The part is included but no mention where it
Thanks again for all the help and tips.
08-27-2015, 11:27 AM
#1852
I think I will pull out the 30 right now and maybe go 15-20k. The 30 feels really thick.
Howardcano - What is the rubber band for? My servo is in the forward position. I liked the plate flat on the chassis and will adjust height from there with the shims that go under the arms, but that is a really good idea with the slip in shims.
Howardcano - What is the rubber band for? My servo is in the forward position. I liked the plate flat on the chassis and will adjust height from there with the shims that go under the arms, but that is a really good idea with the slip in shims.
09-21-2015, 12:25 AM
#1853
.
Last edited by Josh Keller; 09-21-2015 at 06:19 PM.
09-21-2015, 03:15 AM
#1854
Oh, crap, I totally missed this! Please forgive this delayed response.
The rubber band is just an old-school, lazy-man's way to reduce steering slop. It could be called "active slop reduction", because if one decides to adjust the toe via contact with an immovable object while driving (which I do with alarming regularity), thereby adding inadvertently to the slop, the rubber band instantly compensates for it.
The rubber band is just an old-school, lazy-man's way to reduce steering slop. It could be called "active slop reduction", because if one decides to adjust the toe via contact with an immovable object while driving (which I do with alarming regularity), thereby adding inadvertently to the slop, the rubber band instantly compensates for it.
09-23-2015, 02:13 AM
#1856
Hello
stupid question i know...but i live in Europe and inch tools not are "usual" for us...
for close the 2/56 nut what nut driver size?...
Thanks
stupid question i know...but i live in Europe and inch tools not are "usual" for us...
for close the 2/56 nut what nut driver size?...
Thanks
09-23-2015, 07:19 PM
#1857
It's not a stupid question, but for me the answer is a pair of needle-nose pliers to hold the nut and a 2mm driver works fine in the screw. The 2-56 screw that sets the play in the front arms should only be as tight as it needs to be to minimize play, the pivot ball still needs to freely move.
09-24-2015, 03:29 AM
#1858
Hello Desert
at now i use pliers...but if have a driver think is better...my problem are the size of this driver...on manual indicate for other nut but not for 2/56...
at now i use pliers...but if have a driver think is better...my problem are the size of this driver...on manual indicate for other nut but not for 2/56...