


 6Likes
HPI Sprint 2 Mods
 05-22-2012, 06:32 AM
#1
Everyone has their own voodoo. This is my voodoo. This is what works for me.
*New voodoo is added as it becomes available.
Allow me to preface my fix, mod and upgrade posts by stating:
First off – I’m no expert.
Secondly, my posts are primarily for people on tight budgets that want to race a reasonably tight car on the cheap.
Having said that, I continue…
The HPI Sprint 2 Sport is a great ‘entry level’ RC race car for the neo-RCer on a budget whether you want to bash, drift or race on road.
The S2S does have potential.
With a little time and minimal out of pocket (considering you have the necessary tools on hand) and a few upgrades, like carbon fiber shock towers and competition shocks, the S2S can be enhanced enough to allow you to run with the big dogs & perhaps pee on the taller trees once in a while on race day.
There are several posts on the internet by people that have tackled the steering slop and other issues on various forums. However, what I have found is that these posts rarely if ever cover everything that needs to be done, should be done, nor do they list the parts w/part numbers necessary to complete the tasks.
My goal is to bring the dots closer together and help close some of those gaps.
Finally - By no means is this the only way to accomplish tightening up or upgrading the S2S.
LINKS TO SPRINT AND SPRINT 2 MANUALS -ADDED 03/18/2013:
NOTE:
All these links worked at the time I posted them.
http://www.hpieurope.com/manuals/pdf/323.pdf
http://www.hpieurope.com/manuals/pdf/714.pdf
http://www.hpiracing.com/graphics/in...130/106130.pdf
http://www.hpiracing.com/manuals/pdf/106149.pdf
http://www.hpiracing.com/graphics/instr/pdf/106159.pdf
http://www.hpieurope.com/manuals/pdf/100424.pdf
http://www.hpieurope.com/manuals/pdf/101553.pdf
OTHER
Instructions for RS4 Sport =
http://www.hpiracing.com/instructions/instruct-s.htm
Instructions forRS4 SPORT 2 =
http://www.hpiracing.com/instructions/instruct-s2.htm
SOME MORE MANUALS HERE =
http://www.hpieurope.com/instructions.php?lang=en
EDIT 06/27/2014: INDEX TO VOODOO / MODS COMING SOON
Everyone has their own Voodoo.
This is my Voodoo.
This is what works for me.
Until I find better Voodoo.
ALL voodoo is welcome here.
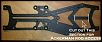
FIRST MOD
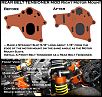
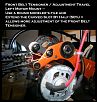
Rear Belt Tensioner Mod
Get yourself another front belt tensioner HPI #86041.
NOTE:
I used a 4-40 Allen head screw instead of the self tapping screw that comes in the tensioner package. I found this easier to screw in & out. So drill your slot holes according to which screw you decide to use. I also used an old shock piston for a washer - just because.
I used the same angle as the motor mount slots for my belt rear belt tensioner slot.
I measured 5/16" from the center line of the motor mount brace screw and down from the edge of the motor mount so that when drilled my 1st hole would be 1/8" from the edge of the motor mount.
I center punched for the top & bottom holes so that when finished, my slot would be 5/8" long.
I scribed my line from the top center punch to the bottom center punch.
I drilled the top & bottom holes - Following my scribed line, I center punched the next hole down so it will overlap the top hole then drilled the hole. I repeated this until all the holes were done.
Next I took a flat modeler's file and removed the excess metal until I had a slot.
Milling the slot is a lot easier & faster - if you know someone with a milling machine - have at it.
Click on thumbnail for larger picture -
*New voodoo is added as it becomes available.
Allow me to preface my fix, mod and upgrade posts by stating:
First off – I’m no expert.
Secondly, my posts are primarily for people on tight budgets that want to race a reasonably tight car on the cheap.
Having said that, I continue…
The HPI Sprint 2 Sport is a great ‘entry level’ RC race car for the neo-RCer on a budget whether you want to bash, drift or race on road.
The S2S does have potential.
With a little time and minimal out of pocket (considering you have the necessary tools on hand) and a few upgrades, like carbon fiber shock towers and competition shocks, the S2S can be enhanced enough to allow you to run with the big dogs & perhaps pee on the taller trees once in a while on race day.
There are several posts on the internet by people that have tackled the steering slop and other issues on various forums. However, what I have found is that these posts rarely if ever cover everything that needs to be done, should be done, nor do they list the parts w/part numbers necessary to complete the tasks.
My goal is to bring the dots closer together and help close some of those gaps.
Finally - By no means is this the only way to accomplish tightening up or upgrading the S2S.
LINKS TO SPRINT AND SPRINT 2 MANUALS -ADDED 03/18/2013:
NOTE:
All these links worked at the time I posted them.
http://www.hpieurope.com/manuals/pdf/323.pdf
http://www.hpieurope.com/manuals/pdf/714.pdf
http://www.hpiracing.com/graphics/in...130/106130.pdf
http://www.hpiracing.com/manuals/pdf/106149.pdf
http://www.hpiracing.com/graphics/instr/pdf/106159.pdf
http://www.hpieurope.com/manuals/pdf/100424.pdf
http://www.hpieurope.com/manuals/pdf/101553.pdf
OTHER
Instructions for RS4 Sport =
http://www.hpiracing.com/instructions/instruct-s.htm
Instructions forRS4 SPORT 2 =
http://www.hpiracing.com/instructions/instruct-s2.htm
SOME MORE MANUALS HERE =
http://www.hpieurope.com/instructions.php?lang=en
EDIT 06/27/2014: INDEX TO VOODOO / MODS COMING SOON
Everyone has their own Voodoo.
This is my Voodoo.
This is what works for me.
Until I find better Voodoo.
ALL voodoo is welcome here.
FIRST MOD
Rear Belt Tensioner Mod
Get yourself another front belt tensioner HPI #86041.
NOTE:
I used a 4-40 Allen head screw instead of the self tapping screw that comes in the tensioner package. I found this easier to screw in & out. So drill your slot holes according to which screw you decide to use. I also used an old shock piston for a washer - just because.
I used the same angle as the motor mount slots for my belt rear belt tensioner slot.
I measured 5/16" from the center line of the motor mount brace screw and down from the edge of the motor mount so that when drilled my 1st hole would be 1/8" from the edge of the motor mount.
I center punched for the top & bottom holes so that when finished, my slot would be 5/8" long.
I scribed my line from the top center punch to the bottom center punch.
I drilled the top & bottom holes - Following my scribed line, I center punched the next hole down so it will overlap the top hole then drilled the hole. I repeated this until all the holes were done.
Next I took a flat modeler's file and removed the excess metal until I had a slot.
Milling the slot is a lot easier & faster - if you know someone with a milling machine - have at it.
Click on thumbnail for larger picture -

Last edited by Marv; 06-27-2014 at 03:19 PM. Reason: MANUAL INFO ADDED 03/18/2013 ~ INDEX INFO ADDED 06/27/2014
 05-22-2012, 06:52 AM
#2
Everyone has their own voodoo. This is my voodoo. This is what works for me.
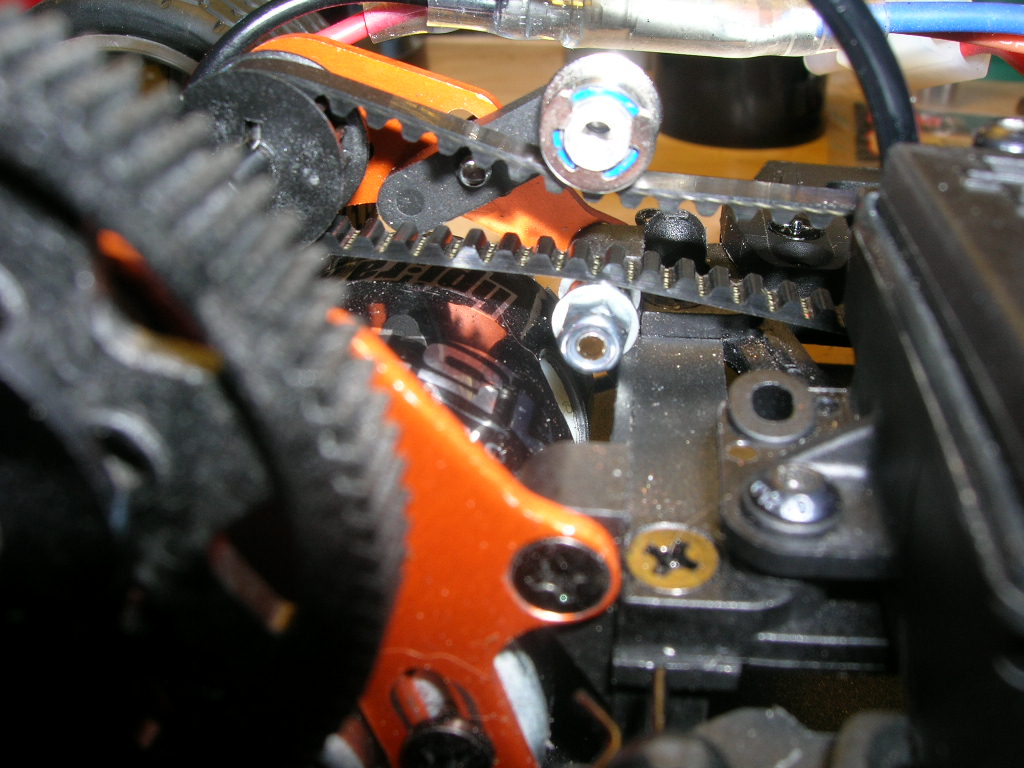
Front Belt Lifter For LiPo Battery
PARTS NEEDED:
HPI #Z530 M3x18 flat head machine screw (HPI #Z087 M3x20 is OK also)
Two 3x6x2.5mm sealed bearings / VXB Kit7033 (www.vxb.com)
Two 3mm washers / Dubro #2109 (The washers act as a belt guide)
One 3mm Lock nut / Dubro #2101
Click on thumbnails for larger pictures.
Loosen the front belt tensioner.
Replace the self tapping motor mount screw (the upper forward screw when looking at the motor mount) with the HPI #Z530 M3x18 flat head machine screw (HPI #Z087 M3x20 is OK also) - spray a little oil on the screw before you install it = the oil makes it go in easier because you are basically re-tapping the hole as you drive the screw in & the oil also makes the screw come out easier later.
Put on one 3mm washer smoother side towards bearings / install two bearings / install second washer smoother side towards bearings / install lock nut - DO NOT OVER TIGHTEN - leave a little wiggle room so washers & bearings rotate freely.
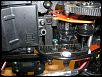
The washers act as a belt guide.
Remove the upper deck / cut out section shown in picture.

Reinstall the upper deck.
Adjust the front belt tensioner.
Check to make sure the edge of the belt clears the battery holder - if not, remove the battery holder and file / sand some meat off of it.
Now is a good time to re-route your ESC wires.
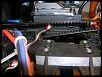
Your belt will now clear the top of most standard soft case 2c 5000mAh LiPo packs and not slap or drag on the upper deck.
Added bonus = you have more front belt tensioner adjustment.
Front Belt Lifter For LiPo Battery
PARTS NEEDED:
HPI #Z530 M3x18 flat head machine screw (HPI #Z087 M3x20 is OK also)
Two 3x6x2.5mm sealed bearings / VXB Kit7033 (www.vxb.com)
Two 3mm washers / Dubro #2109 (The washers act as a belt guide)
One 3mm Lock nut / Dubro #2101
Click on thumbnails for larger pictures.
Loosen the front belt tensioner.
Replace the self tapping motor mount screw (the upper forward screw when looking at the motor mount) with the HPI #Z530 M3x18 flat head machine screw (HPI #Z087 M3x20 is OK also) - spray a little oil on the screw before you install it = the oil makes it go in easier because you are basically re-tapping the hole as you drive the screw in & the oil also makes the screw come out easier later.
Put on one 3mm washer smoother side towards bearings / install two bearings / install second washer smoother side towards bearings / install lock nut - DO NOT OVER TIGHTEN - leave a little wiggle room so washers & bearings rotate freely.


The washers act as a belt guide.
Remove the upper deck / cut out section shown in picture.

Reinstall the upper deck.
Adjust the front belt tensioner.
Check to make sure the edge of the belt clears the battery holder - if not, remove the battery holder and file / sand some meat off of it.
Now is a good time to re-route your ESC wires.

Your belt will now clear the top of most standard soft case 2c 5000mAh LiPo packs and not slap or drag on the upper deck.
Added bonus = you have more front belt tensioner adjustment.
Last edited by Marv; 07-13-2012 at 03:08 PM.
05-22-2012, 06:56 AM
#3
Everyone has their own voodoo. This is my voodoo. This is what works for me.
What you need:
Painter's masking tape
X-Acto knife or razor blade
It's all in the picture.
Click the thumbnail for larger picture.
What you need:
Painter's masking tape
X-Acto knife or razor blade
It's all in the picture.
Click the thumbnail for larger picture.

Last edited by Marv; 05-25-2012 at 11:13 AM.
05-22-2012, 06:59 AM
#4
Everyone has their own voodoo. This is my voodoo. This is what works for me.
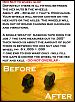
What you need:
HPI #6819 'O' Rings
It's all in the picture.
Click thumbnail for larger picture.
NOTE:
This worked fine, until I found a better (IMO) fix.
FOR THE BETTER FIX - SEE POST #124
What you need:
HPI #6819 'O' Rings
It's all in the picture.
Click thumbnail for larger picture.

NOTE:
This worked fine, until I found a better (IMO) fix.
FOR THE BETTER FIX - SEE POST #124
Last edited by Marv; 10-10-2012 at 07:30 PM. Reason: INFO ADDED
05-22-2012, 11:38 AM
#5
Tech Adept
iTrader: (5)
Join Date: Apr 2012
Location: Everett WA in the Summer Mesa AZ in the Winter
Posts: 128
Trader Rating: 5 (100%+)
Wow really great info and timely. Getting ready to go Lipo on mine and trying to actually get it to handle. I'm new to this so a lot of the handling issues are probably mine but I'm sure some of these mods will help.
I thought I heard or read that you shouldn't tighten up the belt tension on these things. Can't remember why. Doesn't make sense not to as far as I'm concerned.
Got any race set-up info for non treated asphalt?
I know; I'm greedy.
I thought I heard or read that you shouldn't tighten up the belt tension on these things. Can't remember why. Doesn't make sense not to as far as I'm concerned.
Got any race set-up info for non treated asphalt?
I know; I'm greedy.
05-22-2012, 04:42 PM
#6
Got any race set-up info for non treated asphalt?
However, one guy gave me this:
HPI #6847 Blue Springs for the Front
HPI #6843 Yellow Springs for the Rear
-1° toe on the Front
-1° camber on the Front
-1° camber on the Rear
I ran those settings with the 6° C Blocks & the 2° hubs on the rear on an indoor hard surface / basketball court and Pargoned the tires (VTA tires) and it hooked up nicely.
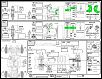
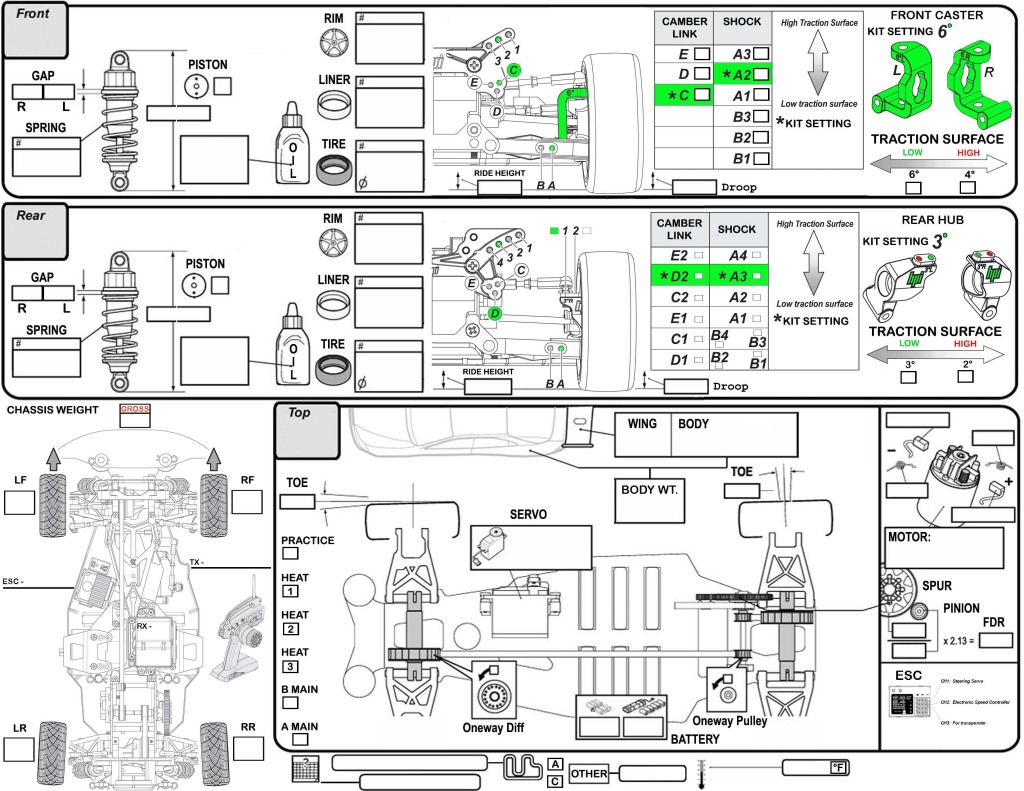
Here's the OUT of THE BOX settings that mine came with (click thumbnail for larger picture):

For LOW TRACTION surfaces you could try the HPI recommendations.
I'm working on a C Block Mod to eliminate the slop of the bushings in the C Blocks, the screws and balls in the bushings & the arm screws.
Soon as I have everything together & test it out I'll post it here.
05-22-2012, 06:10 PM
#7
Tech Adept
iTrader: (5)
Join Date: Apr 2012
Location: Everett WA in the Summer Mesa AZ in the Winter
Posts: 128
Trader Rating: 5 (100%+)
Thanks. I had forgotten about the information in the HPI manual.
05-23-2012, 02:42 PM
#8
Tech Rookie
Hey Marv, are you running everything in the factory holes, and just changing the alignment? I think that's what I see in the green diagram.
05-23-2012, 03:57 PM
#9
Tech Apprentice
finally some good sprint info is there any other threads where we can talk about this car
 05-24-2012, 09:06 AM
#11
Those I changed to the 2° hubs, but I did use the out of the box holes for everything.
I also took out the shock spacer that came installed = this lowered my ride height. On the 'out of the box' jpg this spacer is the 'gap' referred to in the shock section.

NOTE: One person recommended that (on the rear) I use the outer most holes on the hubs and the E holes on the shock tower for the camber links.
I didn't.
But that's not to say that I won't try it should I experience traction roll.
It's my understanding that using the outer most holes on the rear will affect the roll center.
So, to recap:
Everything colored in GREEN, as well as the RED checks and RED text, is how my particular S2S came 'out of the box'.
All I did was to adjust the front toe -1°, front camber -1°, switched the rear hubs to the 2° hubs and adjust the rear camber -1°.
In as much as the track I was on was an indoor basketball court the car hooked up quite well, considering the steering slop issues hadn't been addressed at that time.
Another limiting factor was the steering throw / radius = some meat needs to be taken off the C Block stops + doing the -1° tow allows for tighter cornering.
However, too tight on the cornering and the front wheels will hit the lower shock eyes.
So re-adjusting the steering end points is critical.
Pictures and procedures for the C Block mods; pinning the bushings in the C Blocks, reducing ball/screw slop within the bushings, front hub to C block slop and C Block to lower arm slop, as well as the tools & parts needed are forthcoming.
Last edited by Marv; 01-10-2013 at 05:30 AM.
05-24-2012, 09:58 AM
#12
Everyone has their own voodoo. This is my voodoo. This is what works for me.
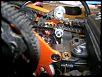
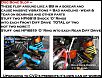
This mod will give you more front belt tensioner travel.
It's all in the picture.
Click the thumbnail for larger picture.
This mod will give you more front belt tensioner travel.
It's all in the picture.
Click the thumbnail for larger picture.

Last edited by Marv; 05-24-2012 at 11:19 AM.
05-25-2012, 10:35 AM
#13
They tightened up the steering a whole bunch.
REAL tight = I used a little Powdered Graphite in each one & worked each cup around it's respective ball, tapped out the excess and that improved their function.
The best part = once these were installed it was easier to find the other steering slop issues.
ADDED 08/24/2012
I forgot to add this earlier:
I still had some servo buzz - very slight and not always, but sometimes. In GOOGLING the issue, I came up with two probable causes = 1) The servo is ng or 2) Something is binding in the linkage. Mine was #2.
I removed all of the linkage ball studs, chucked each one up in a Dremel and polished each one with 500 grit silicon carbide paper to removed the factory black coating and then reinstalled = no more buzz.
Last edited by Marv; 08-24-2012 at 09:55 AM. Reason: Content Added
05-26-2012, 05:21 AM
#14
Here's a blank S2S setup sheet - it's a bit more detailed than the one found in the S2S manual.
Everything in GREEN are the out of the box settings that came on my S2S.
Click the thumbnail for larger picture.
Right click & save to your pc.
Everything in GREEN are the out of the box settings that came on my S2S.
Click the thumbnail for larger picture.
Right click & save to your pc.
 05-27-2012, 10:45 AM
#15
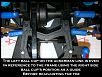
Everyone has their own voodoo. This is my voodoo. This is what works for me.
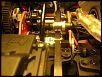
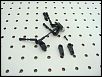
Servo Saver Horn & Left Side Steering Crank Slop Fix
Right side = Most of the slop is in the shaft to saver pipe fit.
The servo saver spring helps put pressure on the bearings so the bearing slop is not an issue.
Left side = Most of the slop is in the bearings themselves.
This became clear after I staked the inside of the horn & the shaft with an automatic center punch, installed a .005 shim on top of the lower bearing and reinstalled everything.
Initially, I installed a spring under the horn = that didn't work out.
Next, I upgraded to pricey hybrid ceramic/steel bearings = same slop.
The best option I have come up with to fix the left bell crank slop is to install another servo saver assembly as the left bell crank.
Additionally, I decided to upgrade the non-adjustable Ackerman rod to an adjustable one at the same time.
The oem rod has two right hand threads = a PITA to adjust because I had to keep taking it off, adjust and put back on = I upgraded it using a servo turnbuckle.
Parts -
One HPI 93317 (servo) Turnbuckle - this will replace the A186 Ackerman rod = the oem Ackerman rod has right hand threads on both sides / using the servo turnbuckle instead allows you to adjust the Ackerman link without removing it.
You'll need to cut the upper deck brace to access the new Ackerman turnbuckle.
One HPI 86195 Ball Studs
One HPI Z125 Ball Cups (and two Zip Lock Bag disks) or RPM 73375 Heavy Duty Ball Ends
One HPI 86190 Servo Saver Shaft
One HPI A181 Servo Pipe
One HPI 85097 Center post/Servo Horn/Steering Crank Set
One HPI A182 Servo Saver With Nut
One HPI B017 Bearings
Plumber's Teflon Tape
OR
Contact Anthony at ICB Hobbies www.icbhobbies.com/
He has a Buy It Now RC 'bone yard' on that left coast auction site & I was able to get the parts quite reasonably priced AND he ships FAST!!!
He lists the parts as HPI RACING SPRINT 2 SPORT FLUX STEERING BELL CRANK & 23 24 25 SERVO SAVER HORNS
Just Google 110861283944 and follow the link.
Plumber's Teflon Tape is nice.
It takes up the shaft slop is self lubricating and a PITA to apply on small parts - but IMO worth the effort.
For the Ackerman link mod - remove the upper deck & cut out the section shown in the picture - reinstall the deck leaving the two forward most screws out for now.
Right side Servo Saver assembly -
Remove the two forward most upper deck screws - remove and disassemble the servo saver assembly - wrap the lower part of the servo shaft with the plumber's Teflon tape - barber pole style.
Follow the pictures for wrapping & trimming the Teflon tape.
NOTE: If you wrap the tape clockwise make sure when you reinstall the shaft in the servo saver pipe that you 'screw' it in counter-clockwise SLOWLY.
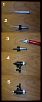
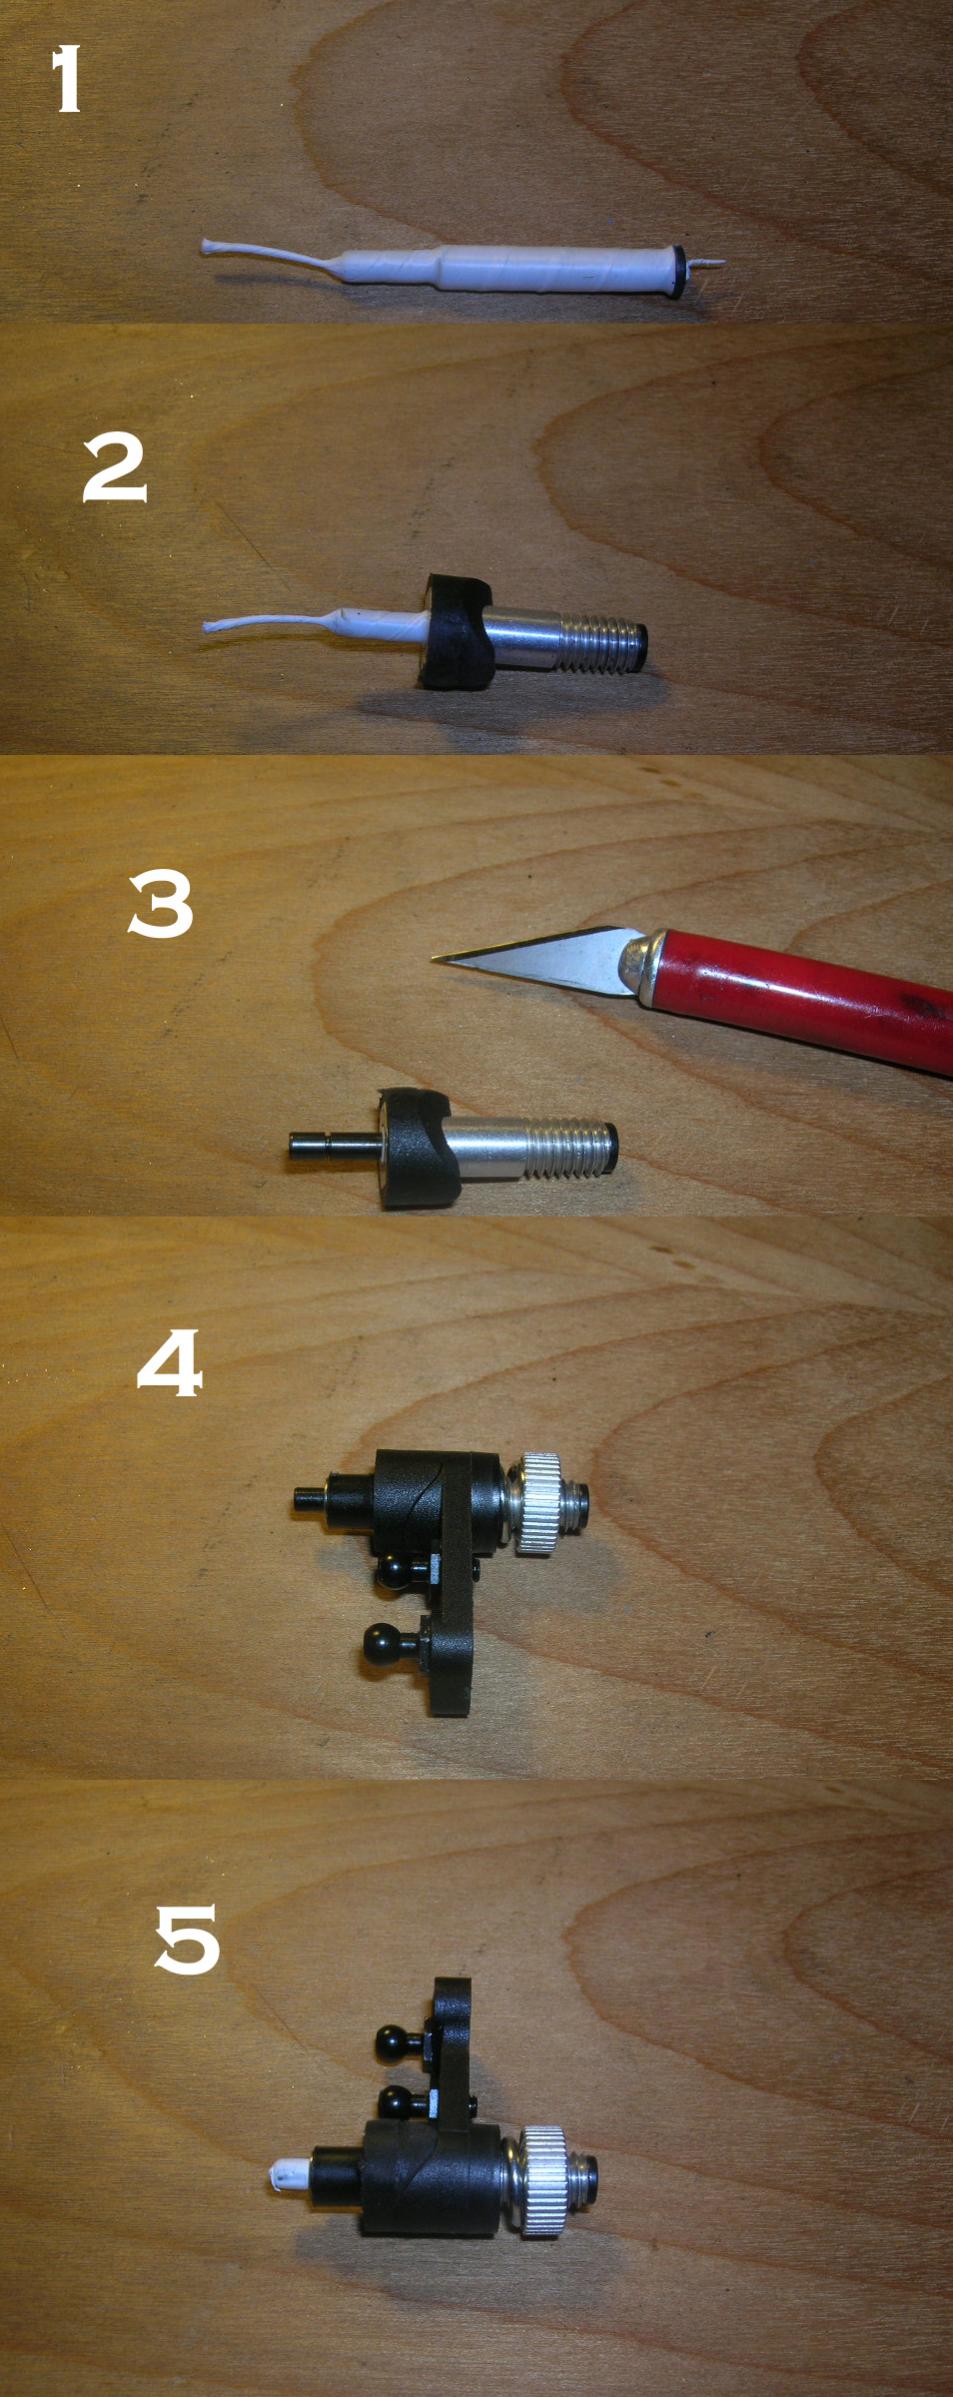
Wrap the shaft, install it in the servo pipe, assemble the shaft in the pipe, the pipe in the horns and trim the Teflon tail. Next install the spacer & E clip.
Then wrap the upper section of the shaft (just a straight away wrap) so that it fits in the upper deck hole with minimal play.
Probably about 5 warps or so.
Place a spacer/shim under the servo saver nut to keep it from backing off when you reinstall – DO NOT over tighten the nut – you need a little give so the servo saver does it’s job – and not burn out your servo.
For the left side cut off the servo arm - you won't need it.
Repeat the right side procedure for the left side and install on chassis.
Reinstall the two forward most upper deck screws.
Trim the excess Teflon tape after the upper deck is refastened.
Now, with everything back on the chassis -
Looking at the new left assembly as it would be mounted to the chassis, use the outside hole on the new assembly for the toe turnbuckle ball stud.
The Ackerman hole for the ball stud remains the same.
Once your Ackerman and toe links are reinstalled place your car on your stand, turn on the TX & the RX - your servo should center.
Adjust the new Ackerman rod FIRST so that the new left servo assembly is in line with the right servo assembly =
Your right & left Ackerman ball cups should be evenly parallel (same amount protruding) from the upper deck.
Your left side toe will be WAY off.
The right side should not have changed.
Check your camber & toe - readjust as required.
NOTE: I'm told that the Ackerman link is not supposed to be adjustable - Mine is.
A BETTER mod for the left side slop is in post #17
Servo Saver Horn & Left Side Steering Crank Slop Fix
Right side = Most of the slop is in the shaft to saver pipe fit.
The servo saver spring helps put pressure on the bearings so the bearing slop is not an issue.
Left side = Most of the slop is in the bearings themselves.
This became clear after I staked the inside of the horn & the shaft with an automatic center punch, installed a .005 shim on top of the lower bearing and reinstalled everything.
Initially, I installed a spring under the horn = that didn't work out.
Next, I upgraded to pricey hybrid ceramic/steel bearings = same slop.
The best option I have come up with to fix the left bell crank slop is to install another servo saver assembly as the left bell crank.
Additionally, I decided to upgrade the non-adjustable Ackerman rod to an adjustable one at the same time.
The oem rod has two right hand threads = a PITA to adjust because I had to keep taking it off, adjust and put back on = I upgraded it using a servo turnbuckle.
Parts -
One HPI 93317 (servo) Turnbuckle - this will replace the A186 Ackerman rod = the oem Ackerman rod has right hand threads on both sides / using the servo turnbuckle instead allows you to adjust the Ackerman link without removing it.
You'll need to cut the upper deck brace to access the new Ackerman turnbuckle.
One HPI 86195 Ball Studs
One HPI Z125 Ball Cups (and two Zip Lock Bag disks) or RPM 73375 Heavy Duty Ball Ends
One HPI 86190 Servo Saver Shaft
One HPI A181 Servo Pipe
One HPI 85097 Center post/Servo Horn/Steering Crank Set
One HPI A182 Servo Saver With Nut
One HPI B017 Bearings
Plumber's Teflon Tape
OR
Contact Anthony at ICB Hobbies www.icbhobbies.com/
He has a Buy It Now RC 'bone yard' on that left coast auction site & I was able to get the parts quite reasonably priced AND he ships FAST!!!
He lists the parts as HPI RACING SPRINT 2 SPORT FLUX STEERING BELL CRANK & 23 24 25 SERVO SAVER HORNS

Just Google 110861283944 and follow the link.
Plumber's Teflon Tape is nice.
It takes up the shaft slop is self lubricating and a PITA to apply on small parts - but IMO worth the effort.
For the Ackerman link mod - remove the upper deck & cut out the section shown in the picture - reinstall the deck leaving the two forward most screws out for now.

Right side Servo Saver assembly -
Remove the two forward most upper deck screws - remove and disassemble the servo saver assembly - wrap the lower part of the servo shaft with the plumber's Teflon tape - barber pole style.
Follow the pictures for wrapping & trimming the Teflon tape.
NOTE: If you wrap the tape clockwise make sure when you reinstall the shaft in the servo saver pipe that you 'screw' it in counter-clockwise SLOWLY.
Wrap the shaft, install it in the servo pipe, assemble the shaft in the pipe, the pipe in the horns and trim the Teflon tail. Next install the spacer & E clip.
Then wrap the upper section of the shaft (just a straight away wrap) so that it fits in the upper deck hole with minimal play.
Probably about 5 warps or so.
Place a spacer/shim under the servo saver nut to keep it from backing off when you reinstall – DO NOT over tighten the nut – you need a little give so the servo saver does it’s job – and not burn out your servo.
For the left side cut off the servo arm - you won't need it.
Repeat the right side procedure for the left side and install on chassis.
Reinstall the two forward most upper deck screws.
Trim the excess Teflon tape after the upper deck is refastened.
Now, with everything back on the chassis -
Looking at the new left assembly as it would be mounted to the chassis, use the outside hole on the new assembly for the toe turnbuckle ball stud.
The Ackerman hole for the ball stud remains the same.
Once your Ackerman and toe links are reinstalled place your car on your stand, turn on the TX & the RX - your servo should center.
Adjust the new Ackerman rod FIRST so that the new left servo assembly is in line with the right servo assembly =
Your right & left Ackerman ball cups should be evenly parallel (same amount protruding) from the upper deck.

Your left side toe will be WAY off.
The right side should not have changed.
Check your camber & toe - readjust as required.
NOTE: I'm told that the Ackerman link is not supposed to be adjustable - Mine is.
A BETTER mod for the left side slop is in post #17
Last edited by Marv; 08-24-2012 at 10:19 AM.