


 38Likes
Tekno ET48 Thread
 06-01-2013, 10:47 AM
#1
Pictures to come later today....

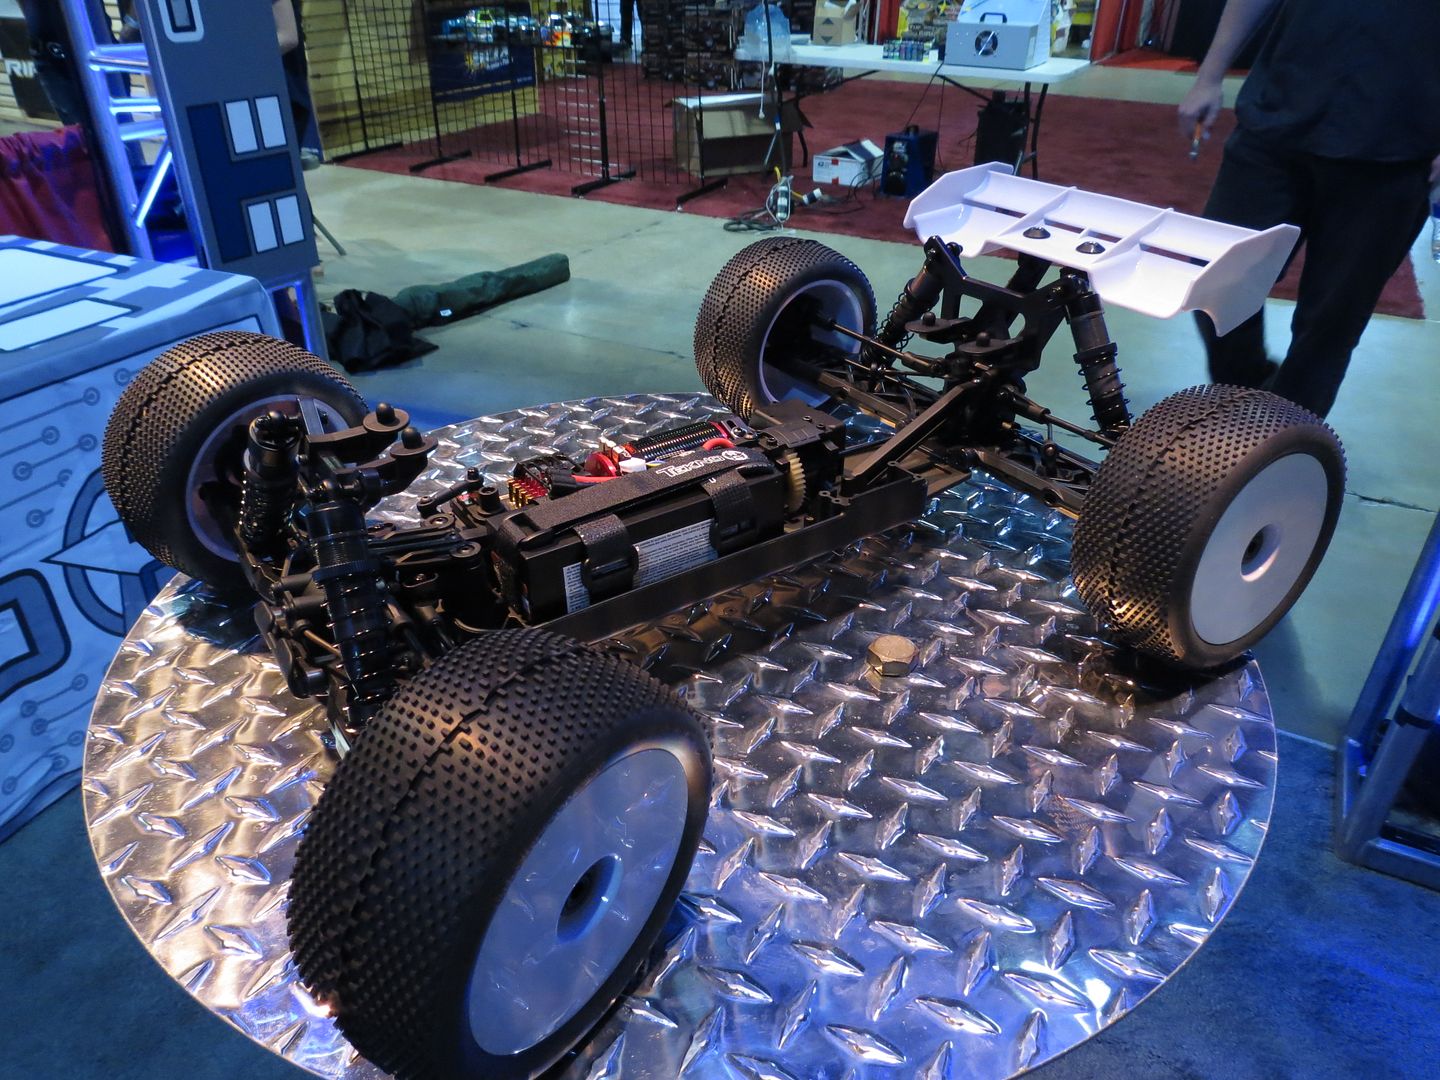
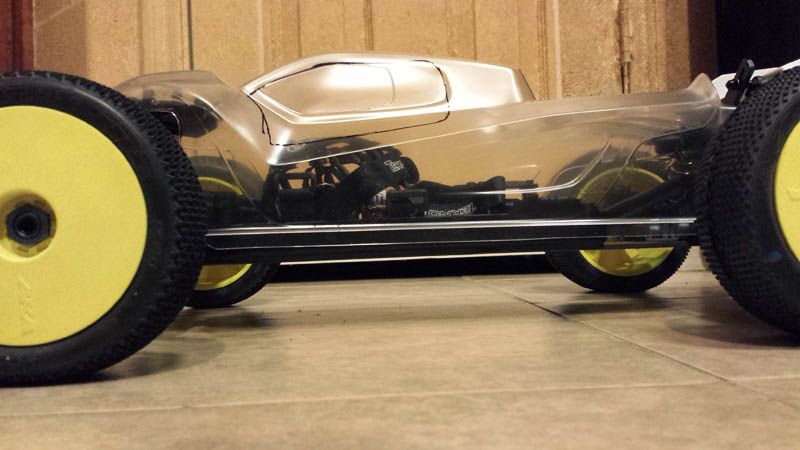
Tekno RC’s presence in the 1/8th electric class is nothing new. We were the trailblazers that were first to design a 1/8th chassis specifically for electric power. Now we are introducing the next phase in the evolution of the big scale electric classes – the ET48 Electric 1/8th 4WD Competition Truggy!
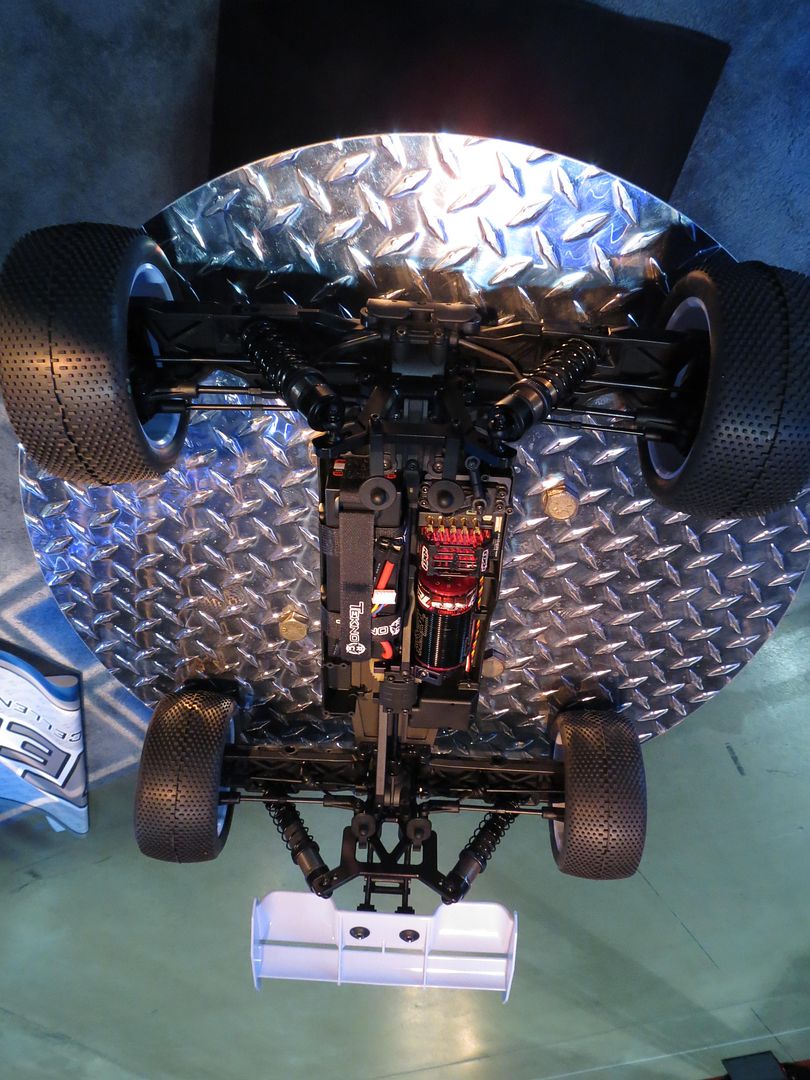
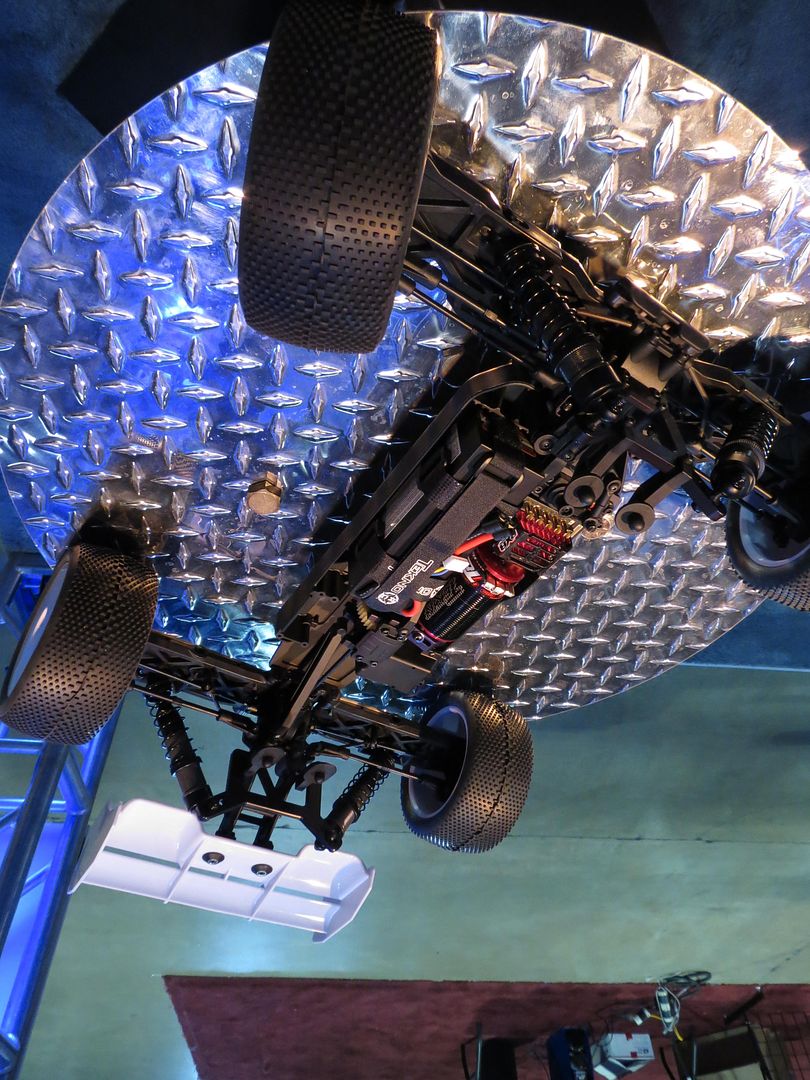
We started with our highly successful EB48 foundation – narrow chassis, perfect weight distribution, efficient straight driveline, and incredible durability. Then we added heavy duty truggy driveshafts,truggy turnbuckles and truggy shock towers. But we were not satisfied with doing what some other companies have done, so we took a totally different approach to the truggy suspension design.
Most of the current truggies on the market have flip-floppy arms and inadequate shock absorbers coupled to undersized shock towers. We set out to change all that with a set of truggy arms that are stiffer and beefier than any others. This makes the suspension much more efficient and results in higher corner speed and a noticeable increase in overall steering and response. Another obvious benefit is the ultimate durability of the arms. They are nearly indestructible.
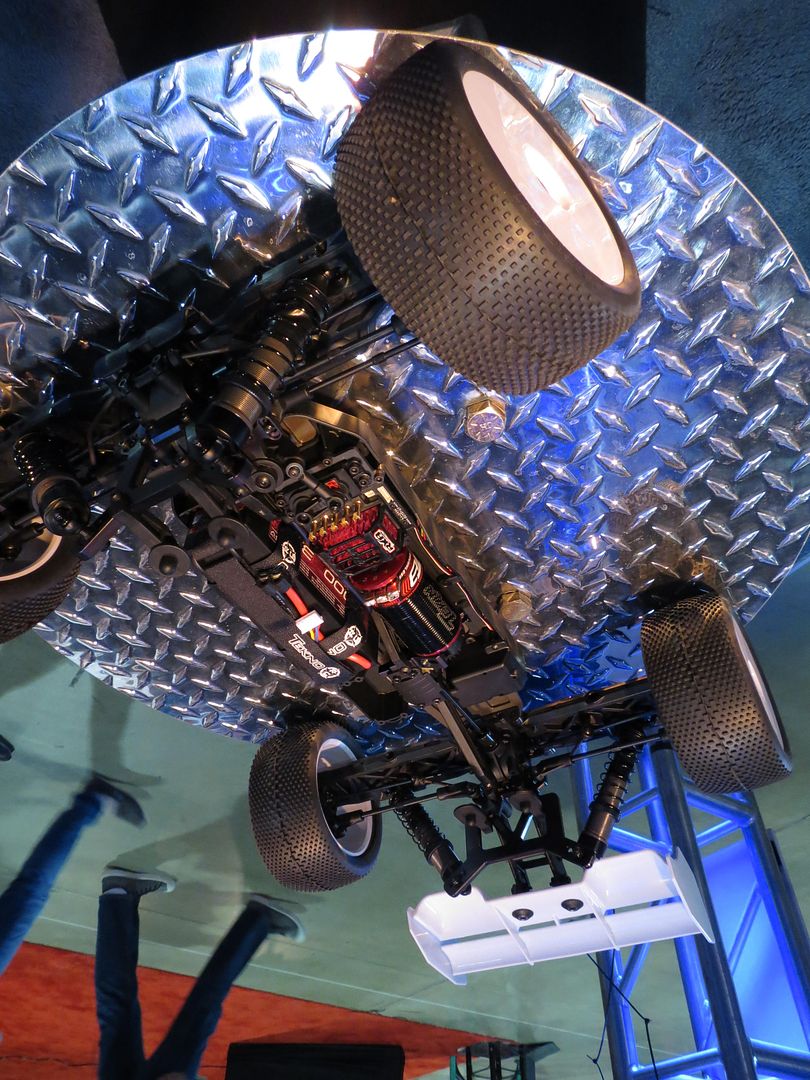
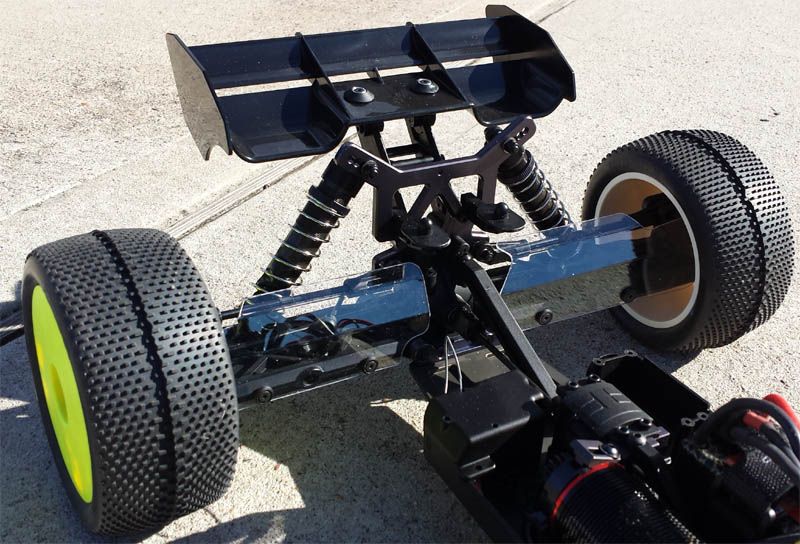
A new set of rear shocks were needed to handle the rigors of truggy racing. Measuring in at 137mm long, they provide excellent bump handling and jump landing. Our current 122mm shocks, standard on the rear of our EB48/NB48/SCT410, are now outfitted to the front of this awesome truggy. CNC machined 8 x 1.3mm pistons are standard, giving you an excellent blend of low speed and high speed damping. New, truggy specific springs and sway bars finish off the damping package.
The last piece of the puzzle were the shock towers. Truggies need more suspension travel than buggies, both up and down. To ensure that any racer could tune in their suspension to any track condition, we supplied the ET48 with more droop than any other truggy. At the same time, there is an abundance of up-travel to make sure the shocks don’t bottom before the chassis does on hard landings or super rough conditions. The front tower stands tall and is a whopping 6mm thick full CNC 7075 gun metal anodized aluminum masterpiece. The rear is 5mm thick and equally impressive. Let’s face it, truggies drive hard and this truggy will stand up to the abuse.
An electric specific truggy body was designed to hug the mud guards and cut through the wind like a razor. Put it this way, the body is narrower than a 1/10 touring car and contributes to the incredibly agile and nimble handling characteristics of the ET48.
Let’s continue. The ET48 shares all of the factory hop-ups and improvements we made to the EB48.2 buggy. We have included the +1.5 degree rear toe plate (TKR5013B) along with a new 0.5 degree offset insert to go along with the 1.0 and 0.0 offset inserts (TKR5021). New shock cartridges and shock bushings (TKR6008) improve handling consistency and reduce shaft deflection.
The differentials carry over from the EB48/NB48/SCT410 with the updated cross-pins and internal gears (TKR5149, TKR5150). All new truggy specific straight cut CNC diff ring and pinion gears ensure smooth, efficient, and quiet operation. Lightened differential outdrives (TKR5112X, TKR5114X) are used throughout. The lightened aluminum center driveshaft (TKR5077) is standard. A lighter drivetrain results in faster acceleration, higher top speed, and reduced wear. Our angled rear gearbox (TKR5016B) and larger bearings (TKRBB05134) round out the driveline. The angled gearbox reduces wear and increases efficiency by minimizing drive angles.
Up front the ET48 features the HD servo saver spring (TKR5101X) to help keep you pointing in the right direction. Lightened aluminum steering posts (TKR5102A) as well as lightened aluminum suspension sleeves (TKR5054A, TKR5055A) help reduce weight without any sacrifice in durability. Aluminum hard anodized pivot balls are used throughout (TKR5049A, TKR5052A, TKR5053A, TKR5058A, TKR5079A) to reduce weight.
Combine all of this with a winning out-of-the-box setup and you have the ET48 – the best 1/8th Electric Truggy on the market. Tekno RC – Dominating RC One Class at a Time!
ET48 Features:
+1.5 degree rear outer toe plate for more adjustability (TKR5013B)
CNC straight cut differential ring and pinion gears for smoother and quieter operation (TKR5403, TKR5405).
Internal differential gears with low wear cross-pin design (TKR5149, TKR5150)
Low-friction shock cartridge internals that minimize shaft deflection (TKR6008)
Angled rear inner bulkhead with larg bearings to reduce wear and increase efficiency (TKR5016B, TKRBB05134)
Hard anodized aluminum pivot balls throughout – reduces weight (TKR5049A, TKR5052A, TKR5053A, TKR5058A, TKR5079A)
Hard anodized aluminum front spindle and suspension bushings – reduces weight (TKR5054A, TKR5055A)
Aluminum steering posts – reduces weight (TKR5102A)
Aluminum front center driveshaft – reduces rotating mass (TKR5077)
Lightened differential outdrives throughout – reduces rotating mass (TKR5112X, TKR5114X)
HD servo saver spring for more precise steering feel (TKR5101X)
1.0, 0.5, and 0.0mm offset hinge pin inserts for more adjustability (TKR5021)
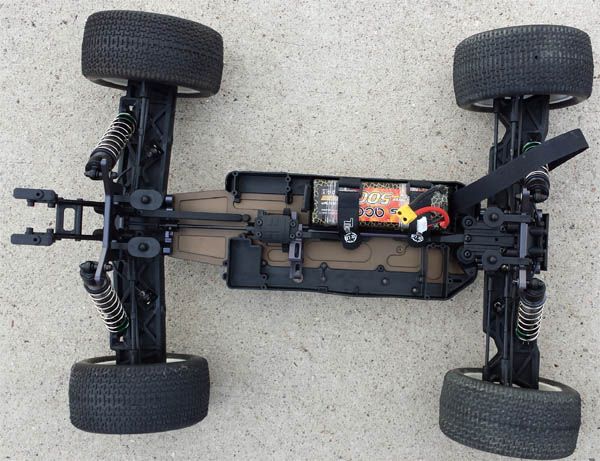
Chassis:
100% Tekno RC Designed and Tested in Southern California.
Designed to be electric from the ground up – no nitro conversions here!
4mm CNC 7075 aluminum hard anodized lightened chassis.
Super narrow chassis – widest point is only 125mm (less than 5”) mudguard-to-mudguard.
Class leading front and rear clearance (short chassis overhang) provides better bump handling and jump landing.
Integrated battery tray/mud guard, battery is sunken into chassis for a super low COG.
Integrated electronics tray/mud guard for easy removal of electronics.
Spacious, enclosed, easy access radio box with integrated transponder mount.
Single pack configuration is better balanced, lighter weight, and makes battery changes easier. Battery tray accommodate 2x2s packs.
Differentials and Drivetrain:
Straight cut CNC ring and pinion gears.
3 fluid filled adjustable super lightweight diffs.
Less rotating mass = better acceleration.
Straight center driveline for maximum efficiency and minimal wear.
CV driveshafts with captured pins on all 4 wheels.
Shocks:
Super smooth 16mm big bore shocks.
6mm front, 5mm rear CNC 7075 aluminum shock towers are standard.
CNC pistons are standard.
Innovative cone piston design (not just tapered) provides varied compression and rebound rates.
Fully adjustable long travel suspension geometry maximizes stability and traction while providing superior cornering and on-power steering.
CNC threaded shock bodies, caps, cartridge caps, and adjustment nuts.
4mm hardened steel polished shafts.
Triple guide design for true consistent shaft action.
Options for vented cap, emulsion, or standard shock configurations.
Optional spring rates and spring kits are available.
Suspension and Steering:
Adjustable length rear arms to suit any track condition.
Adjustable front arm sweep and angle to make the car more aggressive (swept back), or easier to drive (swept forward).
Front and rear arms can be used on either side, rear hubs can be used on either side – less parts in your toolbox.
‘Narrow pivot’ steering posts provide ‘0 bump’ geometry with almost ’0 steering slop’.
Adjustable CNC 7075 hinge pin braces are standard.
4mm inner, 3.5mm outer hinge pins, polished for smooth action.
Adjustable Ackerman and bump-steer (bump in, 0 bump, bump out).
CNC aluminum Ackerman plate rides on 4 precision bearings.
LCG rod ends and lightweight turnbuckles are lowered by 5mm.
Adjustable steering stops for precise steering travel settings.
Motor Mount:
2-piece CNC aluminum motor mount with precise dual clamping gear mesh adjustment.
Lightweight direct-to-diff mount design.
Use standard MOD 1 pinion, Tekno RC Traktion Drive or Elektri-Clutch.
Use motor brakes or mechanical brakes, the choice is yours.
Easily accommodates ‘Truggy’ or ‘Long’ can motors up to 78mm long.
Other Features:
Lightweight easily adjustable wing mount system.
High downforce wing included.
Easily adjust anti-squat, rear toe, front arm angle, front arm sweep, roll center, toe, camber, wheelbase, rear arm length, Ackerman, bump steer, suspension geometry out of the box.
Full set of option parts avaialble.
Extremely easy to work on with minimal screw count.
All metric hex hardware.
Specifications:
Length: 595mm
Wheelbase: 375-385mm
Width: 416-420*mm (*optional hubs required)
Weight: 4000g (9.0lb) (weight varies with equipment and battery used)
Diff Ratio: F/R – 9/40t, Center – 44t
Battery tray dimensions: 50x148mm (2x2s or 1x4s config)
Kit/RTR: Kit
Needed to complete:
2/3 channel radio/transmitter
1/8 Scale ESC and motor
High torque steering servo, optional brake servo
Pinion or Traktion Drive / Elektri-Clutch system
4-6s LiPo battery
1/8th scale truggy tires, wheels & CA glue
Paint for body
Hex tools (1.5, 2.0, 2.5mm), pliers, other tool
Recommended servo arm:
TKR5253 – Aluminum Servo Horn (25t spline)
TKR5252 – Aluminum Servo Horn (24t spline)
TKR5251 – Aluminum Servo Horn (23t spline)
recommend pinion gear for 2000/4S:
TKR4174 – M5 Pinion Gear (14t, MOD1, 5mm bore, M5 set screw)
TKR4175 – M5 Pinion Gear (15t, MOD1, 5mm bore, M5 set screw)


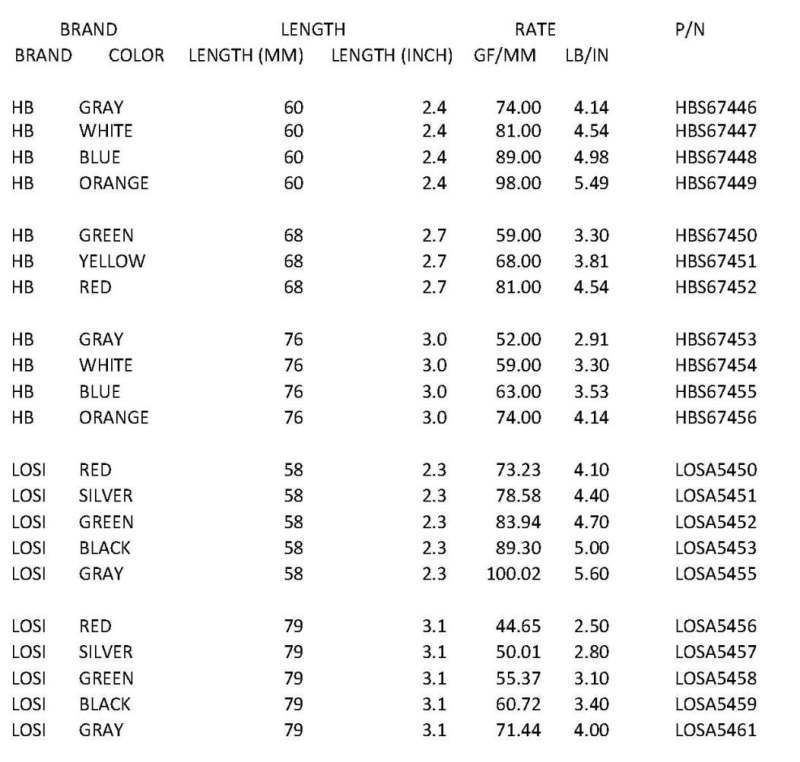
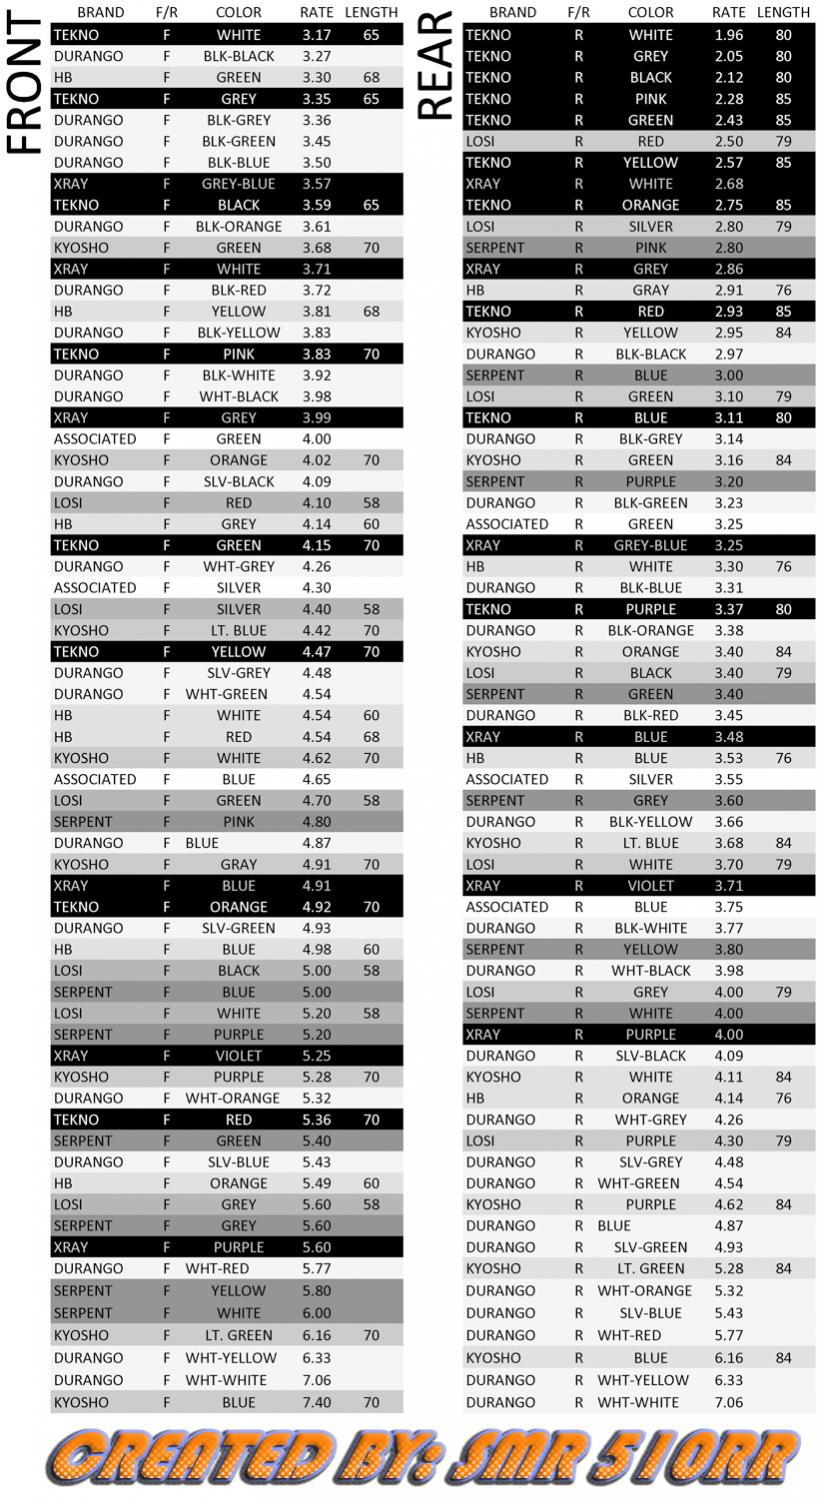
I also found this chart comparing Losi 8ight and Hot Bodies D8 springs, both of which fit Tekno shocks.
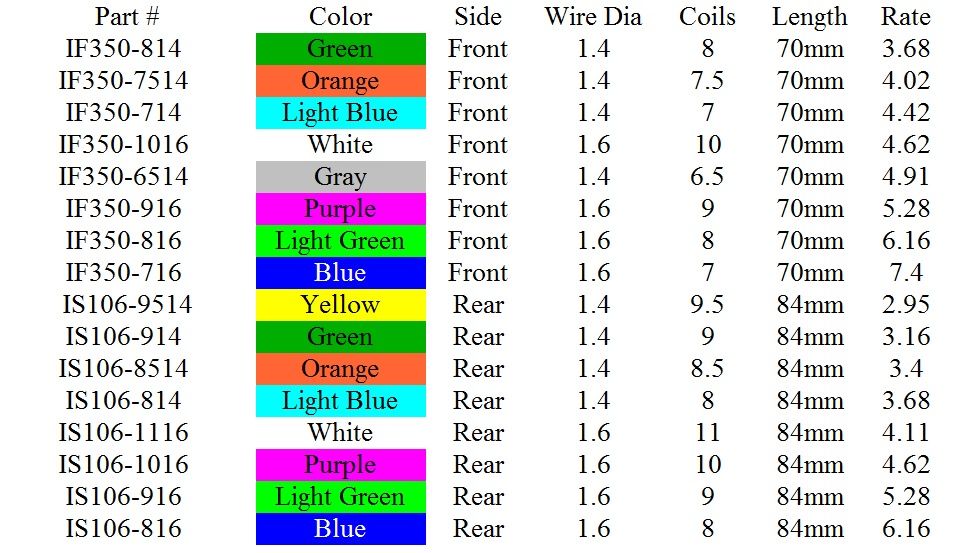
I made a chart of the Kyosho springs.
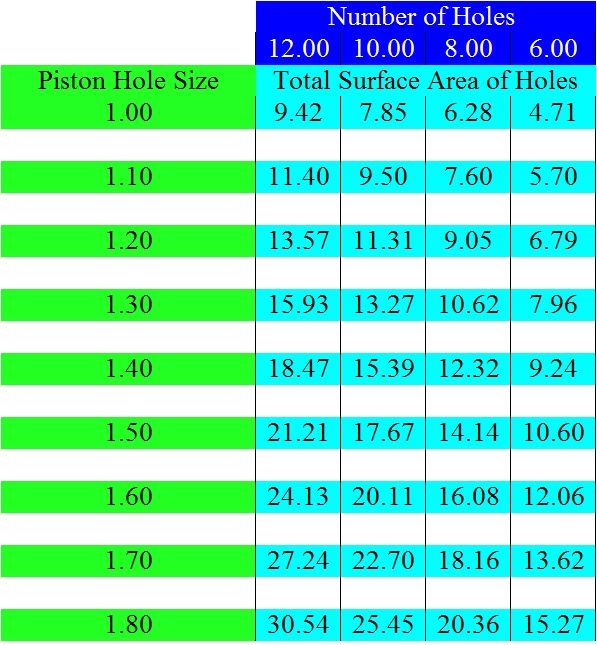
PISTON CHART
BEARING CHART

Skid plates
APE-RC makes a stainless steel skid-plate. Here's a link to his online store.

T-Bone Racing makes several bumpers/skids in different sizes for the front and rear of the buggy.

Here's a link to the online store
DE-Racing's rear skid plate

http://www.deracing.net/store/index....product_id=301
LEADFINGER Racing's rear stainless steel skid plate

http://shop.leadfingerrc.com/All-Stainless-Skids_c2.htm
LIST OF COMPATIBLE ALUMINUM SERVO HORNS:
OFNA-
23T OFN10772
24T OFN10774
25T OFN10776

Serpent-
23T SER600463
24T SER600464
25T SER600465

Hot Bodies-
23T HBS67167
24T HBS67168
25T HBS67169

VPPro
http://www.vpprousa.com/rc-parts-acc...category_id=22

Tekno-
23T TKR5251
24T TKR5252
25T TKR5253

OTHER STEERING UPGRADES
APE-RC makes a stainless steel ackermann plate.
 It's available here.
Tekno makes an aluminum ackermann plate.

Available direct, your LHS, or your favorite online store.
MISCELLANEOUS TOOLS
APE-RC has a great shock tool set that can be purchased here.

CAMBER LINK INFO
The camber links need a 4mm turnbuckle wrench for adjustment. We've found that some wrenches work exceptionally well.-
-The Losi stamped steel wrench (the one included with the 22 series of vehicles)
-The Hudy wrench

Taken from metoo's thread-
This is not intended to be a complete build thread. Its purpose is to point out a few non-mentions/typos in the manual and provide a bit of information that may help you in your build, including some specs at the bottom to help you figure out if another body will fit. I'll be updating this post as I go. Others, feel free to add your comments and I may include them in this posts. That said, this has go to be the best kit build I've done: Clear instruction, minimal part trees, great fits, practically no slop steering, etc.
I gotta say, for the most part Tekno has done a great job with engineering and manufacturing as "fit" goes. Also gotta love the interchangeability of the L/R suspension components.
1) Seemingly Defective Chassis. In some, if not all kits, you'll notice a bulge under at the kick-up on the bottom and a resulting sunk in area at the top. I was assured by Tekno that this is typical and a non-issue. Your front diff will not get dirty because it is fully housed. Everything for me mounted up just fine.
2) To use or not to use a 4mm Reamer? [page 8] The instructions call for it's use for the a-arms, as the inner pins fit snugly. Tekno suggest reaming them out so the pin rotates freely. I did not have a reamer, but I found that the arms on mine had minimal pivot resistance....that is until I tightened the suspension hangers. Regardless of any reaming, there would still be a clamping force on the arms. I removed the arms and sanded them a bit. As an example, the fronts arms were 50.35mm front to back at the pivot. I made them 50.00mm and everything free'd up with no axial slop.
3) Inner Diff Shims Are Different. [pages 3-4] Tekno uses Facebook more than their own website for news and updated information. This was mentioned there. The shims are not the same as indicated in the manual. The ID of the shims are also over-sized (not sure why), but the diff builds smoothly.....at least in my case.
4) Diff Gasket Tip. The gasket fits really snug in the ring gears of the front and rear diffs and the holes in the gasket are precisely the size of the holes in the ring gear. So, install the gasket in the ring gear at an angle and get the first hole aligned perfectly before working the rest of the gasket in. I personally smeared a lil' bit of black grease on both sides of the gasket first. Once the gasket is fully seated, you can not turn it within the ring gear.
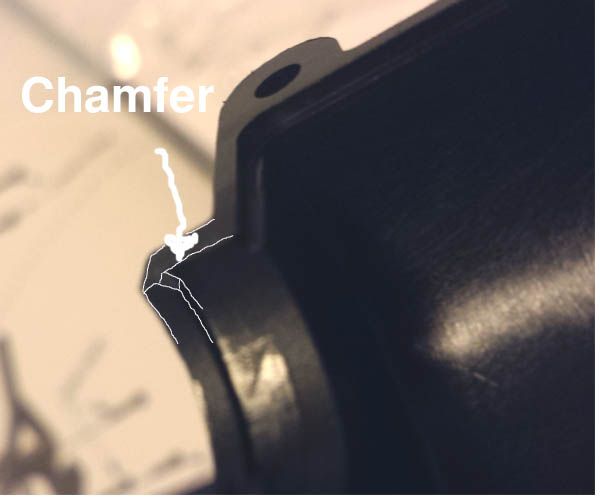
5) Outer Diff Shims Tip. [pages 5-6] I found it to be quite a feat of magic to get the diff in the housings with one shim on each side. They are delicate, thin, and have nothing to keep them in place while you try to install the diff. It's very easy to buckle/bend one or miss getting it in the housing. What worked great for me was to cut a .5mm x 30-40 degree chamfer on the inside of each of the four corners of the bearing lip of each diff housing halve (8 total for front diff, 8 total for rear diff). [See pic below] This allowed me a bit of alignment assistance to get the diff installed without damaging the shims.
6) Different Screws For The Swaybars. The screw to mount the sway bar linkage to the arms is called out as 14mm long. They are actually 20mm.
7) Barely worth mentioning, but the TKR1346 screws are listed on page 17 as 15mm long, but are actually 16mm. This is only mentioned because there are several length screws in the bag. I find the screws I need by checking them with calipers. I didn't find any 15's, just 16's, but no 16's were listed.
8) Hub/CVA Installation. I like to eliminate axial movement along the hing pin. As instructed, there's still a bit (less than 1mm) of axial play, which is typical of most kits I come across. [BTW, the nailed it on the inner hinge.] I added .5mm thick shim to the stack of spacers used on the outer pin.
9) Body Protection. The bodies have been getting quite a bit of damage about the front shock towers. After the paint has fully cured on your body, reinforce these areas. Smear some Amazing Goop on an press a square of drywall tape in. Add more goop, more tape, more goop, more tape, and finish with more goop. Work fast, as this stuff starts to thicken quickly. Let it cure at least 24hrs before use. Disclaimer: I haven't done this, nor installed the body, so do not know if there is room for 3 layers.
10) Steering Tierods. Below is the result of making building the linkage to the 77.7mm the instructions call for. It looks like a lot of toe-out to me, but I haven't run it yet to make that call for sure.
11a) Shocks. [pages 20-21] The piston pictured is the black 10 hole, but the one called out to be used for the stock build is the white 8 hole.
11b) Shocks. [pages 20-21] It's not mentioned or clearly pictured, but the boots are to be captured by the lower spring stops.
11c) Shocks. [pages 20-21] The rodend thread on the shafts are not very sharp, making it difficult to get the rodend threaded on. This can be a finger killer. If your tough-fingers, just grab the rod end very tightly and push very hard while turning. Just do this very hard from the start as multiple attempts get painful quickly. I felt popping the balls in after this was best.
12) Right Mud Guard.[page 23] I found that when the front 3 holes lined up perfectly, the rear 3 holes were quite a bit off. It will still mount up though if you thread in each screw sequentially a little at a time.
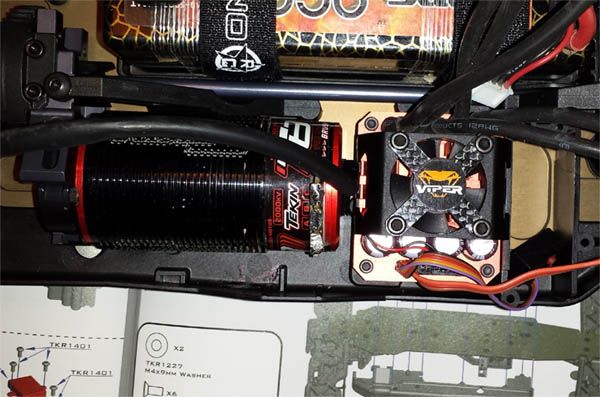
13) What ESCs fit? I seems this thing was designed closely around the Tekin RX8, as such, other 150A range ESCs may be a tight fit. The Hobbywing 150A fits, but its REALLY tight. You have two choices that I've seen. 1)...to face the sensor port out and notch the side guard to get the sensor cable in and tucked under the ESC. 2) Open the case and route the wires out the side. HERE's pics. What you don't want is THIS. HERE's on one done similarly, but better. The HW is 45.8mm wide which is less than my 46.4mm wide Viper VTX8 shown below which has plenty of room top to bottom as viewed in pic, but is very close to my truggy sized motor. The switch will be Gooped to the side of the fan.
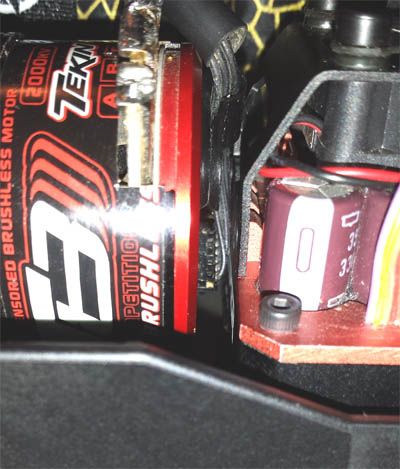
14) What's the smallest pinion? With a Tekin T8 2000kv, anything smaller than a 15T pinion will not fit without sanding down some of the bulge on the center chassis brace. A 15T may make the motor touch the brace.
_______________________________________
As measured: For body fitment assessment.
Front mounting posts center to center: 40.14mm
Rear mounting posts center to center: 45.53mm
Diameter of each post: 7.85mm
Depth of front post base from tower top: 6.5mm
top of front post base to chassis bottom: 109.3mm
top of rear post base to chassis bottom: 79.90mm
center of front post from top of front tower: 24.4mm
center of rear post from rear tower: 26.88mm
Horizontal dist from the inside
of the rear tower to the inside
of the top of Front tower: 383mm
cent-to-cent front post to rear post: 331.72mm as calculated from above data
Width of front tower: 101.47mm (shocks mount in out 3 holes will make the relative width wider.)
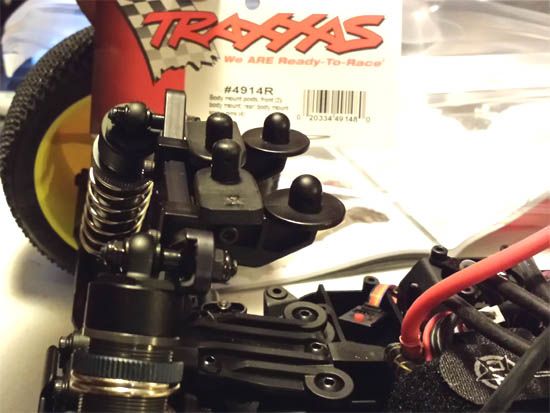
Installing a DEX408T body.
The only part required was Traxxas part # 4914R. The rear fits without modification. The only ET48 mod needed is a single hole thru each of the front mounts.
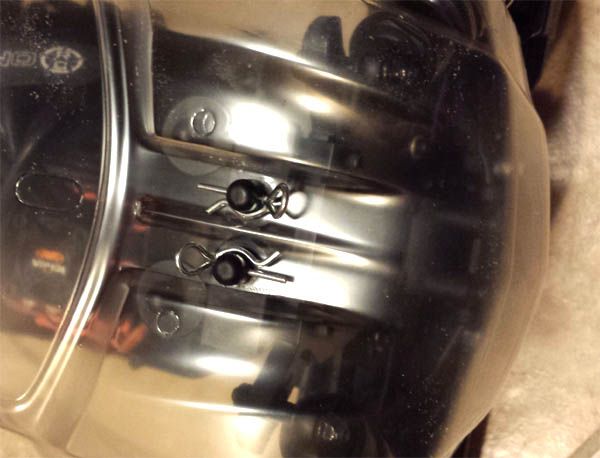
1) The single rear Emaxx body mount was cut into 4 pieces: the two posts and two cuts of material (spacers) next to the posts.
2) I placed a spacer between the Traxxas posts and the ET48 posts, squeezed them tightly together, and drilled a 2.77mm hole thru all 3 components.
3) I used a 20mm long (may need to grind to 19mm) M3 screw to bring the pieces together. You could put a nylok nut on it for insurance.
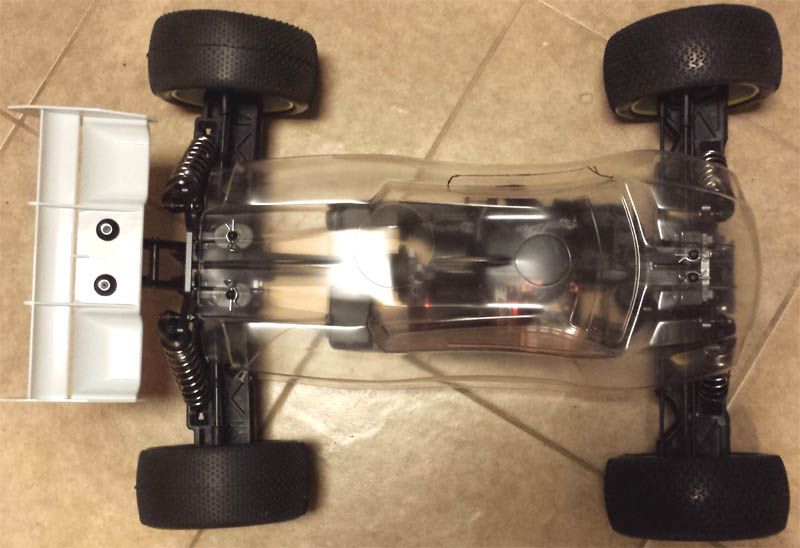
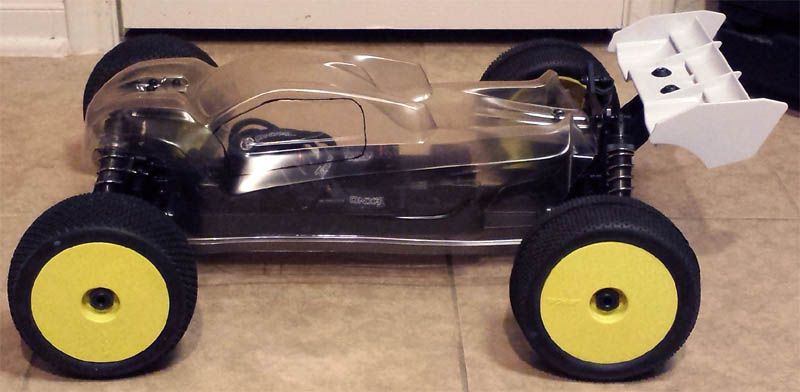
The body is shallow, so the bottom edge is higher than the bottom of the chassis. For this reason, I have not yet removed the the bottom flash from the body...and I may not. But, as you can see, if you look at the truggy from any elevated view, you can't tell. I have not finished cutting the body yet.
DIY Rear Mud Guards:
material: .06" thick lexan
hole spacing: 60mm
Clearance hole dia: 3.5mm max
hole depth in arm: it's just a bit over 6mm
screw size: M3. Depth depends on your material thickness, washer, screw type, etc.
[make with paper first, to make sure you like your final shape]
1) Cut two 154mm x 60mm rectangles an shape as required.
2) In general, the cutout required on the wheel end at the top needs to be 53mm x 15mm to avoid hitting the wheel at full droop and still leave about 10mm of clearance when the wheel flexes in during a crash.
3) Cut a 15mm radius from the bottom inside corner to make clearance for the suspension hanger.
4) Cut a 8mm x 8mm chamfer from the wheel end on the bottom to clear the outer hinge pin nut.
5) You'll see there are other cuts required for the driver's side guard to clear the rear brace.
6) Align the lexan with the bottom of the arm (or slightly above). Mark the first hole. Measure 60mm over and mark the second hole. Dent the marks with a punch to prevent drill wandering. Drill a 2mm hole as a pilot, then a 3.5mm hole. Use a sharp hobby blade to remove the flashing.
7) Mark your bend lines and clamp the lexan in wide steel vice at the line and bend it with the base of your hand.
8) Done! Enjoy the extra drag
ALUMINUM SCREW LISTING
From MattP-
I just made a list of all the screws, washers and nuts needed to convert a Tekno ride over to all aluminum screws. I listed the stock replacement Tekno screw part number first with details beside each. Only screws I did not list for an aluminum swap are the diff screws holding the ring/spur on to the diff. That's a high load bearing screw and steel is a better choice there.
Tekno Screw List:
Tekno #1523 3x10mm Flat Head 2
Tekno #1529 3x20mm Cap Head 20
Tekno #1341 4x6mm Flat Head 6
Tekno #1525 3x14mm Cap Head 18
Tekno #1524 3x12mm Cap Head 10
Tekno #1333 3x40mm Flat Head 4
Tekno #1327 3x16mm Flat Head 4
Tekno #1443 4x10mm Button Head 11
Tekno #1522 3x8mm Cap Head 9
Tekno #1445 4x14mm Button Head 6
Tekno #1447 4x16mm Button Head 2
Tekno #1401 3x6mm Button Head 8
Tekno #1448 4x18mm Button Head 2
Tekno #1343 4x10mm Flat Head 12
Tekno #1322 3x8mm Flat Head 11
Tekno #1344 4x12mm Flat Head 12
Tekno #1346 4x15mm Flat Head 2
Tekno #1325 3x14mm Flat Head 3
Tekno #1407 3x16mm Button Head 1
3x8mm Washer 20
4x9mm Washer 2
3mm Locknuts 20
3mm Flanged Locknuts 8
Part list for all the Tekno screws cross referenced over to blue aluminum at Fastenerexpress.com:
Only thing not listed are the washers.
M3 x .5 x 8mm Socket Head Cap Screws - Blue Qty. 25
Item Number: 30968
$6.01
M3 x .5 x 12mm Socket Head Cap Screws - Blue Qty. 25
Item Number: 30974
$6.47
M3 x .5 x 20mm Socket Head Cap Screws - Blue Qty. 25
Item Number: 30989
$7.51
M3 x .5 x 16mm Button Head Socket Screws - Blue Anodized Qty. 25
Item Number: 30671
$6.82
M3 x .5 x 6mm Flat Head Socket Screws - Blue Qty. 25
Item Number: 30750
$5.78
M3 x .5 x 10mm Flat Head Socket Screws - Blue Qty. 25
Item Number: 30756
$6.24
M3 x .5 x 16mm Flat Head Socket Screws - Blue Qty. 25
Item Number: 30765
$6.82
M4 x .7 x 10mm Button Head Socket Screws - Blue Anodized Qty. 25
Item Number: 30604
$8.44
M4 x .7 x 14mm Button Head Socket Screws - Blue Anodized Qty. 25
Item Number: 30610
$9.59
M4 x .7 x 16mm Button Head Socket Screws - Blue Anodized Qty. 25
Item Number: 30613
$10.16
M4 x .7 x 18mm Button Head Socket Screws - Blue Anodized 25 Pieces
Item Number: 30622
$10.75
M4 x .7 x 10mm Flat Head Socket Screws - Blue Qty. 25
Item Number: 30717
$7.51
M4 x .7 x 12mm Flat Head Socket Screws - Blue Qty. 25
Item Number: 30720
$7.98
M4 x .7 x 14mm Flat Head Socket Screws - Blue Qty. 25
Item Number: 30723
$8.44
M4 x .7 x 6mm Flat Head Socket Screws - Blue Qty. 25
Item Number: 30711
$11.21
3mm Hex Lock Nut Aluminum,Low Profile 5.5mm Hex - Blue Qty. 25
Item Number: 30147
$14.09
M3 x .5 x 14mm Socket Head Cap Screws - Blue Qty. 25
Item Number: 30977
$6.57
M3 x .4 x 6mm Button Head Socket Screws - Blue Anodized Qty. 25
Item Number: 30646
$5.78
M3 x .5 x 14mm Flat Head Socket Screws - Blue Qty. 25
Item Number: 90193
$6.70
Total with all screws having a count of 25 is $162.58
I will keep updating it as information becomes available. Thanks.


Tekno RC’s presence in the 1/8th electric class is nothing new. We were the trailblazers that were first to design a 1/8th chassis specifically for electric power. Now we are introducing the next phase in the evolution of the big scale electric classes – the ET48 Electric 1/8th 4WD Competition Truggy!
We started with our highly successful EB48 foundation – narrow chassis, perfect weight distribution, efficient straight driveline, and incredible durability. Then we added heavy duty truggy driveshafts,truggy turnbuckles and truggy shock towers. But we were not satisfied with doing what some other companies have done, so we took a totally different approach to the truggy suspension design.
Most of the current truggies on the market have flip-floppy arms and inadequate shock absorbers coupled to undersized shock towers. We set out to change all that with a set of truggy arms that are stiffer and beefier than any others. This makes the suspension much more efficient and results in higher corner speed and a noticeable increase in overall steering and response. Another obvious benefit is the ultimate durability of the arms. They are nearly indestructible.
A new set of rear shocks were needed to handle the rigors of truggy racing. Measuring in at 137mm long, they provide excellent bump handling and jump landing. Our current 122mm shocks, standard on the rear of our EB48/NB48/SCT410, are now outfitted to the front of this awesome truggy. CNC machined 8 x 1.3mm pistons are standard, giving you an excellent blend of low speed and high speed damping. New, truggy specific springs and sway bars finish off the damping package.
The last piece of the puzzle were the shock towers. Truggies need more suspension travel than buggies, both up and down. To ensure that any racer could tune in their suspension to any track condition, we supplied the ET48 with more droop than any other truggy. At the same time, there is an abundance of up-travel to make sure the shocks don’t bottom before the chassis does on hard landings or super rough conditions. The front tower stands tall and is a whopping 6mm thick full CNC 7075 gun metal anodized aluminum masterpiece. The rear is 5mm thick and equally impressive. Let’s face it, truggies drive hard and this truggy will stand up to the abuse.
An electric specific truggy body was designed to hug the mud guards and cut through the wind like a razor. Put it this way, the body is narrower than a 1/10 touring car and contributes to the incredibly agile and nimble handling characteristics of the ET48.
Let’s continue. The ET48 shares all of the factory hop-ups and improvements we made to the EB48.2 buggy. We have included the +1.5 degree rear toe plate (TKR5013B) along with a new 0.5 degree offset insert to go along with the 1.0 and 0.0 offset inserts (TKR5021). New shock cartridges and shock bushings (TKR6008) improve handling consistency and reduce shaft deflection.
The differentials carry over from the EB48/NB48/SCT410 with the updated cross-pins and internal gears (TKR5149, TKR5150). All new truggy specific straight cut CNC diff ring and pinion gears ensure smooth, efficient, and quiet operation. Lightened differential outdrives (TKR5112X, TKR5114X) are used throughout. The lightened aluminum center driveshaft (TKR5077) is standard. A lighter drivetrain results in faster acceleration, higher top speed, and reduced wear. Our angled rear gearbox (TKR5016B) and larger bearings (TKRBB05134) round out the driveline. The angled gearbox reduces wear and increases efficiency by minimizing drive angles.
Up front the ET48 features the HD servo saver spring (TKR5101X) to help keep you pointing in the right direction. Lightened aluminum steering posts (TKR5102A) as well as lightened aluminum suspension sleeves (TKR5054A, TKR5055A) help reduce weight without any sacrifice in durability. Aluminum hard anodized pivot balls are used throughout (TKR5049A, TKR5052A, TKR5053A, TKR5058A, TKR5079A) to reduce weight.
Combine all of this with a winning out-of-the-box setup and you have the ET48 – the best 1/8th Electric Truggy on the market. Tekno RC – Dominating RC One Class at a Time!
ET48 Features:
+1.5 degree rear outer toe plate for more adjustability (TKR5013B)
CNC straight cut differential ring and pinion gears for smoother and quieter operation (TKR5403, TKR5405).
Internal differential gears with low wear cross-pin design (TKR5149, TKR5150)
Low-friction shock cartridge internals that minimize shaft deflection (TKR6008)
Angled rear inner bulkhead with larg bearings to reduce wear and increase efficiency (TKR5016B, TKRBB05134)
Hard anodized aluminum pivot balls throughout – reduces weight (TKR5049A, TKR5052A, TKR5053A, TKR5058A, TKR5079A)
Hard anodized aluminum front spindle and suspension bushings – reduces weight (TKR5054A, TKR5055A)
Aluminum steering posts – reduces weight (TKR5102A)
Aluminum front center driveshaft – reduces rotating mass (TKR5077)
Lightened differential outdrives throughout – reduces rotating mass (TKR5112X, TKR5114X)
HD servo saver spring for more precise steering feel (TKR5101X)
1.0, 0.5, and 0.0mm offset hinge pin inserts for more adjustability (TKR5021)
Chassis:
100% Tekno RC Designed and Tested in Southern California.
Designed to be electric from the ground up – no nitro conversions here!
4mm CNC 7075 aluminum hard anodized lightened chassis.
Super narrow chassis – widest point is only 125mm (less than 5”) mudguard-to-mudguard.
Class leading front and rear clearance (short chassis overhang) provides better bump handling and jump landing.
Integrated battery tray/mud guard, battery is sunken into chassis for a super low COG.
Integrated electronics tray/mud guard for easy removal of electronics.
Spacious, enclosed, easy access radio box with integrated transponder mount.
Single pack configuration is better balanced, lighter weight, and makes battery changes easier. Battery tray accommodate 2x2s packs.
Differentials and Drivetrain:
Straight cut CNC ring and pinion gears.
3 fluid filled adjustable super lightweight diffs.
Less rotating mass = better acceleration.
Straight center driveline for maximum efficiency and minimal wear.
CV driveshafts with captured pins on all 4 wheels.
Shocks:
Super smooth 16mm big bore shocks.
6mm front, 5mm rear CNC 7075 aluminum shock towers are standard.
CNC pistons are standard.
Innovative cone piston design (not just tapered) provides varied compression and rebound rates.
Fully adjustable long travel suspension geometry maximizes stability and traction while providing superior cornering and on-power steering.
CNC threaded shock bodies, caps, cartridge caps, and adjustment nuts.
4mm hardened steel polished shafts.
Triple guide design for true consistent shaft action.
Options for vented cap, emulsion, or standard shock configurations.
Optional spring rates and spring kits are available.
Suspension and Steering:
Adjustable length rear arms to suit any track condition.
Adjustable front arm sweep and angle to make the car more aggressive (swept back), or easier to drive (swept forward).
Front and rear arms can be used on either side, rear hubs can be used on either side – less parts in your toolbox.
‘Narrow pivot’ steering posts provide ‘0 bump’ geometry with almost ’0 steering slop’.
Adjustable CNC 7075 hinge pin braces are standard.
4mm inner, 3.5mm outer hinge pins, polished for smooth action.
Adjustable Ackerman and bump-steer (bump in, 0 bump, bump out).
CNC aluminum Ackerman plate rides on 4 precision bearings.
LCG rod ends and lightweight turnbuckles are lowered by 5mm.
Adjustable steering stops for precise steering travel settings.
Motor Mount:
2-piece CNC aluminum motor mount with precise dual clamping gear mesh adjustment.
Lightweight direct-to-diff mount design.
Use standard MOD 1 pinion, Tekno RC Traktion Drive or Elektri-Clutch.
Use motor brakes or mechanical brakes, the choice is yours.
Easily accommodates ‘Truggy’ or ‘Long’ can motors up to 78mm long.
Other Features:
Lightweight easily adjustable wing mount system.
High downforce wing included.
Easily adjust anti-squat, rear toe, front arm angle, front arm sweep, roll center, toe, camber, wheelbase, rear arm length, Ackerman, bump steer, suspension geometry out of the box.
Full set of option parts avaialble.
Extremely easy to work on with minimal screw count.
All metric hex hardware.
Specifications:
Length: 595mm
Wheelbase: 375-385mm
Width: 416-420*mm (*optional hubs required)
Weight: 4000g (9.0lb) (weight varies with equipment and battery used)
Diff Ratio: F/R – 9/40t, Center – 44t
Battery tray dimensions: 50x148mm (2x2s or 1x4s config)
Kit/RTR: Kit
Needed to complete:
2/3 channel radio/transmitter
1/8 Scale ESC and motor
High torque steering servo, optional brake servo
Pinion or Traktion Drive / Elektri-Clutch system
4-6s LiPo battery
1/8th scale truggy tires, wheels & CA glue
Paint for body
Hex tools (1.5, 2.0, 2.5mm), pliers, other tool
Recommended servo arm:
TKR5253 – Aluminum Servo Horn (25t spline)
TKR5252 – Aluminum Servo Horn (24t spline)
TKR5251 – Aluminum Servo Horn (23t spline)
recommend pinion gear for 2000/4S:
TKR4174 – M5 Pinion Gear (14t, MOD1, 5mm bore, M5 set screw)
TKR4175 – M5 Pinion Gear (15t, MOD1, 5mm bore, M5 set screw)


I also found this chart comparing Losi 8ight and Hot Bodies D8 springs, both of which fit Tekno shocks.

I made a chart of the Kyosho springs.

Alright guys, I got tired of referring to 3 different spring charts to compare different brands so I compiled all of them and sorted them by spring rate. Please feel free to pass this along.
It will also print nicely on a 8.5x11 piece of paper to keep in your track bag for quick reference while at the track. Also, if anyone wants any other springs added (I think I got most of the popular ones) please let me know and if you find any errors please let me know.
It will also print nicely on a 8.5x11 piece of paper to keep in your track bag for quick reference while at the track. Also, if anyone wants any other springs added (I think I got most of the popular ones) please let me know and if you find any errors please let me know.
PISTON CHART
BEARING CHART
Skid plates
APE-RC makes a stainless steel skid-plate. Here's a link to his online store.
T-Bone Racing makes several bumpers/skids in different sizes for the front and rear of the buggy.
Here's a link to the online store
DE-Racing's rear skid plate
http://www.deracing.net/store/index....product_id=301
LEADFINGER Racing's rear stainless steel skid plate
http://shop.leadfingerrc.com/All-Stainless-Skids_c2.htm
LIST OF COMPATIBLE ALUMINUM SERVO HORNS:
OFNA-
23T OFN10772
24T OFN10774
25T OFN10776
Serpent-
23T SER600463
24T SER600464
25T SER600465
Hot Bodies-
23T HBS67167
24T HBS67168
25T HBS67169
VPPro
http://www.vpprousa.com/rc-parts-acc...category_id=22
Tekno-
23T TKR5251
24T TKR5252
25T TKR5253
OTHER STEERING UPGRADES
APE-RC makes a stainless steel ackermann plate.
It's available here.Tekno makes an aluminum ackermann plate.
Available direct, your LHS, or your favorite online store.
MISCELLANEOUS TOOLS
APE-RC has a great shock tool set that can be purchased here.
CAMBER LINK INFO
The camber links need a 4mm turnbuckle wrench for adjustment. We've found that some wrenches work exceptionally well.-
-The Losi stamped steel wrench (the one included with the 22 series of vehicles)
-The Hudy wrench
Taken from metoo's thread-
This is not intended to be a complete build thread. Its purpose is to point out a few non-mentions/typos in the manual and provide a bit of information that may help you in your build, including some specs at the bottom to help you figure out if another body will fit. I'll be updating this post as I go. Others, feel free to add your comments and I may include them in this posts. That said, this has go to be the best kit build I've done: Clear instruction, minimal part trees, great fits, practically no slop steering, etc.
I gotta say, for the most part Tekno has done a great job with engineering and manufacturing as "fit" goes. Also gotta love the interchangeability of the L/R suspension components.
1) Seemingly Defective Chassis. In some, if not all kits, you'll notice a bulge under at the kick-up on the bottom and a resulting sunk in area at the top. I was assured by Tekno that this is typical and a non-issue. Your front diff will not get dirty because it is fully housed. Everything for me mounted up just fine.
2) To use or not to use a 4mm Reamer? [page 8] The instructions call for it's use for the a-arms, as the inner pins fit snugly. Tekno suggest reaming them out so the pin rotates freely. I did not have a reamer, but I found that the arms on mine had minimal pivot resistance....that is until I tightened the suspension hangers. Regardless of any reaming, there would still be a clamping force on the arms. I removed the arms and sanded them a bit. As an example, the fronts arms were 50.35mm front to back at the pivot. I made them 50.00mm and everything free'd up with no axial slop.
3) Inner Diff Shims Are Different. [pages 3-4] Tekno uses Facebook more than their own website for news and updated information. This was mentioned there. The shims are not the same as indicated in the manual. The ID of the shims are also over-sized (not sure why), but the diff builds smoothly.....at least in my case.
4) Diff Gasket Tip. The gasket fits really snug in the ring gears of the front and rear diffs and the holes in the gasket are precisely the size of the holes in the ring gear. So, install the gasket in the ring gear at an angle and get the first hole aligned perfectly before working the rest of the gasket in. I personally smeared a lil' bit of black grease on both sides of the gasket first. Once the gasket is fully seated, you can not turn it within the ring gear.
5) Outer Diff Shims Tip. [pages 5-6] I found it to be quite a feat of magic to get the diff in the housings with one shim on each side. They are delicate, thin, and have nothing to keep them in place while you try to install the diff. It's very easy to buckle/bend one or miss getting it in the housing. What worked great for me was to cut a .5mm x 30-40 degree chamfer on the inside of each of the four corners of the bearing lip of each diff housing halve (8 total for front diff, 8 total for rear diff). [See pic below] This allowed me a bit of alignment assistance to get the diff installed without damaging the shims.
6) Different Screws For The Swaybars. The screw to mount the sway bar linkage to the arms is called out as 14mm long. They are actually 20mm.
7) Barely worth mentioning, but the TKR1346 screws are listed on page 17 as 15mm long, but are actually 16mm. This is only mentioned because there are several length screws in the bag. I find the screws I need by checking them with calipers. I didn't find any 15's, just 16's, but no 16's were listed.
8) Hub/CVA Installation. I like to eliminate axial movement along the hing pin. As instructed, there's still a bit (less than 1mm) of axial play, which is typical of most kits I come across. [BTW, the nailed it on the inner hinge.] I added .5mm thick shim to the stack of spacers used on the outer pin.
9) Body Protection. The bodies have been getting quite a bit of damage about the front shock towers. After the paint has fully cured on your body, reinforce these areas. Smear some Amazing Goop on an press a square of drywall tape in. Add more goop, more tape, more goop, more tape, and finish with more goop. Work fast, as this stuff starts to thicken quickly. Let it cure at least 24hrs before use. Disclaimer: I haven't done this, nor installed the body, so do not know if there is room for 3 layers.
10) Steering Tierods. Below is the result of making building the linkage to the 77.7mm the instructions call for. It looks like a lot of toe-out to me, but I haven't run it yet to make that call for sure.
11a) Shocks. [pages 20-21] The piston pictured is the black 10 hole, but the one called out to be used for the stock build is the white 8 hole.
11b) Shocks. [pages 20-21] It's not mentioned or clearly pictured, but the boots are to be captured by the lower spring stops.
11c) Shocks. [pages 20-21] The rodend thread on the shafts are not very sharp, making it difficult to get the rodend threaded on. This can be a finger killer. If your tough-fingers, just grab the rod end very tightly and push very hard while turning. Just do this very hard from the start as multiple attempts get painful quickly. I felt popping the balls in after this was best.
12) Right Mud Guard.[page 23] I found that when the front 3 holes lined up perfectly, the rear 3 holes were quite a bit off. It will still mount up though if you thread in each screw sequentially a little at a time.
13) What ESCs fit? I seems this thing was designed closely around the Tekin RX8, as such, other 150A range ESCs may be a tight fit. The Hobbywing 150A fits, but its REALLY tight. You have two choices that I've seen. 1)...to face the sensor port out and notch the side guard to get the sensor cable in and tucked under the ESC. 2) Open the case and route the wires out the side. HERE's pics. What you don't want is THIS. HERE's on one done similarly, but better. The HW is 45.8mm wide which is less than my 46.4mm wide Viper VTX8 shown below which has plenty of room top to bottom as viewed in pic, but is very close to my truggy sized motor. The switch will be Gooped to the side of the fan.
14) What's the smallest pinion? With a Tekin T8 2000kv, anything smaller than a 15T pinion will not fit without sanding down some of the bulge on the center chassis brace. A 15T may make the motor touch the brace.
_______________________________________
As measured: For body fitment assessment.
Front mounting posts center to center: 40.14mm
Rear mounting posts center to center: 45.53mm
Diameter of each post: 7.85mm
Depth of front post base from tower top: 6.5mm
top of front post base to chassis bottom: 109.3mm
top of rear post base to chassis bottom: 79.90mm
center of front post from top of front tower: 24.4mm
center of rear post from rear tower: 26.88mm
Horizontal dist from the inside
of the rear tower to the inside
of the top of Front tower: 383mm
cent-to-cent front post to rear post: 331.72mm as calculated from above data
Width of front tower: 101.47mm (shocks mount in out 3 holes will make the relative width wider.)
Installing a DEX408T body.
The only part required was Traxxas part # 4914R. The rear fits without modification. The only ET48 mod needed is a single hole thru each of the front mounts.
1) The single rear Emaxx body mount was cut into 4 pieces: the two posts and two cuts of material (spacers) next to the posts.
2) I placed a spacer between the Traxxas posts and the ET48 posts, squeezed them tightly together, and drilled a 2.77mm hole thru all 3 components.
3) I used a 20mm long (may need to grind to 19mm) M3 screw to bring the pieces together. You could put a nylok nut on it for insurance.
The body is shallow, so the bottom edge is higher than the bottom of the chassis. For this reason, I have not yet removed the the bottom flash from the body...and I may not. But, as you can see, if you look at the truggy from any elevated view, you can't tell. I have not finished cutting the body yet.
DIY Rear Mud Guards:
material: .06" thick lexan
hole spacing: 60mm
Clearance hole dia: 3.5mm max
hole depth in arm: it's just a bit over 6mm
screw size: M3. Depth depends on your material thickness, washer, screw type, etc.
[make with paper first, to make sure you like your final shape]
1) Cut two 154mm x 60mm rectangles an shape as required.
2) In general, the cutout required on the wheel end at the top needs to be 53mm x 15mm to avoid hitting the wheel at full droop and still leave about 10mm of clearance when the wheel flexes in during a crash.
3) Cut a 15mm radius from the bottom inside corner to make clearance for the suspension hanger.
4) Cut a 8mm x 8mm chamfer from the wheel end on the bottom to clear the outer hinge pin nut.
5) You'll see there are other cuts required for the driver's side guard to clear the rear brace.
6) Align the lexan with the bottom of the arm (or slightly above). Mark the first hole. Measure 60mm over and mark the second hole. Dent the marks with a punch to prevent drill wandering. Drill a 2mm hole as a pilot, then a 3.5mm hole. Use a sharp hobby blade to remove the flashing.
7) Mark your bend lines and clamp the lexan in wide steel vice at the line and bend it with the base of your hand.
8) Done! Enjoy the extra drag
ALUMINUM SCREW LISTING
From MattP-
I just made a list of all the screws, washers and nuts needed to convert a Tekno ride over to all aluminum screws. I listed the stock replacement Tekno screw part number first with details beside each. Only screws I did not list for an aluminum swap are the diff screws holding the ring/spur on to the diff. That's a high load bearing screw and steel is a better choice there.
Tekno Screw List:
Tekno #1523 3x10mm Flat Head 2
Tekno #1529 3x20mm Cap Head 20
Tekno #1341 4x6mm Flat Head 6
Tekno #1525 3x14mm Cap Head 18
Tekno #1524 3x12mm Cap Head 10
Tekno #1333 3x40mm Flat Head 4
Tekno #1327 3x16mm Flat Head 4
Tekno #1443 4x10mm Button Head 11
Tekno #1522 3x8mm Cap Head 9
Tekno #1445 4x14mm Button Head 6
Tekno #1447 4x16mm Button Head 2
Tekno #1401 3x6mm Button Head 8
Tekno #1448 4x18mm Button Head 2
Tekno #1343 4x10mm Flat Head 12
Tekno #1322 3x8mm Flat Head 11
Tekno #1344 4x12mm Flat Head 12
Tekno #1346 4x15mm Flat Head 2
Tekno #1325 3x14mm Flat Head 3
Tekno #1407 3x16mm Button Head 1
3x8mm Washer 20
4x9mm Washer 2
3mm Locknuts 20
3mm Flanged Locknuts 8
Part list for all the Tekno screws cross referenced over to blue aluminum at Fastenerexpress.com:
Only thing not listed are the washers.
M3 x .5 x 8mm Socket Head Cap Screws - Blue Qty. 25
Item Number: 30968
$6.01
M3 x .5 x 12mm Socket Head Cap Screws - Blue Qty. 25
Item Number: 30974
$6.47
M3 x .5 x 20mm Socket Head Cap Screws - Blue Qty. 25
Item Number: 30989
$7.51
M3 x .5 x 16mm Button Head Socket Screws - Blue Anodized Qty. 25
Item Number: 30671
$6.82
M3 x .5 x 6mm Flat Head Socket Screws - Blue Qty. 25
Item Number: 30750
$5.78
M3 x .5 x 10mm Flat Head Socket Screws - Blue Qty. 25
Item Number: 30756
$6.24
M3 x .5 x 16mm Flat Head Socket Screws - Blue Qty. 25
Item Number: 30765
$6.82
M4 x .7 x 10mm Button Head Socket Screws - Blue Anodized Qty. 25
Item Number: 30604
$8.44
M4 x .7 x 14mm Button Head Socket Screws - Blue Anodized Qty. 25
Item Number: 30610
$9.59
M4 x .7 x 16mm Button Head Socket Screws - Blue Anodized Qty. 25
Item Number: 30613
$10.16
M4 x .7 x 18mm Button Head Socket Screws - Blue Anodized 25 Pieces
Item Number: 30622
$10.75
M4 x .7 x 10mm Flat Head Socket Screws - Blue Qty. 25
Item Number: 30717
$7.51
M4 x .7 x 12mm Flat Head Socket Screws - Blue Qty. 25
Item Number: 30720
$7.98
M4 x .7 x 14mm Flat Head Socket Screws - Blue Qty. 25
Item Number: 30723
$8.44
M4 x .7 x 6mm Flat Head Socket Screws - Blue Qty. 25
Item Number: 30711
$11.21
3mm Hex Lock Nut Aluminum,Low Profile 5.5mm Hex - Blue Qty. 25
Item Number: 30147
$14.09
M3 x .5 x 14mm Socket Head Cap Screws - Blue Qty. 25
Item Number: 30977
$6.57
M3 x .4 x 6mm Button Head Socket Screws - Blue Anodized Qty. 25
Item Number: 30646
$5.78
M3 x .5 x 14mm Flat Head Socket Screws - Blue Qty. 25
Item Number: 90193
$6.70
Total with all screws having a count of 25 is $162.58
I will keep updating it as information becomes available. Thanks.
Last edited by Matthew_Armeni; 01-13-2015 at 09:00 AM.
 06-01-2013, 10:50 AM
#2

get one or follow one.
Last edited by UK.hardcore; 01-27-2014 at 01:51 PM. Reason: added info.
06-01-2013, 12:07 PM
#3
YES! Finally!!!!! I am going to broke thanks to you guys. Already earmarking funds for the NB48 and now this..
06-01-2013, 12:07 PM
#4
truggy!
Last edited by Mullet1; 07-24-2013 at 04:55 PM.
06-01-2013, 01:32 PM
#8
Finally!! Gonna order one as soon as they are in stock!
06-01-2013, 02:26 PM
#11
That's a game changer. Any word on when they will be available?
06-01-2013, 02:31 PM
#12
I called it.
06-01-2013, 02:49 PM
#14
Available in the fall (fingers crossed) according to Danny.
06-01-2013, 04:20 PM
#15
Damn, should I sell my V4 MBX6Te.....
Wonder how the anorexic truggy body will look too.
Wonder how the anorexic truggy body will look too.