


 19Likes
Team Associated RC8.2e Thread
 03-09-2012 | 05:40 AM
#811
Tech Regular
iTrader: (36)
Joined: Dec 2011
Posts: 461
From: Indiana
Lapster....
This is an old trick from motorcycle engine building...
Aluminum is softer and more reactive to temperature changes than steel.
Remove the hub from the car and clean very well. Place in 200 deg. oven for 10-15 min's. Use gloves to remove part from oven. The heat will make the aluminum expand faster than the bearing....a couple taps on a wood cutting board and it should fall right out. Be careful - it may drop out as you're removing it from the oven. We use this trick to remove pressed-in bearings from aluminum engine cases. Just make sure the part is clean so you don't stink up the oven....
Same trick can be used to install pressed in or very tight fitting bearings. Instead of using a lot of force or pounding, simply put the aluminum part in the oven (low temp) for a little and the bearing in the freezer. After 10 min's or so, the bearing will fall right into place without distortion or damage to either part.....
 03-09-2012 | 06:07 AM
#812
Tech Apprentice
iTrader: (3)
Joined: Aug 2011
Posts: 74
From: Houston, TX
That's a good tip, thank you! My problem was that when I started to push it out I guess i pushed it just a little bit crooked. After trying everything I simply pushed it in then it came right out when I removed it straight.
 03-09-2012 | 06:31 AM
#814
 .
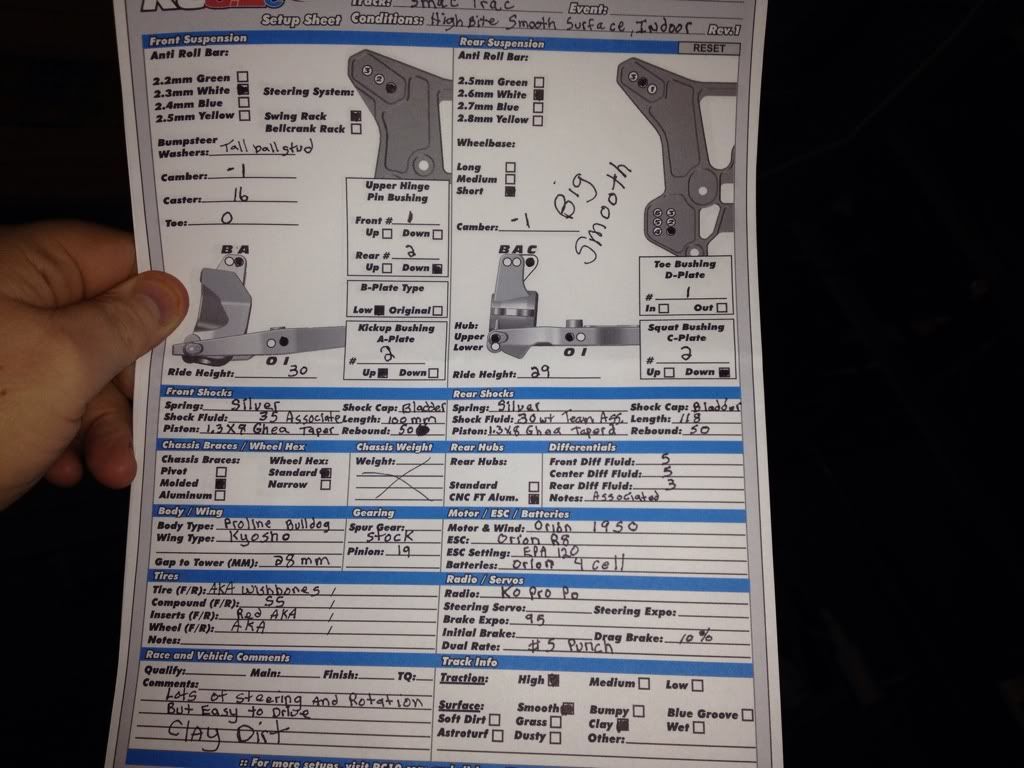
.This was my testing as of yesterday with the ulum rear hub link in the 3hole inside the car rotated a lot more so I went back down to the silver spring in the rear and dropped 2% on the drag brake..
And thanks for the trimming tips when getting the ulum rear hubs for everyone who chimed in
Last edited by bigBoyBigToy; 03-09-2012 at 06:52 AM.
03-09-2012 | 08:41 AM
#815
03-09-2012 | 08:51 AM
#816
Tech Adept
iTrader: (13)
Joined: Jan 2010
Posts: 192
From: Michigan
Hey, how do you like the orion esc and motor? I been running the tekin rx8 with a 1900 motor in my old car. I just bough a new 8.2e and was thinking about trying the orion setup, but no one locally runs it so I don't have any feedback on it. I run orion stuff in my 1/10 scales and it's awsome.
 Edit I'm using the bellcrank rack! Not the swing rack!!
03-09-2012 | 01:17 PM
Edit I'm using the bellcrank rack! Not the swing rack!!
03-09-2012 | 01:17 PM
#817
Hey, how do you like the orion esc and motor? I been running the tekin rx8 with a 1900 motor in my old car. I just bough a new 8.2e and was thinking about trying the orion setup, but no one locally runs it so I don't have any feedback on it. I run orion stuff in my 1/10 scales and it's awsome.
Smoothness and braking and runs super cool I've ran tekin also in 1/8 and I'm in love with the Orion r8 and 1950 combo!! Just butter smooth...
Now the big test will be outdoors which starts in 2 weeks that will be the real test of its durability then is when I find out the whole package.. But the whole indoors season has been flawless... I did hav to replace the fan ,I just put a tekin fan on it..
Butter smooth
03-09-2012 | 02:17 PM
#818
Tech Rookie
Joined: Nov 2011
Posts: 14
hello all.. just brought home my factory team kit rc8.2e.. my question is.. are there any hints tips or tricks when building the buggy?? i know a few things learned from my b44.1 build.. like the green slime in the difs... think i should do the same thing. or whats everyones thoughts?? anything would help.. this will only be my second kit built from scratch.. thanks alot
team associated b44.1
team losi ten-scte
now team associated rc8.2E
team associated b44.1
team losi ten-scte
now team associated rc8.2E
03-09-2012 | 03:18 PM
#819
hello all.. just brought home my factory team kit rc8.2e.. my question is.. are there any hints tips or tricks when building the buggy?? i know a few things learned from my b44.1 build.. like the green slime in the difs... think i should do the same thing. or whats everyones thoughts?? anything would help.. this will only be my second kit built from scratch.. thanks alot
team associated b44.1
team losi ten-scte
now team associated rc8.2E
team associated b44.1
team losi ten-scte
now team associated rc8.2E
Tips and suggestions tons of info on all the tid
Bits.. The more u read the better understanding the build will be
03-09-2012 | 10:38 PM
#822
Interesting note...I replaced my rear diff outdrives from the old rc8be to the new light weight rc8.2 outdrives...saved 7 grams of weight between the old & new. Interestingly the new outdrives are shorter in length. I haven't installed the rear diff yet...I'm sure it will be fine but I also noticed on the nitro thread that someone is having issues with the rear cvd falling out. I'm gonna install the diff tonight and we'll see...
03-09-2012 | 11:12 PM
#824
Tech Regular
Joined: Mar 2011
Posts: 333
From: Mid TN
I think 140mm length or less should fit fine. I use some Turnigy packs that are 138mm long and use the foam pads in the tray on all 4 sides.
http://www.hobbyking.com/hobbyking/s...arehouse_.html
http://www.hobbyking.com/hobbyking/s...arehouse_.html
03-09-2012 | 11:27 PM
#825
I think 140mm length or less should fit fine. I use some Turnigy packs that are 138mm long and use the foam pads in the tray on all 4 sides.
http://www.hobbyking.com/hobbyking/s...arehouse_.html
http://www.hobbyking.com/hobbyking/s...arehouse_.html