


Associated RC12R5
 08-15-2011, 09:56 PM
#2926
Tech Apprentice
Todd snuck in while I was re-installing the spell checker.  He did a more thorough job than I explaining the shock anyway...
On to the second half of my post.
I'm in the process of updating my RC12R5 as well. It's got a Slapmaster thrust bearing set for the 5.1 already as well as the blue AE alumnium screw set. I just ordered up the 5.1 rear pod plates and cross bar (or whatever it is) plus the LiPo conversion kit. I'm hoping that takes care of the various CF bits I need. I suspect I'll need to order up a few blue screws when it's all said and done if I want to keep the bling content at 100%. I've got entry level Novak remanufactured electronics (13.5 SS Pro and Havoc Sport 1S ESC) plus the standard issue Futaba S9650 so we'll see how all that works out.
I unfortunately never made it out last year for any shake down runs with it so I won't have any good point of comparison. Fortunately Todd runs that track I'll be running at in a month or so. I suspect he won't be opposed to taking a few laps with my car once I get it out there.
Half the fun of these things is building them, taking them apart, and doing it all over again, right? Except that part where the edges of the new CF have to be sanded...
He did a more thorough job than I explaining the shock anyway...On to the second half of my post.
I'm in the process of updating my RC12R5 as well. It's got a Slapmaster thrust bearing set for the 5.1 already as well as the blue AE alumnium screw set. I just ordered up the 5.1 rear pod plates and cross bar (or whatever it is) plus the LiPo conversion kit. I'm hoping that takes care of the various CF bits I need. I suspect I'll need to order up a few blue screws when it's all said and done if I want to keep the bling content at 100%.
I've got entry level Novak remanufactured electronics (13.5 SS Pro and Havoc Sport 1S ESC) plus the standard issue Futaba S9650 so we'll see how all that works out. I unfortunately never made it out last year for any shake down runs with it so I won't have any good point of comparison.
Fortunately Todd runs that track I'll be running at in a month or so. I suspect he won't be opposed to taking a few laps with my car once I get it out there. Half the fun of these things is building them, taking them apart, and doing it all over again, right? Except that part where the edges of the new CF have to be sanded...
 08-16-2011, 01:51 AM
#2927

Ah...yes. The 12R5 shock cap.
My best technique is to fill the shock with oil to just above the lip where the inside plastic ring seats. Pump the piston to make sure the reservoir is full and not trapping any air. Make sure the oil is bubbled out. Gently seat the plastic ring on the inside lip with the tip of a 1.5mm hex driver. A little oil should force itself around the ring. Lightly dab it out with the tip of a shop towel. Slip the o-ring over the piston shaft (I've long since caved in and just use new o-rings when I rebuild the shocks. It's so much easier, as they do swell after being in the shock for even a little while. Green Slime them. O-rings are a cheap consumable.)
The end cap: Hold it lightly so you can feel the threading. Lightly press it down on the threads and twist it backward. You should be able to feel a subtle click--maybe not even a click--more like a snick--when the start of the threads pass over each other. From right there, gently thread the shock cap on. If it's easy and goes right on, you should be good. If there's any resistance at all, don't force it! Just back it off until you feel the thread snick on your finger tips and start it again.
A properly built 12R5 shock lasts a long time. I like them a lot. I think the main frustrations are experienced when guys rush the initial build and cross-thread the end caps, or if they try to reuse swollen o-rings and, again, can't get the caps to seat properly.
I'll add that the O-ring should just barely be proud of the shock cylinder before installing the shock cap.
Also cutting a tiny bit off the edge of the plastic ring helps to bleed the oil out.
This will make it a lot easier to build, and consistent.
New O-rings every time for sure, cheap insurance.
RAL;
Hit me up anytime if you got any questions on that R5
See you at TQ bud
08-16-2011, 07:36 PM
#2928
RedBull,
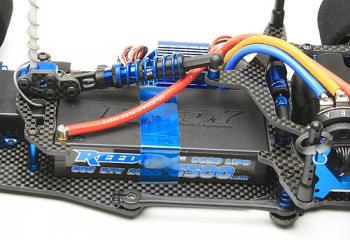
I just finished the Lipo conversion and was very surprised to see how close the shock mount is to the negative bullet on the battery. I have the Reedy 4600 with the stepped case so it doesn't quite fit the tray, it can slide under if the tape gives out. Looks like you have to pop the shock off to change batteries. (Hello CRC).
Other than that it was an uneventful build. I'll put the electronics in another day.
08-16-2011, 07:56 PM
#2929
RedBull,
I just finished the Lipo conversion and was very surprised to see how close the shock mount is to the negative bullet on the battery. I have the Reedy 4600 with the stepped case so it doesn't quite fit the tray, it can slide under if the tape gives out. Looks like you have to pop the shock off to change batteries. (Hello CRC).
Other than that it was an uneventful build. I'll put the electronics in another day.
Much better than the Red Car in this aspect.
The battery post are even closer with 4mm bullets.
4600's are not quite as tall as the larger capacity lipo packs.
Battery changes are not going to be as easy with the upgrade.
08-16-2011, 08:32 PM
#2930
With a 12R5 you can un-bolt the shock, no need to "pop" it off
Much better than the Red Car in this aspect.
The battery post are even closer with 4mm bullets.
4600's are not quite as tall as the larger capacity lipo packs.
Battery changes are not going to be as easy with the upgrade.
Much better than the Red Car in this aspect.
The battery post are even closer with 4mm bullets.
4600's are not quite as tall as the larger capacity lipo packs.
Battery changes are not going to be as easy with the upgrade.
Looks like I'll do the same as last year and charge the battery in the car unless the track insists on bagging.
Still the layout is nice.
08-17-2011, 07:44 AM
#2932
I was messing around with my old body to see how far off the mounting holes were on the Lipo Conversion and to my surprise it just dropped on. Both front and rear body mounts and holes lined up. Now the rollover mast is another story and that will need a hole in the windshield.
08-17-2011, 08:06 AM
#2933
What about the wheel location? Isn't the wheelbase longer?
E
E
08-17-2011, 08:24 AM
#2935
It's a Parma EE-1 body.
Just looks like a little trimming behind the rear wheels. It will depend how big you run your tires. Mine are 44 rear and 42 front to start.
Now mind you that this was a body that has seen its share of barriers and other moving objects so the holes may be enlarged a little.
I have new batteries on order so I'm not going to try and balance the car until I fit the new packs in, they will be a tad larger (heavier) than the old Reedy packs. I'm in no rush since the track will not be open for road course for another month or so.
08-17-2011, 09:52 PM
#2936
Hello 1/12 racers.
We have indoor carpet race track in Chino, CA.
Associated LiPo Conversion Kit 12R5.1 is in stock at TQ RC RACING.
http://www.tqrcracing.com/shop/produ....asp?p_id=2154
Also, Click here to see the 12R5 parts store.
FYI, Thanks.
We have indoor carpet race track in Chino, CA.
Associated LiPo Conversion Kit 12R5.1 is in stock at TQ RC RACING.
http://www.tqrcracing.com/shop/produ....asp?p_id=2154
Also, Click here to see the 12R5 parts store.
FYI, Thanks.
08-21-2011, 09:26 PM
#2937
Shook down the new Lipo Update kit today.
I was very surprised at how much different the car works compared to the std 5.1
The old setup does not work on the new chassis.
On our high grip 90x45 carpet track, It has much more side bite, and requires firmer springs on the center and side.
After several runs back to back against the 5.1, I have to say there is more speed with the new chassis, even if only a tenth so far.
Will post a setup later this week.
It's funny how we get used to some things.
Even though it still works quite well, I look at the 5.1 chassis now, and already it looks dated
08-22-2011, 01:38 PM
#2938
Tech Apprentice
i'm interested into why you feel the need for the setup change?
we're still waiting for our lipo upgrade kits to land over the pond ...so any homework i can do on setup now may prove very useful! that and i'm going on holiday on thursday and have a race a week after i get back! hopefully associated send us poor english folk our new toys
what was your setup before with oils/springs/front springs/tires, and how different do you think you will go with it?
oh, and ps. thanks for all the pictures of the new chassis layout being built, pictures say a thousand words! i take it you no longer need to space the front end out like we used to? thanks
we're still waiting for our lipo upgrade kits to land over the pond
...so any homework i can do on setup now may prove very useful! that and i'm going on holiday on thursday and have a race a week after i get back! hopefully associated send us poor english folk our new toyswhat was your setup before with oils/springs/front springs/tires, and how different do you think you will go with it?
oh, and ps. thanks for all the pictures of the new chassis layout being built, pictures say a thousand words! i take it you no longer need to space the front end out like we used to? thanks
08-22-2011, 01:58 PM
#2939
Tech Apprentice
also, should the new chassis layout favour both stock (10.5 unboosted) and mod? or more one than another? thinking of buying a second car, not sure if its worth getting another chassis upgrade or not. thanks
08-22-2011, 11:32 PM
#2940
Settings are for High grip carpet.
My R5.1 setup uses Blue side with 40wt, and Blue center with 25wt.
Normally caster is max 6deg on the 5.1
New chassis has great center out on-power steering, so 3deg seems enough.
This new chassis seems to carry more corner speed, so I think it needs more spring to hold it up than the 5.1
Only had 4 runs with it, was racing 13.5 boosted with the old chassis, and testing the new chassis in between rounds.
Much more to come, don't really feel in tune with this car yet, after driving the 5.1 for about 2 years now.
With the new chassis, even running a little wide on the corners it still ran 3 consecutive 9.9 secs laps, for track record.
So far I would characterize the 5.1 as more cut and thrust, with the 5.2 being more of a corner speed demon.
But there are so many little settings to play with yet, I believe the 5.2 will be better in every way with time.
Looking forward to running it at Norcal in mod on that high speed paved track !