


 19Likes
Project: Break in Dutch machine
 01-23-2016, 06:45 AM
#16

Thanks!
The water test.
Mounted an empty crank case, it needed a little bit more than 400cc of water to fill it up (the case is 550cc). I expect that about 380cc of oil is needed to fill it up with a to break-in engine. So a 350cc fill marking has to be created and a yet to create small filling tube or nipple to fill it up to the right level.
Heating it up to 80 degrees Celcius takes about 20 minuts. OK, not realy fast but for sure good enough.
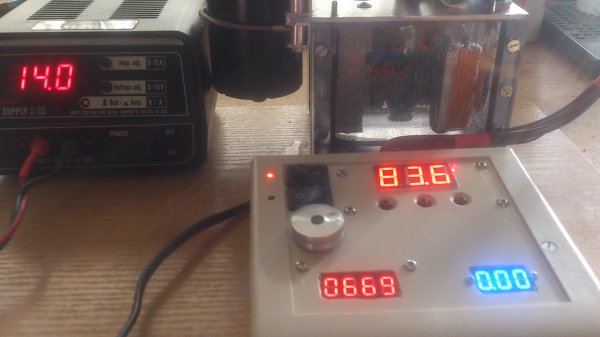
100 degrees celcius is reachable, on the side of the front bearing it will be about 84. At 80 degrees on the top of the crankcase it will be at the front bearing about 70 degrees. The heat is spreaded very well.
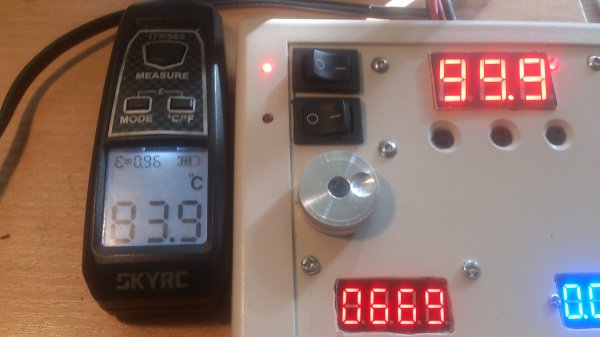
And yes, at 100 degrees the water is really boiling, time to throw in some eggs

The water test.
Mounted an empty crank case, it needed a little bit more than 400cc of water to fill it up (the case is 550cc). I expect that about 380cc of oil is needed to fill it up with a to break-in engine. So a 350cc fill marking has to be created and a yet to create small filling tube or nipple to fill it up to the right level.
Heating it up to 80 degrees Celcius takes about 20 minuts. OK, not realy fast but for sure good enough.
100 degrees celcius is reachable, on the side of the front bearing it will be about 84. At 80 degrees on the top of the crankcase it will be at the front bearing about 70 degrees. The heat is spreaded very well.
And yes, at 100 degrees the water is really boiling, time to throw in some eggs
Last edited by Roelof; 05-10-2016 at 07:44 AM.
 01-24-2016, 08:15 AM
#17
I think I have reached the end of my building....
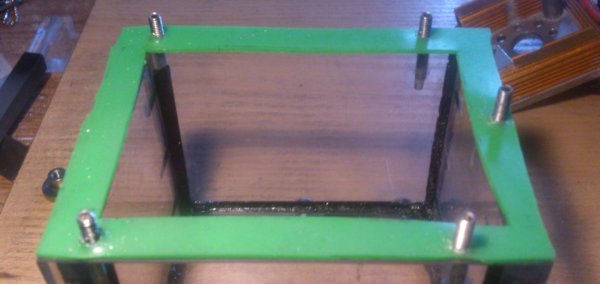
I have made holders for the housing of the connector. It will be more stable/stronger, it looks nice and it will not get all the heat from the plate right under it.
Made a small filling tube. This construction does not allow an exact filling so this will make it easy.
The girlfriend has arranged 60cc inject to fill it up.
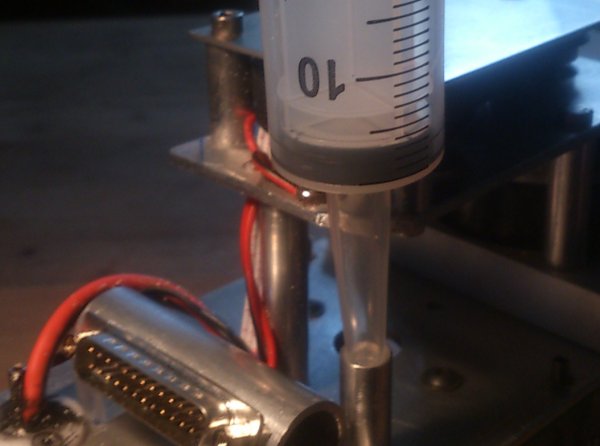
And made a seal on the edge from a silicone baking mat.
A fresh engine is mounted, oil is on its way.
I have made holders for the housing of the connector. It will be more stable/stronger, it looks nice and it will not get all the heat from the plate right under it.
Made a small filling tube. This construction does not allow an exact filling so this will make it easy.
The girlfriend has arranged 60cc inject to fill it up.
And made a seal on the edge from a silicone baking mat.
A fresh engine is mounted, oil is on its way.
01-24-2016, 03:34 PM
#18
Great project Roelof, thanks for sharing.
Will be great to see a video when you start using it.
Will be great to see a video when you start using it.
01-25-2016, 12:02 AM
#19
Thank you. As Richard I am a guy who like to build an try stuff, what is more satisfying if your build does work? And the results are there with the guy behind the Break in Dutch so we do expect the same.
Also funny to see 2 different builds based on the original Break in Dutch, one almost a copy mostly made on CNC machines and mine started with an idea in the head, some measurements and builded from there with no computer powered machines up to what it has become now.
The working is there and on full rpm there is a huge of power from the window wiper motor so it time to give it a try next weekend.
Movie and pics will follow
01-25-2016, 12:29 AM
#20
I just love programming my 30 year old CNC machines, they are so basic, not like modern programming with CAD post processors, I am actually typing each and every G-/ M-/ and other codes. But I can make basically any workpiece that I want. Actually I started more or less similar like Roelof with a design where the RC engine shaft is in a vertical position, like Break In Dutch's commercial version of this system. For only 1 reason it is much easier to build, because there is no need of a relatively complex oil seal system for the shaft from the electric motor going through the sidewall of the oil bath tub. My main doubt with the RC engine in that vertical situation is that the conrod can slide sideways from the bigend end, possibly pushing the piston in the same way sideways with unknown theoretical consequences. Also I feel that the "bottom" side of the piston could break-in differently from the "top" side. Maybe unmeasurable, but for me it just didn’t feel right. I was already halfway with the manufacturing, but at a certain point I took the decision to start again from scratch, back to the drawing board, based on the RC engine being in a horizontal position. By the way, I am a little bit behind with the report / thread, my Easy Break In System is as good as ready, I just need to fabricate the oil bath cover.
Last edited by Richard E; 01-25-2016 at 12:40 AM.
01-30-2016, 07:18 AM
#21
I have ordered 1 liter of Eurol RX oil which is a synthetic 2stroke/4stroke race oil for also methanol fuel. Sadly after a week it is still not delivered, it must be out of order or else I would have seen it the next day. Although I think any oil will do like the can's of normal motoroil I have I will wait for this high quality oil.
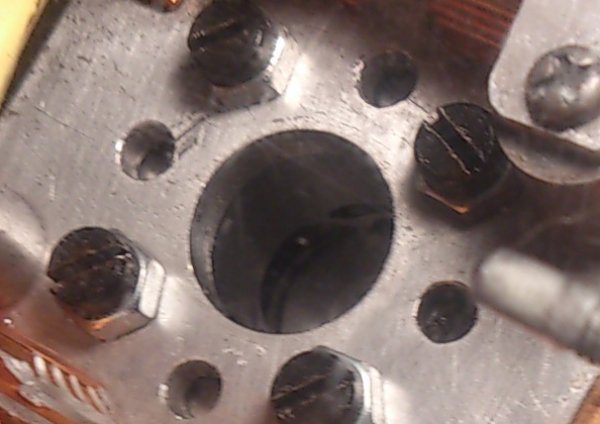
Some pics of the fresh mounted motor, ready to be filled up.
From the under side with a sight on the open adjustable backplate.
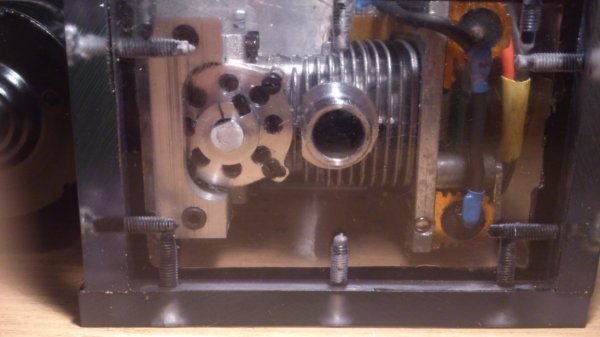
The side with also a sight on the green silicone seal.
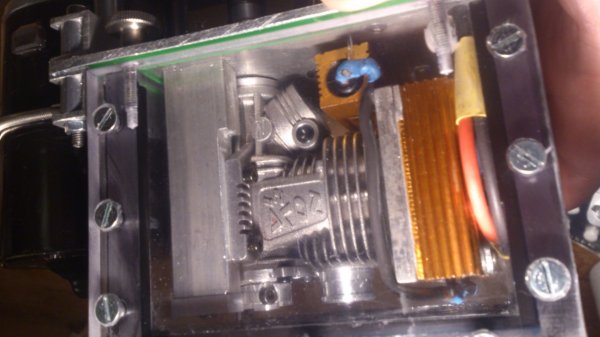
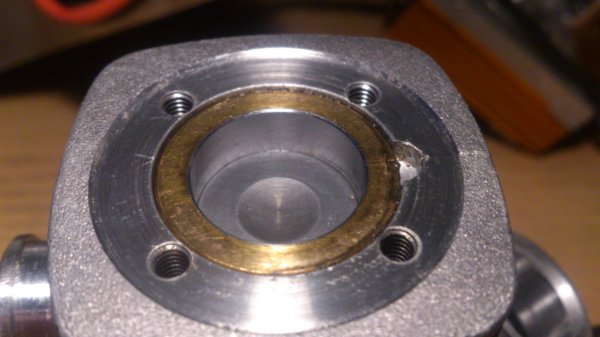
The other side where you can look into the cilinder.
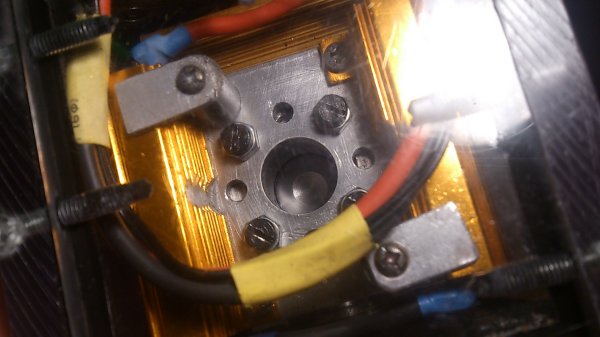
A close up
Some pics of the fresh mounted motor, ready to be filled up.
From the under side with a sight on the open adjustable backplate.
The side with also a sight on the green silicone seal.
The other side where you can look into the cilinder.
A close up
02-02-2016, 12:14 PM
#23
Now for real!
I was called yesterday that the oil supplier did not have the Eurol RX. I agreed to get the Castrol A747. It was delivered today and so far so good.
The case needed about 370cc oil and heating it up did go much faster than with water.
I started with 95 degree Celcius temperature. When the temperature was reached I started the motor on a high RPM and there was no problem at all. With changing the RPM I could even go as low as 200 RPM without issues. At 400 RPM the window wiper motor was taking 1A current
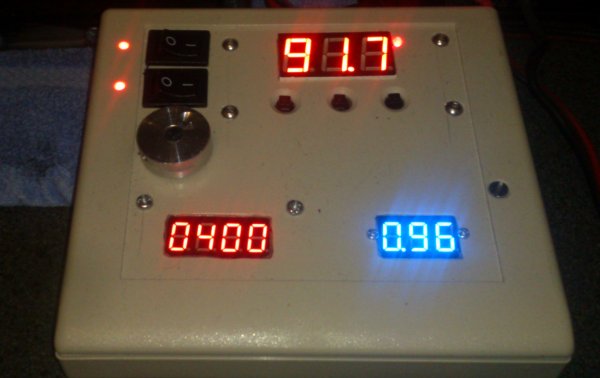
After 15 minutes the current was already down to 0.76A with almost the same RPM. I know the current at free spinning at 400RPM is about 0.62A so it was on its way. I decided to lower the temperature to 85 degrees which is a normal operating temp on the track regarding my telemetry system. Funny to see that the current went up from 0.76 to 0.78A, the 10 degree cooling did raise the pinch a bit.
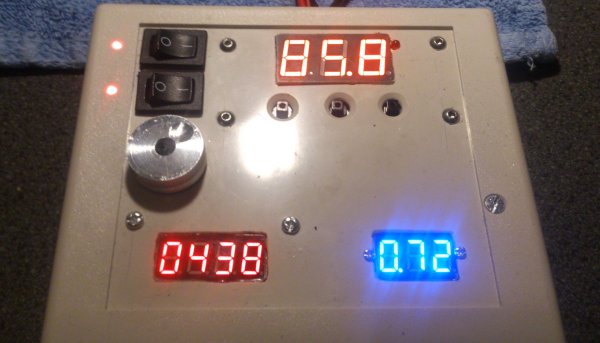
After 2 hours the curent is at 0.72A and the RPM is a tiny bit raised from 400 to 438, a good sign the engine is comming loose.
Now at this moment with 3 hours running the current is at 0.69A and after 4 hours 0.66A, the current meter is a nice indication.
A movie:
I was called yesterday that the oil supplier did not have the Eurol RX. I agreed to get the Castrol A747. It was delivered today and so far so good.
The case needed about 370cc oil and heating it up did go much faster than with water.
I started with 95 degree Celcius temperature. When the temperature was reached I started the motor on a high RPM and there was no problem at all. With changing the RPM I could even go as low as 200 RPM without issues. At 400 RPM the window wiper motor was taking 1A current
After 15 minutes the current was already down to 0.76A with almost the same RPM. I know the current at free spinning at 400RPM is about 0.62A so it was on its way. I decided to lower the temperature to 85 degrees which is a normal operating temp on the track regarding my telemetry system. Funny to see that the current went up from 0.76 to 0.78A, the 10 degree cooling did raise the pinch a bit.
After 2 hours the curent is at 0.72A and the RPM is a tiny bit raised from 400 to 438, a good sign the engine is comming loose.
Now at this moment with 3 hours running the current is at 0.69A and after 4 hours 0.66A, the current meter is a nice indication.
A movie:
| + YouTube Video | |
Last edited by Roelof; 02-02-2016 at 03:19 PM.
02-02-2016, 02:40 PM
#24
I have been following this thread closely and what you have/are doing is excellent, what a great talent and very informative too
02-03-2016, 10:29 AM
#25
Thank you fizzy. Building something is no problem, knowing what to do is something else (as with many RC racers ) As Richard mentioned Roy Bakker (the guy behind the Dutch break in) has builded up a lot of experience he did share with us but we also know there were some things he did not know.
Richard and I had a lot of chat of how to start and he also started with my idea but has changed it with a valid reason. Because you do not know of how the proces is going I came to the idea to use a simpe current meter and that does give a very good sight. I am also using a normal brushed electric motor that changes the RPM a bit regarding the amount of power it has to deliver that also will give some sight on how loose the engine is becomming. A stepper motor does not change its RPM but it is a very good power plant.
As Roy is using a high performance racing oil I had that choice too but it must be something friendly with methanol. Richard will have a talk with an oil supplier to see if there are better options. We are all searching for the best result and who knows....
Well, after about 4 and an half hour the current was at 0.66A so I decided to stop the proces. The oil did become a bit blurry:

And the piston is going this high before the pinch goes in:
The funny thing is that the pinch does feel more solid and that is because the piston and sleeve has taken exact the same shape. For sure more time is needed to get the engine further breaked in but for a first attempt I am very satisfied. The rod has still no play on the crank pin but the piston did get some small scratches. That is something to think about although they are really small.
) As Richard mentioned Roy Bakker (the guy behind the Dutch break in) has builded up a lot of experience he did share with us but we also know there were some things he did not know. Richard and I had a lot of chat of how to start and he also started with my idea but has changed it with a valid reason. Because you do not know of how the proces is going I came to the idea to use a simpe current meter and that does give a very good sight. I am also using a normal brushed electric motor that changes the RPM a bit regarding the amount of power it has to deliver that also will give some sight on how loose the engine is becomming. A stepper motor does not change its RPM but it is a very good power plant.
As Roy is using a high performance racing oil I had that choice too but it must be something friendly with methanol. Richard will have a talk with an oil supplier to see if there are better options. We are all searching for the best result and who knows....
Well, after about 4 and an half hour the current was at 0.66A so I decided to stop the proces. The oil did become a bit blurry:
And the piston is going this high before the pinch goes in:
The funny thing is that the pinch does feel more solid and that is because the piston and sleeve has taken exact the same shape. For sure more time is needed to get the engine further breaked in but for a first attempt I am very satisfied. The rod has still no play on the crank pin but the piston did get some small scratches. That is something to think about although they are really small.
02-03-2016, 11:34 AM
#26
Tech Apprentice
Does the oil also need to be circulated through a filter of some sorts during use?
02-03-2016, 12:55 PM
#27
As mentioned, it is something to think about which is easy to add with only finding a right pump.
02-08-2016, 03:17 PM
#28
Nice shot at low speed (100rpm)
This time I had it running for 4 hours with Eurol Racing 1 castor oil. Although you can see a starting shining ring just in between the 2 oil grooves I think it lubricates too good, the pinch is not that much changed. But for sure at least 8 hours is needed.
I just wan to try 2 other oils, one is a low viscosity engine oil the other guys are using with succes and I am still thinking of a transmission oil. Another oil to think about is a light abrasion oil for a quick but still proper break in.
A nice story:
http://www.shell.com/business-custom...-30071255.html
| + YouTube Video | |
This time I had it running for 4 hours with Eurol Racing 1 castor oil. Although you can see a starting shining ring just in between the 2 oil grooves I think it lubricates too good, the pinch is not that much changed. But for sure at least 8 hours is needed.
I just wan to try 2 other oils, one is a low viscosity engine oil the other guys are using with succes and I am still thinking of a transmission oil. Another oil to think about is a light abrasion oil for a quick but still proper break in.
A nice story:
http://www.shell.com/business-custom...-30071255.html
02-20-2016, 05:16 PM
#29
Tech Fanatic
iTrader: (1)
Crazy super work 
Now, maybe few questions
What about rubber parts?
Did you remove o-ring under carb?
Also if front bearing is with rubber shield, removed also?
What kind of wires you used for connections?
Hot oil will not destroy shields?
Best regards from Warsaw!
michal
Now, maybe few questions
What about rubber parts?
Did you remove o-ring under carb?
Also if front bearing is with rubber shield, removed also?
What kind of wires you used for connections?
Hot oil will not destroy shields?
Best regards from Warsaw!
michal
02-21-2016, 03:24 AM
#30
The oil I used so far is common 2-stroke oil used with homebrew fuel. I do not expect the rubber rings are affected. The only rubber ring is indeed the one in the carb shaft.
I do not think these silicone rings are affected by any kind of oil but you can always take it out. Most onroad engines have a metal shield in the front bearing. The seal of the front bearing is placed close to the cover and is above oil level, also the large hole where the crankshaft is comming through is giving some cooling.
From the original Dutch Break in guy I haven't heard any issues with the seals and his construction has the front bearing totaly covered in hot oil. I should look up the specs but I expect 90 degrees celcius is pinuts to withstand.
The wires going inside the oil bath are silicone wires from electric racing, the shielding can withstand high temperatures. The shrinkwrap does not melt either. And because it is oil and low voltage powered there is no way to have a shortcut.