


 1387Likes
Tamiya TT02 Thread


 03-22-2025 | 09:37 AM
#3977
I went through this with all variations of lighter and heavier shorties and I made different battery bars that would position them at various spots forward or rearward. I did this while trying to balance out the car perfectly on the scales depending on the shorty weight. The car drove well but then the one race I had forgotten to actually hit start to charge my battery so I threw in my full size Protek battery which made the car heavier and unbalanced on the scales but it drove so much better and that final came down to just a nose that night. I've kept racing with the full size pack ever since because it just feels better to drive. So I say if you have different batteries experiment and see how the car feels to you when driving when your tires are in a similar state.
03-24-2025 | 06:21 PM
#3978
For the TCS race at 180 Raceway I ran the Gens Ace Redline 2.0 6500mah battery and my car was the fastest GT ProSpec there, just not the driver...LOL  . I qualified 3rd and was very close to the front two runners but screwed up in the main and fell back. But if you are running GT ProSpec and following the 1400g minimum weight rule then the way to go is a full size pack that gets the car to the minimum 1400g. The bigger packs have lower IR's and much less voltage drop off.
If you don't have a weight limit rule, then run the shorty pack to the rear. Before the implemented the 1400g minimum weight rule by GT ProSpec was under 1200g with the small shorty pack.
. I qualified 3rd and was very close to the front two runners but screwed up in the main and fell back. But if you are running GT ProSpec and following the 1400g minimum weight rule then the way to go is a full size pack that gets the car to the minimum 1400g. The bigger packs have lower IR's and much less voltage drop off.If you don't have a weight limit rule, then run the shorty pack to the rear. Before the implemented the 1400g minimum weight rule by GT ProSpec was under 1200g with the small shorty pack.
04-06-2025 | 07:20 AM
#3979
I had a break from the TRF421 and decided to race my TT02 against competition touring cars at the largest UK indoor race track.
I was pleasantly surprised
https://www.thercracer.com/2025/02/y...eview.html?m=0
I was pleasantly surprised
https://www.thercracer.com/2025/02/y...eview.html?m=0

 04-09-2025 | 01:36 PM
#3981
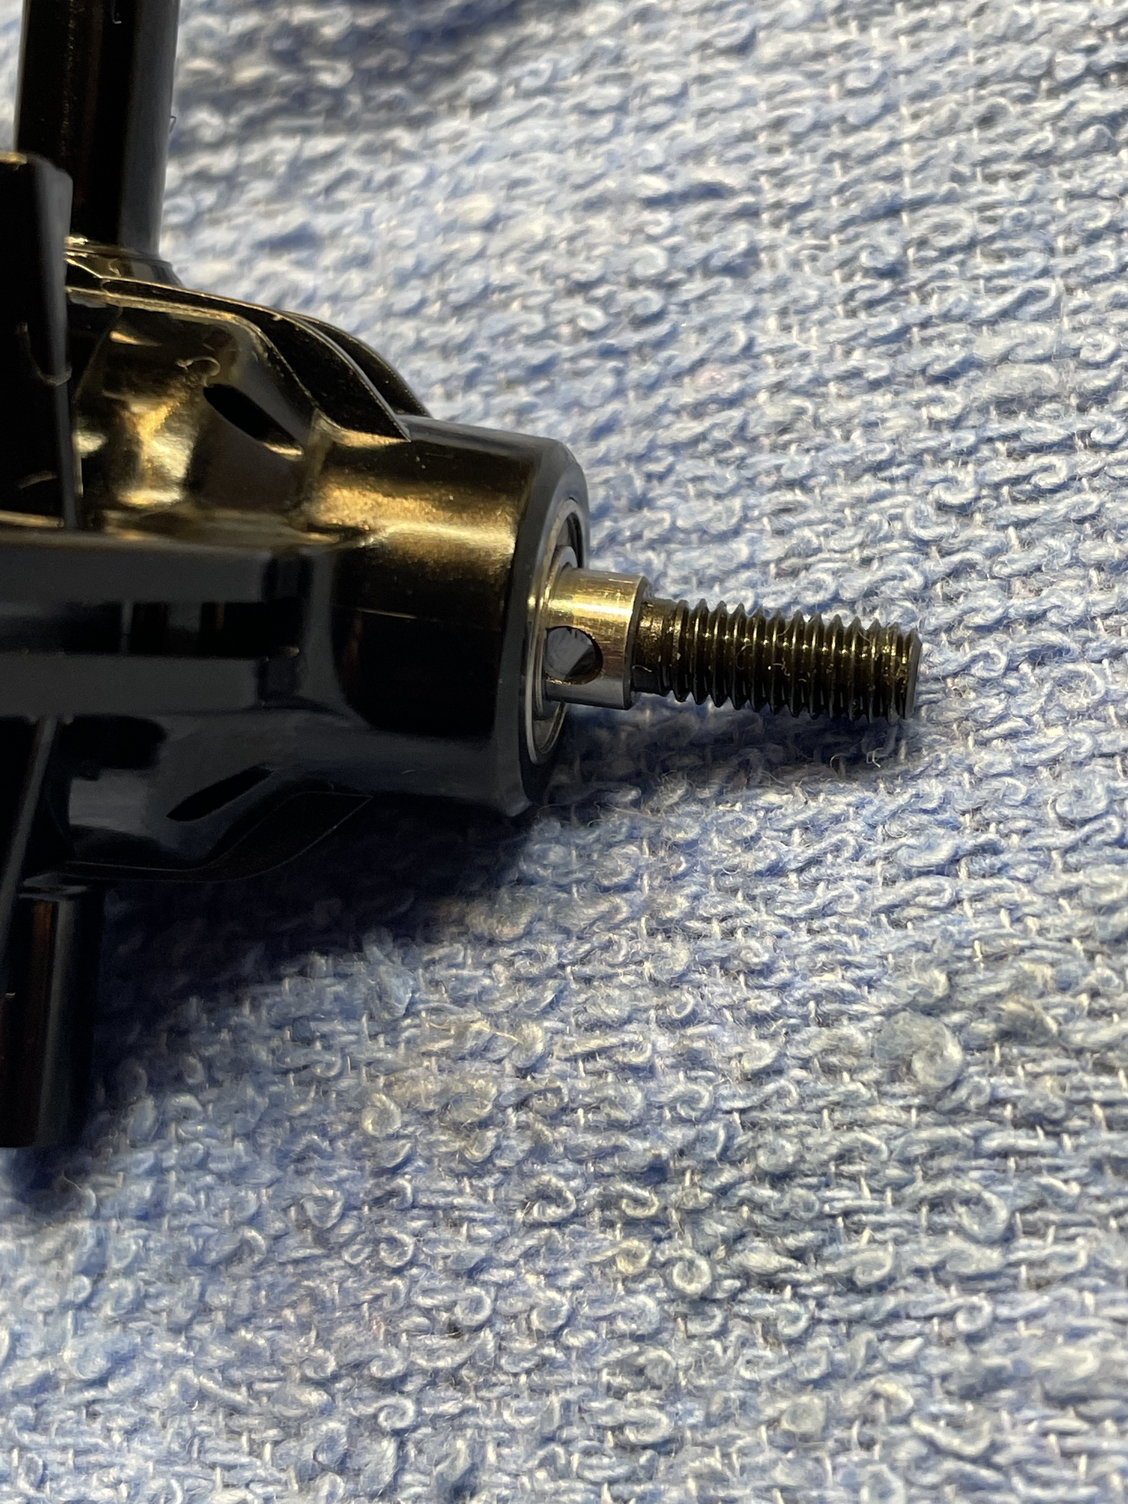
When threading the 3x23mm steering screws from the bottom of the chassis, it DOES help to apply some grease/lube on the screw threads. Pay attention when starting the screw into the hole that it isn't off center/at an angle.
This is a better option than using the screws that screw in from the top. The top down screws don't go all the way thru the chassis and have the potential to break the chassis/hole where the screws go in. This includes the small set screws that are included with Tamiya 54574 or 54752. In fact, I would highly recommend getting a new chassis if you are upgrading from the stock self tapping steering screws when going to 3mm machine thread steering screws.
Here is some part info on TT02 stock steering screws & the low friction option from Tamiya
Stock screw is a 3x18mm step screw - Tamiya 9805573 (https://www.tamiyausa.com/shop/7-dig...p-screw-44028/)
Low friction TT02 upgrade has a hex head - Tamiya 54550 (https://www.tamiyausa.com/shop/optio...ep-screw-2pcs/)
Here is the part number for the flanged tube - Tamiya 9803242 (https://www.tamiyausa.com/shop/7-dig...ed-tube-47439/)
**Note: I would either suggest purchasing one of the Tamiya TT02 Aluminum steering upgrades or aftermarket aluminum steering upgrades which will include the appropriate bushing/tubes as part of that hop-up.
04-10-2025 | 07:04 PM
#3982
On the diagram above using the 23mm screw it seemed easier doing it the opposite way since the bottom of the chassis has the cutout for the nut. So the screw and washer going from the top down into the nut in the recessed area on the bottom.
04-11-2025 | 11:22 AM
#3983
While you can use the 23mm screw from the top and the nut at the bottom of the chassis, it will make it more difficult to remove the steering arms. Because the screw is threaded into the plastic, you will have to totally back out the screw if you want to perform any maintenance on the steering arms/components. Having the nut on the top makes performing any maintenance on the steering simple/quick which is important when racing.
04-14-2025 | 07:11 AM
#3984
Tech Adept
Joined: Jun 2011
Posts: 120
From: Canada
One of the things I typically love about Tamiya, is that majority of parts can be use across their kits.. eg from TT02 to TRF420. Tonight however I hit a major hick up.
I purchased 39mm DCJ joints for my TT02 RR. The dcj package comes with a 5x10x3 bearing. Well it turns out, it�s not enough, the cross pin won�t go in. I tried it on 4 hubs. Nope!
You need a 5x10x2.5 bearing.. good luck finding one! 🤦🏻
I purchased 39mm DCJ joints for my TT02 RR. The dcj package comes with a 5x10x3 bearing. Well it turns out, it�s not enough, the cross pin won�t go in. I tried it on 4 hubs. Nope!
You need a 5x10x2.5 bearing.. good luck finding one! 🤦🏻
04-15-2025 | 08:49 AM
#3986
Tech Adept
Joined: Jun 2011
Posts: 120
From: Canada
I have a couple of TT-02 S kits, one I've been slowly upgrading to a TT-02 SR spec.
I recently purchased Tamiya 42372 RC DOUBLE CARDAN JOINT SHAFTS
39Mm (2Pcs). I should have paid more attention to the TT-02 SR manual as it requires 42mm drive shafts (Tamiya 42339).
The question I have is has anyone tried the 39mm Double Cardan on a Stock TT02 (with steel gearbox joint/outdrive)? I know the Yeah Racing 39mm universal works (I raced with one)
----------
I should note a few things when assembling the Tamiya Double Cardan shafts (42372)
Pro - comes with 1 extra pin & 1 extra axle ring
Pro - included 2 Tamiya 1050 (3mm thick) steel shield bearings
Pro - includes a very detailed instruction manual
Con - did not include any grease (sold separately)
Con - the axle rings can be a bit tricky to install
One thing to note about the axle rings - the included manual shows you the correct direction to install the rings due to the different rotation direction of the left/right sides of the car. I need to show this to a racer at my local track as he was having issues with his drive joints on his TT-02 SRX coming apart. I should also note that the SRX uses 419 a-arms/steering knuckles in the front and uses a 37mm drive shaft (22054) on its double cardan setup.
Make sure to read your manuals before buying parts for your cars!
shout 22054 37mm shaft be used as the double joint part makes it longer?
 05-15-2025 | 05:18 PM
#3989
Tech Apprentice
Joined: Jul 2012
Posts: 52
Hey guys this one has me stumped. This car will spin when pushed hard on left hand turns or with abrupt throttle during a corner, but to the right it will never spin no matter how hard I mash the throttle. On a hard turn in with no throttle it will start to slide turning left, but it will never do it to the right. I've put it on my arrowmax setup station and the numbers are all good. I have the Tamia CVA super mini shocks. The car goes straight under throttle and off throttle. The turning radius is exactly the same, I physically match the diameter of the circles on flat concrete. There's no excessive play. The lateral balance is pretty close, not enough to cause this kind of nonsense. All four hubs are mounted properly, none of them are upside down. I have a spool on the front and very light grease in the rear. Heavy grease in the rear didn't make a difference. I know the wiring is ugly, I just converted it from a shorty with the ESC on the battery side and I'm not going to dial it in until it handles. This is on contact 32s and yokomo 28a's. There is no servo binding at the endpoint, I make sure to back it off to zero buzz before I do the physical circles to even the steering completely. I just printed some -2� knuckles and it did not change the handling. I've used the setup station before and after these knuckles and they are perfect at -1 camber and 2� toe in per side. I was hopeful that a lot of rear toe and would help but no. I'm running a savox 1258 and It centers great . The shocks are all the same length. I have it set up with a reasonable for this chassis ride height and it has about a third of the travel in droop. Basically when I lift the car the springs have just a little free play. This setup works reasonably well on any other touring car I've used for a base setup. Interestingly I have a Euro Truck that does the same, but I purchased it used and the guy who had it was a cheater and it has weights that I took off and the rear chassis has part of it glued together so I can't disassemble it and check it out. On that vehicle I assumed it was just something the guy had done. Now I have the same problem with this car. I've built of cars, I have x-ray t4, TC3, tc4, x-ray F1, cero V2 and sport. I've probably built another 50 cars over the years for off-road. I'm ready to throw this thing at a wall. I even went so far as to add extra preload to only the front right shock and it's still did it. I've swapped the shocks around. Ugggh. I hate this car!!!
05-15-2025 | 07:06 PM
#3990
Hey guys this one has me stumped. This car will spin when pushed hard on left hand turns or with abrupt throttle during a corner, but to the right it will never spin no matter how hard I mash the throttle. On a hard turn in with no throttle it will start to slide turning left, but it will never do it to the right. I've put it on my arrowmax setup station and the numbers are all good. I have the Tamia CVA super mini shocks. The car goes straight under throttle and off throttle. The turning radius is exactly the same, I physically match the diameter of the circles on flat concrete. There's no excessive play. The lateral balance is pretty close, not enough to cause this kind of nonsense. All four hubs are mounted properly, none of them are upside down. I have a spool on the front and very light grease in the rear. Heavy grease in the rear didn't make a difference. I know the wiring is ugly, I just converted it from a shorty with the ESC on the battery side and I'm not going to dial it in until it handles. This is on contact 32s and yokomo 28a's. There is no servo binding at the endpoint, I make sure to back it off to zero buzz before I do the physical circles to even the steering completely. I just printed some -2� knuckles and it did not change the handling. I've used the setup station before and after these knuckles and they are perfect at -1 camber and 2� toe in per side. I was hopeful that a lot of rear toe and would help but no. I'm running a savox 1258 and It centers great . The shocks are all the same length. I have it set up with a reasonable for this chassis ride height and it has about a third of the travel in droop. Basically when I lift the car the springs have just a little free play. This setup works reasonably well on any other touring car I've used for a base setup. Interestingly I have a Euro Truck that does the same, but I purchased it used and the guy who had it was a cheater and it has weights that I took off and the rear chassis has part of it glued together so I can't disassemble it and check it out. On that vehicle I assumed it was just something the guy had done. Now I have the same problem with this car. I've built of cars, I have x-ray t4, TC3, tc4, x-ray F1, cero V2 and sport. I've probably built another 50 cars over the years for off-road. I'm ready to throw this thing at a wall. I even went so far as to add extra preload to only the front right shock and it's still did it. I've swapped the shocks around. Ugggh. I hate this car!!!