


"targetingxmod" Losi Mini 8 4s Project
 11-07-2013, 06:02 AM
#61
Expo in this case stands for an exponential response curve, rather than a linear one. Some radios can set both an expo on steering and throttle. For steering it's very useful for high speeds too reducing the amount of steering when driving fast, without reducing the full steering range.
My not so advanced DX3C radio can only set a certain percentage of expo (no graphical tuning), but in the Castle Link software, you can actually shape the throttle (and brake) curve graphically how you want it. It's under the throttle curve tab (see pic). The curve I set as an example is a positive expo, you see the full power will kick in not linearly, but at a later point, when the car is already moving and it will be harder for the motor to flip the car on its back Similarly, a negative expo will give you more than proportional power at start-up, which in this case is not what you want.
Good luck!
My not so advanced DX3C radio can only set a certain percentage of expo (no graphical tuning), but in the Castle Link software, you can actually shape the throttle (and brake) curve graphically how you want it. It's under the throttle curve tab (see pic). The curve I set as an example is a positive expo, you see the full power will kick in not linearly, but at a later point, when the car is already moving and it will be harder for the motor to flip the car on its back
Similarly, a negative expo will give you more than proportional power at start-up, which in this case is not what you want.Good luck!
 11-07-2013, 08:47 AM
#62
Ah, there you go, you found it. Yes, that's it, no need to use so many points though, keep it smooth like the one I showed, mother nature likes smooth
If you're gonna buy a new Castle Link, check out the one with the "field link" card. You can use it both with computer and stand-alone when you're out testing it so you can make some changes right away (only simple ones though, not the curve tuning), and it's only a couple of bucks more.

If you're gonna buy a new Castle Link, check out the one with the "field link" card. You can use it both with computer and stand-alone when you're out testing it so you can make some changes right away (only simple ones though, not the curve tuning), and it's only a couple of bucks more.
11-07-2013, 09:46 AM
#63
Tech Elite

Thread Starter
What does the points do exactly, can explain? What is the diference of having all those points on the throtlhle curve and the pic you showed with only 2 or 3? (smooth)?
Ah, there you go, you found it. Yes, that's it, no need to use so many points though, keep it smooth like the one I showed, mother nature likes smooth
If you're gonna buy a new Castle Link, check out the one with the "field link" card. You can use it both with computer and stand-alone when you're out testing it so you can make some changes right away (only simple ones though, not the curve tuning), and it's only a couple of bucks more.
If you're gonna buy a new Castle Link, check out the one with the "field link" card. You can use it both with computer and stand-alone when you're out testing it so you can make some changes right away (only simple ones though, not the curve tuning), and it's only a couple of bucks more.
11-07-2013, 10:16 AM
#64
Those points define/shape the curve: horizontal axis represents trigger position on your Tx, vertical axis represents corresponding throttle output of ESC.
Abrupt changes equal stress. Smooth means no abrupt changes, minimizing stress. Do you have the latest version of the Castle Link software? I created the example curve I showed with just one point and the software automatically makes it a smooth exponential curve. You can use more points if you want it shaped differently, but I see no need for that and would start as simple as possible.
Abrupt changes equal stress. Smooth means no abrupt changes, minimizing stress. Do you have the latest version of the Castle Link software? I created the example curve I showed with just one point and the software automatically makes it a smooth exponential curve. You can use more points if you want it shaped differently, but I see no need for that and would start as simple as possible.
Last edited by Dr_T; 11-07-2013 at 10:38 AM.
11-07-2013, 12:43 PM
#65
Tech Elite
Thread Starter
That will have to wait... i searched the MMP and there is no Usb port on it. Maybe on mamba max that i see pics over the web.
I have to order the USB pcb that castle have... time to use that card that offers it on the box of the MMP and pay only the shipment.
Just wait then! Thanks for all the help!
EDIT:
-I had the rear springs on back and on front. Front gets higher for the Kyosho DRX tires, but now i put the normal front ones and the normal rear ones, and waiting for the hard ones for both, and meanwhile maided the car lowred.
With this new tires (1/10 buggy) and lowred it will not wheelie so much. Still wheelie, but more animal, not a monster
No i can drive it with more fun :P "Still waitin the sway bars"
Those points define/shape the curve: horizontal axis represents trigger position on your Tx, vertical axis represents corresponding throttle output of ESC.
Abrupt changes equal stress. Smooth means no abrupt changes, minimizing stress. Do you have the latest version of the Castle Link software? I created the example curve I showed with just one point and the software automatically makes it a smooth exponential curve. You can use more points if you want it shaped differently, but I see no need for that and would start as simple as possible.
Abrupt changes equal stress. Smooth means no abrupt changes, minimizing stress. Do you have the latest version of the Castle Link software? I created the example curve I showed with just one point and the software automatically makes it a smooth exponential curve. You can use more points if you want it shaped differently, but I see no need for that and would start as simple as possible.
Last edited by targetingxmod; 11-09-2013 at 02:43 AM.
11-09-2013, 06:56 AM
#66
I understand the negative effect of raising the cg, and maybe increasing overall weight and rotational mass. However, rolling resistance is actually inversely proportional to wheel diameter. Reducing rolling resistance sounds like a pro for speed runs no?
Thanks!
11-09-2013, 07:50 AM
#67
Tech Elite
Thread Starter
Hi guys, I'm actually planning on running bigger (85mm OD) tires too (mainly because I don't like the TC wheels and the crazy high RPM and gearing that come with it) and I was wondering whether I am overlooking something. Can any of the experts explain why running bigger tires is such a bad idea?
I understand the negative effect of raising the cg, and maybe increasing overall weight and rotational mass. However, rolling resistance is actually inversely proportional to wheel diameter. Reducing rolling resistance sounds like a pro for speed runs no?
Thanks!
I understand the negative effect of raising the cg, and maybe increasing overall weight and rotational mass. However, rolling resistance is actually inversely proportional to wheel diameter. Reducing rolling resistance sounds like a pro for speed runs no?
Thanks!
But they raised the level of the car so it wheelie more! Problem now is fixed way more! Smaller tires but still 1/10 buggy size!
imo and experience bigger tires equals to more tooth pinion.... just that. I had the 1/10 on road Rally HPI on my 3s m8 and when changed to 1/10 buggy tires/rims it as a vast improvement on speed and HEAT!
(just change to capable motor and ESC) and nice vent system, and all went with the wind... lol| + YouTube Video | |
11-09-2013, 06:29 PM
#68
Tech Initiate
Hey it's been a while since I've checked your progress. Your m8 is looking good!! I was thinking about getting the Thunder power 70c 1300 mah 4s. How does the 1800 mah fit?? I have the same motor and esc as you do. Congratulations on your awesome build and thanks for all the advice u gave me.
11-10-2013, 01:36 AM
#69
Tech Elite
Thread Starter
Hey it's been a while since I've checked your progress. Your m8 is looking good!! I was thinking about getting the Thunder power 70c 1300 mah 4s. How does the 1800 mah fit?? I have the same motor and esc as you do. Congratulations on your awesome build and thanks for all the advice u gave me.
All the stuff i learn is on foruns... very little on my country tracks with rc people!
Anyway... 1800mah 4s Thunder Power 70C is the only batery i can find in the world that fits the mini8 with a little dremel and actual fits nice after that, but with the truggy body. For the 1300mah 100mm x 30mm x 23 mm against the 1800mah 99mm x 30mm x 31mm i guess it will fit the buggy body!
You have a Neu? Welcome abord to the insane speed...better get sway bars,lower chassis and tbone bumpers and trottle control... and do not hard bash it, otherwise it will be just monster silly power! After those steps don't horry to much about overkill power doing racing speeds! And for hard bash get a 1/8 truggy
Some pics:


 11-11-2013, 02:07 AM
#70
-I had the rear springs on back and on front. Front gets higher for the Kyosho DRX tires, but now i put the normal front ones and the normal rear ones, and waiting for the hard ones for both, and meanwhile maided the car lowred.
With this new tires (1/10 buggy) and lowred it will not wheelie so much. Still wheelie, but more animal, not a monster
No i can drive it with more fun :P "Still waitin the sway bars"
With this new tires (1/10 buggy) and lowred it will not wheelie so much. Still wheelie, but more animal, not a monster
No i can drive it with more fun :P "Still waitin the sway bars"
 11-14-2013, 02:45 AM
#71
Tech Elite
Thread Starter


-Notice this washer, where she goes... that's a little trick i learned with "squirrel"
| + YouTube Video | |
Last edited by targetingxmod; 11-14-2013 at 06:28 AM.
11-14-2013, 02:05 PM
#72
Nice to see some of your goodies have arrived! And those tires don't seem so happy 
Could you tell me some more about the MERV spur mod please? In HondaMonster's video he says the lip has to be dremeled off the motor mount, but in your pics I don't see that. Also, here:
there seems to be a washer between the bearing and the spur, but not here:
And does the mod require the slipper to be fully locked up, or can you still use some slip? It looks to me from the pics that if slip would be allowed, there will be rubbing and wearing where the spur gear touches the bearing/washer no?
Also, do you remember which tires/wheels (brand, OD, etc.) you had on here:
How was the wearing and grip? I'm having a hard time finding good street tires that are bigger than the 65mm TC ones, but smaller than 85mm OD. Ideally I'd like to run around 80mm OD and not have to change tires after 4-5 battery packs (gets a bit expensive)
Last edited by Dr_T; 11-14-2013 at 02:48 PM.
11-14-2013, 03:35 PM
#73
It looks like the slipper clutch was completely removed. He is using his ESC to simulate a clutch.
11-14-2013, 11:19 PM
#74
No, the MERV spur only has a slipper plate on one side (see his other pics), but I don't understand how that works, hence my question. ESC punch control is not a replacement for the slipper clutch.
11-15-2013, 01:26 AM
#75
Tech Elite
Thread Starter
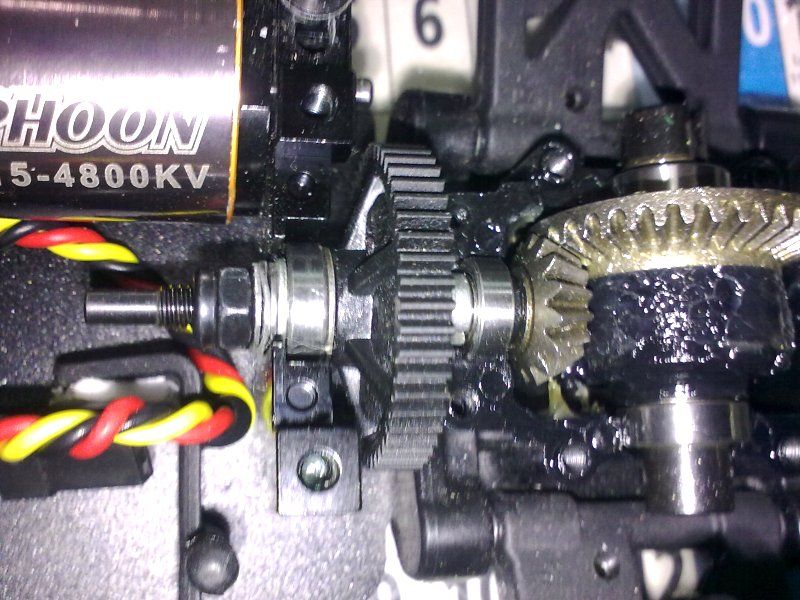
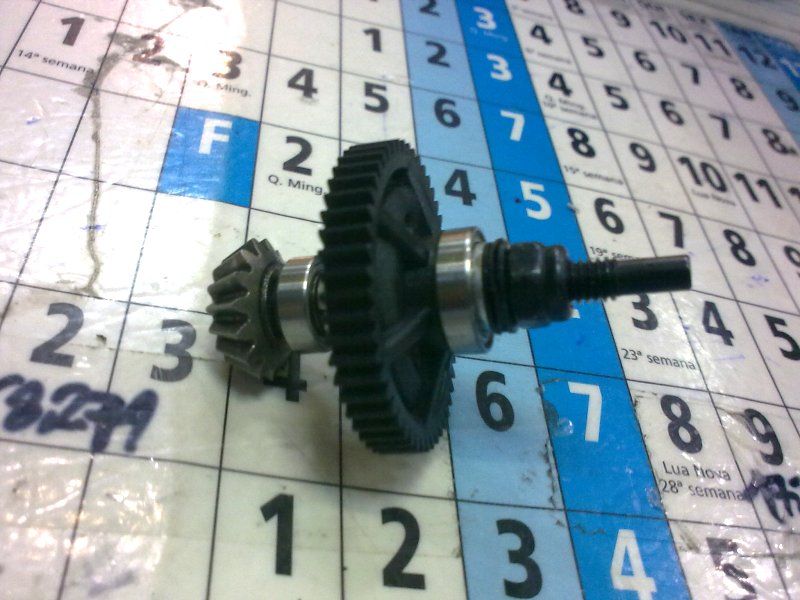
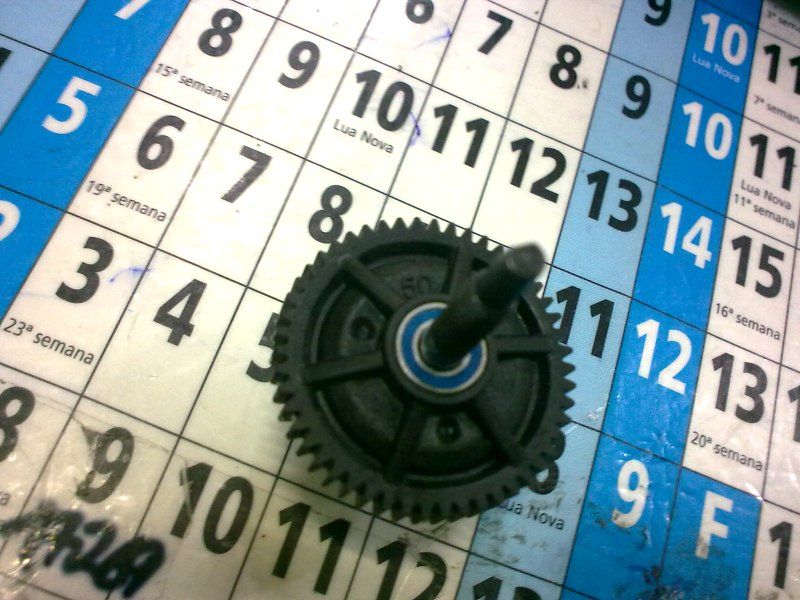
The merv spur mod, is more easy then you all think. When you know how and understand it, is just even just easy as the stock. Problem knowing how is it is another thing... i taked my time and figure it out. Video only helps a little.
Let's see:
Stock:
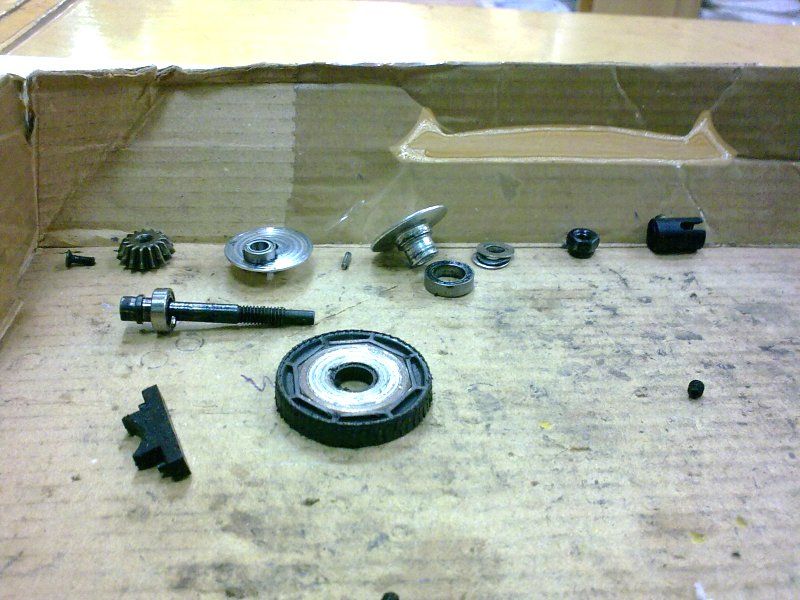
-Remember i talked about 2 weeks or so, how do i secure even more the spur... see that black plastic holder? i put glue tape on the round side where the bearings sits... that way it's more even secure, and not making spur hobbling. This is a find of my own, and it works for me... there are more stuff... but i can't spread them to all the winds... lol
Merv Spur:
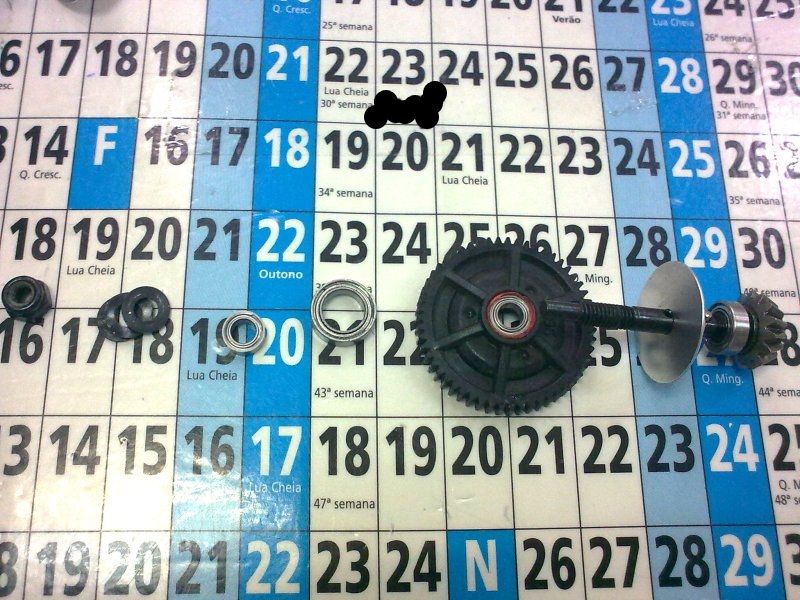
-You just need to put the losi bearings inside each other, another merv bearing and remove one losi slipper holder/pad on one side because the merv got only one side, and that's it... just add some washer's for it to fit nice on the spur hole, and it's fucking done. Nut just screw as a slipper nut, not to thight, not to loose!
Easy as mounting a new merv spur on a merv!
On the video he says he dremeled the lip of the spur holder, well i don't, i just sanded or find more smaller washer's that fit inside that hole. When building and mounting you see why...
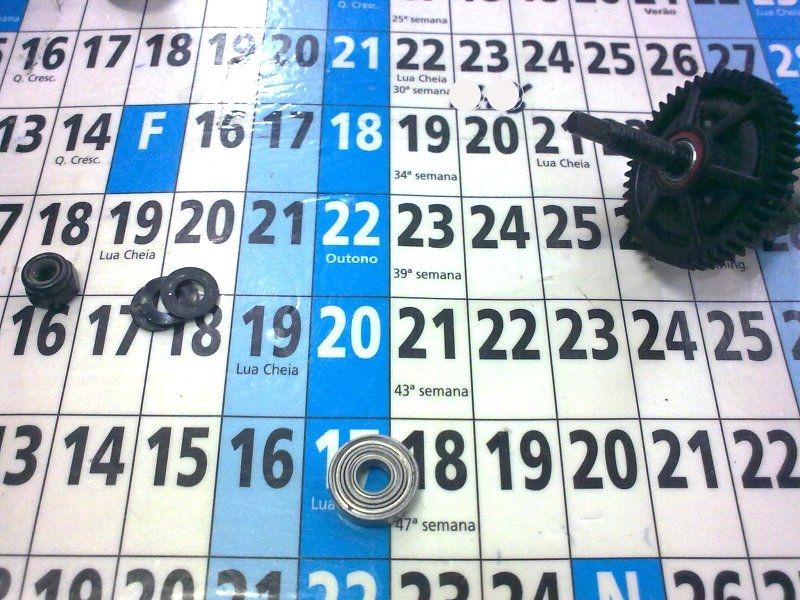
-Those pics says it all! The slipper pad of the merv is not showed on pic's, that will make contact to the Losi slipper holder!
Tire:
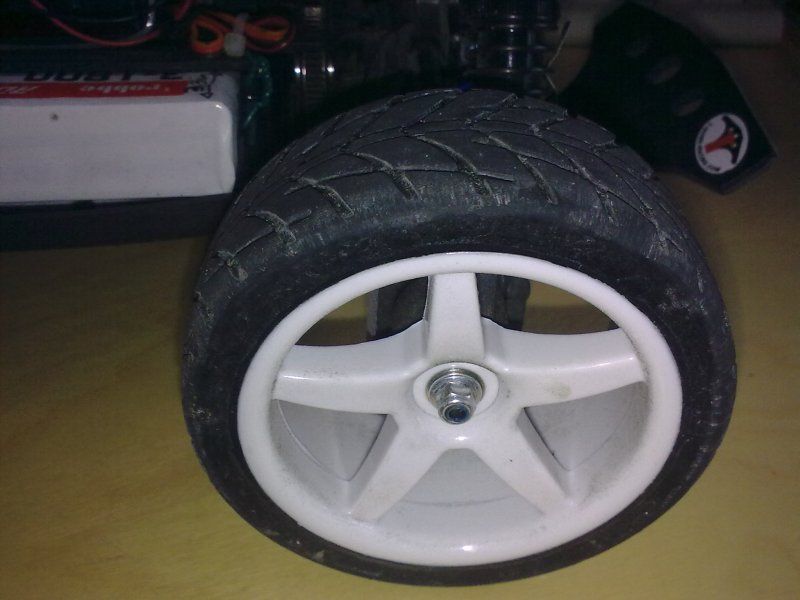
-These tires are these:
http://www.modelsport.co.uk/wheel-ty...ID%5B92%5D=877
There are several brands that make the same... mine are ansmann.
They last and wear like the hpi rally ones. They last a lifetime. Grip is not bad, and not good... but wear time is around an year, yeah and yes! They grip normal, but the wear is my principable must for this ones! I need a set for the 4s but i need to try more options before them
Just puy more glue on the tires. they will eventually blow up, but are easy reparable because the blow up is only with the foam getting out. The rubber does not break. glued it again and go! Experience, more then 3 times.
And could do this all day...
On the end... i see no wear on tires after that! They last!
I have tried other tires and only hpi rally are comparable in wear time!
Other's stock or not will be bold after this run like the video, above!
I understand your set tires getting bold after 4 or 5 batery packs! (it happen to me to) but with tires like these you get an year of runs... without horry.... that's my experience!
Let's see:
Stock:

-Remember i talked about 2 weeks or so, how do i secure even more the spur... see that black plastic holder? i put glue tape on the round side where the bearings sits... that way it's more even secure, and not making spur hobbling. This is a find of my own, and it works for me... there are more stuff... but i can't spread them to all the winds... lol
Merv Spur:

-You just need to put the losi bearings inside each other, another merv bearing and remove one losi slipper holder/pad on one side because the merv got only one side, and that's it... just add some washer's for it to fit nice on the spur hole, and it's fucking done. Nut just screw as a slipper nut, not to thight, not to loose!
Easy as mounting a new merv spur on a merv!
On the video he says he dremeled the lip of the spur holder, well i don't, i just sanded or find more smaller washer's that fit inside that hole. When building and mounting you see why...


-Those pics says it all! The slipper pad of the merv is not showed on pic's, that will make contact to the Losi slipper holder!
Tire:

-These tires are these:
http://www.modelsport.co.uk/wheel-ty...ID%5B92%5D=877
There are several brands that make the same... mine are ansmann.
They last and wear like the hpi rally ones. They last a lifetime. Grip is not bad, and not good... but wear time is around an year, yeah and yes! They grip normal, but the wear is my principable must for this ones! I need a set for the 4s but i need to try more options before them
Just puy more glue on the tires. they will eventually blow up, but are easy reparable because the blow up is only with the foam getting out. The rubber does not break. glued it again and go! Experience, more then 3 times.
And could do this all day...
| + YouTube Video | |
On the end... i see no wear on tires after that! They last!
I have tried other tires and only hpi rally are comparable in wear time!
Other's stock or not will be bold after this run like the video, above!
I understand your set tires getting bold after 4 or 5 batery packs! (it happen to me to) but with tires like these you get an year of runs... without horry.... that's my experience!
Nice to see some of your goodies have arrived! And those tires don't seem so happy
Could you tell me some more about the MERV spur mod please? In HondaMonster's video he says the lip has to be dremeled off the motor mount, but in your pics I don't see that. Also, here:
there seems to be a washer between the bearing and the spur, but not here:
And does the mod require the slipper to be fully locked up, or can you still use some slip? It looks to me from the pics that if slip would be allowed, there will be rubbing and wearing where the spur gear touches the bearing/washer no?
Also, do you remember which tires/wheels (brand, OD, etc.) you had on here:
How was the wearing and grip? I'm having a hard time finding good street tires that are bigger than the 65mm TC ones, but smaller than 85mm OD. Ideally I'd like to run around 80mm OD and not have to change tires after 4-5 battery packs (gets a bit expensive)
Last edited by targetingxmod; 11-15-2013 at 02:07 AM.