


 1Likes
T.O.P. PHOTON EX
 04-24-2012, 06:38 PM
#241
Hi got conformation my car has been shipped, unfortunatly I will not be able to run laid off work, so will put it up for sale, I also ordered the front aluminum knuckles, rear aluminum hubs, extra shims 3x0.5, 3x1,3x2, the new aluminum steering block, xray 52mm ecs x2, xray blades, I basically want what I paid for everything not trying to make a profit, everything cost me 580 all said and done, will let everything go for 550 usd shipped to usa or canada, paypal only thanks

 04-24-2012, 07:26 PM
#243
EA
04-24-2012, 09:09 PM
#244
OK so I'm done for tonight. Just uploaded my latest pics online at https://picasaweb.google.com/racerlog/PhotonEX and added some build hits to http://racerlog.com/wiki/T.O.P._Photon_EX . Within my pictures you'll see a few the non-kit parts:
- top aluminum v2 knuckles
- top aluminum rear hubs
- xray 4 degree c-hubs
- xray 50mm ecs
- side piece racing mira outdrives
- 66t 48p spur
- spektrum S6070
- misc red lock nuts, counter sunk washers and shims
- top high/low roll center blocks (haven't looked into the kit ones yet)
- yokomo gear diff (haven't looked into this yet either..)
- titanium turnbuckles
- top 18mm rod ends used on 1/2 of the upper camber links
There are many great parts included in the kit:
- aluminum camber plates
- carbon battery holder
- quick change spur gear holder
- gear diff
Make sure you have some lock tight handy before you start this car build!
04-24-2012, 09:18 PM
#245
OK so I'm done for tonight. Just uploaded my latest pics online at https://picasaweb.google.com/racerlog/PhotonEX and added some build hits to http://racerlog.com/wiki/T.O.P._Photon_EX . Within my pictures you'll see a few the non-kit parts:
- top aluminum v2 knuckles
- top aluminum rear hubs
- xray 4 degree c-hubs
- xray 50mm ecs
- side piece racing mira outdrives
- 66t 48p spur
- spektrum S6070
- misc red lock nuts, counter sunk washers and shims
- top high/low roll center blocks (haven't looked into the kit ones yet)
- yokomo gear diff (haven't looked into this yet either..)
- titanium turnbuckles
- top 18mm rod ends used on 1/2 of the upper camber links
There are many great parts included in the kit:
- aluminum camber plates
- carbon battery holder
- quick change spur gear holder
- gear diff
Make sure you have some lock tight handy before you start this car build!
- top aluminum v2 knuckles
- top aluminum rear hubs
- xray 4 degree c-hubs
- xray 50mm ecs
- side piece racing mira outdrives
- 66t 48p spur
- spektrum S6070
- misc red lock nuts, counter sunk washers and shims
- top high/low roll center blocks (haven't looked into the kit ones yet)
- yokomo gear diff (haven't looked into this yet either..)
- titanium turnbuckles
- top 18mm rod ends used on 1/2 of the upper camber links
There are many great parts included in the kit:
- aluminum camber plates
- carbon battery holder
- quick change spur gear holder
- gear diff
Make sure you have some lock tight handy before you start this car build!
 lol OD!

 04-25-2012, 03:37 AM
#247
OK so I'm done for tonight. Just uploaded my latest pics online at https://picasaweb.google.com/racerlog/PhotonEX and added some build hits to http://racerlog.com/wiki/T.O.P._Photon_EX . Within my pictures you'll see a few the non-kit parts:
- top aluminum v2 knuckles
- top aluminum rear hubs
- xray 4 degree c-hubs
- xray 50mm ecs
- side piece racing mira outdrives
- 66t 48p spur
- spektrum S6070
- misc red lock nuts, counter sunk washers and shims
- top high/low roll center blocks (haven't looked into the kit ones yet)
- yokomo gear diff (haven't looked into this yet either..)
- titanium turnbuckles
- top 18mm rod ends used on 1/2 of the upper camber links
There are many great parts included in the kit:
- aluminum camber plates
- carbon battery holder
- quick change spur gear holder
- gear diff
Make sure you have some lock tight handy before you start this car build!
- top aluminum v2 knuckles
- top aluminum rear hubs
- xray 4 degree c-hubs
- xray 50mm ecs
- side piece racing mira outdrives
- 66t 48p spur
- spektrum S6070
- misc red lock nuts, counter sunk washers and shims
- top high/low roll center blocks (haven't looked into the kit ones yet)
- yokomo gear diff (haven't looked into this yet either..)
- titanium turnbuckles
- top 18mm rod ends used on 1/2 of the upper camber links
There are many great parts included in the kit:
- aluminum camber plates
- carbon battery holder
- quick change spur gear holder
- gear diff
Make sure you have some lock tight handy before you start this car build!
04-25-2012, 04:23 AM
#249
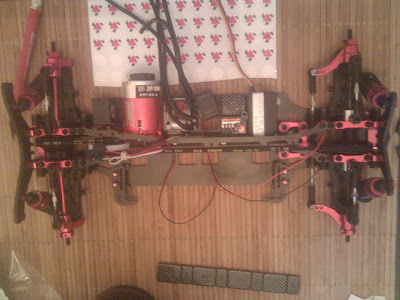
Here is an action shot of my electronics layout for the car. Yes - there are wires everywhere. While some might say "don't your cars always look like that?" -- this car will be tight looking. Since Larry's car is so light on the electronics side I'm going to mount two Side Piece Racing Seis Fans -- one for the motor, and one for the speedo (that just happens to be blowing on the motor too.. ssshhhh)
More later..
More later..
 04-25-2012, 05:03 AM
#251
Here is an action shot of my electronics layout for the car. Yes - there are wires everywhere. While some might say "don't your cars always look like that?" -- this car will be tight looking. Since Larry's car is so light on the electronics side I'm going to mount two Side Piece Racing Seis Fans -- one for the motor, and one for the speedo (that just happens to be blowing on the motor too.. ssshhhh)
More later..
More later..
04-25-2012, 05:17 AM
#252
04-25-2012, 07:18 AM
#255
Hey hanulec your motor wires look to long.