


 4Likes
Corally HMX
 09-03-2014, 03:41 AM
#451
Tech Adept
What happened to Corally at all.
I remember when they won the first ever Touring Euro's in in England with the C4 a Clubmate was one of they're team drivers...
They had great stuff Oscar Jansen of Team Orion grow up with them as many others....
Even a Marc Rheinard run they're cars before leaving to Tamiya...
It's all gone, it would be nice if one of the investors show up here to tell us what's going on but that never will happen I think............
Claude
 11-02-2014, 04:53 PM
#452
Tech Initiate
Hi every one,
Does any one knows where I could find HMX parts? I still race both my HMXs and I still love them alot. My parts inventory is still pretty good but I would like to get a few spare parts like lower bumper plate, top decks, hub carriers before the stock is all gone but I already checked Stormer, Superior and a few other places and none of them have what I'm looking for. Any recommandation where I should check??
It is really sad that Corally was sold... There seems to be some activity on the new web site but I sent an email 3 weeks ago and still didn't get an answer. The new owner doesn't seem to be serious at all! If they ever get some new products in the ne ar futur, will I still be a Corally customer? I really miss the good old Corally.
 01-10-2015, 01:26 PM
#454
Tech Rookie
Hi All, New to Corally Cars but now have 2 HMX's looking through posts trying to get my head around gear diff options, I have parts of an SGX gear diff but read on an earlier post here about TAO5 gear diff can fit, but since new to RC not quite sure how much modification is required from standard to get a gear diff in, also the post I found was back in 2012 so not sure how much has changed since then.
So can anybody tell me what gear diffs I can upgrade the car with and what else is required to make it fit?
Also spares seem in short supply for HMX's (but I have found more for our RDX!) so any recommendations for spares for HMX, of alternative parts, or web suppliers (in UK preferable!)
thanks
So can anybody tell me what gear diffs I can upgrade the car with and what else is required to make it fit?
Also spares seem in short supply for HMX's (but I have found more for our RDX!) so any recommendations for spares for HMX, of alternative parts, or web suppliers (in UK preferable!)
thanks
01-10-2015, 02:53 PM
#455
Spec-r ta05 diffs work. They are 37t and the stock pulleys are 36t so the internal ratio changes and you have to change the front as well. Tamiya sells a pulley that mounts up to the corally spool with minimal modification. The corally gear diff is cool though, it just requires a lot of maintenance. try superior hobbies for parts.
01-12-2015, 01:59 PM
#456
Tech Rookie
Thanks, so do you mean put a TA05 in the front as well?
06-19-2020, 11:09 PM
#459
Tech Initiate
What was the latest 'spec' of the HMX before Corally was sold? Was it the M1 with optional carbon shock towers, or did they ever come out with anything after that?


 10-05-2020, 01:19 AM
#461
Nice project and nice car. A few remarks:
-Lose the Corally body mounts. Yes, they look very Corally but they are super brittle, and using them horizontally at the rear is a surefire way to break them when rolling over. I would keep them for the shelf though, they do look super cool.
-Spending a few bucks to replace the mangled shock plastics and ball cups would go a long way.
-Nice that you kept (some of) the torx screws. Again, very Corally. But the mix-and-match of 2mm hex and T10 screws... Not a fan. And the 2mm hex screws are mismatched to boot.
-With the 4mm of spacers on the front arms, I worry that the whole assembly is going to flex too much and also make the arms too fragile. And since they probably aren't easy to come by these days... You probably have thought of this, but couldn't you space out the towers, say, 2mm, and then anchor the shock behind the tower � la Photon? Some anti-roll bars from another brand (without the kinks) might give you a few extra millimeters of clearance without being really noticeable. Yes, it wouldn't be exactly authentic, but authenticity went out the window when you put the Xray shocks and the custom towers anyway.
-Nice use of the red washers under the tower screws, though. But why not do it on the rear tower too?
- Front camber links look mismatched with the other turnbuckles. That reallly stands out. I would choose a set of matched turnbuckles from another brand over mismatched Corally ones.
Anyway, sorry if I come off as harsh in writing. I have watched many of your 1/12 videos (thanks for your work, BTW) and I know you're a perfectionist like me so I figured you would like constructive feedback. Again, really cool project, I'am actually a bit envious.
Last edited by tygertyger; 10-07-2020 at 07:20 AM.
10-10-2020, 11:24 AM
#462
Tech Initiate
Really nice!
Are the shock towers made from scratch, or modified HMX carbon towers? I am in the process of doing one myself for the front in order to run "modern" touring body shells, they simply won't fit as things are right now..
How much lower are those compared to the kit items?
Are the shock towers made from scratch, or modified HMX carbon towers? I am in the process of doing one myself for the front in order to run "modern" touring body shells, they simply won't fit as things are right now..
How much lower are those compared to the kit items?
10-10-2020, 11:26 AM
#463
Tech Initiate
2nd question; Are there any modifications needed on the layshaft to mount it the way you did? It looks almost like you have a non-corally gear diff in the rear.. is that so? Does it perhaps give another position for the rear belt.
According to the manual, the belts go on the other side of the spur gear, this way it seems much more practical (no long boss pinions needed)..
According to the manual, the belts go on the other side of the spur gear, this way it seems much more practical (no long boss pinions needed)..
10-11-2020, 02:01 AM
#464
Nice project and nice car. A few remarks:
-Lose the Corally body mounts. Yes, they look very Corally but they are super brittle, and using them horizontally at the rear is a surefire way to break them when rolling over. I would keep them for the shelf though, they do look super cool.
-Spending a few bucks to replace the mangled shock plastics and ball cups would go a long way.
-Nice that you kept (some of) the torx screws. Again, very Corally. But the mix-and-match of 2mm hex and T10 screws... Not a fan. And the 2mm hex screws are mismatched to boot.
-With the 4mm of spacers on the front arms, I worry that the whole assembly is going to flex too much and also make the arms too fragile. And since they probably aren't easy to come by these days... You probably have thought of this, but couldn't you space out the towers, say, 2mm, and then anchor the shock behind the tower � la Photon? Some anti-roll bars from another brand (without the kinks) might give you a few extra millimeters of clearance without being really noticeable. Yes, it wouldn't be exactly authentic, but authenticity went out the window when you put the Xray shocks and the custom towers anyway.
-Nice use of the red washers under the tower screws, though. But why not do it on the rear tower too?
- Front camber links look mismatched with the other turnbuckles. That reallly stands out. I would choose a set of matched turnbuckles from another brand over mismatched Corally ones.
Anyway, sorry if I come off as harsh in writing. I have watched many of your 1/12 videos (thanks for your work, BTW) and I know you're a perfectionist like me so I figured you would like constructive feedback. Again, really cool project, I'am actually a bit envious.
-Lose the Corally body mounts. Yes, they look very Corally but they are super brittle, and using them horizontally at the rear is a surefire way to break them when rolling over. I would keep them for the shelf though, they do look super cool.
-Spending a few bucks to replace the mangled shock plastics and ball cups would go a long way.
-Nice that you kept (some of) the torx screws. Again, very Corally. But the mix-and-match of 2mm hex and T10 screws... Not a fan. And the 2mm hex screws are mismatched to boot.
-With the 4mm of spacers on the front arms, I worry that the whole assembly is going to flex too much and also make the arms too fragile. And since they probably aren't easy to come by these days... You probably have thought of this, but couldn't you space out the towers, say, 2mm, and then anchor the shock behind the tower � la Photon? Some anti-roll bars from another brand (without the kinks) might give you a few extra millimeters of clearance without being really noticeable. Yes, it wouldn't be exactly authentic, but authenticity went out the window when you put the Xray shocks and the custom towers anyway.
-Nice use of the red washers under the tower screws, though. But why not do it on the rear tower too?
- Front camber links look mismatched with the other turnbuckles. That reallly stands out. I would choose a set of matched turnbuckles from another brand over mismatched Corally ones.
Anyway, sorry if I come off as harsh in writing. I have watched many of your 1/12 videos (thanks for your work, BTW) and I know you're a perfectionist like me so I figured you would like constructive feedback. Again, really cool project, I'am actually a bit envious.
The pictures I took were merely to show the potential of updating the look and design of this older chassis and possibly inspire others to do the same.
As for the shock towers, they are Yokomo BD8 towers that had the holes modified with a dremel to match the bulkhead mounting points. Not perfect, but it will do for now.
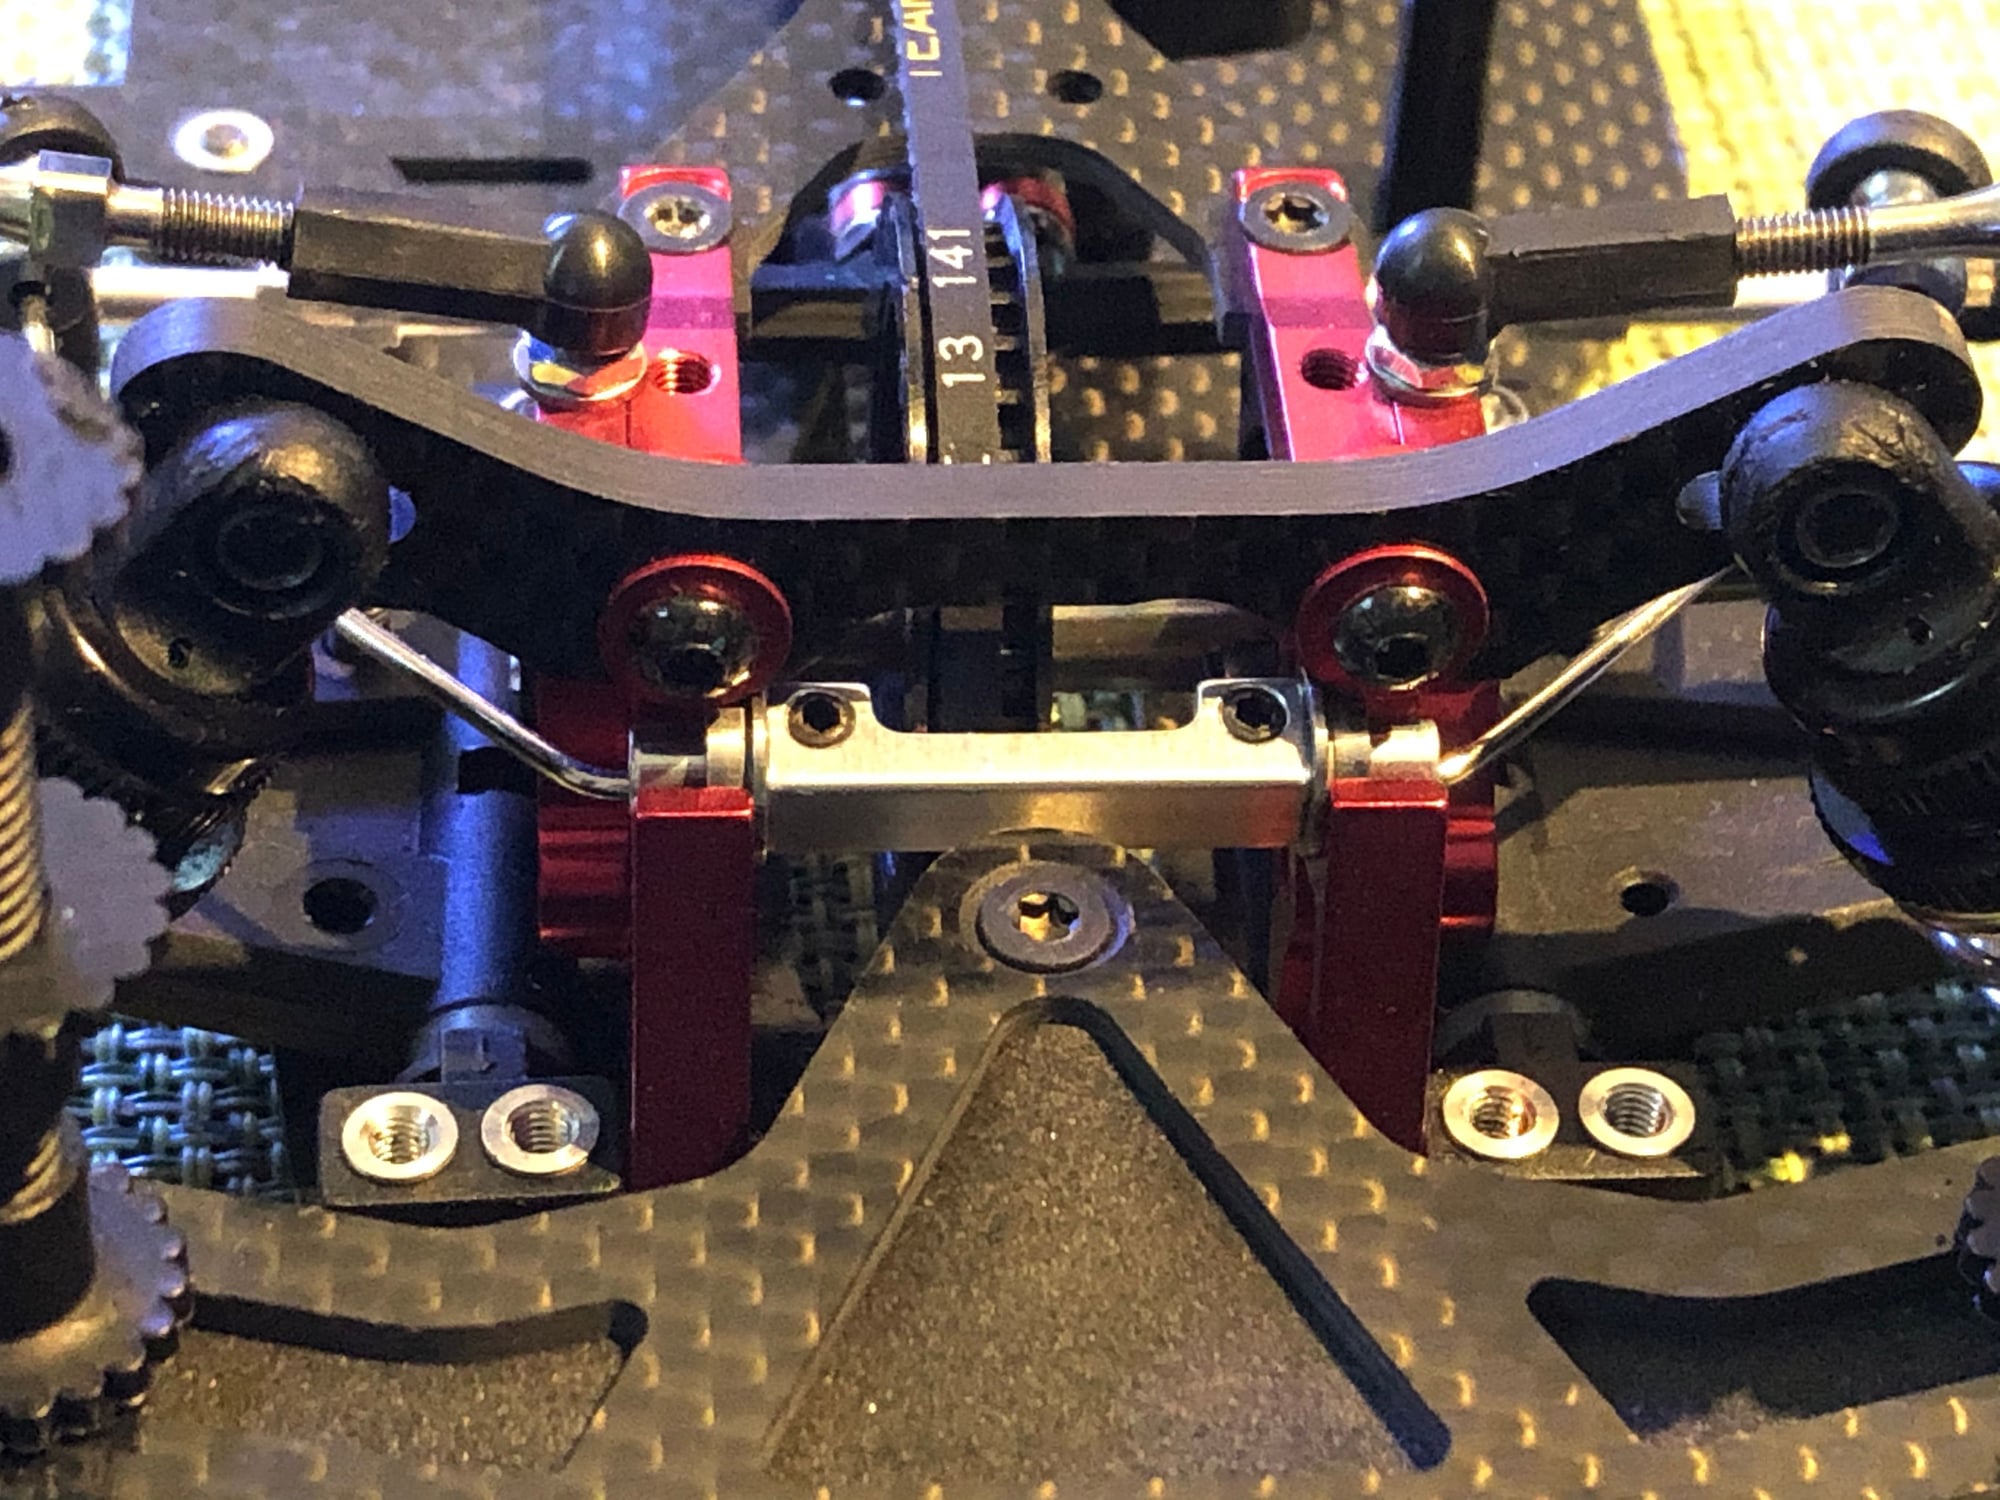
The red shims on the front are used to keep the anti-roll bar bearings from lifting up and out of the holder. I cut too much material off of the lower section of the tower and as a result there was too much play with the bearing holders. So I ended up using two red shims, the rear was perfectly fine. I could do it the same for the rear tower for ascetics.As for the turnbuckles and dampers, I will look into updating those when I have the chance.
 Thank you for your advice, I will take a look at the car again and put your suggestions into practice
10-11-2020, 02:30 AM
Thank you for your advice, I will take a look at the car again and put your suggestions into practice
10-11-2020, 02:30 AM
#465
The shock towers come from the BD7-BD8 chassis. There were two styles of towers : regular and low profile and I went for the latter. The holes are not a direct fit, but require slight modification to shift the holes slightly outwards. You will see that these towers have countersunk screw holes, I just flipped them the other way round. I had to do multiple test fits to make sure that A - The towers are not tweaking the bulkheads and B - Material removed from both left and right side holes were relatively the same.
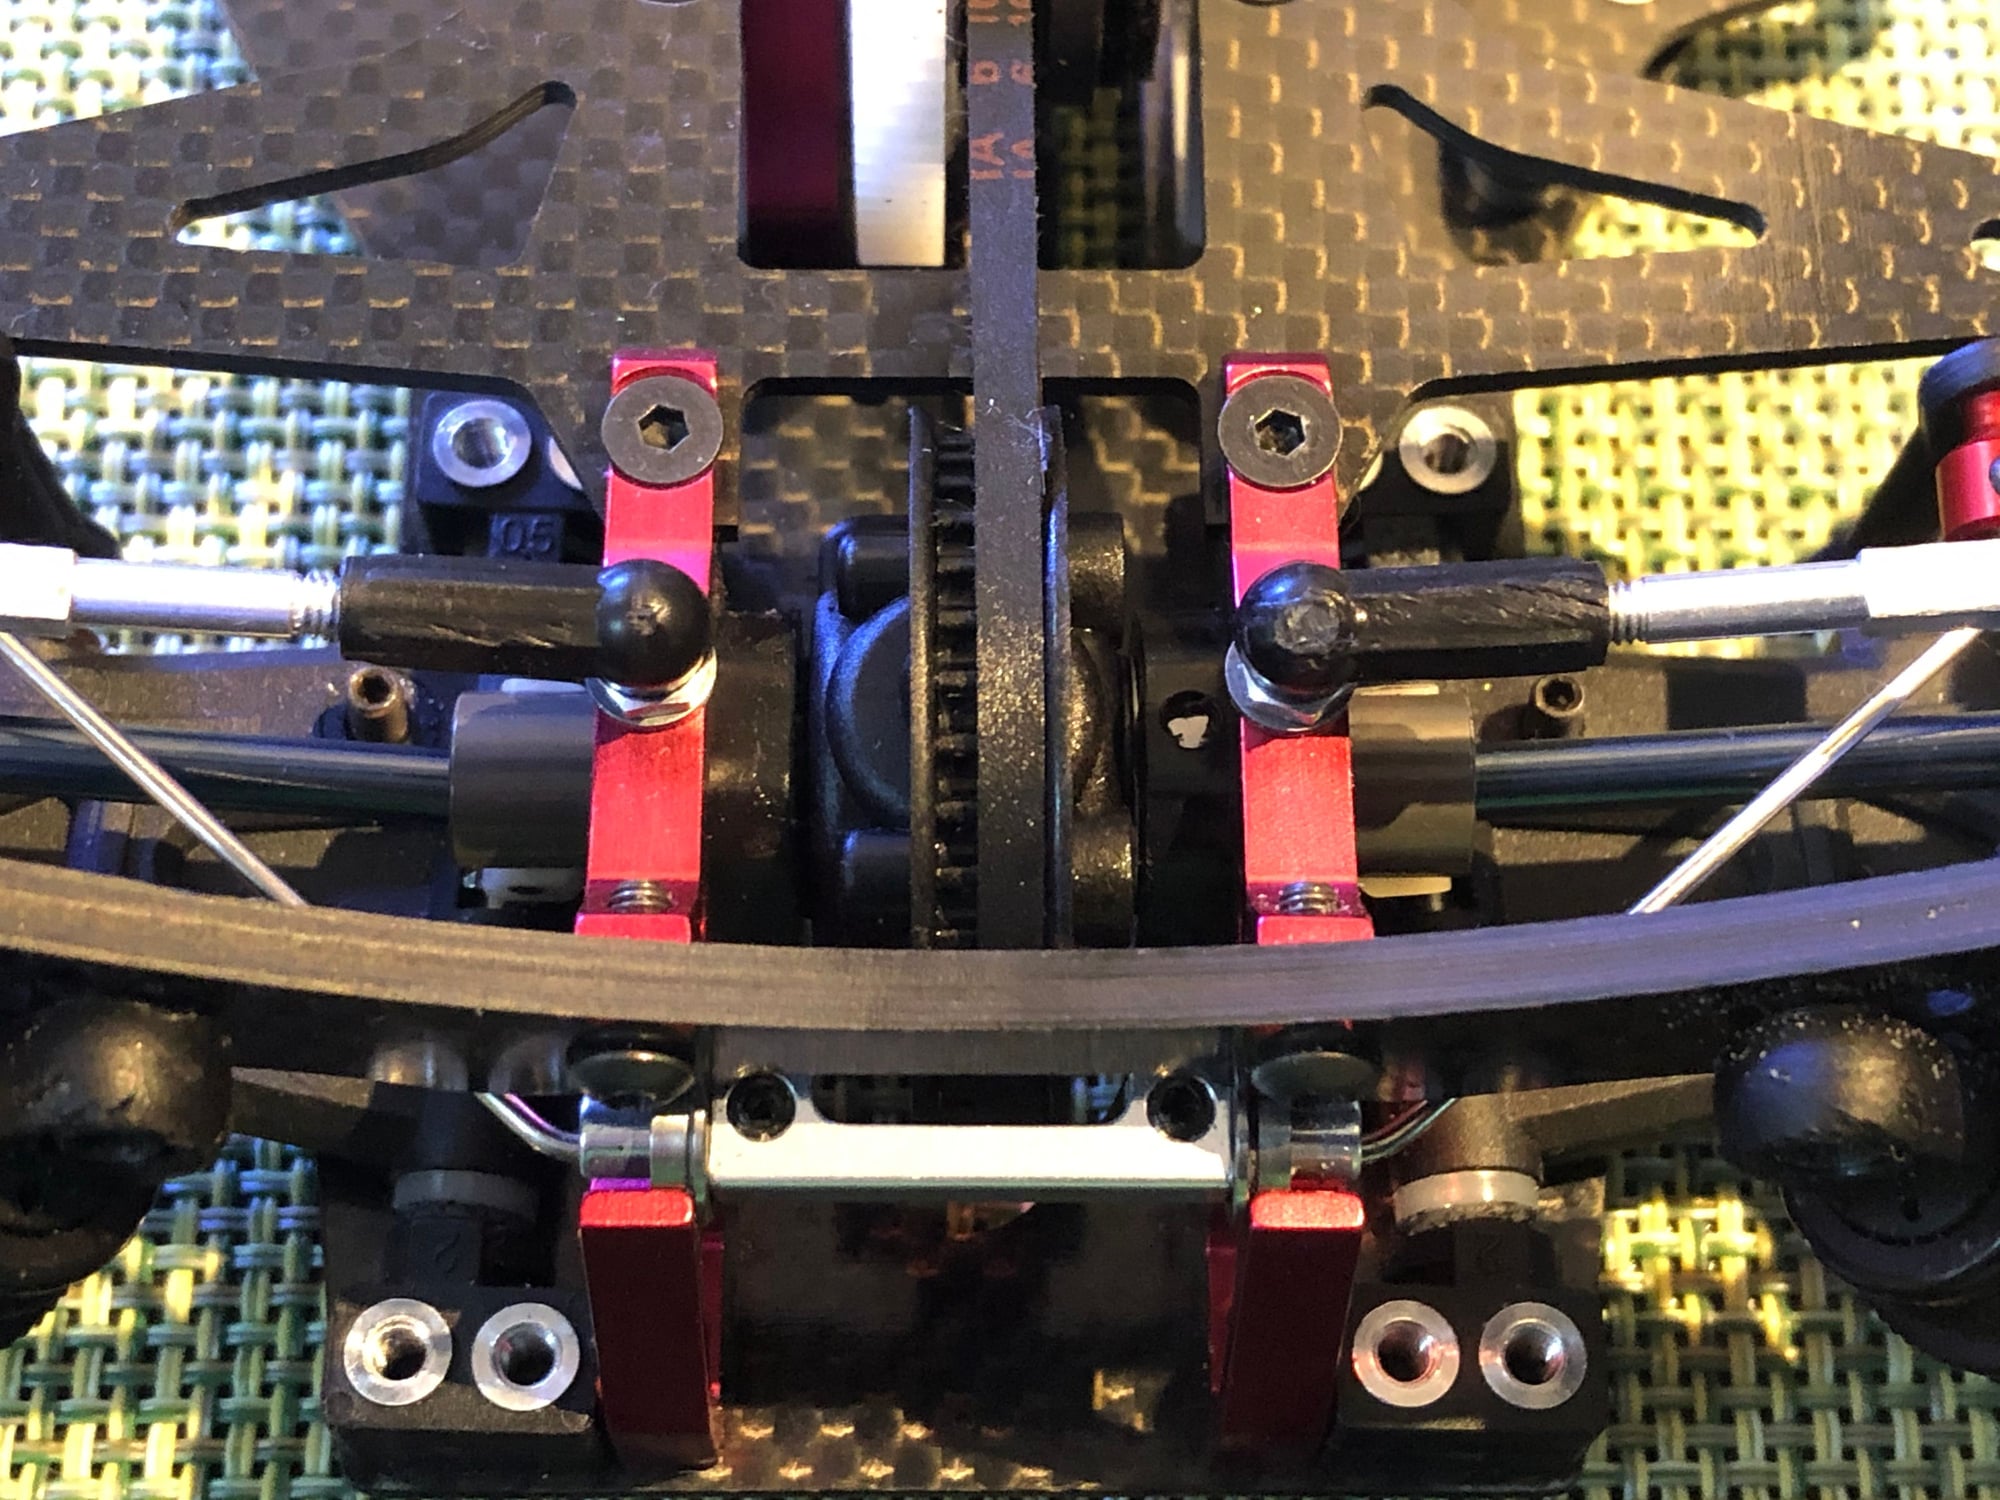
The gear differential is a Schumacher Mi5 differential gear set and or you can use a TRF 417 White colored differential. I opted for the Mi5 because it was the only one I could get my hands on at the time. However this setup posed some challenges which were A - flipped the bearing cam holders so the bearing outputs were facing inwards towards the differential case. This took up a lot of slop and allowed the differential to operate correctly. B - The bearings would shift out of the outputs so I drilled a small hole and used a set screw to act as a stop so the bearings would vibrate / slip out of the holders. C - I also had to sand the bearing cam holders down so the inward face wouldn't rub against the differential case.
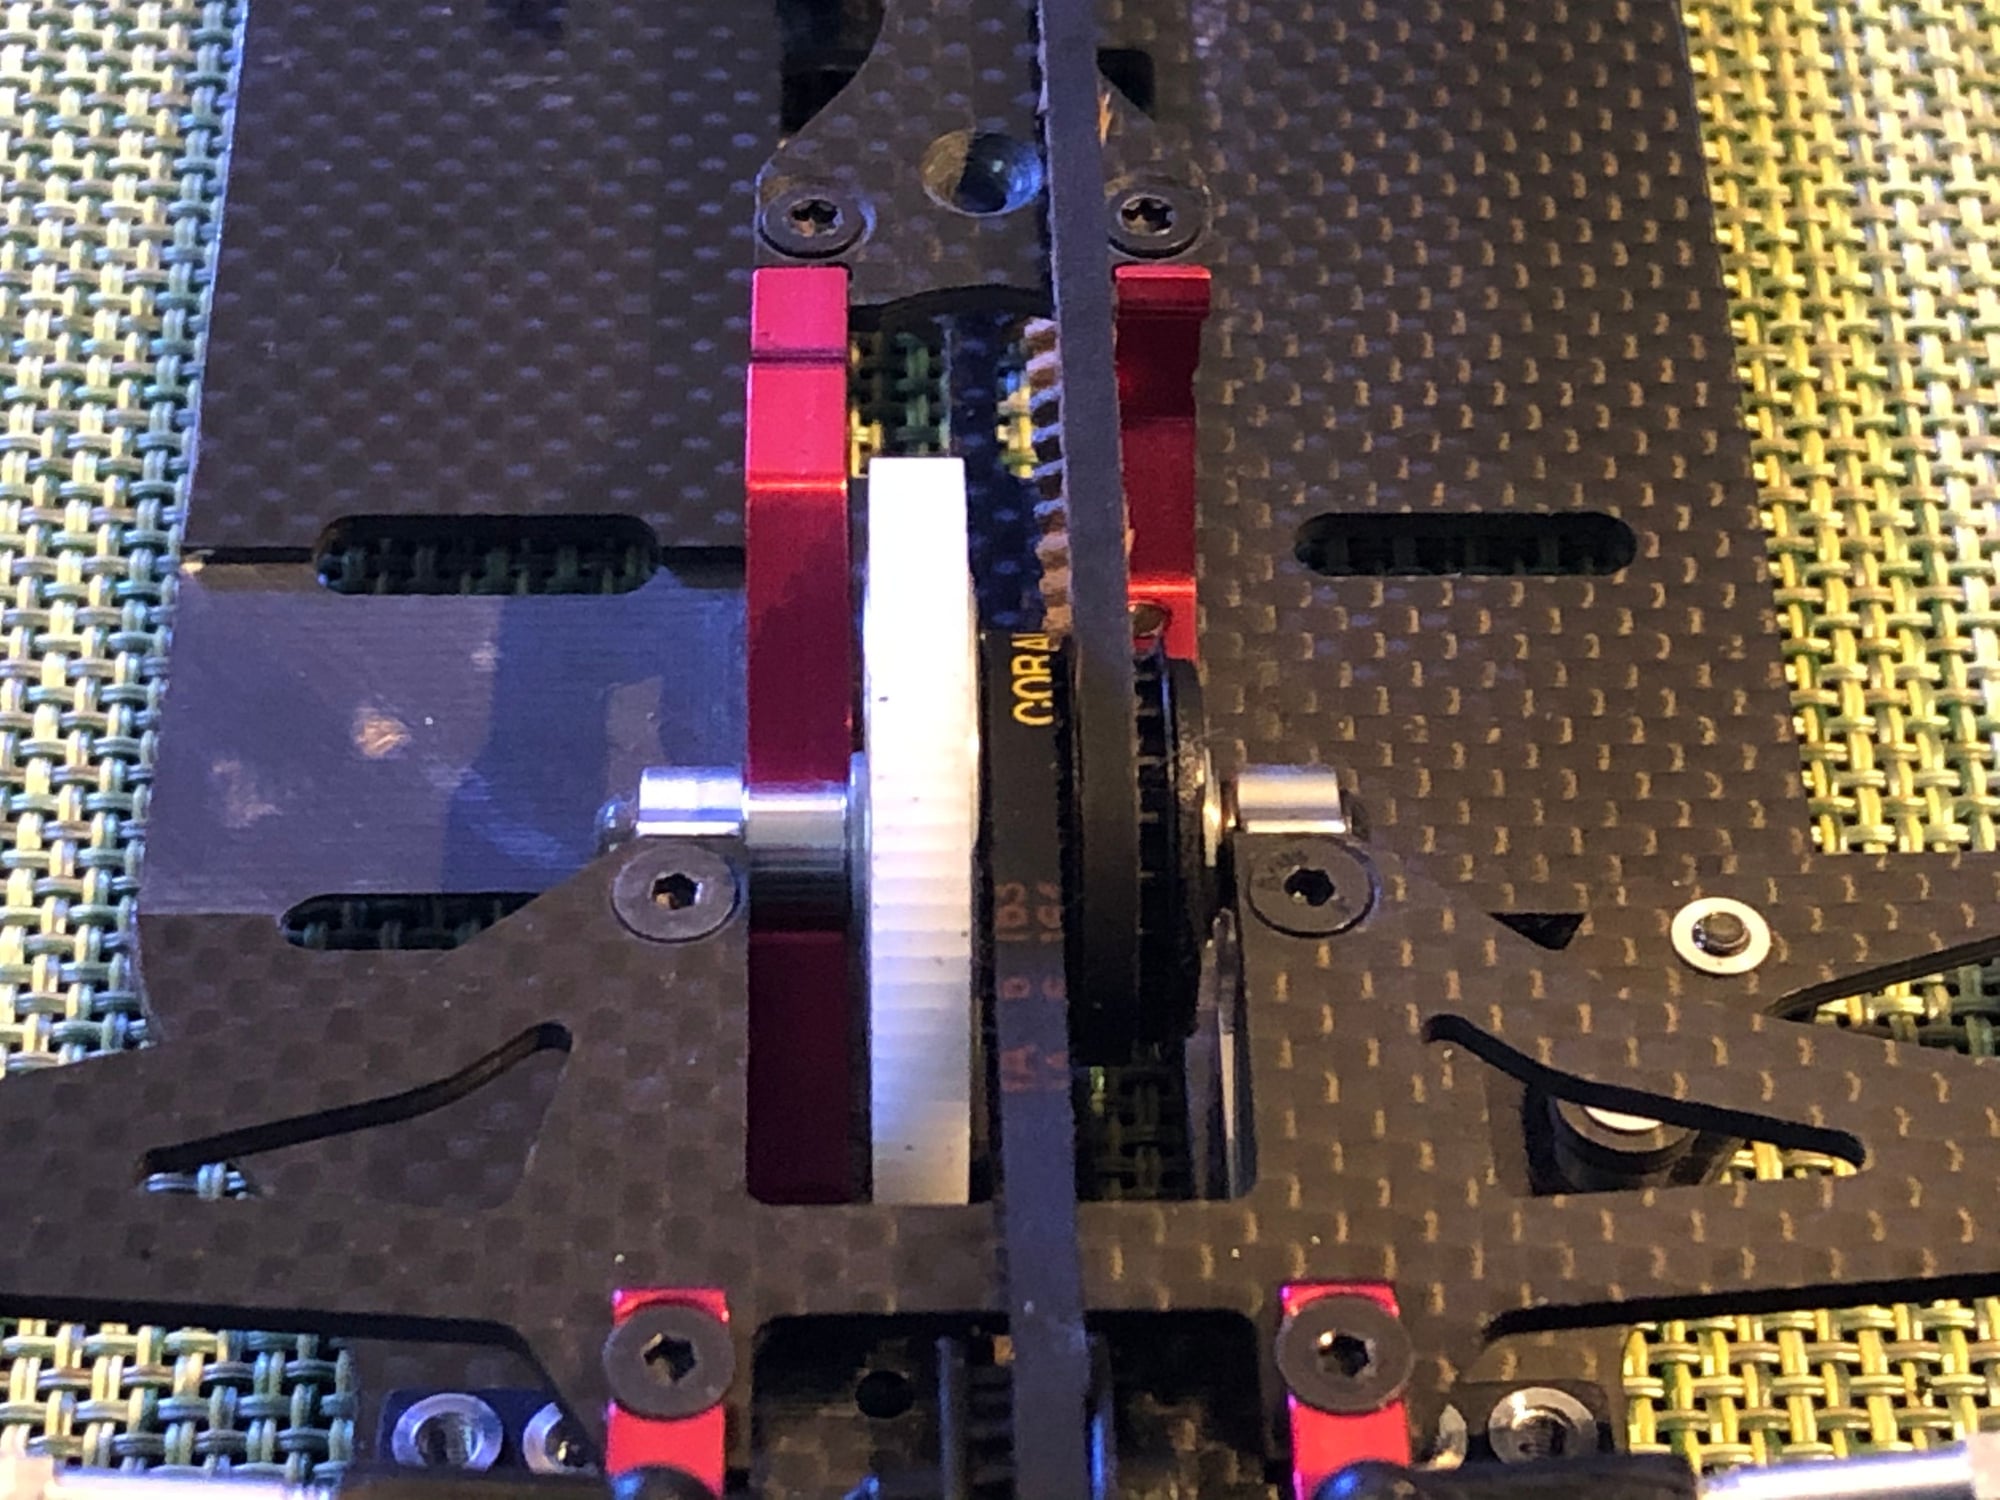
The central drive and spur gear setup. I just flipped it and spaced the spur gear away just slightly from the motor mount. It is a tight squeeze, but no more boss pinion gears.
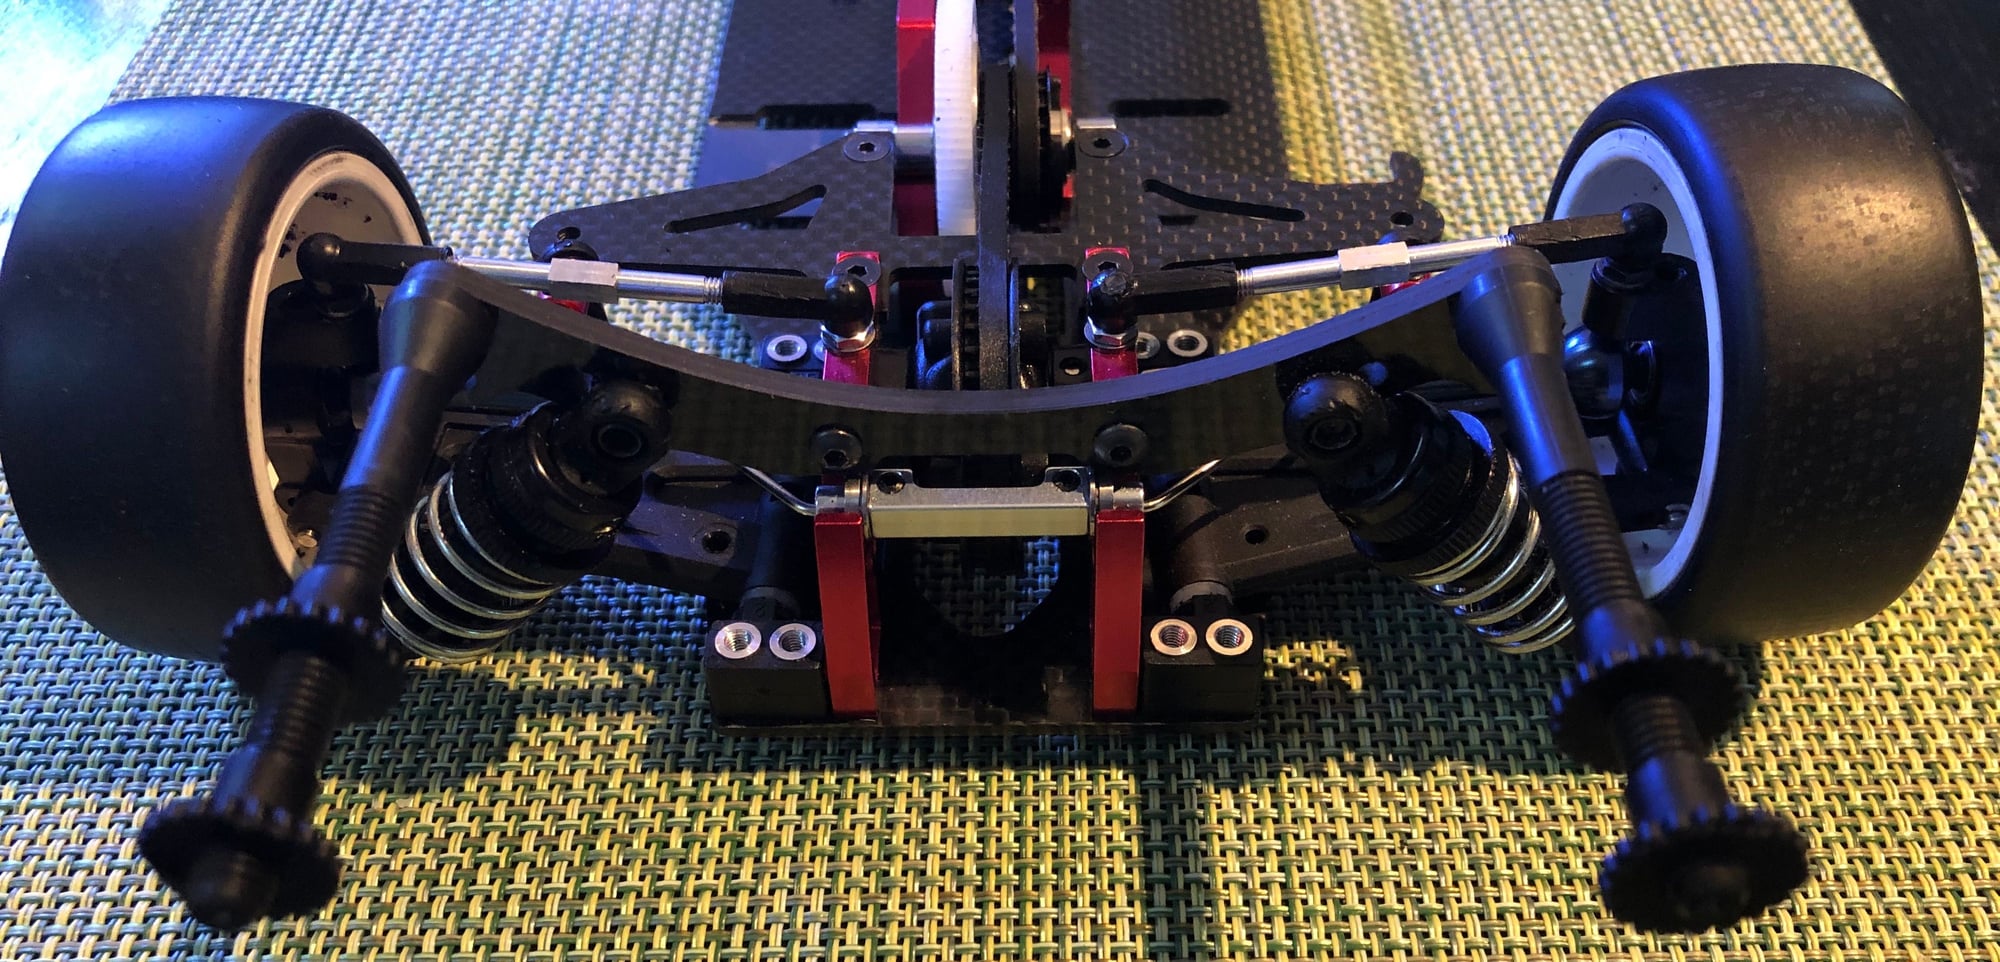
The only issue I have at the moment is the rear drive train where the MIP CVDs are too long. Since the Schumacher Mi5 differential fits in nicely, the outputs wont allow the MIP CVDs to be placed in correctly. In order to make it work I would have to space out the rear hub carrier by 2-3 mm. Luckily the lower suspension arm has two hing-pin hole locations. The standard location is the inner hole which didn't given me enough space, and so I simply moved the hub carrier to the outer hole and it worked. However, the rear width was a little too wide compared to the front and so I bought really thin wheel hexes to help over come this issue.
I hope this helps and I will do a video on a later date.
The gear differential is a Schumacher Mi5 differential gear set and or you can use a TRF 417 White colored differential. I opted for the Mi5 because it was the only one I could get my hands on at the time. However this setup posed some challenges which were A - flipped the bearing cam holders so the bearing outputs were facing inwards towards the differential case. This took up a lot of slop and allowed the differential to operate correctly. B - The bearings would shift out of the outputs so I drilled a small hole and used a set screw to act as a stop so the bearings would vibrate / slip out of the holders. C - I also had to sand the bearing cam holders down so the inward face wouldn't rub against the differential case.
The central drive and spur gear setup. I just flipped it and spaced the spur gear away just slightly from the motor mount. It is a tight squeeze, but no more boss pinion gears.
The only issue I have at the moment is the rear drive train where the MIP CVDs are too long. Since the Schumacher Mi5 differential fits in nicely, the outputs wont allow the MIP CVDs to be placed in correctly. In order to make it work I would have to space out the rear hub carrier by 2-3 mm. Luckily the lower suspension arm has two hing-pin hole locations. The standard location is the inner hole which didn't given me enough space, and so I simply moved the hub carrier to the outer hole and it worked. However, the rear width was a little too wide compared to the front and so I bought really thin wheel hexes to help over come this issue.
I hope this helps and I will do a video on a later date.