


TC4 RTR, Tips and Tricks for Stock, Etc.
 07-06-2010, 07:42 AM
#61
Most oneway axles have smaller oneway bearings in the housings that will let the outdrives spin & freewheel in one direction only. I might be wrong but it is possible that the solid axle that you have might be riding on oneway bearings in the chassis bearing housing. Again letting the solid axle spin and freewheel in one direction but not reverse.
 07-06-2010, 09:51 AM
#62
Tech Addict
iTrader: (1)
Correct. A spool would be one solid peice that the ring gear would be attached to. I myself am thinking about a slipper spool as well, it seems like a great idea. John, if you could give a more detailed description of how you did it, that would be great!
07-06-2010, 12:16 PM
#63

See post #2 on page 1. This is part of it.
Slipper Spool
The trouble with making a slipper on the TC3 is you have the gear lash to reckon with. You must end up with a unit very close in width to a ball diff or you will not be able to shim the gear lash properly.
Enter the Losi A 3325 slipper spool and Associated lightened steel outdrives. I clipped the perimeter of the Losi pulley with a cutter and got close to the pads. I sanded the outer perimeter to just touch the outer part of the pad. Now I could remove it easily without cracking it. I got some cracking just trying to pry it out. There are little prongs on the inside of the pads to fill the ball slots. They snapped in perfectly to the TC4 gear. You remove the balls, but use the steel rings. I removed only one shim and lash was perfect. That means they are the perfect thickness. The TC5 ones on the TC3 thread that Dave used may also be a good thickness with the standard steel outdrives. You need to be able to drop the diff in and have just a little play on the gears when you rock the spur back and forth.
Now for a lube.
Use Aero Car gear lube or the identical lube by LGB trains which I tested here for gears. It is a light paraffin. It will melt with just a little heat or rubbing. Otherwise it is a dry waxy coating attracting little dirt. I lube the gears through that upper hole in the case with the Red Socket head cap screw sealing it. This hole is open on the kit. Thread it with a steel socket head cap screw and then seal it with a short aluminum screw or dirt will enter.
That silicone diff lube the RTR car is filled with is just too sticky. I could tell just by spinning the wheels by hand on the new kit. I opened both diffs, removed the sticky grease and added the very lightweight LGB gear lube. The aero car lube came with a tiny brush that would enter the screw hole. Lube the rear gears lightly once a session so that you do not contaminate the gear diff.
Gear lash
Remove only enough shims to get a slight play . Making a sloppy gear train will lose you power with extra vibration at speed and with poor gear contact occurring too near the points of the gears. This type of contact loses the proper rolling action that gear teeth should have.
Why add a locked diff? It is just a rocket out of the corners. Equal to a oneway. If it is a slipper spool you have reduced drive line breakage and maintenace over that obtained with a one -way. A one-way outside is just a mess quickly and then the bearings in it start to fail. I expect an improved lap time in next weeks race.
So how free could we make this driveline? We could back off the pinion and spin it up with a front wheel and have it coast for 10 seconds. Not possible with any other type of touring car. That is the edge for stock. Note I don't like the oil filled and steel sealed bearings which made this possible. Use rubber seals instead.
John
pics, Losi slipper spool after trimming, sanding, and removing slipper pads in good condition. Top of gear case showing an extra hole that can be used as a lube port.
07-06-2010, 03:12 PM
#64
Tech Addict
iTrader: (1)
I'm pretty sure I understand. The only thing your using from the Losi part is the pads that snap together around the pulley. Yes the light turned on for me. Just a heads up, not all the pads are snapped together around the pulley in the package from Losi.
07-12-2010, 07:51 AM
#65
Try to run a plastic rear diff if you can. Rear weight transfer is more consistent and adds a level of 'tossability' to the car (once the rest is sorted out of course).
I prefer the battery forward in my car as well, and it makes it easier to balance it out F/R and L/R without adding weight. This does depend on driving style too, and not everyone likes the same thing. For me the car is better balanced, offers consistent tire wear, and helps the car rip through medium to high speed chicanes. My setup is fairly unconventional though... i dont even use droop screws.
I prefer the battery forward in my car as well, and it makes it easier to balance it out F/R and L/R without adding weight. This does depend on driving style too, and not everyone likes the same thing. For me the car is better balanced, offers consistent tire wear, and helps the car rip through medium to high speed chicanes. My setup is fairly unconventional though... i dont even use droop screws.
 with pin cushions and a small grubscrew on the end on the bone to stop the metal pin inside the cushion from moving around and hitting the top link mounts. No droop screws!!?
  What works for you mate, personally one of my favorite tuning options. Might look in to getting a couple of small scales to check the corner weights.
07-12-2010, 10:15 AM
What works for you mate, personally one of my favorite tuning options. Might look in to getting a couple of small scales to check the corner weights.
07-12-2010, 10:15 AM
#66
This isnt the easiest setup to initially tune, and it gets tougher the more power you add to the chassis. After all these years though, its second nature for me, and works quite well.
 07-12-2010, 02:25 PM
#67
I take it your next post involves the miss-pelt words of old skool adjusting with oils, pistons and springs...") please do elaborate sir, I'm always willing to learn.
please do elaborate sir, I'm always willing to learn.
adjusting with oils, pistons and springs... please do elaborate sir, I'm always willing to learn.
07-13-2010, 01:33 PM
#68
Old skool. LOL
I think spending time on 1:1 cars had me rethink some of my my previous thoughts on suspension setup. I know its not 100% relative, but can be used as guidelines for experimentation.
With that said, i went beyond the usual rebound limiting droop screws, and use internal springs. Because they rely on consistent rideheight for consistent results, they work best with one tire size (either foam or rubber).
I have longer progressive inner springs for rubber tires, and short linear springs for foam tires. The progressive springs are actually made for pan car front suspension kingpins. I have had them since 2001 and dont remember who made them. Purple, blue and orange are the most common i use, laid out hardest to softest.
I use longer .56 shafts. In place of the old inner foam bobbin, i use custom Delrin stoppers 3mm thick to hold the o rings in and act as a guide for the shock shaft (modifying the current black stopper would probably work well, but it wasnt available back then). Its thickness with the longer shaft gave me the room i needed to use the long internal springs and shims (if needed), and keeps the piston out of the "air" in a bladderless setup.
Admittedly the setup works best (for me) with the altered shock positions on my custom F/R shock towers, but it also works just fine on the standard Tc3/4 towers that i started using them on.
Anyways, you can imagine how time consuming and difficult the learning curve could be using such a setup. But the results are great... and make this old tub car handle fantastic!
I think spending time on 1:1 cars had me rethink some of my my previous thoughts on suspension setup. I know its not 100% relative, but can be used as guidelines for experimentation.
With that said, i went beyond the usual rebound limiting droop screws, and use internal springs. Because they rely on consistent rideheight for consistent results, they work best with one tire size (either foam or rubber).
I have longer progressive inner springs for rubber tires, and short linear springs for foam tires. The progressive springs are actually made for pan car front suspension kingpins. I have had them since 2001 and dont remember who made them.
Purple, blue and orange are the most common i use, laid out hardest to softest. I use longer .56 shafts. In place of the old inner foam bobbin, i use custom Delrin stoppers 3mm thick to hold the o rings in and act as a guide for the shock shaft (modifying the current black stopper would probably work well, but it wasnt available back then). Its thickness with the longer shaft gave me the room i needed to use the long internal springs and shims (if needed), and keeps the piston out of the "air" in a bladderless setup.
Admittedly the setup works best (for me) with the altered shock positions on my custom F/R shock towers, but it also works just fine on the standard Tc3/4 towers that i started using them on.
Anyways, you can imagine how time consuming and difficult the learning curve could be using such a setup. But the results are great... and make this old tub car handle fantastic!
 07-14-2010, 05:37 PM
#70
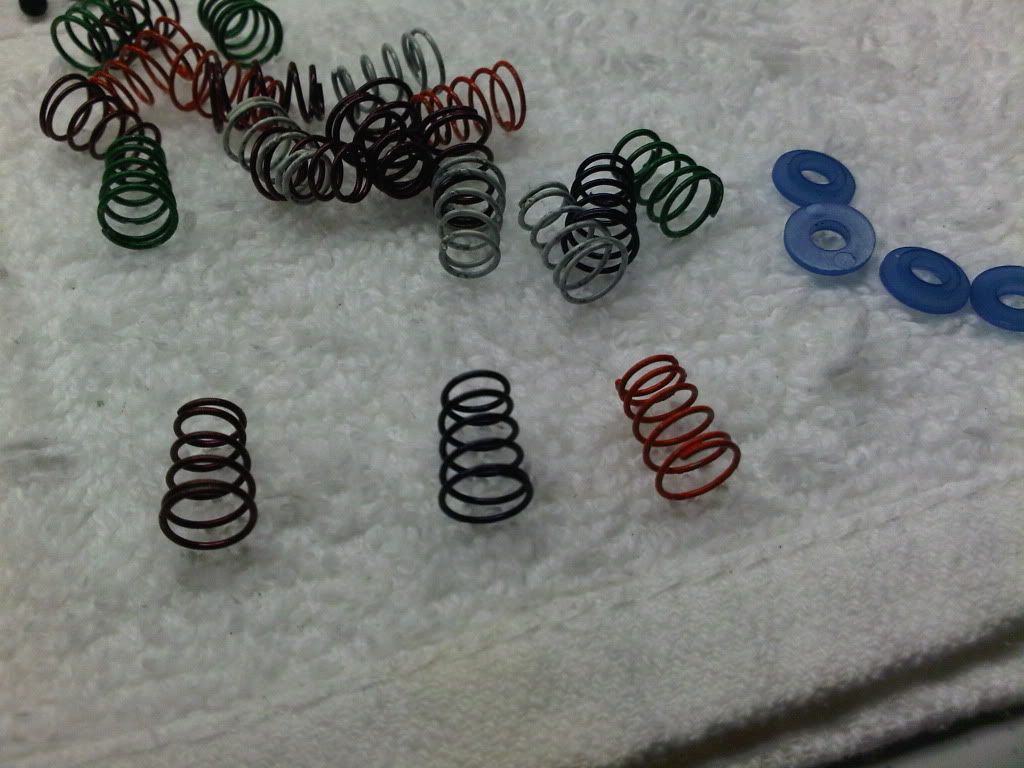
Track Test 97F Track Temp 134F, Soft Droop Stops
First I should say that I like the idea of soft stops to droop. I have commented in print that I like the droop screws on the Losi XXXS. They are set in soft plastic and thus give a soft stop to the arm as the car rolls. Racers complained of droop screws that did not stay put and Losi came out with harder material for the bumpers.
I tried Daves idea of putting little progressive springs inside the shock under the piston. Then as the car rolls, and the inside shocks extend, eventually they come up on the tiny spring. No shock load is transmitted to the car to cause it to break traction. I tried using CRC white springs which are second from the softest probably in the 10-12 lb/inch range. I used both Sliver 14.5 lb/in and then Green 12.5 lb/in per inch. I used the stock TC4 plastic shocks which have a fairly thin retainer on the O-ring to give more internal space. So I put the white spring pointy side up under the piston. Refilled the shocks. Putting on the big spring was now difficult. I ended up taking all the spacers off (no threaded rings on these shocks). I put the big spring on and then put my spacer stack back on. Now the shock would extend. You could tell there was a lot of preload on the main spring as the spring was compressed shorter than before. The shock would extend, then you could pull it about an additional 1 mm by fully compressing the internal spring. I put the pair of shocks on the car and I had lost 2 mm of ride height. I would have to add 1-2 mm more spacers to get my ride height back. This would add additional preload. I was getting soft spring loaded droop stops, but I was also getting a spring under more preload. It would act like a stiffer spring. I went one size down to green springs on the big spring. I still was not happy with the ride height and preload on the main spring. Anyway, although I like the idea, I took the little springs out. This gave me a supple car again. It might work better on a track with more traction than I have, where you would normally run blue springs and could substitute the greens at a higher preload.
I tested the car on the tiny track with greens instead of blue springs. I can't say there was an improvement. I may add some light sway bars. The losi Aluminum Hexes worked well. I lost no more wheel nuts.
john
07-14-2010, 06:58 PM
#71
The longer shock shafts (.56) and the modded/custom inner bobbin/stopper are needed to have room for the inner spring. (assuming your inner springs are the same length)
My car is set up with .75mm gap between the small end of the front inner spring pointing up and the e-clip on the bottom of the shock piston with 5.5 mm of static ride height (no rear inner spring for our local track). I have one .030 plastic spacer for the big end of the inner spring, basically to center it during use. It fits inside the spring, and doesnt 'preload' it.
Basically, the gap is adjusted for the initial response you want. In my findings, a larger track with a lot of sweeping corners would have a greater inner spring gap. A track with chicanes or a lot of transitional sections would have a minimal to non existent inner spring gap.
Its weird how it handles. Its like the car has a swaybar on it as it corners smooth and consistent, but without the sudden loss of grip when pushed to the limits. You can literally drive the tires off of it and it feel completely stuck at all times.
The first run with the front slipper spool a few weeks back was interesting. After a few laps, i could 3/4 lift the throttle coming into the first right hand 180 after the sweeper and punch the throttle just before the apex and power drift off the corner with all 4 tires squealing. Superbly neutral. No roll induced snap, no wiggle, no TQ steer.
I did some research and found that it was a company called Wolf that made my progressive springs (late 90's). Apparently they are no longer in business(?). There are other springs on the market that look similar (RC4Less), but i dont know if they are identical in length or tension.
My car is set up with .75mm gap between the small end of the front inner spring pointing up and the e-clip on the bottom of the shock piston with 5.5 mm of static ride height (no rear inner spring for our local track). I have one .030 plastic spacer for the big end of the inner spring, basically to center it during use. It fits inside the spring, and doesnt 'preload' it.
Basically, the gap is adjusted for the initial response you want. In my findings, a larger track with a lot of sweeping corners would have a greater inner spring gap. A track with chicanes or a lot of transitional sections would have a minimal to non existent inner spring gap.
Its weird how it handles. Its like the car has a swaybar on it as it corners smooth and consistent, but without the sudden loss of grip when pushed to the limits. You can literally drive the tires off of it and it feel completely stuck at all times.
The first run with the front slipper spool a few weeks back was interesting. After a few laps, i could 3/4 lift the throttle coming into the first right hand 180 after the sweeper and punch the throttle just before the apex and power drift off the corner with all 4 tires squealing.
Superbly neutral. No roll induced snap, no wiggle, no TQ steer. I did some research and found that it was a company called Wolf that made my progressive springs (late 90's). Apparently they are no longer in business(?). There are other springs on the market that look similar (RC4Less), but i dont know if they are identical in length or tension.
07-14-2010, 07:05 PM
#72
Which ones do you have? I noticed they have several different thicknesses and thought about trying out a set.
I favor my old o-ring Yokomo hexes as they are thin and allow track adjustment with HPI aluminum spacers between the wheel and hex. I had to trade them in for these thick AE hexes as they developed too much slop from years of use.
I favor my old o-ring Yokomo hexes as they are thin and allow track adjustment with HPI aluminum spacers between the wheel and hex. I had to trade them in for these thick AE hexes as they developed too much slop from years of use.
07-14-2010, 09:27 PM
#75
I installed the thin Losi Aluminum Hexes for this tiny course. I have some 1/8 inch of axle sticking out of the narrow nut. A better match to stock thickness would be the thickest Losi Aluminum Hexes. They fit the wheel and axle perfectly. Thanks for the additional detail.
John
John