


 2421Likes
Tekno RC EB410 Thread

 05-13-2019, 06:33 AM - Wikipost
|
|||
|
|||


 09-08-2017, 07:09 AM
#976
I think it's only 2mm but dont quote me for front 4wd wheels. I use both with no prob on a b64 and b44.3
 09-08-2017, 07:13 AM
#977

I believe they said it was a 1mm shim that was needed to run the front AE wheels, Losi wheels require no shim. And rear wheels all use same offset, but they offer longer threads on rear to allow thicker backspacing on the Losi wheels.
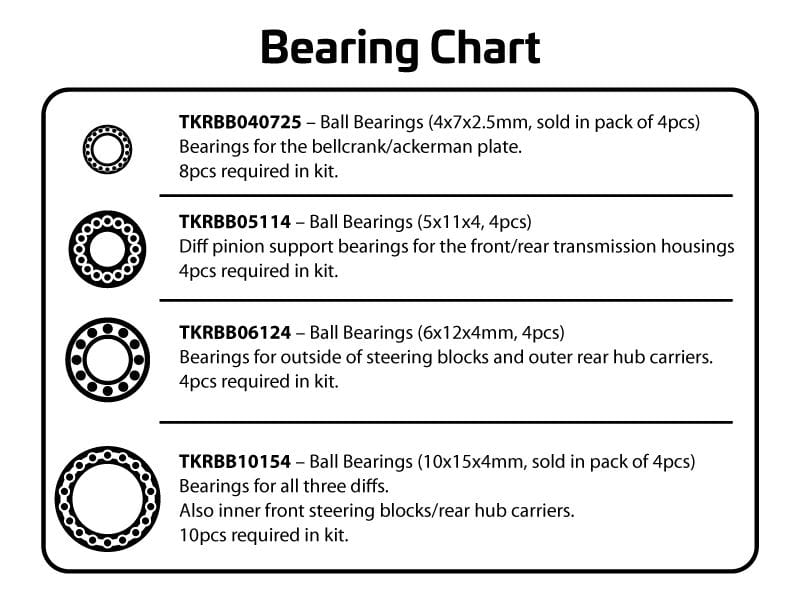
I'm getting ready to place an order for some Revolution bearings from AVID and I love seeing the larger 10x15x4 bearings are being used on the inner hubs to capture the pins on the CVD's
I'm getting ready to place an order for some Revolution bearings from AVID and I love seeing the larger 10x15x4 bearings are being used on the inner hubs to capture the pins on the CVD's
Last edited by billdelong; 09-08-2017 at 07:27 AM.
09-08-2017, 07:13 AM
#978
Few questions:
- Can you get to all the setup change areas (change diff fluids, etc) without having to wrench on the chassis bottom? By that I mean, can I run a chassis protector and do setup changes without having to pull it off?
- Based on the layout being seen, what advantages do you gain other than weight by going with a low profile servo?
- Also, what is the max width servo you can fit there as it looks pretty compact.
Be curious to see what a fatter ESC looks like mounted there like a Tekin RSX or a Maclan MMax in comparison to the RS general model shown:
Tekin RS: 26 x 34 x 12.9mm
Tekin RSX: 31.2 x 37.2 x 21mm
Maclan MMax: 40 x 30 x 19mm
Hobbywing XR10 Pro: 37.5 x 30.9 x 31.6mm (w/Fan & Fan Shroud)
Orion HMX: 43.9 � 32.7 � 22.4mm
Not saying it won't fit or anything, just curious on some wiring strategies with say receivers like the R203GFE from futaba.
Last edited by Cain; 09-08-2017 at 07:51 AM.
09-08-2017, 07:16 AM
#979
be curious to see what a fatter ESC looks like mounted there like a Tekin RSX or a Maclan MMax in comparison to the RS general model shown:
Tekin RS: 26 x 34 x 12.9mm
Tekin RSX: 31.2 x 37.2 x 21mm
Maclan MMax: 40 x 30 x 19mm
Hobbywing XR10 Pro: 37.5 x 30.9 x 31.6mm (w/Fan & Fan Shroud)
Orion HMX: 43.9 � 32.7 � 22.4mm
Not saying it won't fit or anything, just curious on some wiring strategies.
Tekin RS: 26 x 34 x 12.9mm
Tekin RSX: 31.2 x 37.2 x 21mm
Maclan MMax: 40 x 30 x 19mm
Hobbywing XR10 Pro: 37.5 x 30.9 x 31.6mm (w/Fan & Fan Shroud)
Orion HMX: 43.9 � 32.7 � 22.4mm
Not saying it won't fit or anything, just curious on some wiring strategies.
09-08-2017, 07:19 AM
#980
You read my mind. I realize they said they tested all of the popular ESCs and RXs, but what we see in the pic are two of the smallest examples on the market, and it's already tight. Take a Futaba RX and an XR10 Pro with a quad cap (or a Maclan!), and things might get interesting real quick.
 09-08-2017, 07:39 AM
#981
Looks amazing and this should continue to push the 4wd class into the spotlight in the US. The attention to details is awesome:
-Tekno logo on the pack using a pocket for the 'O'
-Hollowed out shock towers to keep them beefy but light
-Wire clips for the battery built into the brace and a pocket on the battery strap to hold the far wire down
-The fan mount for the motor makes me think they were planning to attack the 13.5 class from the start
-Velco pads for those who hate body clips
-Large lip on the front of the chassis to keep out debris out of the electronics
Can't wait to race against them on the track!
I hope this car excels on loose tracks as well as high traction without just throwing weight at it, but I'm not convinced at the moment. A big reason for the rear weight bias that current vehicles maintain in the face of increasing traction is due to the larger rear tires on 10th scale vehicles vs the uniform tire size on 8th scale. When the Durango 4wd first came out with such a bias towards the front, slapping a brass skidplate on to add 60g to the rear was standard practice for medium to low grip tracks. Looking forward to what setups they come up with once the car hits the wild.
09-08-2017, 07:40 AM
#982
For those curious about the hex spacers to run the front AE wheels, here they are:
12mm Hex Track Width Spacers | Carbon | Set Accessorie AV1044-S-SET
12mm Hex Track Width Spacers | Carbon | Set Accessorie AV1044-S-SET
09-08-2017, 07:47 AM
#983
Tech Master
As far as difference beyond that, not sure.
09-08-2017, 07:49 AM
#984
 09-08-2017, 07:58 AM
#986
Plenty of space at the rear for adding weight per lower bite conditions.
09-08-2017, 08:01 AM
#987
...
I hope this car excels on loose tracks as well as high traction without just throwing weight at it, but I'm not convinced at the moment. A big reason for the rear weight bias that current vehicles maintain in the face of increasing traction is due to the larger rear tires on 10th scale vehicles vs the uniform tire size on 8th scale. When the Durango 4wd first came out with such a bias towards the front, slapping a brass skidplate on to add 60g to the rear was standard practice for medium to low grip tracks. Looking forward to what setups they come up with once the car hits the wild.
I hope this car excels on loose tracks as well as high traction without just throwing weight at it, but I'm not convinced at the moment. A big reason for the rear weight bias that current vehicles maintain in the face of increasing traction is due to the larger rear tires on 10th scale vehicles vs the uniform tire size on 8th scale. When the Durango 4wd first came out with such a bias towards the front, slapping a brass skidplate on to add 60g to the rear was standard practice for medium to low grip tracks. Looking forward to what setups they come up with once the car hits the wild.
The various milling areas I was curious to see if something would have like a built in screw hole so you could just mount weights there that fit the milling sections to keep the weight as low as possible. Maybe something could be released if needed that just sticks on but is made to fit those areas for a nice factory look.
All in all though, based on how they described changes in the surfaces we run on, I am not too surprised by what was shown in addition if we see any issues running the vehicle in places that are not high grip.
One thing though, considering Tekno's experience with getting vehicles to work well in conditions that are low grip that have the electronics weight pretty far forward, if anyone can, it'll be them.
The tranny shims too may help as well. Its been a bit help at least for me in 2wd buggy with my Yokomo which was known to be very light in the rear. so much so they helped in addition to the standup Dirt tranny I haven't added any weight to the rear. But without the shims, would be spin city here.
 09-08-2017, 08:04 AM
#989
For sure, but if they had an additional set of bolt holes for the center diff to move it back 10-15mm, you wouldn't have to add weight at all. I just wonder if an aftermarket company will make that option first or if Tekno will.
Or if they find that moving the shocks to the front of the rear arms helps, then moving the center diff back a tad to keep the same weight bias. Just random thoughts about future adjust-ability.
Or if they find that moving the shocks to the front of the rear arms helps, then moving the center diff back a tad to keep the same weight bias. Just random thoughts about future adjust-ability.
09-08-2017, 08:07 AM
#990
Matt mentioned an updated servo horn would be released for the EB410 close to the release date. I hope they can share some details regarding other option parts that are going to be available (and when?) or may be in the works for this car such as hexes, pinions, sway bars and springs etc...