


 219Likes
Tekno RC SCT410.3 Thread

 09-05-2022, 08:19 AM - Wikipost
|
|||
|
|||


 08-21-2015, 01:31 PM
#1996

Could anyone can give me a clarify the rear camber link because other set up book it says longer link it more stable and rear traction and hudy set up book and it says shorter rear camber link more stable and more rear traction.. I am confused my rear camber link is the shortest camber link outside tower hole#6 and inner rear hub and i feel had a good traction entering the corner but exiting the corner i got loose rear traction. Never try longer link yet.
A shorter/lower link will make the rear end very reactive and want to come around off power. You will gain traction/forward bite coming out of corners.
If you are a point and shoot driver who goes in hot, hits the brakes, turns and stabs the throttle, you will probably like a shorter link and/or a higher roll center (lower link). Some of this is track dependent.
To be able to drive a short and low link rear end, you have to be on the throttle all the way around the track. Even if it's really light throttle, that will keep the rear end planted pretty well. But if you let off to break or turn, that rear end will be hard to control.
If you are easy on the throttle and brakes and round the corners and drive out of them, try the longer link first. Only move the link up if you are still having issues with the rear end breaking loose off power.
 08-21-2015, 01:51 PM
#1997
Matt, thank you. Very helpful.
I just reluctanly retired my original 410 after 2+ years. Ran awesome, it was just time for a new kit. I'm in the process this weekend of building my new truck, and I'm doing my best to translate my setup over so it drives as close as possible.
I just reluctanly retired my original 410 after 2+ years. Ran awesome, it was just time for a new kit. I'm in the process this weekend of building my new truck, and I'm doing my best to translate my setup over so it drives as close as possible.
08-21-2015, 01:58 PM
#1998
Tech Master
iTrader: (36)
Longer and/or higher link is more stable into a corner. If the rear end is coming around too quickly off throttle or in a sweeper, for example, or there is too much turn-in, go to a longer link. If that doesn't help enough, raise the link on the tower (lower the roll center). The flip side to a higher link is less on-power traction (more steering out of a corner).
A shorter/lower link will make the rear end very reactive and want to come around off power. You will gain traction/forward bite coming out of corners.
If you are a point and shoot driver who goes in hot, hits the brakes, turns and stabs the throttle, you will probably like a shorter link and/or a higher roll center (lower link). Some of this is track dependent.
To be able to drive a short and low link rear end, you have to be on the throttle all the way around the track. Even if it's really light throttle, that will keep the rear end planted pretty well. But if you let off to break or turn, that rear end will be hard to control.
If you are easy on the throttle and brakes and round the corners and drive out of them, try the longer link first. Only move the link up if you are still having issues with the rear end breaking loose off power.
To be able to drive a short and low link rear end, you have to be on the throttle all the way around the track. Even if it's really light throttle, that will keep the rear end planted pretty well. But if you let off to break or turn, that rear end will be hard to control.
I had this situation it's hard to control if i let the throttle off exiting in the corner. Thanks for the input will try longer link
08-21-2015, 02:32 PM
#2000
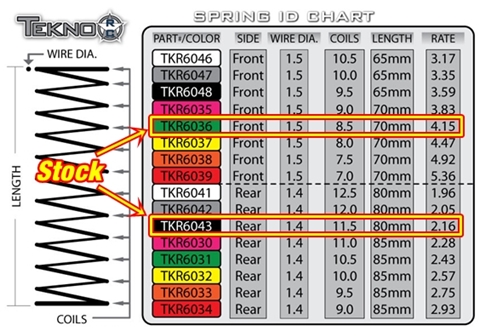
For anyone fighting ride height issues like I was and has try'd all the suggested fixes here is what I did. I had the alum shock collars on truck but switched out the front to the stock plastic collars. I used a mic and shaved 2mm off of them and reinstalled, can get like 24mm in front now with the Tekno 70mm front springs, just make sure you take material from the flat side of the collar not the side the spring rides on obviously, and make sure they are flat and even across with a mic so they sit flush against shock body and are even side to side.
08-21-2015, 03:37 PM
#2001
Just seemed to give it a ton of toe in??? I'm using the composite blocks, front stayed in kit setup position and I moved the d block to the up and out postion, I think I'm still confused, or am I right
08-21-2015, 05:08 PM
#2002
08-21-2015, 06:04 PM
#2003
08-21-2015, 06:20 PM
#2004
Tech Initiate
Okay so my build was going fairly smoothly until bag g which was the front end. First my camber link came with an unthreaded end, which tekno took care of immediately, i had a tracking number within 15 min of emailing them. I decided to put the other one together and the ball end with the flange (attaches to the shock tower) moves smoothly but the normal one binds. I assembled the other side and had the same problem. Is this there a special way to assemble these? I popped them in with small channel locks trying to keep them straight as they go in, when i take them back apart the cups look fine. And to top it off i go to put my one camber link in and the nut that holds it on the axle carrier starts spinning in place before the screw even came close to tightening. Has anyone else experienced these problems? Am i doing something something wrong, defective bag? I had no problems with the rear i did the day before.
08-21-2015, 08:30 PM
#2005
Tech Adept
iTrader: (3)
Man don't tell me this, I just pulled out bag G and put it on the table to work in the morning before getting in bed a few minutes ago, that's gotta suck. At least they are fixing you up. On the other issues I'll chime in sometime tomorrow. Good luck!
08-21-2015, 10:00 PM
#2006
Longer and/or higher link is more stable into a corner. If the rear end is coming around too quickly off throttle or in a sweeper, for example, or there is too much turn-in, go to a longer link. If that doesn't help enough, raise the link on the tower (lower the roll center). The flip side to a higher link is less on-power traction (more steering out of a corner).
A shorter/lower link will make the rear end very reactive and want to come around off power. You will gain traction/forward bite coming out of corners.
If you are a point and shoot driver who goes in hot, hits the brakes, turns and stabs the throttle, you will probably like a shorter link and/or a higher roll center (lower link). Some of this is track dependent.
To be able to drive a short and low link rear end, you have to be on the throttle all the way around the track. Even if it's really light throttle, that will keep the rear end planted pretty well. But if you let off to break or turn, that rear end will be hard to control.
If you are easy on the throttle and brakes and round the corners and drive out of them, try the longer link first. Only move the link up if you are still having issues with the rear end breaking loose off power.
A shorter/lower link will make the rear end very reactive and want to come around off power. You will gain traction/forward bite coming out of corners.
If you are a point and shoot driver who goes in hot, hits the brakes, turns and stabs the throttle, you will probably like a shorter link and/or a higher roll center (lower link). Some of this is track dependent.
To be able to drive a short and low link rear end, you have to be on the throttle all the way around the track. Even if it's really light throttle, that will keep the rear end planted pretty well. But if you let off to break or turn, that rear end will be hard to control.
If you are easy on the throttle and brakes and round the corners and drive out of them, try the longer link first. Only move the link up if you are still having issues with the rear end breaking loose off power.
Great stuff!!!
Good lesson, keep them coming, please.
08-21-2015, 10:05 PM
#2007
Okay so my build was going fairly smoothly until bag g which was the front end. First my camber link came with an unthreaded end, which tekno took care of immediately, i had a tracking number within 15 min of emailing them. I decided to put the other one together and the ball end with the flange (attaches to the shock tower) moves smoothly but the normal one binds. I assembled the other side and had the same problem. Is this there a special way to assemble these? I popped them in with small channel locks trying to keep them straight as they go in, when i take them back apart the cups look fine. And to top it off i go to put my one camber link in and the nut that holds it on the axle carrier starts spinning in place before the screw even came close to tightening. Has anyone else experienced these problems? Am i doing something something wrong, defective bag? I had no problems with the rear i did the day before.
08-21-2015, 10:34 PM
#2008
Figured out how to break the SCT410.3... Turns out the TKR5161 A-block upgrade on the EB48.3 makes it a tougher vehicle than the SCT410.3... Looks like the TKR5161 is a great upgrade for the SCT, I'll be ordering one asap. Also, recorded a bunch of laps with the EB48.3 in really loose conditions.
| + YouTube Video | |
08-22-2015, 05:04 AM
#2009
Tech Adept
My 410.3 broke in exactly the same spot. Replaced with an alum A block. IMHO a flathead screw should not be used on the A block to secure it. There is not much meat on the top and bottom of the hole and when you tighten the flathead screw your actually putting the cone part of the hole under stress. It would have been much stronger with a plain hole and a button head screw. But that being said, I love this truck. It's so easy to go fast in it.
Rich
Rich
08-22-2015, 08:06 PM
#2010
Tech Regular
So I reduced the anti squat as recommended on hear to help with the nose down issue. Made a huge difference. My truck is dialed. Super happy with it.