


 28Likes
TLR 22-4 THREAD
 09-25-2013, 11:38 PM
#1
Tech Regular
Thread Starter

1/10 Twenty Two-Four
[ TLR03005 ]
The 22-4 (Twenty Two-Four) buggy is the result of over two years of testing, tweaking and sweating the small stuff. Everything from the chassis plate to the hinge pins has been designed or chosen by some of the best engineers and drivers in the world. It all adds up to a 1/10-scale, 4WD buggy that completely redefines world-class performance.
Chassis Call-Out

- 2.5mm hard-anodized aluminum 7075 T-6 aluminum chassis
- Sealed 3-belt drivetrain with modular covers
- Centralized forward motor mount
- Gen II hard-anodized, big bore 12mm emulsion shocks
- Steering Ackerman plate
- HDS Slipper Clutch
- Ball Differentials with Tungsten Carbide Balls
- Universal driveshafts
- Integrated battery restraint system
- Two sets of TLR wheels included
- Compact, one-piece wing mount
- Updated body and wing
- One-way Clicker of Full Time 4wd
- Front and Rear Aluminum Camber Blocks
2.5MM HARD ANODIZED 7075 T-6 ALUMINUM CHASSIS
The lightweight aluminum chassis has been milled to reduce weight without sacrificing strength. Its rigidity minimizes torsion and longitudinal flex so the drive belts are always positively engaged. Removable mud guards are included.

SEALED 3-BELT DRIVETRAIN
The innovative 3-belt drivetrain delivers better grip and acceleration than gear-driven designs. It�s completely sealed from the elements by modular covers that make maintaining and adjusting belt tension a breeze.

CENTRALIZED FORWARD MOTOR MOUNT
The position of the motor mount makes for a more balanced chassis with superb handling characteristics.

GEN II HARD-ANODIZED, BIG BORE 12MM EMULSION SHOCKS
The shocks are equipped with low friction Ti-CN shock shafts and CNC machined pistons. They�re topped by a threaded aluminum bleeder cap with an outer O-ring seal. A new X-ring seal prolongs life and reduces maintenance.

BALL BEARING STEERING
The smooth, precise ball bearing steering features an Ackerman that can be adjusted via the bell cranks.

REVISED SLIPPER SYSTEM
The larger surface area of the HDS slipper pads provide more consistency on high grip tracks throughout the life of the pads.

IMPROVED DIFFERENTIALS
Tungsten carbide diff and thrust balls, along with revised thrust washers, deliver ultra-smooth operation and longer life.

UNIVERSAL DRIVESHAFTS
Team Losi Racing universal joints are included for improved performance and handling on rough tracks.

INTEGRATED BATTERY RESTRAINT SYSTEM
The battery restraint system has been designed so different sizes and types of battery packs can be mounted for optimum chassis balance

TWO SETS OF TLR WHEELS
The kit includes two sets of wheels that are mounted using a standard 12mm hex. Tires and inserts are sold separately so you can use the treads and compounds you prefer.

COMPACT WING MOUNT
The compact, one-piece wing mount is remarkably durable and provides plenty of rear tire clearance for the wing. The wing itself is 6.5 inches wide and made of 1.2mm thick Lexan material.

MID-CAB BODY
The distinctive shape of the mid-cab body design not only sets the buggy apart visually, but improves handling at high speeds.

SMALL DIAMETER OUTDRIVES
The small diameter outdrives improve forward traction and allow you to corner faster because the differential includes tungsten carbide differential and thrust balls.

FULL BALL BEARINGS
High quality C3 rubber-shielded ball bearings are used throughout the chassis

TI-CN (TITANIUM CARBON NITRIDE) HINGE PINS
The Ti-CN coating on the hinge pins not only makes them incredibly durable, but actually reduces friction so the suspension moves more freely.

INCLUDED ALUMINUM PARTS
The kit comes with several machined aluminum parts that give the chassis even more strength and durability. They include:
- Aluminum front and rear camber blocks
- Aluminum rear toe plates
- Aluminum spindle carriers

ADJUSTABLE ANTI-SQUAT
Rear anti-squat can quickly and easily be adjusted by adding or removing the included shims.

METRIC HARDWARE
The 22-4 buggy was built for racers all over the world, that�s why all hardware including screws, nuts, hinge pins and bearings are in metric sizes.

FRONT ONE-WAY CLICKER OR FULL-TIME 4WD
The drivetrain can be set up for full-time 4WD or with an optional one-way clicker on the front. Using the clicker allows the front belt drive system to free wheel during deceleration for more off-power steering. Drivers can precisely set the amount of steering they want by adjusting the tension of the clicker spring.

Key Features
- 2.5mm hard-anodized aluminum 7075 aluminum chassis
- Sealed 3-belt drivetrain with modular covers
- Centralized forward motor mount
- Gen II hard-anodized, big bore 12mm emulsion shocks
- Adjustable Steering Ackerman
- HDS Slipper Clutch
- Ball Differentials with Tungsten Carbide Balls
- Universal driveshafts
- Integrated battery restraint system
- Two sets of TLR wheels included
- Compact, one-piece wing mount
- Updated mid-cab body and wing
- Front One-way clicker or full-time 4WD
- Front and Rear Aluminum Camber Blocks (included)
- Full ball bearings
- Titanium Carbon Nitride (Ti-CN) hinge pins
- Aluminum Rear Toe Plates and Aluminum Spindle Carriers (included)
- Adjustable rear anit-squat
Product Specifications
Type: 4WD Off-Road Buggy
Scale: 1/10
Length: 16.5 in (419.1mm)
Width: 9.41 in (239.0mm)
Height: 6.50 in (165.1mm)
Ground Clearance: Adjustable
Wheelbase: 11.10 in (282.3mm)
Chassis: 2.5mm Plate, 7075-T6 Aluminum
Suspension: Four Wheel Independent
Drivetrain: 4WD BeltGear
Pitch: 48-pitch (84T Spur Gear)
Wheel Size: Width: 1.04 in (26.0mm front),1.50 in (38.0mm rear); Diameter: 2.2 in (55.9mm)
Kit/RTR: Kit
Shock Type: Coilover, Oil Filled
Body: Clear Polycarbonate
Ball Bearings: Full set
Minimum Age Recommendation: 14 years
Experience Level: Adult Supervision Required
Assembly Time: 5-7 hours
Preview Video:
Todd Hodge introduces the 22-4:
| + YouTube Video | |
Promo video:
| + YouTube Video | |
Horizon link:
http://www.horizonhobby.co.uk/autoon...html#media-gal
Product link:
http://www.tlracing.com/Products/Def...rodID=TLR03005
Youtube videos:
Dustin Evans Practice:http://youtu.be/l7OeROifLKk
JR Mitch Practice:http://youtu.be/_a5tTxNybyk
Test day at JLR:http://youtu.be/AXFRPaWUNoM
Ryan Dunford @ OCRC:http://www.youtube.com/watch?v=g41cG...hGpBIw&index=2
Andrew Gillott down under!http://www.youtube.com/watch?v=NQOvV...hGpBIw&index=4
Spektrum Mod 4WD Buggy A1 Phend and Evans:https://www.youtube.com/watch?v=V1wrkTzqDa0
Manual link:
http://www.tlracing.com/ProdInfo/Fil...005-Manual.pdf
Parts Explosion:
http://www.tlracing.com/ProdInfo/Fil...loded_View.pdf
Blank setup sheet:
http://www.tlracing.com/ProdInfo/Fil...lank_Setup.pdf
Standard setup:
http://www.tlracing.com/ProdInfo/Fil...uggy_Setup.pdf
Shorty Setups:
Ryan Mayfield setup
http://www.tlracing.com/ProdInfo/Fil...s,%20Chico.pdf
http://www.tlracing.com/ProdInfo/Fil..._Surf_City.pdf
Dakotah Phend:
http://www.tlracing.com/ProdInfo/Fil...onals%20TQ.pdf
Saddle Setups
Ryan Dunford starting setup for OCRC:
http://www.rctech.net/forum/attachme...ocrc_setup.pdf
Reedy race setups:
Dustin Evans:

Dakota Phend:

JR Mitch setups:
Standard:

SMAC:

Building 22 shocks with Dustin Evans:
| + YouTube Video | |
Building a ball diff with Matt Castellano:
| + YouTube Video | |
Setting the slipper and ball diffs with Todd Hodge:
| + YouTube Video | |
Setting ride height with Todd Hodge:
| + YouTube Video | |
Build Tips:
- punch holes in the ballstud cups for access to the ballstud with with an allen wench. Use the TLR diff tool (TLR2950) to hold the ballstud when changing the ballstud location.

-use a drill to run the tie rods in and out of the ball cups 5 or 6 times, then assemble with some black grease on the threads.
-use a toothpick to put threadlock in the threaded holes of the caster blocks. If you get threadlock in the holes of the a-arm or spindle it will cause binding of the suspension.
- adjusting the gear mesh can be a chore. Once you get the mesh correct, run it. If it is where you want it (not too tight, not too loose), use a sharpie to mark the motor mount. When you take it apart you will have a reference to put it back to, provided you don' change the gears.

-if you need a more stable driving car (large 1/8th scale outdoor bumpy kind of track) use the saddle pack configuration.
-if you are running on a tight indoor track, just want some more steering or are just looking to find something to make it look like your busy and not ignoring the wife and kids then try the shorty setup. Here is a pic of what I cut and ground down, and a pic of my electronics lay out.


- Team Losi Racing 22-4 - One-Way Clicker Assembly -
Before assembling your new one-way clicker assembly, or if you are experiencing some binding in the assembly, here is a simple modification.
Step 1: Take a Scotch Brite pad and remove the black anodizing from the slipper shaft (TLR232022) on the clicker side, see figure 1.
Figure 1: TLR slipper shaft

Once completed, the shaft should be a metallic color and have a smooth finish, see Figure 2.
Figure 2: Polish slipper shaft

Step 2: Using TLR black Grease, place a small amount on the clicker gear, and gently spread between all teeth, see Figure 3.
Note: only a very small amount is needed, as you just want a small film-like coating layer to prevent the clicker from binding under load.
Figure 3: Apply TLR grease to Clicker Gear

Step 3: Apply a small drop of oil (bearing oil works well) on the slipper shaft and work-in using your fingers, see Figure 4.
Figure 4: Apply a small amount of bearing oil to slipper shaft

Step 4: Assemble the clicker assembly, see Figure 5, and if needed remove any excess grease between the clicker teeth.
Figure 5: Assemble Clicker

Step 5: Complete and seal your vehicle and enjoy your TLR 22-4!

A special thanks to Team Losi Racing Driver Jose Zayas for providing this excellent tech tip article and photos for the Team Losi Racing 22-4.
Center belt cover modification by Ty Campbell, aka Ty@teamtekin
So I got to working on my Team Losi Racing 22-4 today and modified my belt cover system so it is truly modular and any of them can come off without removing another. I wanted to be able to get the side belt/spur cover off without pretty much disassembling the entire car, so here's what I came up with. Once you have all three belt covers off (sort of a project, but not too bad) check out the photos.
Photo 1: Cut the keyed portion of the side belt cover flush with the step down edge. This piece holds the spur shaft bearing in place, so don't mess it up! Then with some CA (or any glue, you have to work fast if you use CA) put a dab on the part you just cut off and place it in the front belt cover where it would normally sit over the bearing and put the cover in place so everything lines up. Let it dry for a minute or two. Test fit the side belt cover with the front cover on. It should snap right into place and there should be no gap where you just cut if you lined it up perfectly.

Photo 2: Now you need to cut the tabbed portion off that sits under the corner of the rear belt cover. This is tricky, I used our band saw and it worked pretty well for me and left a pretty clean cut. Only needed to sand a little to clean it up. Then just take that cut piece and press it (or glue if you're afraid of losing it) into the rear belt cover corner. Now you can put all the screws holding the front and rear covers back in and you're left with Photo 3.

Photo 3: Pretty self-explanatory, but I am now able to remove the side belt cover a lot easier. The servo can come out with it very easily all as one unit. I'm happy with the way it turned out and it didn't take me very long to do it.

Parts for converting the rear end to 22
TLR234058 x 1
TLR232006 x 1
TLR2941 x 1
Recommended Hop-ups:
TLR:
Steering Bellcrank Set, Aluminum: 22-4 TLR334009
Rear Hub Set, Aluminum: 22-4 TLR334008
Turnbuckle Set, Titanium: 22-4 TLR334013
Titanium Shock Mounts (4): 22 TLR4166
Hex Differential Wrench, Aluminum: 22 TLR2950
Exotech:
22-4 STEER LINK, ALLOY W/ BUSHINGS
22-4 FINNED MOTOR CAM STRAP
Recommended gearing (with stock 84 tooth spur):
Motor / Pinion
5.5 / 17
6.5 / 18
7.5 / 19
8.5 / 20
9.5 / 21
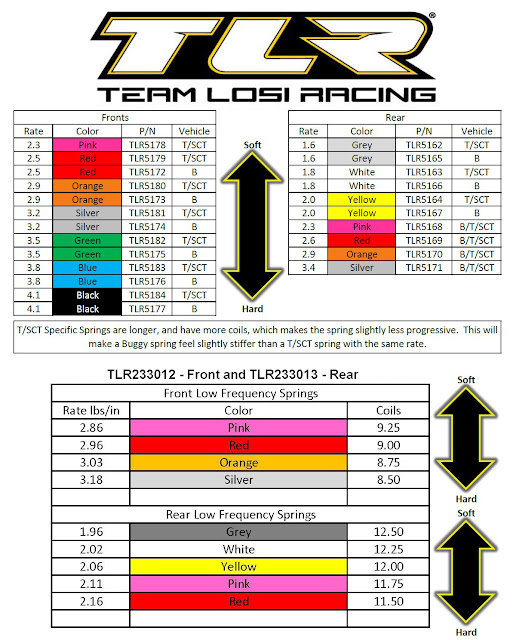
TLR spring chart:
Last edited by 1badgoat; 12-13-2015 at 10:24 AM. Reason: update

 09-26-2013, 12:09 AM
#4
has anyone done a successful front-motored 4wd yet? also, it's ugly.
09-26-2013, 12:17 AM
#6
09-26-2013, 12:22 AM
#7
[ TLR03005 ]
Available For: $469.99*
Retail Price: $539.99
*Avaliable at participating retailers Due Late January, 2014
Available For: $469.99*
Retail Price: $539.99
*Avaliable at participating retailers Due Late January, 2014
09-26-2013, 12:32 AM
#9
All I was going to do was log in to check the 22sct thread and the zx-6 thread and wow.  I think your right. This was probably not supposed to hit until after the worlds. LOL
I think your right. This was probably not supposed to hit until after the worlds. LOL
09-26-2013, 12:34 AM
#10
Product announcements from Horizon are always done on Thursdays. It's not a mistake.
09-26-2013, 12:40 AM
#12
2 years of research to copy their own design?  looks nice and they did the right thing redoing the xx4. Just imagine the backlash if they did anything else!
Glad to see a new tlr wheeler. Hopefully the class will finally take off here in the states.
looks nice and they did the right thing redoing the xx4. Just imagine the backlash if they did anything else!Glad to see a new tlr wheeler. Hopefully the class will finally take off here in the states.
09-26-2013, 01:00 AM
#13
I've put my order in.
