


Anybody get the Avid motor centering kit for the associated b4.1
 08-19-2013, 06:10 AM
#31

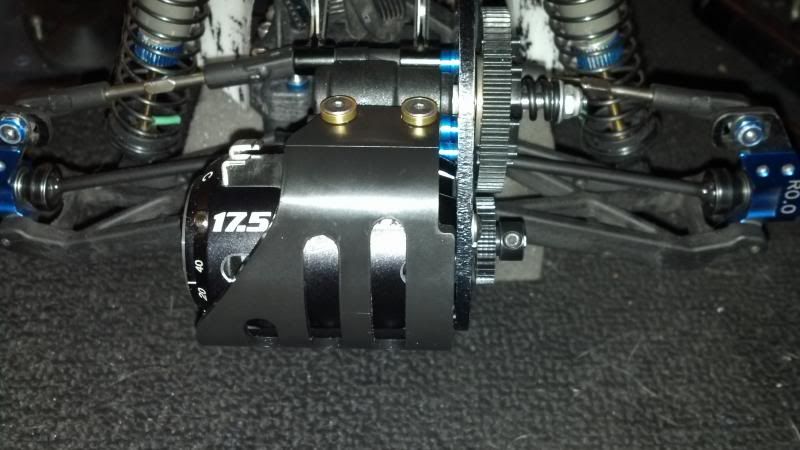
I just installed the centering kit. Here is a close up and long view of it installed. Without the centering kit, my car was 12gr heavier on the left side, The left rear wheel was heavier than the right and the right front was heavier than the left front. After installing the centering kit, The right rear axle is now only 1.5 gr heavier than the left. The right front axle is 14.3 gr heavier than the left, but I have to make sure both left and right side front springs have equal spring rates. If they do, then do a minor collar adjustment should equalize both sides... I have always tried to build a side-to-side balanced car. In the past, I have always used lead weight to balance the car, but the mass of the motor, motor plate, spur gear, and clutch would still no be centered. I think centering all of that mass is a better solution.
 08-19-2013, 08:02 AM
#32
they should have made the aluminum piece in graphite material instead of making it fancy like the kyosho centering kit, plus "IMO" it puts more load on the top shaft bearings. we used to do something similar to this back then by shimming out the motor plate with 2-.30 shims and this was back in the brushed days. it's a great looking piece but not necessary.
08-19-2013, 08:23 AM
#33
I just installed the centering kit. Here is a close up and long view of it installed. Without the centering kit, my car was 12gr heavier on the left side, The left rear wheel was heavier than the right and the right front was heavier than the left front. After installing the centering kit, The right rear axle is now only 1.5 gr heavier than the left. The right front axle is 14.3 gr heavier than the left, but I have to make sure both left and right side front springs have equal spring rates. If they do, then do a minor collar adjustment should equalize both sides... I have always tried to build a side-to-side balanced car. In the past, I have always used lead weight to balance the car, but the mass of the motor, motor plate, spur gear, and clutch would still no be centered. I think centering all of that mass is a better solution.
 08-19-2013, 09:34 AM
#34
they should have made the aluminum piece in graphite material instead of making it fancy like the kyosho centering kit, plus "IMO" it puts more load on the top shaft bearings. we used to do something similar to this back then by shimming out the motor plate with 2-.30 shims and this was back in the brushed days. it's a great looking piece but not necessary.

 I don't think you will notice a physical difference driving the car, but it should produce more consistent lap times lap after lap.
08-19-2013, 12:07 PM
I don't think you will notice a physical difference driving the car, but it should produce more consistent lap times lap after lap.
08-19-2013, 12:07 PM
#35
Got the centering kit couple weeks ago. Have ran my car a few times allready and really did not notice a difference in handling or jumping. Kind of a disappointment. It almost seems it needs to be moved over another 2-3 mm to actually be "centered". Kinda waste of money.
08-19-2013, 02:04 PM
#36
they should have made the aluminum piece in graphite material instead of making it fancy like the kyosho centering kit, plus "IMO" it puts more load on the top shaft bearings. we used to do something similar to this back then by shimming out the motor plate with 2-.30 shims and this was back in the brushed days. it's a great looking piece but not necessary.
 08-19-2013, 02:21 PM
#37
08-19-2013, 02:33 PM
#38
I agree that the weight of the spur/clutch assembly being 5mm further away from the bearing will put more load on the bearings. Only time will tell how it affects bearing life. But at $1 bearing who cares? I run ceramic bearings, and I don't think the extra load is going to make a difference. The centering kit should make the car more stable in mid-flight over a long jump. (less chance of rotation). Also, the car should be more left/right consistent through rough sections and turns. I run 2wd blinky buggy and I am always looking for every advantage I can find. If the centering kit makes the car's handling a little more consistent lap after lap, then for me it's worth the price. As a mediocre driver I need all of the help I can get. I don't think you will notice a physical difference driving the car, but it should produce more consistent lap times lap after lap.
Thanks for the props. It's called expandable braided sleeving. It comes in a variety of colors and sizes. You can buy it here. I also buy my heat shrink tubing from Parts Express. They sell 3:1 heat shrink which is a little softer than 2;1, and IMHO forms better when heated.
I don't think you will notice a physical difference driving the car, but it should produce more consistent lap times lap after lap. Thanks for the props. It's called expandable braided sleeving. It comes in a variety of colors and sizes. You can buy it here. I also buy my heat shrink tubing from Parts Express. They sell 3:1 heat shrink which is a little softer than 2;1, and IMHO forms better when heated.
08-20-2013, 10:54 PM
#40
I just installed my kit and was disappointed:
- The top gear had a bent shaft. It was bent at the threaded portion. I suppose this happened in shipping, as Avid sent it to me in a padded envelope. Long aluminum 4-40 threaded shafts won't tolerate this very well.
- The screw that goes through the wing mount was too long and hit the slipper.
Both of these were fixable by me, but I have better availability to tools than most. It seems that this kit is not quite thought out completely, though it is able to be made to work.
08-21-2013, 05:33 AM
#41
Wow, mine was too. I just built my new kit over Monday and yesterday using the avid kit but noticed the top shaft was bent at the threads as well. I couldn't figure out why the transmission was so loud. I took it apart to look for binding but ended up noticing the shaft was bent.
Avid is sending out a new shaft after I sent them a vid .
Avid is sending out a new shaft after I sent them a vid .
I just installed my kit and was disappointed:
- The top gear had a bent shaft. It was bent at the threaded portion. I suppose this happened in shipping, as Avid sent it to me in a padded envelope. Long aluminum 4-40 threaded shafts won't tolerate this very well.
- The screw that goes through the wing mount was too long and hit the slipper.
Both of these were fixable by me, but I have better availability to tools than most. It seems that this kit is not quite thought out completely, though it is able to be made to work.
- The top gear had a bent shaft. It was bent at the threaded portion. I suppose this happened in shipping, as Avid sent it to me in a padded envelope. Long aluminum 4-40 threaded shafts won't tolerate this very well.
- The screw that goes through the wing mount was too long and hit the slipper.
Both of these were fixable by me, but I have better availability to tools than most. It seems that this kit is not quite thought out completely, though it is able to be made to work.
Last edited by BIGSKI15; 08-21-2013 at 06:42 AM.
08-21-2013, 06:18 AM
#42
Good luck doing that trick with the new VTS slipper or a triad and not having a longer top shaft to compensate. With the old school slipper pictured you could get away with it. Not any longer since you don't have enough extra threads on the stock top shaft to get the spring, spacer and nut on.
08-21-2013, 06:27 AM
#43
Good luck doing that trick with the new VTS slipper or a triad and not having a longer top shaft to compensate. With the old school slipper pictured you could get away with it. Not any longer since you don't have enough extra threads on the stock top shaft to get the spring, spacer and nut on.
So you would save $12 though you wouldn't have the screws (pennies but you have to get them) and the longer top shaft spacer.
08-21-2013, 07:06 AM
#44
After reading on here about how long the wing mount bolt is I decided to see if I had any rubbing on the clutch plate. I didn't but it was very close so I slid a shock limiter all the way to the bolt head, scribed the outline of the head onto the limiter with an exacto then cut the limiter with scissors. It now sits flush like the other bolts.
08-21-2013, 07:14 AM
#45
I installed my kit everything went together very smooth.no problems with long screws bent top shaft....the buggy no doubt had more side bite I was able to stay on throttle a lot more exiting a corner..overall I'm very happy on the way the buggy feels.