


 143Likes
Awesomatix EP Touring Car (A700 Shaft Drive)
 02-27-2014, 11:44 AM
#5761
Thanks for the answer Oleg 


 02-28-2014, 01:08 AM
#5768
Tech Initiate
I have my A700 Evo just finished the assembly and had run it for two days. I like this car so much but there are many areas that the instruction manual has not provided the needed information. I hope to get the answer here.
1) When should we increase the gap between AM49 and AM48/ AM50? what is the effect if we just increase gap at front AM48 or at rear AM50?
2) the optional top deck C21 is supposed to use on high traction condition correct? Then when to use the smaller top deck C18 ?
Thanks.
1) When should we increase the gap between AM49 and AM48/ AM50? what is the effect if we just increase gap at front AM48 or at rear AM50?
2) the optional top deck C21 is supposed to use on high traction condition correct? Then when to use the smaller top deck C18 ?
Thanks.
02-28-2014, 01:40 PM
#5770
Tech Fanatic
P10 is very important element of FFG design and kinematics!
P10:
1. Restricts both the twist and the side movement of the front gearbox to the optimal level.
2. Provides the necessary link between the twist and the side movement of the front gearbox.
02-28-2014, 01:45 PM
#5771
Please install P10 covers on the FFG gear box as it is indicated in the FFG Instruction Manual. P10 is very important element of FFG design and kinematics!
P10:
1. Restricts both the twist and the side movement of the front gearbox to the optimal level.
2. Provides the necessary link between the twist and the side movement of the front gearbox.
P10:
1. Restricts both the twist and the side movement of the front gearbox to the optimal level.
2. Provides the necessary link between the twist and the side movement of the front gearbox.

But that answers my question.
Thanks Oleg.
02-28-2014, 04:31 PM
#5772
Well, I thought I knew what FFG stood for until this weekend. Under peer pressure I installed a FFG set up on my 700L, now I know it means F'ing frustrated guy. The right dog bone would pop out, even after doing the pin fix. The gearbox has more travel to the left then right for sure. The set up didn't have the top deck, would a top deck help solve this also?
If the gearbox has more travel one way, you might not have it on straight. I would double check first that the tube is straight via where it mounts on the rear bulkhead, and then check that the front gearbox is straight relative to that where the front gearbox bolts on. It should travel about the same both ways, at least mine does
I have not run a topdeck and I have had 0 issues with anything happening with 0 precautions to prevent it, other than having no shims under the am06s. Anyone who saw me last week when I was a little sick knows I hit some crap hard too
I have not run a topdeck and I have had 0 issues with anything happening with 0 precautions to prevent it, other than having no shims under the am06s. Anyone who saw me last week when I was a little sick knows I hit some crap hard too
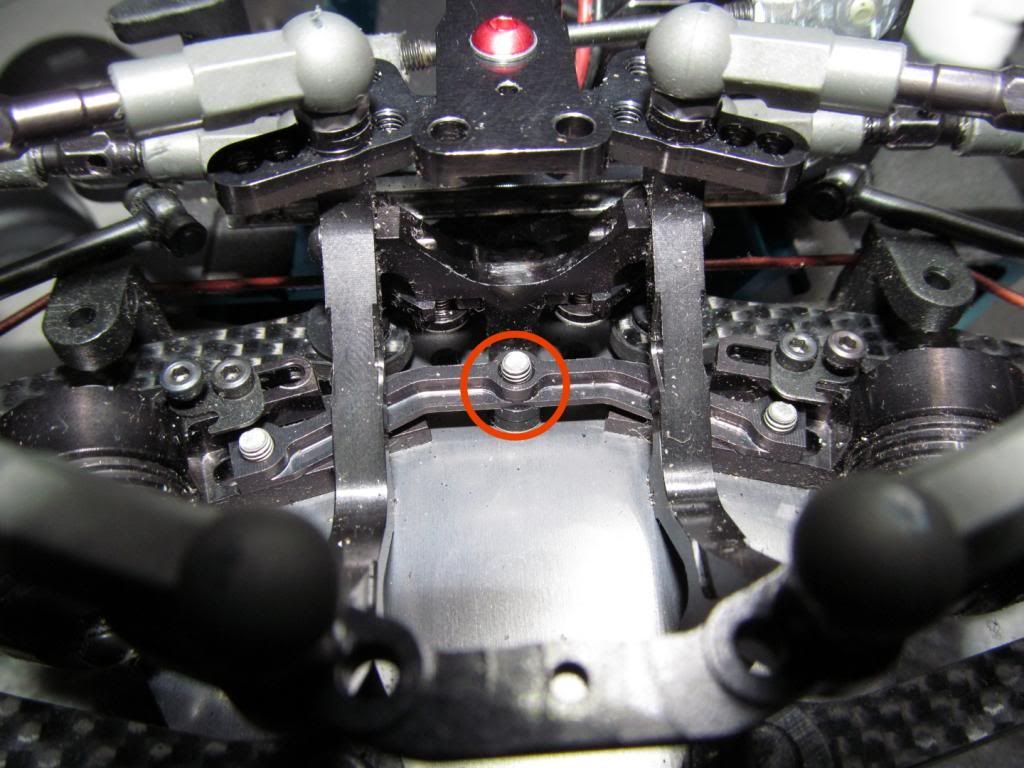
Here is a tip for anyone who is finding their FFG binds up after installing the diff cover.
Make sure the screw I show in the picture here is not too long (it is too long in the picture). If it is too long it will foul the diff cover. This is a problem with the alloy chassis and might be for carbon too but I don't know.
If the FFG moves more one way than the other then it is likely not centered properly. Undo the screws holding the FFG at the rear and carefully reposition it and ensure it remains central whilst tightening the screws.
Also check your battery is not too far inboard. It can foul the FFG also.
Make sure all the stops are not pressed tightly or this will restrict movement.
Ensure that where the gearbox goes through the bulkhead is free from dirt and debris and that whatever tape you have used here is still smooth and clean. I am replacing this tape after every meeting so far. To make this easier I am now putting the tape on the gearbox not the bulk head.
Hope this helps!
EDIT: Forgot to mention make sure the diff cover is closed properly once installed on the front gear box. Mine took a little wiggling before they snapped shut properly and it was possible to tighten everything up with the diff cover not closed properly.
This is a fresh build

Sadly I have to report I'm as stuck as many with getting the FFG moving freely with the diff cover installed.Some other things I had to take care of just to get it moving freely on the car stand was when tightening the 2 screws that hold the front gear box onto carbon rod assembly make sure the gear box does not twist and sits straight. Otherwise I found this limited the overall movement on one side.
For the same reason as above make sure the front bulkhead is square and straight.
After doing this I found the nub of plastic on the bottom of the diff cover was rubbing on the lower deck so I sanded a little material away.
For the same reason as above make sure the front bulkhead is square and straight.
After doing this I found the nub of plastic on the bottom of the diff cover was rubbing on the lower deck so I sanded a little material away.

That was after about an hour of redo'n & retrying the ffg's install.
Now I'm back after about another 2 hours of repositioning and retightening while pushing this & the other...taking it all apart a few times; having my wife hold this while I do the other
.....I'm done trying. I haven't rolled the tube on my glass yet to see if that's a potential issue. Total its been about 3 hours and frustration has long set in.Onwards to GW2

 02-28-2014, 06:54 PM
#5773
Carpet Nats has a bunch of fast Awesomatix cars in 17.5 and 13.5. The Klingforth family has everyone covered on hotlap -- but we are racing for total time. Hopefully the team can get some clean runs in tomorrow.
I even hear that some mod racers are running tire warmers on carpet!?!
I even hear that some mod racers are running tire warmers on carpet!?!
02-28-2014, 07:17 PM
#5775
you know -- it really depends. i might not have the latest/latest sweeps, but i ran not the super soft ones from Aug/Sept/Oct last weekend in Mod TC and they were pretty close to our track standard Solaris Mediums. i'm going to try some Jaco blues this weekend -- but with a green track i don't know how good they will be.
if steering is the issue my hit list is to--
1. add upto 2.5 degress front camber
2. add as much shim as you can fit between your am06(s), P01/P02 and plastic rims
3. decrease the amount of front inner camber link shims
4. increase the shimming between the am23 and the rear toe link
5. try raising the rear arms by 0.5mm
6. longer front camber links