Go Back  R/C Tech Forums > General Forums > Electric Off-Road
Xray XB2 2WD Buggy Thread >

Xray XB2 2WD Buggy Thread

Community
Wiki Posts
Search
Like Tree333Likes

Xray XB2 2WD Buggy Thread

    Hide Wikipost
Old 05-04-2019, 06:44 PM   -   Wikipost
R/C Tech ForumsThread Wiki: Xray XB2 2WD Buggy Thread
Please read: This is a community-maintained wiki post containing the most important information from this thread. You may edit the Wiki once you have been a member for 90 days and have made 90 posts.
 
Last edit by: dgrobe2112
Instruction manuals: (C/O BentKa)

Xray XB2 Carpet Edition Instruction Manual
http://www.teamxray.com/xb2/2016/dow...ual_v2_low.pdf

Xray XB2 Dirt Edition Instruction Manual
http://www.teamxray.com/xb2/2016/dow...w.pdf?update=2

BentKa: Carpet Edition 4 gear to 3 gear laydown conversion parts:
  • Gearbox #323014
  • Motorplate #324012
  • 36T idler gear #324236
  • Brace for waterfall #324031


Socket: Bodies Available:

Xray has two OEM bodies, the .75mm and the .50mm light weight:
light weight: https://www.amainhobbies.com/xray-xb...329701/p492942

OEM .75mm: https://www.amainhobbies.com/xray-0....329700/p477762

Also, I've fitted the yz2 body, both the light and regular fit fine, just make your own cut lines:
https://www.amainhobbies.com/yokomo-...z2-101/p417674


[i] J Concepts S2 Body [i]


Penguin Racing makes a high grip body that fits the DE and CE:
http://www.ebay.com/itm/X-Ray-Xb2-Hi...oAAOSw1S9WewHV


Socket: Wheel fitment:

According to some, you'll require different offset rear hexes to use B5M wheels. According to my Hudy setup board, B5M wheels are the same offset. I measured the overall width of the car with XB2 wheels, and then again with B5M wheels, same measurement.

On the front, B5M wheels were 1.5mm wider. Xray offers hexes to reduce width -.75 on each side, or you could spend 3-5 minutes and sand your OEM hexes down .75mm.

edit by dgrobe2112
here are the hubs for losi and AE

for AE Front 365354 -0.75
for Losi rear 365358 +3.00 (4 stripe)
for AE rear 365359 +3.75 (5 stripe) or add 1.5mm carbon avid spacers


Socket: Flex and the XB2:

Flex screws are as follows:

Plastic bulkhead between motor and waterfall. Can remove screw in chassis, or remove bulkhead altogether.

Waterfall has 4 screws, can remove the inner two or outer two. IIRC, removing the inner two provides more flex, and thus more bite.

Removing the battery brace. This gives a tremendous amount of flex on the middle of the car, and can sometimes be inconsistent. I do this for outdoor racing on low bite. I like the feel over the 4 gear in 17.5 racing, since the 4 gear will take some snap away off the corner.

Rear C block - has inner and outer screws. I haven't played with this, as it's a crucial pivot point of the car.

Medium arms and towers -> I don't believe the carpet car has the rear medium tower available, however the DE DOES have an optional hard part. I think the hard parts are more consistent, especially when it gets hot (90+ degrees F). However, the medium parts do NOT break unless you're severely talented. They also don't wear out.


Socket: Avid/Schelle Slipper mod:

Credit to WillS, Matt Trimmings, and myself for figuring this out months ago.

Parts you'll need:

B5M V2 3gear compatible top shaft.
TKO Special 5x13x5 bear OR 5x13x6 bearing Either can work. This replaces the spur side bearing on the top shaft.
5mm shims, same shims used in 1/8th scale clutch bells. Look for protek .1mm and .2mm kit.
Avid or Schelle b5m top shaft kit, with spur gears of your choosing. (DE can't handle a 69, the CE can)

Shimming: You'll need to install the bearing in the front portion of the removable piece for the shaft. Make sure the bearing is pushed all the way in. With the TKO bearing, you'll need to shim approximately 1.4mm on the front side of the top shaft. Roughly .3-.5mm with the other bearing. This is a "feel" and tolerance setting. I urge you to watch videos about setting clutch bell play in 1/8th scale to get an idea of what yield you want for end play. Too tight, it'll eat bearings.

Outside of trans case: Use Avid/Schelle top shaft spacer plus .2mm shim to offset slipper from motor plate perfectly. Install slipper as instructed, and use Avid/Schelle spring and XB2 slipper nut.

- NEW - Schelle now sells Xb2 Topshafts. They include a spacer, so no need for shims in gearbox, and comes with the smaller bearing. Both methods work.

Socket: Yokomo Differential or MIP pucks:

Credit to: WillS for figuring out pucks, and as well fitting the Losi 22 diff with the same mods.

Parts needed: Yokomo Bmax2 or YZ2 complete diff OR Mip PUCKS outdrives
Xb2 diff gear
Bmax2 V3 Worlds rear dog bones, or Bmax 2 pucks dog bones
You'll use XB2 axles, and will require no other mods for the axles or dog bones.
You'll need .2mm outdrive/diff shims. Shim approximately .5mm on each side of the diff, behind the bearings. The top portion of the transmission is what "sets" the diff in place, not the bottom half. A little play back and forth is fine, the stock diff has some play from the factory.

dgrobe2112: CE to DE conversion:
along with the parts needed.. you MUST have these following hardware, or it wont work

https://www.teamxray.com/xb2/2016/do...conversion.pdf

(3) XRAY 902340 M3x40 button head screws. these are the screws that mount the motor mount to the tranny
(4) XRAY 903322 M3x22 counter sunk screws. these are for the rear diff case, to mount to the chassis. i think i used some M3x18 and they worked ok.

Socket: Best method for setting up the XB2 ball diff:

The XB2 diff is stellar when setup correctly. The spring is too short and soft, allowing the diff to slip. You'll need to glue the rings to the outdrives with just a drop of CA, then add a 1mm shim between the spring and the outdrive. This preloads the spring and stops the diff from slipping so easily.

OR, you can run the AE diff spring, which is both slightly longer, and stiffer. The overwhelming issue is the stock spring allows the nut to bottom out on the outdrive before the diff is tight enough.

This shim:
https://www.amainhobbies.com/xray-al...a303122/p12070

This diff spring (don't need a shim, then.)

https://www.teamassociated.com/parts...thrust_spring/

Functional Aftermarket parts: (Not just bling!)

Servo Horn: (The B5M sized horns are too short to get full throw)
https://www.amainhobbies.com/protek-...800-bk/p273496


Socket: Exotek has a full suite of parts, some bling, some not. Here's a list (all fit DE and CE, unless otherwise noted):

Titanium front axles: http://www.exotekracing.com/xb2-titanium-front-axles-2/

Rear Hanger, HD (Adds 4 grams): http://www.exotekracing.com/xb2-rear...75-heavy-duty/

Brass C block, 18 grams added: http://www.exotekracing.com/xb2-rear...-brass-weight/

Alloy front camber mount: http://www.exotekracing.com/xb2-fron...er-mount-7075/

Carbon Fiber Chassis: http://www.exotekracing.com/xb2-carb...m-plate-2-5mm/

Alloy rear hubs:http://www.exotekracing.com/xb2-allo...ub-set-2-7075/

Alloy servo mounts, allow for use of LP servo:http://www.exotekracing.com/xb2-xb4-...-alloy-1-pair/

Titanium shock mounts: http://www.exotekracing.com/xb2-xb4-...shock-posts-2/

Slipper Eliminator: http://www.exotekracing.com/xb2-direct-spur-mount/
Xray eliminator is #324100

dgrobe2112: 2016-2017 new 3 gear laydown
Gearbox #323014
Motor plate #324012
36T idler gear #324236
Brace for waterfall #324031

dgrobe2112: Xray Spring Rate Conversion:
front C WHT
368174 2 str 0.65-0.85 3.71-4.85

358184 2 dot 0.65 3.71
368185 3 dot 0.72 4.11
368186 4 dot 0.80 4.57


Rear
368273 2 str 0.35-0.45 2.00-2.57

368284 1 Dot 0.35 2.00
368285 2 Dot 0.40 2.28
368286 3 Dot 0.45 2.57
368287 4 Dot 0.50 2.86

Print Wikipost

Thread Tools
 
Search this Thread
 
Old 02-16-2016, 11:56 AM
  #1471  
Tech Elite
iTrader: (40)
 
the big rc's Avatar
 
Join Date: Jan 2011
Location: portland
Posts: 2,171
Trader Rating: 40 (100%+)
Default

Ok gonna pick up an xray later this week. Never run one. I'm planning on club racing in stock a couple times a month on our carpet track. What hop ups do i need and does anyone have a good starting set up for carpet?

Thanks in advance,

Kevin
the big rc is offline  
Old 02-16-2016, 12:16 PM
  #1472  
Tech Fanatic
iTrader: (6)
 
macdude's Avatar
 
Join Date: Feb 2010
Posts: 968
Trader Rating: 6 (100%+)
Default

After reading the last 30 pages of posts, I realized why I stopped coming to RCTech. Jeeze people need to chill out. To the dude that broke a ther rear hinge pin holder. Yeah that looks defective. But also could be from over tightening. The screw is steal and the part is aluminum one eighth of a turn past tight will break just about any aluminum part. Did you put it together by hand or with a tool. I see guys with little drill/driver tools putting shit together all the time. It's cool to take stuff apart, but putting things together should be done by hand to avoid stripping or over heating plastic parts. On a side note, plain ivory soap is your friend, rub it on the screw threads before screwing it in to a new plastic/nylon part. A little hobby tip that seems to have been lost.

Now for my question. What's up with ECS's for the rear of a buggy? I see that they are being advertised and I cannot for the life of me see a benefit running them. On the front of a 4WD makes sense. But adding them to the rear seems like it just introduces another point of failure for no real benefit. So is anyone running them?
macdude is offline  
Old 02-16-2016, 02:35 PM
  #1473  
Tech Addict
iTrader: (7)
 
Join Date: Dec 2011
Posts: 535
Trader Rating: 7 (100%+)
Default

Originally Posted by macdude
Now for my question. What's up with ECS's for the rear of a buggy? I see that they are being advertised and I cannot for the life of me see a benefit running them. On the front of a 4WD makes sense. But adding them to the rear seems like it just introduces another point of failure for no real benefit. So is anyone running them?
i dont see how you could put the esc in the back on here. the battery is in the back
rekim is offline  
Old 02-16-2016, 02:47 PM
  #1474  
Tech Master
iTrader: (21)
 
suby723's Avatar
 
Join Date: May 2011
Location: Spring Hill Tennessee
Posts: 1,378
Trader Rating: 21 (100%+)
Default

Originally Posted by rekim
i dont see how you could put the esc in the back on here. the battery is in the back
He's talking about the ecs rear shafts.
suby723 is offline  
Old 02-16-2016, 02:51 PM
  #1475  
Tech Master
iTrader: (21)
 
suby723's Avatar
 
Join Date: May 2011
Location: Spring Hill Tennessee
Posts: 1,378
Trader Rating: 21 (100%+)
Default

Originally Posted by macdude
After reading the last 30 pages of posts, I realized why I stopped coming to RCTech. Jeeze people need to chill out. To the dude that broke a ther rear hinge pin holder. Yeah that looks defective. But also could be from over tightening. The screw is steal and the part is aluminum one eighth of a turn past tight will break just about any aluminum part. Did you put it together by hand or with a tool. I see guys with little drill/driver tools putting shit together all the time. It's cool to take stuff apart, but putting things together should be done by hand to avoid stripping or over heating plastic parts. On a side note, plain ivory soap is your friend, rub it on the screw threads before screwing it in to a new plastic/nylon part. A little hobby tip that seems to have been lost.

Now for my question. What's up with ECS's for the rear of a buggy? I see that they are being advertised and I cannot for the life of me see a benefit running them. On the front of a 4WD makes sense. But adding them to the rear seems like it just introduces another point of failure for no real benefit. So is anyone running them?
To answer your question, I assembled my entire car with a Mip 2.0 and 1.5 driver. I don't over tighten anything ever. The "cause" of the issue is not tightening the screws enough and they come loose (mine never did) and not using loctite. All of the rr braces have broken on the right side. It's becoming more and more talked about every weekend.

I don't see the need for ecs shafts either. However my 26 degree brass front bulkhead and 50g lipo wait just arrived today. Will do some testing this weekend.
suby723 is offline  
Old 02-16-2016, 02:59 PM
  #1476  
Tech Addict
iTrader: (7)
 
Join Date: Dec 2011
Posts: 535
Trader Rating: 7 (100%+)
Default

Originally Posted by suby723
He's talking about the ecs rear shafts.
oh, my reading comprehension was never my strongest skill
rekim is offline  
Old 02-16-2016, 03:41 PM
  #1477  
Tech Master
iTrader: (21)
 
suby723's Avatar
 
Join Date: May 2011
Location: Spring Hill Tennessee
Posts: 1,378
Trader Rating: 21 (100%+)
Default

Originally Posted by rekim
oh, my reading comprehension was never my strongest skill
Lol no worries brotha
suby723 is offline  
Old 02-16-2016, 04:21 PM
  #1478  
Tech Elite
iTrader: (45)
 
goehm's Avatar
 
Join Date: May 2010
Location: Northern VA
Posts: 2,765
Trader Rating: 45 (100%+)
Default

Originally Posted by suby723
He's talking about the ecs rear shafts.
Reminds me of the time that dyslexic traffic cop was handing out IUDs to everyone that came out of the bar one night...
goehm is offline  
Old 02-16-2016, 07:06 PM
  #1479  
Tech Fanatic
iTrader: (6)
 
macdude's Avatar
 
Join Date: Feb 2010
Posts: 968
Trader Rating: 6 (100%+)
Default

Originally Posted by suby723
To answer your question, I assembled my entire car with a Mip 2.0 and 1.5 driver. I don't over tighten anything ever. The "cause" of the issue is not tightening the screws enough and they come loose (mine never did) and not using loctite. All of the rr braces have broken on the right side. It's becoming more and more talked about every weekend.

I don't see the need for ecs shafts either. However my 26 degree brass front bulkhead and 50g lipo wait just arrived today. Will do some testing this weekend.
Ok, cool. I'll keep my fingers crossed that I didn't get a defective part.

I am glad to know I'm not the only one that thinks the ECS's for the rear are a waste.
macdude is offline  
Old 02-17-2016, 07:15 AM
  #1480  
Tech Initiate
 
Join Date: Jan 2016
Posts: 26
Default

Originally Posted by blacktop20valve
you probably put the cvd pin in the center of the driveshaft barrel
This is exactly the problem! Replaced and all is well know! Thanks so much for the tip!!! Woooooooohoooooo love my X-ray.
Patsfan12 is offline  
Old 02-17-2016, 12:45 PM
  #1481  
Tech Elite
iTrader: (33)
 
Join Date: Sep 2002
Location: Austin, Tx
Posts: 2,384
Trader Rating: 33 (100%+)
Default

i am also of the thinking.. rear ECS shafts are a waste.. #1, the car dont have near enough droop to affect the angle.. the up travel.. isnt that much either.. so.. i would find a better way to use that money..

on this car.. there doesnt seem to really need alot of upgrades.. my car is still stock.. except the spur gear..
dgrobe2112 is offline  
Old 02-17-2016, 12:59 PM
  #1482  
Tech Elite
iTrader: (33)
 
Join Date: Sep 2002
Location: Austin, Tx
Posts: 2,384
Trader Rating: 33 (100%+)
Default

Originally Posted by Rouleau
so how are you guys getting this car to get initial turn in the rear is so locked in that it just pushes off the carpet track
i have been fighting this as well.. been doing alot of different things.. i think Malin setup is setup with so much rear grip.. the 23 front plate will help with this. and i have been using on clay track..

my most recent setup on xray website.. i went back to stock build.. and tried different things.. and have it pretty good.. still alot of grip.. but its getting there.. i have ordered the 23* front kickup plate.. im going to try that next..

also.. my ride height is higher than what malin setup is as well..
dgrobe2112 is offline  
Old 02-17-2016, 01:37 PM
  #1483  
R/C Tech Elite Member
iTrader: (74)
 
TIME MACHINE's Avatar
 
Join Date: Sep 2013
Location: King George, VA
Posts: 2,758
Trader Rating: 74 (100%+)
Default

I'm late to the party, but I did pre-order a dirt edition from Amain today. Hopefully they arrive on the 19th and get sent out shortly after. Eh, it's cold here, so I'm in no rush.
TIME MACHINE is offline  
Old 02-17-2016, 02:34 PM
  #1484  
Tech Master
Thread Starter
 
BentKa's Avatar
 
Join Date: Aug 2011
Location: Norway
Posts: 1,380
Default

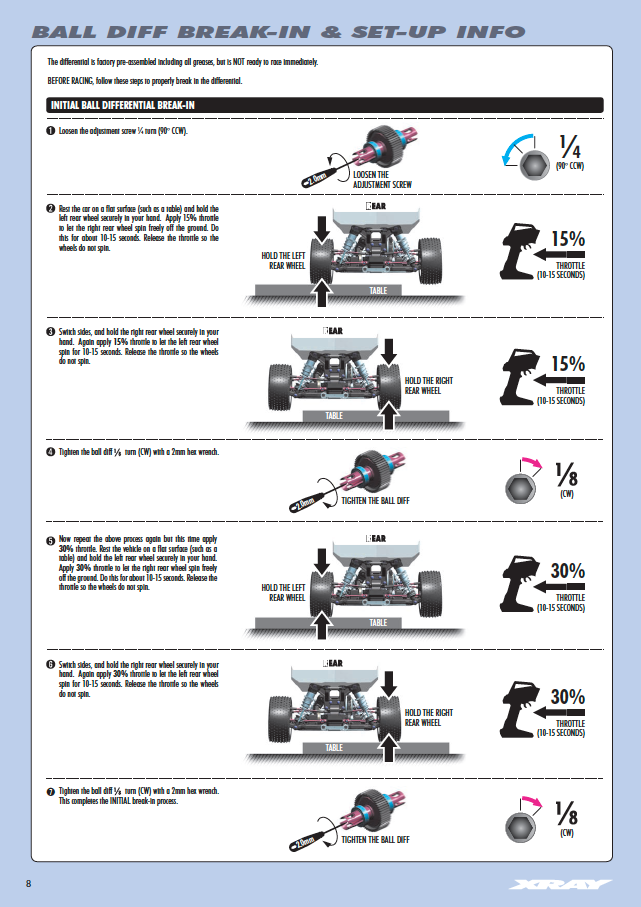
Manual for the XB2 Dirt Edition can now be downloaded here:

http://www.teamxray.com/xb2/2016/download/


Bent
BentKa is offline  
Old 02-17-2016, 02:47 PM
  #1485  
Tech Master
Thread Starter
 
BentKa's Avatar
 
Join Date: Aug 2011
Location: Norway
Posts: 1,380
Default

Hopefully people will appreciate this guide to breaking in and adjusting the ball differential and slipper clutch on the XB2


Bent
BentKa is offline  


Contact Us - Archive - Advertising - Cookie Policy - Privacy Statement - Terms of Service -

Copyright © 2024 MH Sub I, LLC dba Internet Brands. All rights reserved. Use of this site indicates your consent to the Terms of Use.