


 12Likes
Build Complete: Tamiya Boomerang
 10 December 2017, 22:05
#1
You can tell I'm running out of RC ideas, because I just built a vintage Tamiya buggy. I honestly never thought I would.

Why? Because we all know that vintage Tamiya vehicles are made from equally-vintage plastic, and that poses problems for durability. Nevertheless, after watching a few YouTube videos of Hotshots and Boomerangs driving around, I was intrigued enough that I decided to build one anyway.

First I got a Hotshot, but I realized the unusual suspension design had a big problem, specifically in the rear, where the geometry of the suspension linkage prevents the suspension from being able to fully compress. Rather than fighting to make that design work better, I decided instead to build a Boomerang, which also has a less-fiddly body shell in addition to the conventional rear suspension.

The front suspension is the same between both buggies, however, so I still got the opportunity to see how it works in real life. It actually works pretty well, though I had to do a bunch of work to reduce slop. In the picture above, you can see the vintage Parma upper suspension brace and the vintage JG Manufacturing fiberboard swaybar holders, which I had to dye blue using Rit dye. Those two mods go a long way towards making the front suspension work properly; the upper suspension pivots are very small and flex easily, and the original swaybar holders were made of soft plastic and flex even more easily. (I'm honestly not sure why the Boomerang comes with plastic swaybar holders, since the Hotshot comes with fiberboard swaybar holders and they are obviously superior.) I also replaced the preload shims with vintage Team CRP preload collars, swapped the Boomerang swaybar for the Hotshot swaybar, and replaced the original swaybar links with some TRF easy-adjust links.
Why did I use TRF easy-adjust links? Because this way I can bias the swaybar to counteract any lean caused by a left-to-right weight imbalance. That isn't a hypothetical problem; the Boomerang does have a left-to-right weight imbalance caused by the motor hanging off the right side of the chassis, and the single front shock doesn't allow for correcting that by adjusting preload, the way separate left-and-right shocks would.

What you can't see, while the suspension is assembled, is that I also drilled-out the plastic pivots on the front suspension and fitted them with brass tubes. The front suspension had a bunch of slop in it, because the plastic pivots were a little too loose, and the brass tubes (3.1mm ID, 4mm OD) tighten that up nicely. The rear suspension didn't need this modification, though I suppose time will tell whether it ends up needing brass tubes purely for durability reasons.

One last bit of slop that needed to be tuned out of the front suspension was in the ball-and-socket joints on the steering knuckles. Logistically, this was the easiest slop to get rid of. If you look closely at the joint in the picture above, you can see there's a round plastic washer sandwiched between the suspension arm and the metal bracket that holds the joint together; I simply sanded-down the round plastic washer until the socket was tight enough to hold the pivot ball snugly but without binding. A bit of Tamiya ceramic grease helps to make sure the joints continue to operate smoothly. (also visible are the Hot Bodies steel turnbuckles and TRF low-friction ball-cups I used to build the steering links, because I like it when things work well.)

The drivetrain needed more intensive work than the suspension did. I expected this, since the Boomerang is so old and Tamiya has only done minimal work to update it, so ahead of time I ordered not one, but two vintage Thorp ball diffs, which nearly tripled the cost of this buggy by themselves. The ball-diffs needed rebuilding because the grease was ancient and hardened, and as long as I had them apart I replaced the steel balls with tungsten carbide so I wouldn't have to disassemble the entire freaking chassis to service them any time soon. And of course the gearboxes were built with ball bearings and shims as needed to keep everything fitting properly.

The Hotshot re-release comes with a proper dogbone center driveshaft with steel drive cups, but for some reason the Boomerang still comes with the old steel-wire-with-eyelets center driveshaft. (kind of like how the Boomerang didn't come with the Hotshot's stiffer swaybar holders -- weird.) Fortunately, the Hotshot's dogbone center driveshaft was a direct swap, because the drivetrain on both buggies is identical, so I just bought one from an eBay chop shop and included it in this build. You can kinda-sorta see it under the dirt cover in the picture above.
You can also kinda-sorta see the electronics, which at this point are wholly unremarkable, because they're the same electronics I use in all of my brushed touring cars and rally cars -- a Dynamite DYNS2210 ESC, a Hitec HS-8775MG low-profile metal-gear servo, and a Spektrum receiver.

The motor is more interesting. It's a vintage Tamiya DynaTech 02H motor, made by Johnson. I had previously tested this motor in my Tamiya DF-03Ra 2-speed touring car, but I ultimately decided to go back to the older DynaTech 01R that I had heavily customized for that specific car. I decided this motor was better-suited to a chassis that could use the improved brush holders that would make bouncing and sparking less likely, and the Boomerang presented itself as a prime candidate since it can go off-road. The DynaTech 02H armature also has a built-in turbine to keep the commutator cooler, which meant I didn't need to rig up an endbell cooling fan and figure out how to protect it from impacts since it would've stuck way out the side of the buggy. I originally tried this motor with the 10-turn armature I'd used in the DF-03Ra 2-speed touring car, and it was waaaaaay too fast with the Boomerang's larger-diameter tires; I went back to the original 13-turn armature, and it still hits 30mph without difficulty, which is plenty for a buggy this primitive.
- - -
Back to the vintage Thorp ball diffs for a second. After I installed them, I discovered to my dismay that the drive cups were too large for the Boomerang's dogbones. They were exactly 1mm too large, specifically; fortunately that meant that I could come up with a reasonably easy solution -- cylindrical shims:

More brass tubing to the rescue! After cutting four sections of brass tubing, making sure they were exactly the same length, and slotting them, I fit them into the (thoroughly degreased) ball-diff drive cups:

I doused them with superglue to make sure they'd stay in-place, let them sit overnight to dry thoroughly, and then filed the slots to make sure they exactly lined-up with the slots in the drive cups. Now the driveshafts fit perfectly:

You may be thinking that these are not the original driveshafts, and you are correct. They're actually CVDs for the DF-03 racing buggy, which Tamiya recommended as an upgrade for this vehicle; when I have the option to upgrade to CVDs, I will always do so, because I like it when my driveshafts don't rattle. The DF-03 CVDs would've fit the original gear diff drive cups just fine; the only reason the cylindrical shims were needed is because the Thorp ball-diffs must've been designed for use with larger dogbones back in the day.

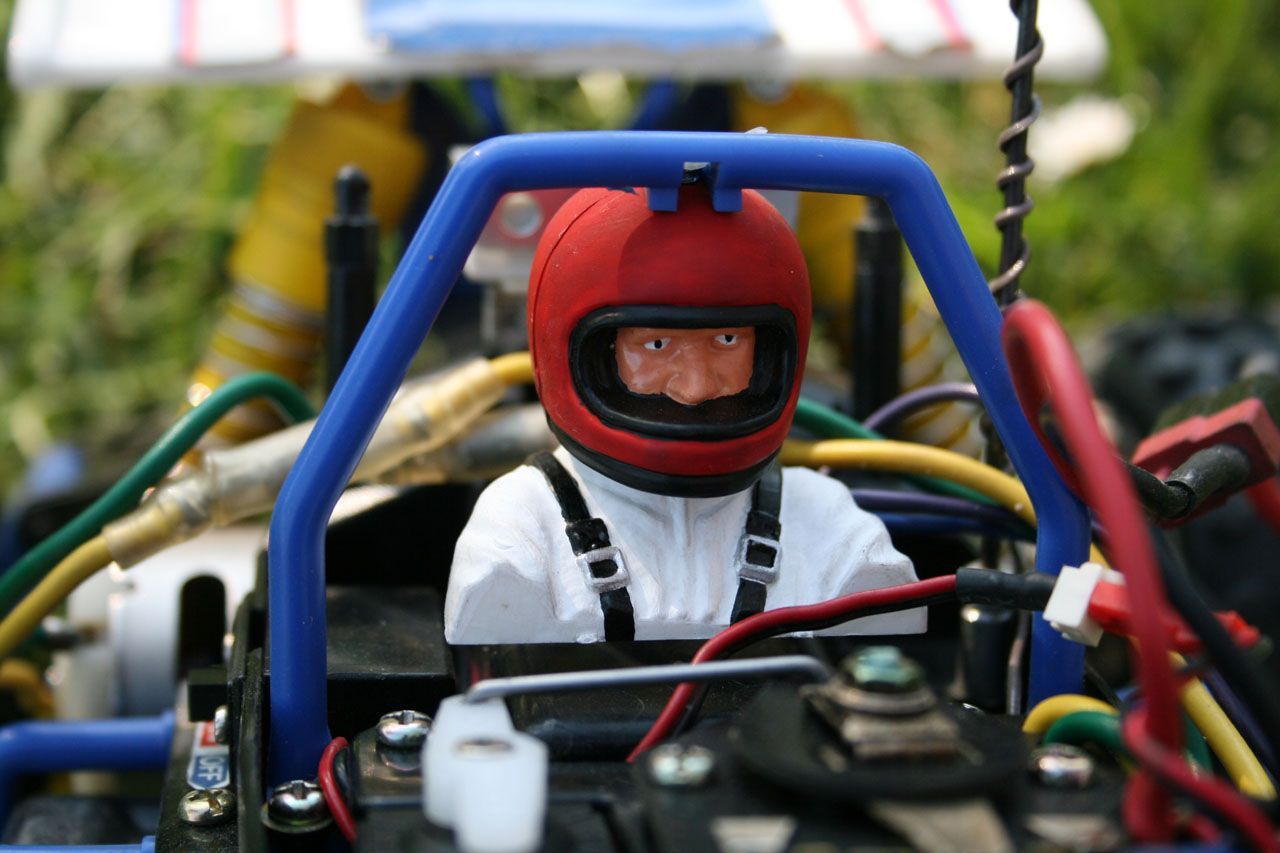
On to the details: This is the first RC kit I've ever built that has any sort of detailed interior, and even though it's just a driver's head and torso, I was sorely tempted to leave it out because I didn't want to paint it. Eventually I decided to man-up and paint it anyway, because the Boomerang just didn't look right otherwise.

It might've taken me a couple hours of futzing with bottled paint and paintbrushes, but it sure looks better than an empty cockpit.

As far as the body itself is concerned, there wasn't much to be done except mask the side and rear windows with masking tape and spray the whole thing with white paint. Tamiya was nice enough to cut-out the body and spoiler for me, which saved me a nice bit of work, so I wasn't so irritated about taking the time to paint the driver figure instead. I put a couple pieces of aluminum tape on the inside of the body to protect the paint against abrasion from the rollbar and the battery plug, and I used a punch to cut a couple small body-post pads to keep the body from rattling, but that's all the extra work the body needed.

So there. Now I've officially compensated for not getting to own any cool RC cars when I was a kid -- and can I just say, I did a way better job on this than I would've when I was a kid. Patience was not my thing back then.
Why? Because we all know that vintage Tamiya vehicles are made from equally-vintage plastic, and that poses problems for durability. Nevertheless, after watching a few YouTube videos of Hotshots and Boomerangs driving around, I was intrigued enough that I decided to build one anyway.
First I got a Hotshot, but I realized the unusual suspension design had a big problem, specifically in the rear, where the geometry of the suspension linkage prevents the suspension from being able to fully compress. Rather than fighting to make that design work better, I decided instead to build a Boomerang, which also has a less-fiddly body shell in addition to the conventional rear suspension.
The front suspension is the same between both buggies, however, so I still got the opportunity to see how it works in real life. It actually works pretty well, though I had to do a bunch of work to reduce slop. In the picture above, you can see the vintage Parma upper suspension brace and the vintage JG Manufacturing fiberboard swaybar holders, which I had to dye blue using Rit dye. Those two mods go a long way towards making the front suspension work properly; the upper suspension pivots are very small and flex easily, and the original swaybar holders were made of soft plastic and flex even more easily. (I'm honestly not sure why the Boomerang comes with plastic swaybar holders, since the Hotshot comes with fiberboard swaybar holders and they are obviously superior.) I also replaced the preload shims with vintage Team CRP preload collars, swapped the Boomerang swaybar for the Hotshot swaybar, and replaced the original swaybar links with some TRF easy-adjust links.
Why did I use TRF easy-adjust links? Because this way I can bias the swaybar to counteract any lean caused by a left-to-right weight imbalance. That isn't a hypothetical problem; the Boomerang does have a left-to-right weight imbalance caused by the motor hanging off the right side of the chassis, and the single front shock doesn't allow for correcting that by adjusting preload, the way separate left-and-right shocks would.
What you can't see, while the suspension is assembled, is that I also drilled-out the plastic pivots on the front suspension and fitted them with brass tubes. The front suspension had a bunch of slop in it, because the plastic pivots were a little too loose, and the brass tubes (3.1mm ID, 4mm OD) tighten that up nicely. The rear suspension didn't need this modification, though I suppose time will tell whether it ends up needing brass tubes purely for durability reasons.
One last bit of slop that needed to be tuned out of the front suspension was in the ball-and-socket joints on the steering knuckles. Logistically, this was the easiest slop to get rid of. If you look closely at the joint in the picture above, you can see there's a round plastic washer sandwiched between the suspension arm and the metal bracket that holds the joint together; I simply sanded-down the round plastic washer until the socket was tight enough to hold the pivot ball snugly but without binding. A bit of Tamiya ceramic grease helps to make sure the joints continue to operate smoothly. (also visible are the Hot Bodies steel turnbuckles and TRF low-friction ball-cups I used to build the steering links, because I like it when things work well.)
The drivetrain needed more intensive work than the suspension did. I expected this, since the Boomerang is so old and Tamiya has only done minimal work to update it, so ahead of time I ordered not one, but two vintage Thorp ball diffs, which nearly tripled the cost of this buggy by themselves. The ball-diffs needed rebuilding because the grease was ancient and hardened, and as long as I had them apart I replaced the steel balls with tungsten carbide so I wouldn't have to disassemble the entire freaking chassis to service them any time soon. And of course the gearboxes were built with ball bearings and shims as needed to keep everything fitting properly.
The Hotshot re-release comes with a proper dogbone center driveshaft with steel drive cups, but for some reason the Boomerang still comes with the old steel-wire-with-eyelets center driveshaft. (kind of like how the Boomerang didn't come with the Hotshot's stiffer swaybar holders -- weird.) Fortunately, the Hotshot's dogbone center driveshaft was a direct swap, because the drivetrain on both buggies is identical, so I just bought one from an eBay chop shop and included it in this build. You can kinda-sorta see it under the dirt cover in the picture above.
You can also kinda-sorta see the electronics, which at this point are wholly unremarkable, because they're the same electronics I use in all of my brushed touring cars and rally cars -- a Dynamite DYNS2210 ESC, a Hitec HS-8775MG low-profile metal-gear servo, and a Spektrum receiver.
The motor is more interesting. It's a vintage Tamiya DynaTech 02H motor, made by Johnson. I had previously tested this motor in my Tamiya DF-03Ra 2-speed touring car, but I ultimately decided to go back to the older DynaTech 01R that I had heavily customized for that specific car. I decided this motor was better-suited to a chassis that could use the improved brush holders that would make bouncing and sparking less likely, and the Boomerang presented itself as a prime candidate since it can go off-road. The DynaTech 02H armature also has a built-in turbine to keep the commutator cooler, which meant I didn't need to rig up an endbell cooling fan and figure out how to protect it from impacts since it would've stuck way out the side of the buggy. I originally tried this motor with the 10-turn armature I'd used in the DF-03Ra 2-speed touring car, and it was waaaaaay too fast with the Boomerang's larger-diameter tires; I went back to the original 13-turn armature, and it still hits 30mph without difficulty, which is plenty for a buggy this primitive.
- - -
Back to the vintage Thorp ball diffs for a second. After I installed them, I discovered to my dismay that the drive cups were too large for the Boomerang's dogbones. They were exactly 1mm too large, specifically; fortunately that meant that I could come up with a reasonably easy solution -- cylindrical shims:
More brass tubing to the rescue! After cutting four sections of brass tubing, making sure they were exactly the same length, and slotting them, I fit them into the (thoroughly degreased) ball-diff drive cups:
I doused them with superglue to make sure they'd stay in-place, let them sit overnight to dry thoroughly, and then filed the slots to make sure they exactly lined-up with the slots in the drive cups. Now the driveshafts fit perfectly:
You may be thinking that these are not the original driveshafts, and you are correct. They're actually CVDs for the DF-03 racing buggy, which Tamiya recommended as an upgrade for this vehicle; when I have the option to upgrade to CVDs, I will always do so, because I like it when my driveshafts don't rattle. The DF-03 CVDs would've fit the original gear diff drive cups just fine; the only reason the cylindrical shims were needed is because the Thorp ball-diffs must've been designed for use with larger dogbones back in the day.
On to the details: This is the first RC kit I've ever built that has any sort of detailed interior, and even though it's just a driver's head and torso, I was sorely tempted to leave it out because I didn't want to paint it. Eventually I decided to man-up and paint it anyway, because the Boomerang just didn't look right otherwise.
It might've taken me a couple hours of futzing with bottled paint and paintbrushes, but it sure looks better than an empty cockpit.
As far as the body itself is concerned, there wasn't much to be done except mask the side and rear windows with masking tape and spray the whole thing with white paint. Tamiya was nice enough to cut-out the body and spoiler for me, which saved me a nice bit of work, so I wasn't so irritated about taking the time to paint the driver figure instead. I put a couple pieces of aluminum tape on the inside of the body to protect the paint against abrasion from the rollbar and the battery plug, and I used a punch to cut a couple small body-post pads to keep the body from rattling, but that's all the extra work the body needed.
So there. Now I've officially compensated for not getting to own any cool RC cars when I was a kid -- and can I just say, I did a way better job on this than I would've when I was a kid. Patience was not my thing back then.
Last edited by fyrstormer; 10 December 2017 at 23:03.

 10 December 2017, 23:43
#4
Tech Legend

iTrader: (51)
Join Date: 12 September 2001
Location: Castle Mamba Max Pro. Feel its power!!!!!!!!!!
Posts: 21.220
Trader Rating: 51 (100%+)
Very cool write up. I use to have a Boomerang when I was a kid. I have to say I had a lot of fun running it.
11 December 2017, 13:58
#7
sort of both...I got one for my 13th birthday back in 1992. It was my first RC car build and what got me into the hobby. Then about 8 years ago and with some disposable income I searched for a clean one and found it. Then found an unpainted body and decal sheet. Unfortunately it has an old electronic speed control instead of the original mechanical speed control. I fixed it up and it runs great, but lives on a shelf!
11 December 2017, 19:27
#8
 It's beautiful!
You can tell I'm running out of RC ideas, because I just built a vintage Tamiya buggy. I honestly never thought I would.
Why? Because we all know that vintage Tamiya vehicles are made from equally-vintage plastic, and that poses problems for durability. Nevertheless, after watching a few YouTube videos of Hotshots and Boomerangs driving around, I was intrigued enough that I decided to build one anyway.
First I got a Hotshot, but I realized the unusual suspension design had a big problem, specifically in the rear, where the geometry of the suspension linkage prevents the suspension from being able to fully compress. Rather than fighting to make that design work better, I decided instead to build a Boomerang, which also has a less-fiddly body shell in addition to the conventional rear suspension.
The front suspension is the same between both buggies, however, so I still got the opportunity to see how it works in real life. It actually works pretty well, though I had to do a bunch of work to reduce slop. In the picture above, you can see the vintage Parma upper suspension brace and the vintage JG Manufacturing fiberboard swaybar holders, which I had to dye blue using Rit dye. Those two mods go a long way towards making the front suspension work properly; the upper suspension pivots are very small and flex easily, and the original swaybar holders were made of soft plastic and flex even more easily. (I'm honestly not sure why the Boomerang comes with plastic swaybar holders, since the Hotshot comes with fiberboard swaybar holders and they are obviously superior.) I also replaced the preload shims with vintage Team CRP preload collars, swapped the Boomerang swaybar for the Hotshot swaybar, and replaced the original swaybar links with some TRF easy-adjust links.
Why did I use TRF easy-adjust links? Because this way I can bias the swaybar to counteract any lean caused by a left-to-right weight imbalance. That isn't a hypothetical problem; the Boomerang does have a left-to-right weight imbalance caused by the motor hanging off the right side of the chassis, and the single front shock doesn't allow for correcting that by adjusting preload, the way separate left-and-right shocks would.
What you can't see, while the suspension is assembled, is that I also drilled-out the plastic pivots on the front suspension and fitted them with brass tubes. The front suspension had a bunch of slop in it, because the plastic pivots were a little too loose, and the brass tubes (3.1mm ID, 4mm OD) tighten that up nicely. The rear suspension didn't need this modification, though I suppose time will tell whether it ends up needing brass tubes purely for durability reasons.
One last bit of slop that needed to be tuned out of the front suspension was in the ball-and-socket joints on the steering knuckles. Logistically, this was the easiest slop to get rid of. If you look closely at the joint in the picture above, you can see there's a round plastic washer sandwiched between the suspension arm and the metal bracket that holds the joint together; I simply sanded-down the round plastic washer until the socket was tight enough to hold the pivot ball snugly but without binding. A bit of Tamiya ceramic grease helps to make sure the joints continue to operate smoothly. (also visible are the Hot Bodies steel turnbuckles and TRF low-friction ball-cups I used to build the steering links, because I like it when things work well.)
The drivetrain needed more intensive work than the suspension did. I expected this, since the Boomerang is so old and Tamiya has only done minimal work to update it, so ahead of time I ordered not one, but two vintage Thorp ball diffs, which nearly tripled the cost of this buggy by themselves. The ball-diffs needed rebuilding because the grease was ancient and hardened, and as long as I had them apart I replaced the steel balls with tungsten carbide so I wouldn't have to disassemble the entire freaking chassis to service them any time soon. And of course the gearboxes were built with ball bearings and shims as needed to keep everything fitting properly.
The Hotshot re-release comes with a proper dogbone center driveshaft with steel drive cups, but for some reason the Boomerang still comes with the old steel-wire-with-eyelets center driveshaft. (kind of like how the Boomerang didn't come with the Hotshot's stiffer swaybar holders -- weird.) Fortunately, the Hotshot's dogbone center driveshaft was a direct swap, because the drivetrain on both buggies is identical, so I just bought one from an eBay chop shop and included it in this build. You can kinda-sorta see it under the dirt cover in the picture above.
You can also kinda-sorta see the electronics, which at this point are wholly unremarkable, because they're the same electronics I use in all of my brushed touring cars and rally cars -- a Dynamite DYNS2210 ESC, a Hitec HS-8775MG low-profile metal-gear servo, and a Spektrum receiver.
The motor is more interesting. It's a vintage Tamiya DynaTech 02H motor, made by Johnson. I had previously tested this motor in my Tamiya DF-03Ra 2-speed touring car, but I ultimately decided to go back to the older DynaTech 01R that I had heavily customized for that specific car. I decided this motor was better-suited to a chassis that could use the improved brush holders that would make bouncing and sparking less likely, and the Boomerang presented itself as a prime candidate since it can go off-road. The DynaTech 02H armature also has a built-in turbine to keep the commutator cooler, which meant I didn't need to rig up an endbell cooling fan and figure out how to protect it from impacts since it would've stuck way out the side of the buggy. I originally tried this motor with the 10-turn armature I'd used in the DF-03Ra 2-speed touring car, and it was waaaaaay too fast with the Boomerang's larger-diameter tires; I went back to the original 13-turn armature, and it still hits 30mph without difficulty, which is plenty for a buggy this primitive.
- - -
Back to the vintage Thorp ball diffs for a second. After I installed them, I discovered to my dismay that the drive cups were too large for the Boomerang's dogbones. They were exactly 1mm too large, specifically; fortunately that meant that I could come up with a reasonably easy solution -- cylindrical shims:
More brass tubing to the rescue! After cutting four sections of brass tubing, making sure they were exactly the same length, and slotting them, I fit them into the (thoroughly degreased) ball-diff drive cups:
I doused them with superglue to make sure they'd stay in-place, let them sit overnight to dry thoroughly, and then filed the slots to make sure they exactly lined-up with the slots in the drive cups. Now the driveshafts fit perfectly:
You may be thinking that these are not the original driveshafts, and you are correct. They're actually CVDs for the DF-03 racing buggy, which Tamiya recommended as an upgrade for this vehicle; when I have the option to upgrade to CVDs, I will always do so, because I like it when my driveshafts don't rattle. The DF-03 CVDs would've fit the original gear diff drive cups just fine; the only reason the cylindrical shims were needed is because the Thorp ball-diffs must've been designed for use with larger dogbones back in the day.
On to the details: This is the first RC kit I've ever built that has any sort of detailed interior, and even though it's just a driver's head and torso, I was sorely tempted to leave it out because I didn't want to paint it. Eventually I decided to man-up and paint it anyway, because the Boomerang just didn't look right otherwise.
It might've taken me a couple hours of futzing with bottled paint and paintbrushes, but it sure looks better than an empty cockpit.
As far as the body itself is concerned, there wasn't much to be done except mask the side and rear windows with masking tape and spray the whole thing with white paint. Tamiya was nice enough to cut-out the body and spoiler for me, which saved me a nice bit of work, so I wasn't so irritated about taking the time to paint the driver figure instead. I put a couple pieces of aluminum tape on the inside of the body to protect the paint against abrasion from the rollbar and the battery plug, and I used a punch to cut a couple small body-post pads to keep the body from rattling, but that's all the extra work the body needed.
So there. Now I've officially compensated for not getting to own any cool RC cars when I was a kid -- and can I just say, I did a way better job on this than I would've when I was a kid. Patience was not my thing back then.

 13 December 2017, 07:53
#11
delete
Last edited by Tamiyadan; 17 April 2019 at 07:57.
25 December 2017, 17:53
#12
Is it only me who thinks that the older Tamiya buggies all look very gimmicky and toy-ish?
25 December 2017, 18:43
#13
Tech Elite
iTrader: (89)
Join Date: 14 August 2009
Location: " The World's Most Famous Beach "
Posts: 2.312
Trader Rating: 89 (100%+)
I raced one of these as a kid back in the day you would be surprised at the beating it can take ! Nice Build can't wait to build my Boomerang and Big Wig kits .
25 December 2017, 18:54
#14
Given that this was the style of the day, they look like fighter jets, or actual dune buggies, etc. as they were percieved at the time. Look at the TOMY Cars. These buggies looked more realistic than the 2wd and 4wd buggies we have now.
These old buggies paved the way. If any cars from then looked rediculous its the Mantua Devil 2wd 1:8 buggy.
25 December 2017, 20:42
#15
delete
Last edited by Tamiyadan; 17 April 2019 at 08:00.