


 81Likes
Corally Kronos XTR Thread


 05-12-2022 | 03:57 PM
#77
Thread Starter
Tech Elite

Joined: Sep 2003
Posts: 4,205
From: Wales, UK

1/2 a mile of perfectly flat tarmac. Fresh JetKo Tyres. How will they fare?
Brilliantly.
These tyres grip consistently, are progressive as they let go and have zero ballooning. They make the truck more predictable at speed and tame 6S on hard, paved surfaces.
The tyres might be heavy, but they certainly work.
Motor temps were acceptable - both the Kronos XTR and the tyres performed flawlessly. Nothing fell off and the drive train was smooth as butter. The speed it carries with 4 x 441g of rubber is quite something.

The tyres get even stickier as they get warm. Nearing the kerbside, the tyres readily pick up chippings and dust - so it's best to keep to the clean parts and avoid the marbles!
Dusty motors shroud did a great job of keeping everything clean whilst allowing good airflow. Nothing overheated.
This truck with these tyres is a formidable street machine. Put the stockers back on, and you're ready for multi-surface use again. Win - win!
06-07-2022 | 05:19 AM
#78
Thread Starter
Tech Elite
Joined: Sep 2003
Posts: 4,205
From: Wales, UK
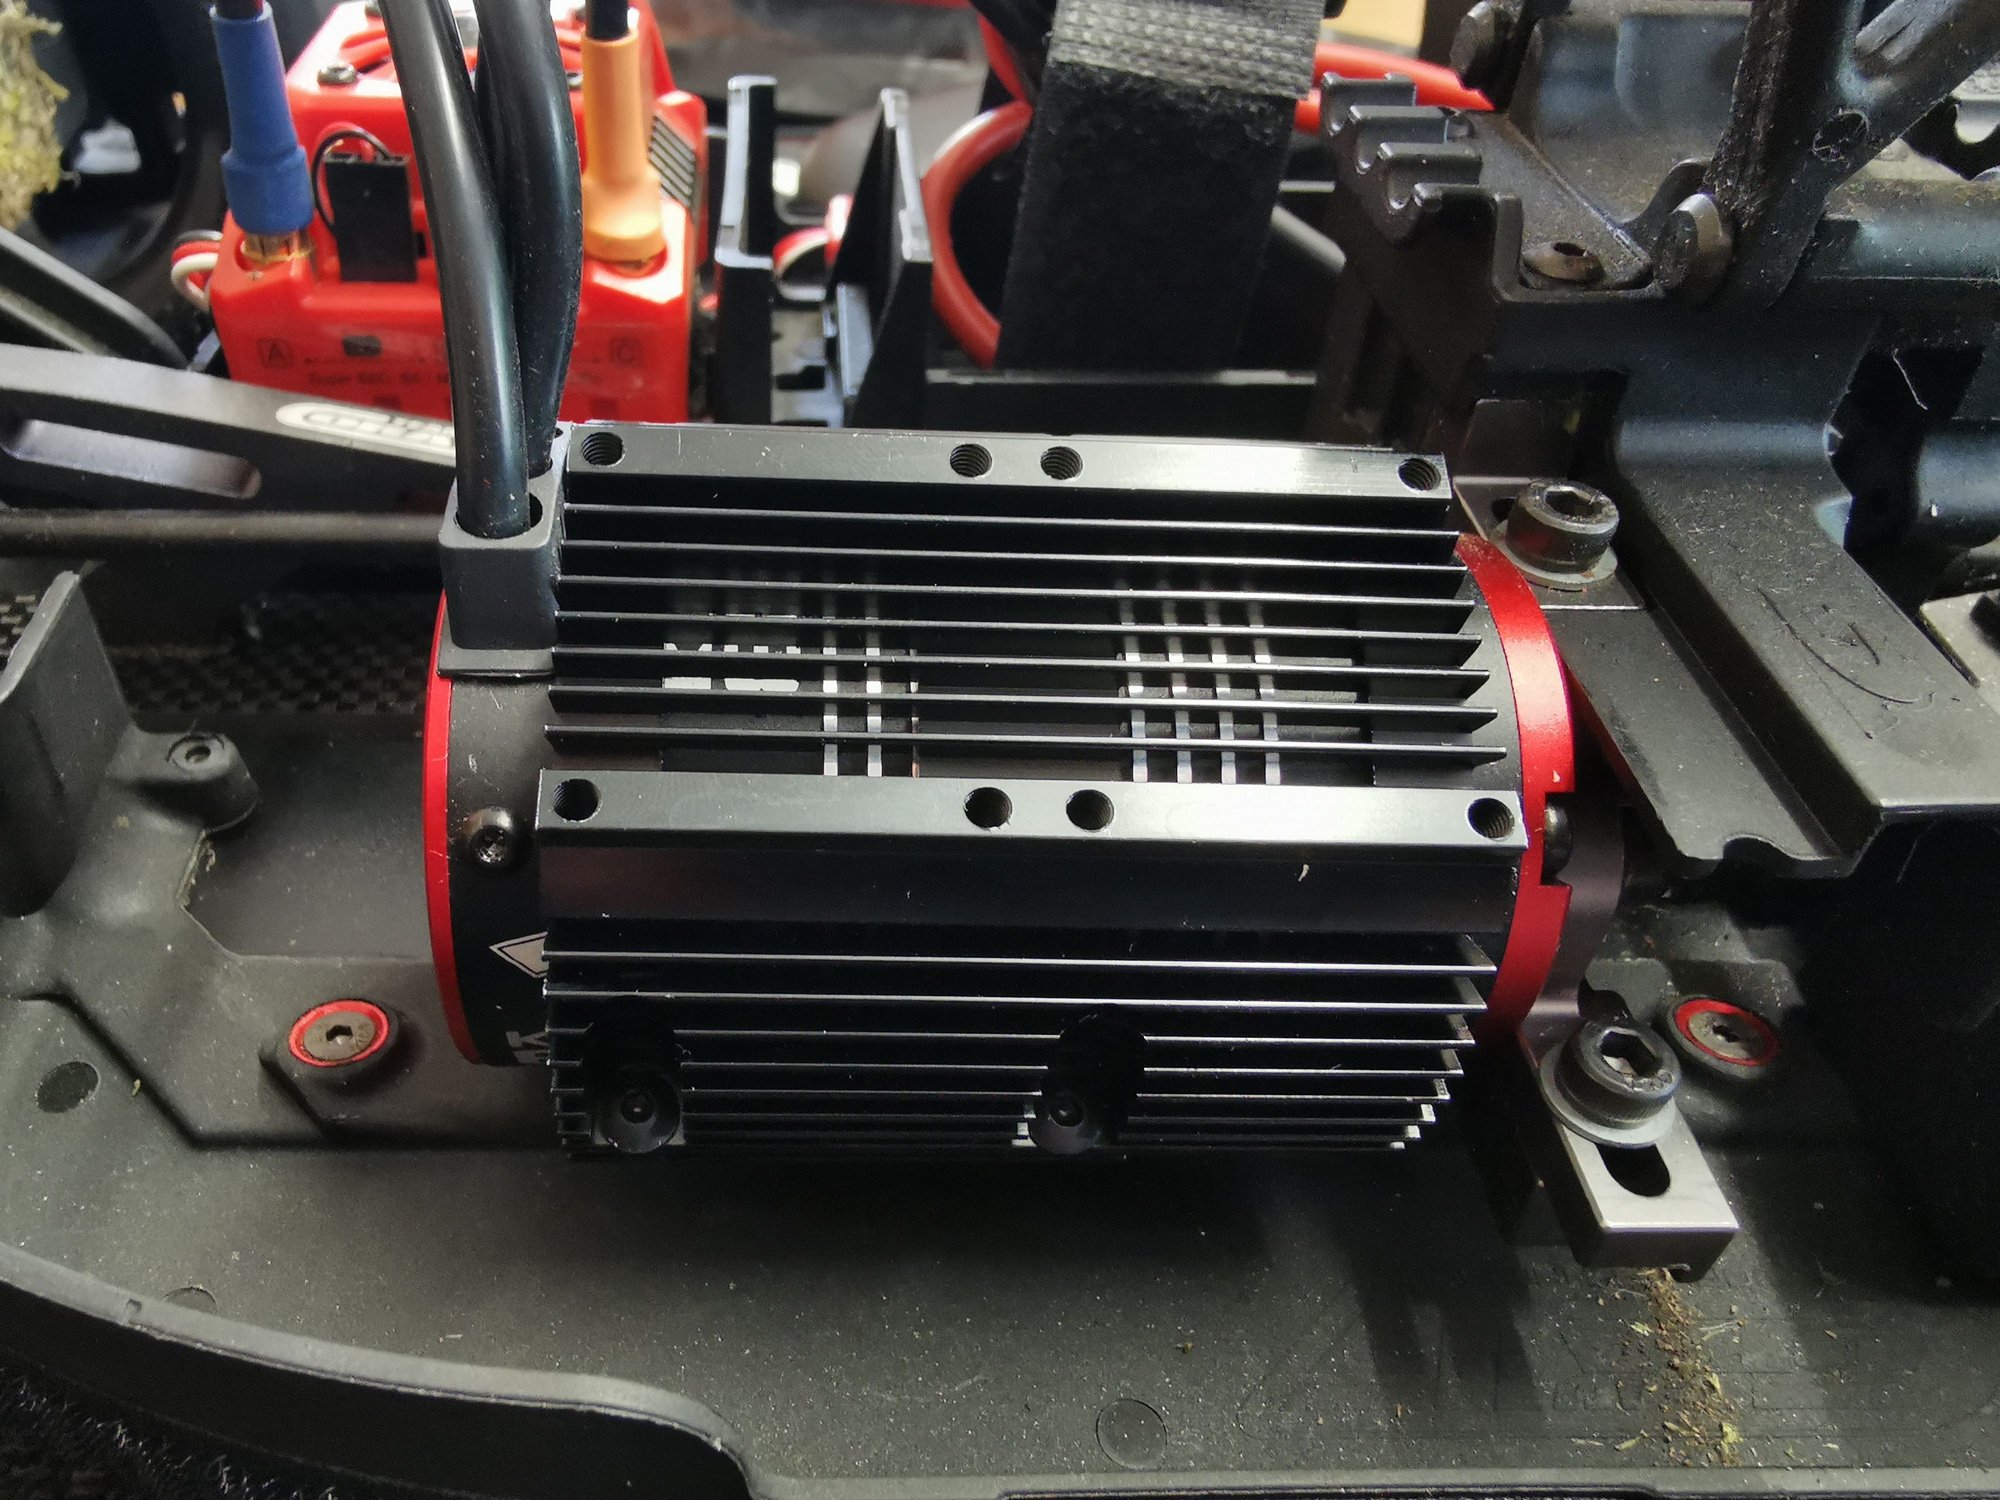
Heat during speed runs was appreciable, so I decided to install this type of twin fan heat sink.

The fans have WCF plates to help with both looks and longevity.
Driving like I stole it, without a break, the temperatures peaked at 162�F after 90% of a 4500 6S pack running the sticky road tyres and mostly full throttle runs. Following a 2 minute break, the fans cooled the motor down to 90�F, so the setup definitely helps dissipate the heat over a shorter timescale and reduces the peak temperature. Win win.
The Team Corally motor is actually in excess of the recommended KV rating for 6S use, as stated in Corally's own ESC manual! So I think cooling is a sensible way of mitigating this 'slight oversight'.

Following a slight issue with the original fans, I used these ones instead. Note: the covers are from Surpass hobby, but the Surpass hobby motors and y-lead were no good - one of the motors was DOA and the y-lead was difficult to see the polarity.
Next up, the servo saver spring.


Set like this, the steering gets sloppy.

Set like this, the steering is positive, but there is virtually no saving action due to insufficient gaps between the coil...
Access to the steering/servo saver isn't great - you either take it apart like I did - 16 screws - or poke a screwdriver on to the knurled thumb screw through the hole in the chassis, turning the steering one way to tighten - the other to loosen. My issue with the latter is that it ruins the thumbscrew, damages the anodising and you can't easily see what compression is on the spring.
It's pretty obvious these servo saver springs need to have a higher rate - they're too soft. Clamping them right up like this isn't ideal, but given the choice, I'd sooner have some steering at 60mph.
Outside diameter = 18mm
Inside diameter = 14.4mm
Spring length = 14.8mm
Spring wire = 1.8mm
Can anyone suggest a beefier spring with a heavier guage wire?
The need for speed

GSM020
Dual locked between rear body posts. I can literally pick the truck up by it!
Dusty motors shroud goes over the top of that.
06-07-2022 | 07:43 AM
#80
Thread Starter
Tech Elite
Joined: Sep 2003
Posts: 4,205
From: Wales, UK
Note the 'squirm' on the runs towards the camera. The wind conditions weren't ideal and I don't use any gyro/stability control - if it all goes 'Pete Tong' - so be it!
Also note that the issue with the servo saver seemed to get progressively worse using these big sticky tyres.
As the spring weakens, or if the thumb screw backs off (which might have been part of the issue), no matter how super-duper your steering servo is - steering throw, response and centering is reduced. At >60mph, that really isn't something anyone wants.")
It just needs a beefier spring.
Ps: The horses are my friends, love the truck and like sweets.
Also note that the issue with the servo saver seemed to get progressively worse using these big sticky tyres.
As the spring weakens, or if the thumb screw backs off (which might have been part of the issue), no matter how super-duper your steering servo is - steering throw, response and centering is reduced. At >60mph, that really isn't something anyone wants.
It just needs a beefier spring.
Ps: The horses are my friends, love the truck and like sweets.

 06-24-2022 | 07:10 AM
#82
Thread Starter
Tech Elite
Joined: Sep 2003
Posts: 4,205
From: Wales, UK
Well following my brush with brushless, it became quite evident that my XT8 17 was getting jealous, so I took it for a blast. After warming it up with a couple of laps for about 1.5 min, I got the following results.

What I saw surprised me. To be fair, this result was off road, on a twisty, bumpy grass track with craters and jumps. But even so, big bad 28-8 - whilst brilliant and everything - 29mph was less than I thought. I would have guessed more like 40mph all day long, even on grass.
I will test again on tarmac with taller gearing to get a better comparison between the 28-8 vs Kuron 825, but here we see the difference in both torque and power between Nitro and Brushless. In real terms, the Novarossi 28-8 is putting out 2 hp, where as the Kuron 825 is a 3000w motor - this equates to 4 hp. This ignores completely the torque, which for the 28-8 is 80.64 oz/in @ 22,000 rpm. The Kuron torque specs aren't anywhere to be seen, but it will likely be much, much more than this.
But it just goes to show - what gets you around a track consistently and quickly requires something that can get it to the ground without drama.
07-01-2022 | 07:46 AM
#83
Tech Apprentice
Joined: Feb 2022
Posts: 64
From: Houston
Note the 'squirm' on the runs towards the camera. The wind conditions weren't ideal and I don't use any gyro/stability control - if it all goes 'Pete Tong' - so be it!
Also note that the issue with the servo saver seemed to get progressively worse using these big sticky tyres.
As the spring weakens, or if the thumb screw backs off (which might have been part of the issue), no matter how super-duper your steering servo is - steering throw, response and centering is reduced. At >60mph, that really isn't something anyone wants.
It just needs a beefier spring.
Ps: The horses are my friends, love the truck and like sweets.
07-01-2022 | 09:47 AM
#84
Thread Starter
Tech Elite
Joined: Sep 2003
Posts: 4,205
From: Wales, UK
I have sorted the problem with wander steering once and for all.
Firstly, we needed to get a bespoke spring, with a higher rate and more space between the coils.


Here, the uprated spring fitted to the steering assembly.
Compare this with the stock item, which would only give reasonable steering with the road tyres when really pre-loaded.

Next, I reduced the toe-out to 1�, which should improve straight line stability. As it was out of the box, it was more like 3� which on reflection for a car this size running on tarmac is excessive IMO.
The horses certainly love the Kronos XTR! It was so funny watching them chase it. Bless em'!
Find the uprated spring here:
Uprated Spring for Servo Saver
07-08-2022 | 04:10 AM
#86
Thread Starter
Tech Elite
Joined: Sep 2003
Posts: 4,205
From: Wales, UK
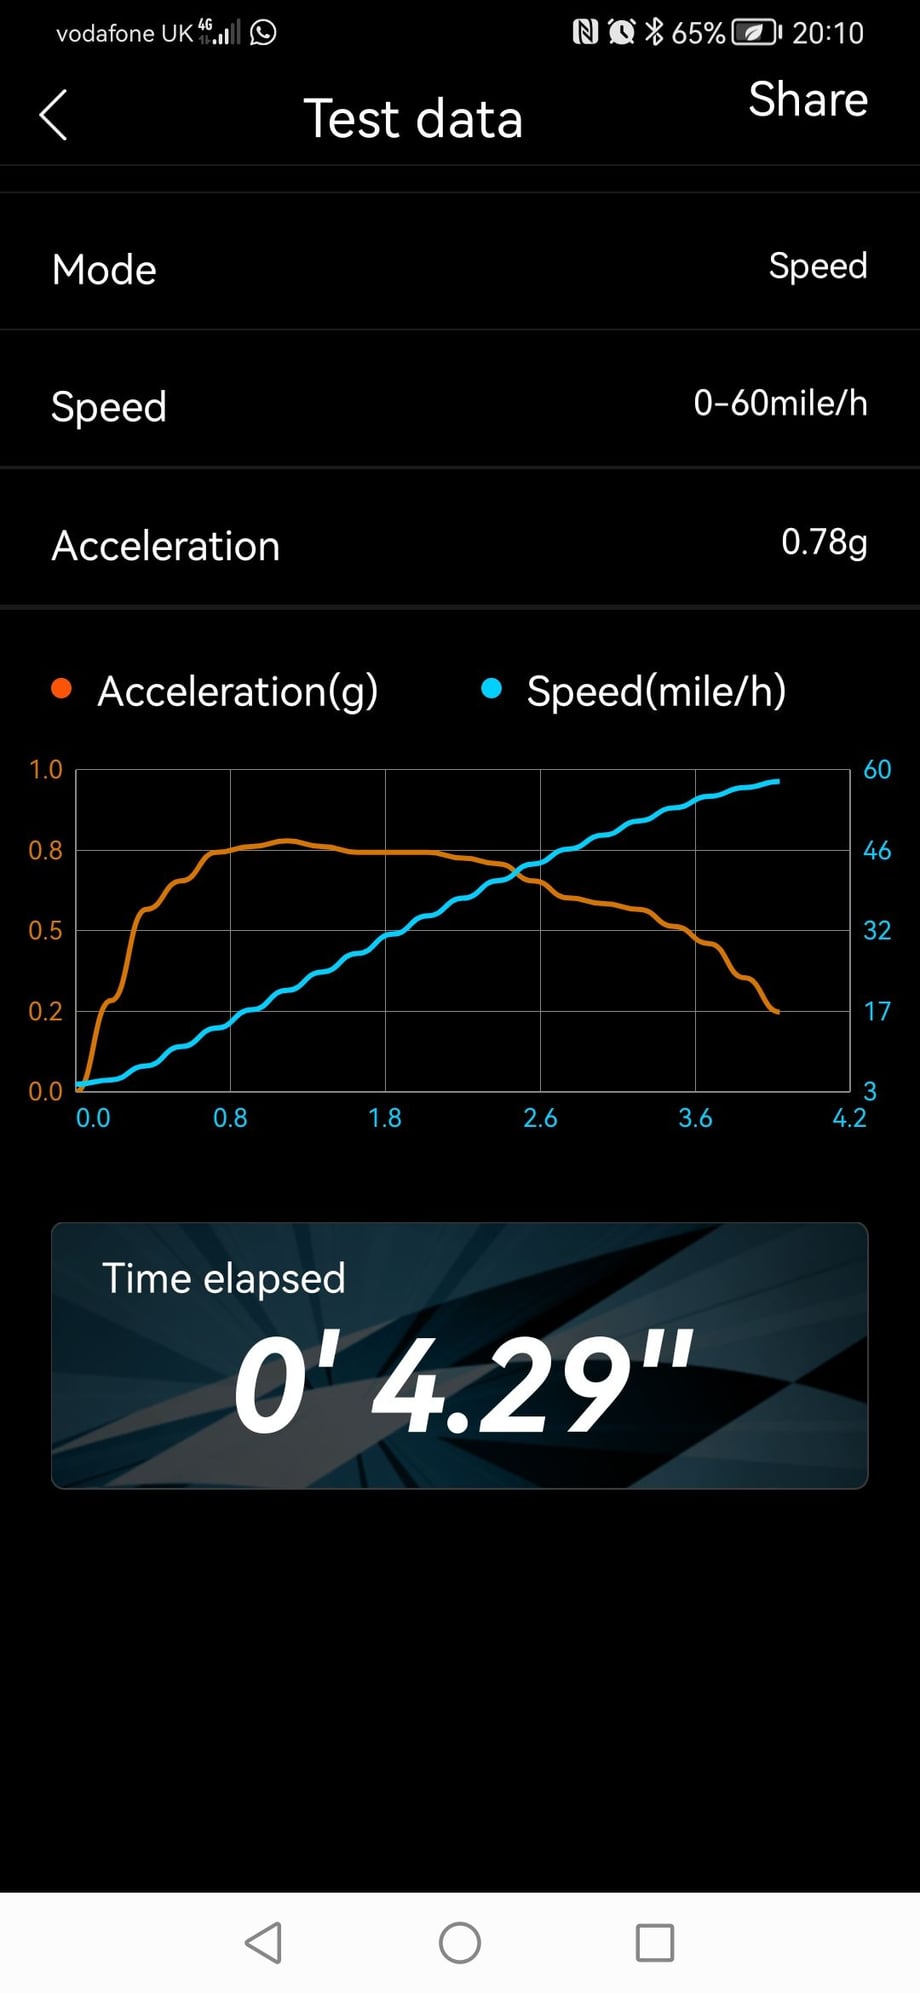
Latest 0-60mph run:
Temps:
Surface 74�F
Front tyres 102�F
Rear tyres 84�F
Motor 162�F

Shaved 100th second off 0-60mph!
With the steering more positive, it is easier to hold in a straight line - especially with heavy tyres.
Changing the toe out back from 3� to 1� really helps too - makes the car easier to predict.

A snap shot of 1' 19", where the truck hit 62mph and averaged 34mph over the course of around 4000 feet, which includes some turning around and goofing about. This truck is rapid!
Temps:
Surface 74�F
Front tyres 102�F
Rear tyres 84�F
Motor 162�F
Shaved 100th second off 0-60mph!
With the steering more positive, it is easier to hold in a straight line - especially with heavy tyres.
Changing the toe out back from 3� to 1� really helps too - makes the car easier to predict.
A snap shot of 1' 19", where the truck hit 62mph and averaged 34mph over the course of around 4000 feet, which includes some turning around and goofing about. This truck is rapid!
02-21-2023 | 02:51 PM
#88
Thread Starter
Tech Elite
Joined: Sep 2003
Posts: 4,205
From: Wales, UK
Visiting this thread having just gone over a few sets of my 1/8th wheels.
There is nothing to lose by balancing your wheels, though it gets increasingly difficult to balance wheels the smaller they are.
IMO, it's better to take reasonable steps to ensure your wheels are as balanced as possible, because besides the obvious improvement in performance, having a car that has less vibration will also reduce wear and improve bearing life.
To do a good job, you need a wheel balancer, blutac, pen, golfing lead tape and a digital balance (scales).
I use blutac on the rim - in the usual way - putting the right amount of blutac opposite the heavy side of the wheel. Mark this with a pen. (often on off road tyres, you'll notice the heavy part of the wheel is where the manufacturer drills the vent hole in the rim)
Once the wheel is balanced as accurately as possible, I then remove all of the blutac and weigh it on the digital balance. I replace the blutac with the same weight of adhesive lead tape. After a bit of experience, you get to know how long a strip of lead tape you need for any specific weight. It's just a matter of practice. If I'm dealing with very small amounts, I often leave the blutac on the scale - let's say it's 2g. I'll add my length of lead tape to the scale and until I get the length I need to total 4g in total - then put the 2g of lead tape on to the wheel.
The reason why I prefer lead tape on the rims is because blutac and putty attract a lot of dust and crap. Also, because lead is denser, you require less volume of it to achieve the same result over putty. It's neater and less likely to fall off.
Some of my wheels require 8g of weight to balance them! On a set of wheels hurtling at 60mph - that's a lot of unwanted vibration if it's left unbalanced.
My truggy wheels have been balanced with a putty that sets hard and this has also worked well to be fair. However, I still prefer the the lead tape - it's cheaper and readily available.
06-01-2023 | 07:54 PM
#89
Tech Rookie
Joined: Jun 2023
Posts: 1
Sorry if my messages/replies seem redundant, I�m trying to figure out how to use this forum from my phone lol I think I may have already posted on here somewhere but I can�t find my reply so here it is again,, I need an upgraded servo saver spring BAD. One was posted on this thread but the link to it didn�t take me anywhere. Where can I find that spring??!! Or a spring of that caliber. Thanks a lot in advance for any advice on the matter.
Lucas from Virginia, USA
Lucas from Virginia, USA
06-02-2023 | 12:13 AM
#90
Thread Starter
Tech Elite
Joined: Sep 2003
Posts: 4,205
From: Wales, UK
Sorry if my messages/replies seem redundant, I�m trying to figure out how to use this forum from my phone lol I think I may have already posted on here somewhere but I can�t find my reply so here it is again,, I need an upgraded servo saver spring BAD. One was posted on this thread but the link to it didn�t take me anywhere. Where can I find that spring??!! Or a spring of that caliber. Thanks a lot in advance for any advice on the matter.
Lucas from Virginia, USA
Lucas from Virginia, USA
Try here - or order a batch of them direct from Leespring.
Upgraded Servo spring info
Upgraded Servo Saver Spring
Hope this helps.