


 32Likes
SERPENT Medius X20'21
 01-17-2021 | 06:04 PM
#16
I used the out of box settings for the shims supplied with the car, but altered droop settings, width and spring selection. From the runs I have had on it I think the shock oil needs to be increased as well. This is all on CRC Black carpet with pretty high traction.
 01-17-2021 | 08:01 PM
#17

So far we are running the stock supplied aluminum chassis and it seems to be working well. With the reconfigured top deck, the chassis and the supplied chassis stiffeners for the rear the car seems to be stiff in the right places.
01-22-2021 | 07:08 PM
#18
Have you changed the setup much for the CRC?
01-23-2021 | 09:25 AM
#19
Much? No not really, but kind of. From the stock setup just some basic changes such as ride height, droop, camber, shock oil (stock is too light) and roll bars. Just for personal preference or fine tuning for myself.
One of the big changes that really effects the car is reducing the amount of rear toe and how much toe is added under compression, this seems to free the car up.
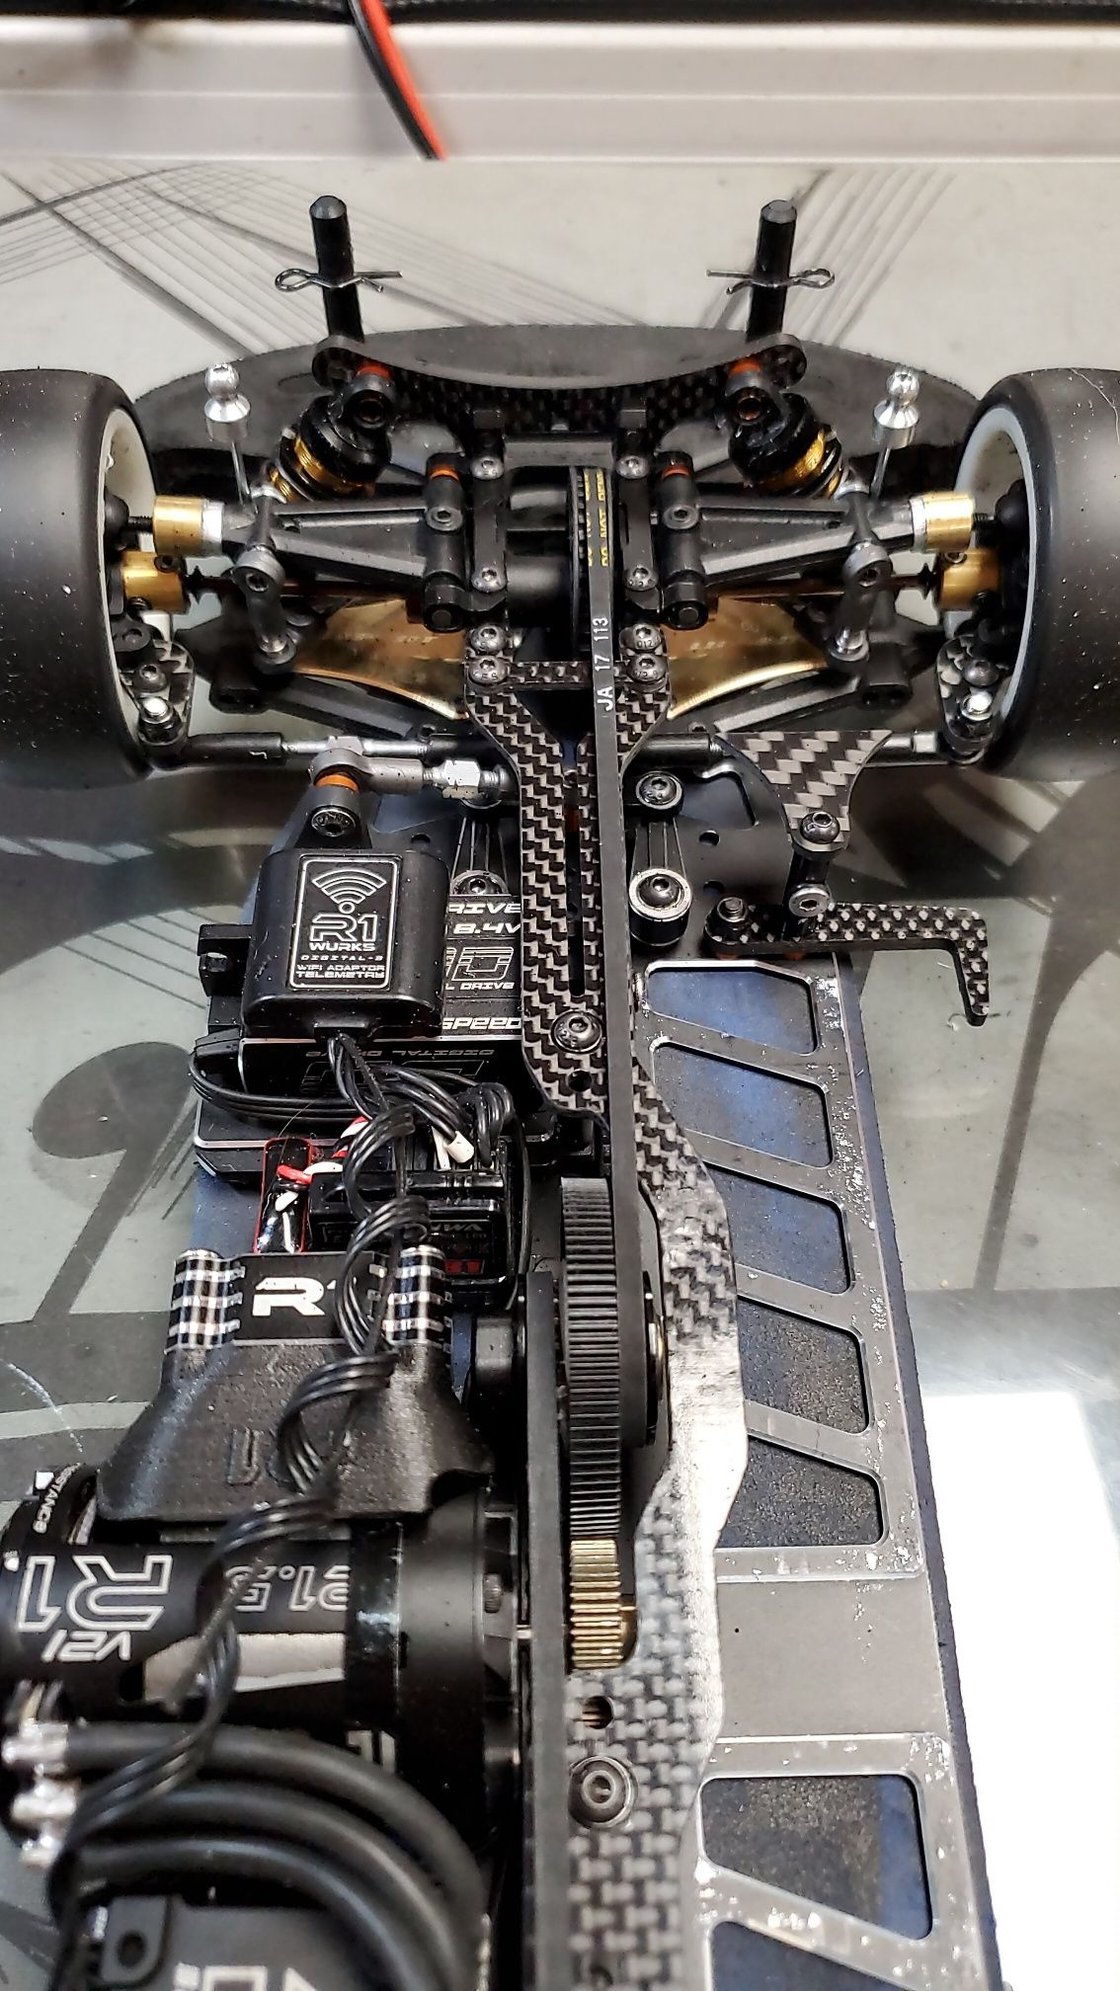
Another change that I did, and I'm not totally sure if it was beneficial or not was in the rear of the car. I run the front upper arm (SER401823) in the rear of the car for two reasons, first it keeps the parts count down and secondly, the front arm is slightly longer, so it provides more material for the ball stud to thread into, makes it a little more bullet proof.
Now, on my car I also did another change in the back of the car, and you may have seen this mentioned by others as well. I take the lower rear arm and trim the nub that the ball stud threads into and shaved it back so that the profile of the arm is flush across the entire arm. Then I use the front steering hub from the X20 (which I believe the 4X also used)(SER401810), and use it in place of the original rear upright. This will change the rear axel location slightly from what the stock setup is like. It should free the back of the car up a little more. There are a few racers that do this but they actually run the front lower arm in the rear as well, but this changes the lower shock mount location so a different shock tower is required as well. Felix Law suggested the method that I use, so really you only need to get a set of front steering hubs from a X20 and you'll be set to go. The only thing you have to remember if you run this setup is that your track width settings are done using the front measurements in the rear as well. Now is it beneficial? I can't really tell but it hasn't hurt the car, maybe on a bigger track it will show up more.
Another option that I have started to play around with is the brass arm weights(SER401962), they make the car feel numb, but in a good way, not sure how to really explain it, but something worth checking out. The only thing when you run the brass arm weights is you have to flip the ball links (SER401807) for the roll bars over as there is no way to get at the grub screw. I drilled the top arms with a hole just big enough for the hex wrench to pass threw to access this from the top and it works very well.
Other things that I changed but probably didn't have to, are the shock bladders, I use the SER401832 as I get a better build out of the shock when I use these. I also change the diff seal to SER401784, as I find it just seals the diff better. Speaking of diffs, I have seen a few diff failures, so I tend to r&r my diff about every 5 race days, just to be sure. I haven't had the gear failures but I change the oil out on a regular basis.
Hope that helps, and if you have any other questions, please feel free to ask.
Thanks
Gary Lanzer
One of the big changes that really effects the car is reducing the amount of rear toe and how much toe is added under compression, this seems to free the car up.
Another change that I did, and I'm not totally sure if it was beneficial or not was in the rear of the car. I run the front upper arm (SER401823) in the rear of the car for two reasons, first it keeps the parts count down and secondly, the front arm is slightly longer, so it provides more material for the ball stud to thread into, makes it a little more bullet proof.
Now, on my car I also did another change in the back of the car, and you may have seen this mentioned by others as well. I take the lower rear arm and trim the nub that the ball stud threads into and shaved it back so that the profile of the arm is flush across the entire arm. Then I use the front steering hub from the X20 (which I believe the 4X also used)(SER401810), and use it in place of the original rear upright. This will change the rear axel location slightly from what the stock setup is like. It should free the back of the car up a little more. There are a few racers that do this but they actually run the front lower arm in the rear as well, but this changes the lower shock mount location so a different shock tower is required as well. Felix Law suggested the method that I use, so really you only need to get a set of front steering hubs from a X20 and you'll be set to go. The only thing you have to remember if you run this setup is that your track width settings are done using the front measurements in the rear as well. Now is it beneficial? I can't really tell but it hasn't hurt the car, maybe on a bigger track it will show up more.
Another option that I have started to play around with is the brass arm weights(SER401962), they make the car feel numb, but in a good way, not sure how to really explain it, but something worth checking out. The only thing when you run the brass arm weights is you have to flip the ball links (SER401807) for the roll bars over as there is no way to get at the grub screw. I drilled the top arms with a hole just big enough for the hex wrench to pass threw to access this from the top and it works very well.
Other things that I changed but probably didn't have to, are the shock bladders, I use the SER401832 as I get a better build out of the shock when I use these. I also change the diff seal to SER401784, as I find it just seals the diff better. Speaking of diffs, I have seen a few diff failures, so I tend to r&r my diff about every 5 race days, just to be sure. I haven't had the gear failures but I change the oil out on a regular basis.
Hope that helps, and if you have any other questions, please feel free to ask.
Thanks
Gary Lanzer
01-23-2021 | 09:23 PM
#20
Cool. Good stuff. I was only able to get a couple of practice runs and 10 laps of a heat race before I rubbed a corner and snapped a pivot ball and steering block top. Before the unfortunate dnf, I was having some traction rolling issues. I'm running the same setup as my '20 car, minus the solid 2mm chassis. Hopefully, I can get the '21 car to work with the stock chassis. It's a bummer that they don't sell a USA carpet spec kit with the solid chassis.
01-24-2021 | 06:02 PM
#21
Cool. Good stuff. I was only able to get a couple of practice runs and 10 laps of a heat race before I rubbed a corner and snapped a pivot ball and steering block top. Before the unfortunate dnf, I was having some traction rolling issues. I'm running the same setup as my '20 car, minus the solid 2mm chassis. Hopefully, I can get the '21 car to work with the stock chassis. It's a bummer that they don't sell a USA carpet spec kit with the solid chassis.
01-25-2021 | 09:31 AM
#22
Ron, my 20 car with the solid chassis is on a very different setup than my 21 car, so much so, that I can't remember when I ran my 20 last, as the 21 is so much nicer and easier to run. What is the setup your running and what tires are you on? Are you gluing the front sidewalls? I don't think you can run on any black carpet track without having to glue the sidewalls unfortunately. I managed to win our A main today with a near flawless run, not the fastest car but very consistent and no breaks all day today. Yesterday I broke a steering block, and the last couple times I have broke them I noticed the break is across the 2 screw holes that hold the bearing holder in place. As I looked at this I noticed that all the screw holes in the hub are drilled thru completely except those 2 holes. I decided to drill those holes to see if perhaps it would relieve some pressure on that location.....not sure if its legit, but so far so good. I also normally tap all those holes just so not to force the screw into that plastic part. My car is using the black pivot balls and after breaking one, and bending one I haven't had issues with them since, not sure if Serpent has changed up/fixed the initial problem with them, but so far so good.
01-25-2021 | 11:38 AM
#23
Tech Master
Joined: Aug 2001
Posts: 1,825
From: Miami, FL
I�d be interested in knowing if drilling out the axle mount holes in the steering block all the way through turns out to be effective. From what I read elsewhere, the change to a carbon steering arm was an effort to stiffen them and make the steering more precise... something about the flex in the plastic arms of the original blocks reducing a precise �feel� over time as they wear and flex more. Of course, it�s a catch 22 because the extra stiffness makes it susceptible to break, especially with the change in the block design. Perhaps adding some material around the screw hole and arm mount might help, but I�ll let the engineers decide. Personally, I really can�t complain, because the one steering block I did break due to a �love tap� against the wall was probably well deserved, lol.
 01-25-2021 | 04:33 PM
#25
 01-26-2021 | 09:37 AM
#27
The covers over the top arms are aluminum tubing, but I found that it seemed a little soft so I put a brass tube over that, its just a overkill to try to save the top arm from having the pivot ball from breaking out. Although I noticed that we haven't had issues with that problem for a while now, maybe a change up in material.
The body stops are just long body pin trimmed and bent to fit the screw in the arm, the tops are from Xray and are old sway bar mounts. The nice thing about these are that you can have the body mounted and turn the front wheel and still access the set screw to bring the ball up against the body for a nice close fit.
01-29-2021 | 07:01 AM
#28
Here are some of our changes we've made.

Rebellion chassis works great. Need to drill one hole in chassis for rear of motor mount. Also needed to add a hole in front of servo mount

Flipping the arms allows you to use the brass weights in the deeper recess so they clear the droop screws and also added the x braces. Using 3x20 set screws and spacer and nut on upper arm mounts helps keep shims in place when changing.

Steve made these carbon plugs to replace the bearings and make it a solid stiffener for our high grip carpet.

We use front upper arms on rear along withe the front uprights (from X20) and makes the wheelbase some what adjustable. I also drilled the small holes in the outside of the upper arms for a hex driver to get to the sway bar set screws as you can't get to them from the bottom with the brass arm weights on.
Rebellion chassis works great. Need to drill one hole in chassis for rear of motor mount. Also needed to add a hole in front of servo mount
Flipping the arms allows you to use the brass weights in the deeper recess so they clear the droop screws and also added the x braces. Using 3x20 set screws and spacer and nut on upper arm mounts helps keep shims in place when changing.
Steve made these carbon plugs to replace the bearings and make it a solid stiffener for our high grip carpet.
We use front upper arms on rear along withe the front uprights (from X20) and makes the wheelbase some what adjustable. I also drilled the small holes in the outside of the upper arms for a hex driver to get to the sway bar set screws as you can't get to them from the bottom with the brass arm weights on.