


 11Likes
Custom Lexan and Vacuum Forming
 03-01-2016, 03:44 AM
#331
Tech Regular
As for the tides bowing out on you, a heat gun might do the trick to allow you to settle back into the correct position. Hold the body on it's side and apply heat to the opposite side until it starts to give and then quickly turn it over and rest it evenly on the heated side until it cools.
Thanks. It is actually a lot of scrap wood, the inside of the heater box is covered with aluminium tape. It has two table-top grill heating elements parallel. I bought a 3,8kW controller for US$ 7 from e-bay, and a voltage / amp gauge from that source. I am still looking for an el-cheapo temp gauge that will go up to 250 degree C. I am working on a new vacuum table, this one is a box with large volume which takes more effort to suck empty. The new table will have a lot less own volume, and I need a better vacuum source.
Also I am looking for a resin type casting mould material. I now use plaster, which is very brittle and the gets chipped easily. I also tried a 2K variant called Acrylic One, it seems a bit better but not yet what I would like.
Have you ever done wings? I have a design I want to make but I need to make a 2-Up mould of it first and then find someone to make them for me. It's a fresh take on a long forgotten wing from ages ago. Can't even find a single anything on the company. It was called Team hammer and their wings were the very best in the industry but they never went big time.


 03-01-2016, 07:05 AM
#332

That's pretty nice. Sauber is my little darling F1 team.
BTW, I had that same rug, actually 3 of them when my kids were small and when they outgrew playing on them I lined my garage floor with them. Versatility from RC guys… who'd've thought?!?!?!? LOL
As for my wing, they're pretty easy to copy and with my design being so simplistic it would be easily copied by someone and I'd rather not post. However, a couple years ago when I was running the a B4.2, I was frustrated that the only nice bodies you could get for it were cab forward and while I didn't want to go back to rear cab bodies, I knew there was a happy medium. So, I designed my own body that I never got into production because my buddy who is a 3D animator and modeler slacked on me and never made it a point to sit with me to bang it out.
Anyhow here is the lid.
First up is the initial design phase for the profile of the lid itself. Starting from top to bottom, each one features slight changes from the one above, making it's way down to the last and final one.
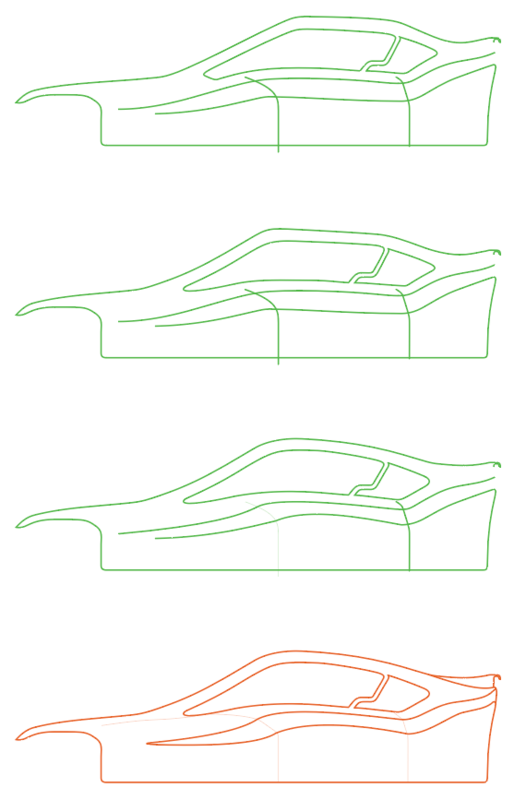
Here is the final profile enlarged
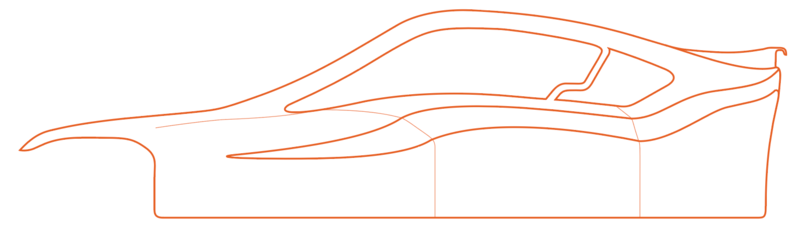
And here is the front view with the sides

This took me several hours to create manually in Illustrator. There is a bit of trial and error with shapes and profiles and mating them together in a way that flows properly. Had my buddy created the rendering I'd have sent it out for a 3D print to test fit to the car and if all was perfect I'd have opted for a machined master cut from a hard delrin I used to make paintball bolts out of.
BTW, I had that same rug, actually 3 of them when my kids were small and when they outgrew playing on them I lined my garage floor with them. Versatility from RC guys… who'd've thought?!?!?!? LOL
As for my wing, they're pretty easy to copy and with my design being so simplistic it would be easily copied by someone and I'd rather not post. However, a couple years ago when I was running the a B4.2, I was frustrated that the only nice bodies you could get for it were cab forward and while I didn't want to go back to rear cab bodies, I knew there was a happy medium. So, I designed my own body that I never got into production because my buddy who is a 3D animator and modeler slacked on me and never made it a point to sit with me to bang it out.
Anyhow here is the lid.
First up is the initial design phase for the profile of the lid itself. Starting from top to bottom, each one features slight changes from the one above, making it's way down to the last and final one.
Here is the final profile enlarged
And here is the front view with the sides
This took me several hours to create manually in Illustrator. There is a bit of trial and error with shapes and profiles and mating them together in a way that flows properly. Had my buddy created the rendering I'd have sent it out for a 3D print to test fit to the car and if all was perfect I'd have opted for a machined master cut from a hard delrin I used to make paintball bolts out of.
03-01-2016, 03:55 PM
#333
Tech Regular
Hi guys,
I've built my own machine last year and I am slowly developing a method to make good bodies out of lexan. Here's a recent video:
I know this is not a good pull, I made the sagging too big and there was not enough heat in the material. I also feel my vacuum cleaner is lacking power, I am looking into a better solution there.
I heat the 0.75mm lexan for an hour at 5 amps (230V), no clue what temp that is, to get the moisture out. I then raise the amps, create the sagg. Switch off the heater, turn on the vacuum (cleaner) and pull the sagg over the mold. Touring cars go fairly well, F1 style is still difficult. I will dig through all these pages in the coming days, but I have two questions I'd like to ask now:
1) I feel the sagging cools the material, as it comes into contact with more ambient air. Would adding a few alloy bars across the system to create multiple smaller saggs help?
2) On all bodies I have made so far, the side bent outwards after I cut the body to size. Like on a touring car the part between the wheels bends outwards like half an inch. As long as the body is in tact, so no wheel cutouts, the lot stays straight. I think it has to do with stress in the material, maybe because it stretches over a cold mold so the inside cools faster then the outside of the material. As long as there are enough folds in the material, it all retains it shape, but when the shape it rather flat, the material bends. (I hope I described the problem clearly). What remedy could I try?
Cheers,
Hugo
I've built my own machine last year and I am slowly developing a method to make good bodies out of lexan. Here's a recent video:
| + YouTube Video | |
I know this is not a good pull, I made the sagging too big and there was not enough heat in the material. I also feel my vacuum cleaner is lacking power, I am looking into a better solution there.
I heat the 0.75mm lexan for an hour at 5 amps (230V), no clue what temp that is, to get the moisture out. I then raise the amps, create the sagg. Switch off the heater, turn on the vacuum (cleaner) and pull the sagg over the mold. Touring cars go fairly well, F1 style is still difficult. I will dig through all these pages in the coming days, but I have two questions I'd like to ask now:
1) I feel the sagging cools the material, as it comes into contact with more ambient air. Would adding a few alloy bars across the system to create multiple smaller saggs help?
2) On all bodies I have made so far, the side bent outwards after I cut the body to size. Like on a touring car the part between the wheels bends outwards like half an inch. As long as the body is in tact, so no wheel cutouts, the lot stays straight. I think it has to do with stress in the material, maybe because it stretches over a cold mold so the inside cools faster then the outside of the material. As long as there are enough folds in the material, it all retains it shape, but when the shape it rather flat, the material bends. (I hope I described the problem clearly). What remedy could I try?
Cheers,
Hugo
03-01-2016, 08:15 PM
#334
Tech Regular
from watching your video i think the main problem is that you are heating from the top only. the underside wont be hot enough compared to the top. the top side ends up being the outside surface so contracts more because it was hotter. redesign your rig so it heats from the underside of the lexan.
03-01-2016, 09:15 PM
#335
Tech Regular
Thanks. I had a heater that heats from below, but the sagging plastic reaches the heating element with undesired effects. Do you mean heat from below as well as from the top? Do you have any design suggestions?
I will definately try to stress relieve the next pull with a heat gun, thanks.
Hugo
I will definately try to stress relieve the next pull with a heat gun, thanks.
Hugo
03-02-2016, 12:15 AM
#336
Tech Regular
Im certainly no expert but Comparing your video to others it seems like you are getting enough (too much??) Sag. Many of the vids I've seen the lexan was either in an oven or heated from underneath with foil on top to trap the heat above for more even heat absorbtion.
03-03-2016, 04:13 AM
#337
Tech Regular
I think I will experiment with a heating-from-below rig. Now the plastic moves away from the heat when is sags, heating from below will get it closer to the heat source, that might be better.
I found this clip:
Seems a pretty good way of doing it.
Hugo
I found this clip:
| + YouTube Video | |
Seems a pretty good way of doing it.
Hugo
03-05-2016, 08:39 PM
#338
I think I will experiment with a heating-from-below rig. Now the plastic moves away from the heat when is sags, heating from below will get it closer to the heat source, that might be better.
I found this clip:
Seems a pretty good way of doing it.
Hugo
I found this clip:
| + YouTube Video | |
Seems a pretty good way of doing it.
Hugo
Honestly I think your shell looks pretty good.
03-05-2016, 10:27 PM
#339
Tech Regular
Thanks for your reply. I will try heating from below to see if it makes a difference. I think in the current set-up the lexan moves away from the heat, heating from below will reverse that.
My new vacuumtable will have hardly any internal volume, and I have my eye on an old vacuum cleaner which I can take apart. I want to fit the pump directly to the table, again reducing volume and resistance. I hope to get it working without tanks and plumbing.
I am also experimenting with making moulds directly from MDF. My current models are made from balsa, contra mould from silicone, and final mould cast from resin or plaster. Here's my first attempt under way, a simple F1:

So far it goed fairly quick and well, but detailing seems more difficult.
Hugo
My new vacuumtable will have hardly any internal volume, and I have my eye on an old vacuum cleaner which I can take apart. I want to fit the pump directly to the table, again reducing volume and resistance. I hope to get it working without tanks and plumbing.
I am also experimenting with making moulds directly from MDF. My current models are made from balsa, contra mould from silicone, and final mould cast from resin or plaster. Here's my first attempt under way, a simple F1:
So far it goed fairly quick and well, but detailing seems more difficult.
Hugo
03-07-2016, 05:47 AM
#340
I think I will experiment with a heating-from-below rig. Now the plastic moves away from the heat when is sags, heating from below will get it closer to the heat source, that might be better.
I found this clip:
Seems a pretty good way of doing it.
Hugo
I found this clip:
| + YouTube Video | |
Seems a pretty good way of doing it.
Hugo
03-10-2016, 08:35 PM
#341
I'm going to try this for a couple of out-of-production Tamiya shells I have. Tried to make a buck of my last 911 GT1 shell but had a horrible time getting the old shell to release (it has many under cuts / details on front and back). Clearly two piece buck is the way to go.
03-15-2016, 01:31 PM
#342
Tech Initiate
iTrader: (4)
any one still doing this? if so, anyone want to pull me a few? i have a plug that ive been working on and was hoping someone would pull it for me. it a body for 1:8 hyper 9e. the bodies they made for that car are hard to come by, and they never really fit well. i was hoping some one would pull some bodies and chassis trays for me. ill just ship you the plugs i have made and pay you.
03-28-2016, 12:20 AM
#343
Tech Regular
What's the best way to repair small imperfections in plaster of paris molds? I made some copies of bodies but there's just a couple of places that need a touch up.
03-28-2016, 06:05 AM
#344
04-14-2016, 12:50 PM
#345
Tech Regular
What temperatures are you guys using?
Specifically the pre drying temp and time.
Specifically the pre drying temp and time.