


Paintman's Pit Trailer Project
 05-25-2010, 09:10 PM
#16
Ok, so the insulation, walls and cabinets are now complete.
Next step was the flooring, I researched long and hard on this as I really like the G-Floor that Ted put down in his trailer.
http://i263.photobucket.com/albums/i...l/101_2792.jpg
But I was leaning towards putting down Herculiner (truck bed liner) because I thought it would produce a slip resistant and heavy duty floor covering. After talking with a ton of people and even the Line-X guy in Lawrenceville I decided against it. One reason was the overall cost, I was probably looking at about $800-$1000 to cover the entire floor.
So I chose to go with the commercial carpet from Home Depot, its a mix between Charcoal and Grey. I began installing the carpet on the right wall, I used a combination of flooring adhesive and staples to attach the carpet to the walls.

I got the passenger side wall done and I figured something out, I am NOT a carpet man. To all you guys that do this for a living, I TRULY take my hat off to you. If I had to make my living as a carpet man I would be in some serious trouble, because I suck!

Then main floor was a little bit easier but still fun.


The carpeting of the ramp turned out better then the rest of the trailer, I am sure because it was a mere quick, straight and flat cut LOLOL.

After I glued and stapled the floor carpeting down, I re-installed the tie downs. I cut the carpet enough to allow the tie down to re-seat itself in the hole and re-bolted them to the floor.

Starting on the opposite wall and pulling the electrical through the opening in the carpet where the AC distribution box is going to be installed.

Finished on the one side, turned out not to bad. There are a few uh-oh spots though hehe.

Finishing up on the other side.

I made a little platform in the rear of the trailer where the storage cabinet is going to be installed. I had to do this as my trailer has a beaver tail ramp for easier loading. Here I am starting to carpet it, boy was this a fun little project all by itself. lol

The picture here was a little dark but it shows the aluminum trim that was reinstalled after the carpet was put down on the floor. I love the ATP they used for the step, I had asked the guys at the factory if they had any ATP scraps that I could take with me but unfortunately they didn't or wouldn't give me any heheh. Just my luck.

Next step was the flooring, I researched long and hard on this as I really like the G-Floor that Ted put down in his trailer.
http://i263.photobucket.com/albums/i...l/101_2792.jpg
But I was leaning towards putting down Herculiner (truck bed liner) because I thought it would produce a slip resistant and heavy duty floor covering. After talking with a ton of people and even the Line-X guy in Lawrenceville I decided against it. One reason was the overall cost, I was probably looking at about $800-$1000 to cover the entire floor.
So I chose to go with the commercial carpet from Home Depot, its a mix between Charcoal and Grey. I began installing the carpet on the right wall, I used a combination of flooring adhesive and staples to attach the carpet to the walls.
I got the passenger side wall done and I figured something out, I am NOT a carpet man. To all you guys that do this for a living, I TRULY take my hat off to you. If I had to make my living as a carpet man I would be in some serious trouble, because I suck!
Then main floor was a little bit easier but still fun.
The carpeting of the ramp turned out better then the rest of the trailer, I am sure because it was a mere quick, straight and flat cut LOLOL.
After I glued and stapled the floor carpeting down, I re-installed the tie downs. I cut the carpet enough to allow the tie down to re-seat itself in the hole and re-bolted them to the floor.
Starting on the opposite wall and pulling the electrical through the opening in the carpet where the AC distribution box is going to be installed.
Finished on the one side, turned out not to bad. There are a few uh-oh spots though hehe.
Finishing up on the other side.
I made a little platform in the rear of the trailer where the storage cabinet is going to be installed. I had to do this as my trailer has a beaver tail ramp for easier loading. Here I am starting to carpet it, boy was this a fun little project all by itself. lol
The picture here was a little dark but it shows the aluminum trim that was reinstalled after the carpet was put down on the floor. I love the ATP they used for the step, I had asked the guys at the factory if they had any ATP scraps that I could take with me but unfortunately they didn't or wouldn't give me any heheh. Just my luck.
Last edited by davidpai; 05-26-2010 at 06:18 AM.
 05-25-2010, 09:23 PM
#17
This is probably the best BLINGAGE (taken from Ted ) that I have in the trailer so far, I know a jam up metal fabricator that is the bomb.
I asked him to come up with something that would cover the springs and wheels for the ramp door and this is what he brought forth from the pits of his forge.

Diamond Plate, aka ATP but this stuff is like 1/8" thick. This isnt that peel and stick stuff you see on the cars and trucks in the parking lot of a Auto Zone or Stuckys.


After I got the trailer back from my metal guy I installed the storage cabinet on the platform I had built to level it out in the rear of the trailer.

The cabinet came with corner protectors that for most intensive purposes looked like corner "L" brackets.

So I used them for just that, a bracket to attach the cabinet to the trailer wall.

Next, I installed the AC distribution box and wired it out. Here are a few photos of the finished product. Any electricians out there, let me know if you see anything wrong or hazardous!! Like Ted my dad is the electrician I am the phone guy, and he is West Virginia at the moment and unable to lend a hand.


I asked him to come up with something that would cover the springs and wheels for the ramp door and this is what he brought forth from the pits of his forge.
Diamond Plate, aka ATP but this stuff is like 1/8" thick. This isnt that peel and stick stuff you see on the cars and trucks in the parking lot of a Auto Zone or Stuckys.
After I got the trailer back from my metal guy I installed the storage cabinet on the platform I had built to level it out in the rear of the trailer.
The cabinet came with corner protectors that for most intensive purposes looked like corner "L" brackets.
So I used them for just that, a bracket to attach the cabinet to the trailer wall.
Next, I installed the AC distribution box and wired it out. Here are a few photos of the finished product. Any electricians out there, let me know if you see anything wrong or hazardous!! Like Ted my dad is the electrician I am the phone guy, and he is West Virginia at the moment and unable to lend a hand.
05-25-2010, 09:27 PM
#18

Looking good!
I hope you used a kick stretcher on the carpet before finishing it in there, otherwise the carpet will get loose as it wears in. did you only use staples or did you glue it down as well? if it is glued then this wont be as big of a deal but it could still happen (wrinkle).
I hope you used a kick stretcher on the carpet before finishing it in there, otherwise the carpet will get loose as it wears in. did you only use staples or did you glue it down as well? if it is glued then this wont be as big of a deal but it could still happen (wrinkle).
05-25-2010, 09:28 PM
#19
I am going to use light bridges like Ted used in his trailer as well. I thought long and hard about this as well but in the end I know that it is going to be a better option then what I originally had in mind with wall cabinets and underneath lighting.

While there are a number of things in this trailer that have been created in my brain, I have studied Ted and Paul's trailer builds on the forum. Not to mention everyone else's trailer that I have been able to get my head into to peek and look around. The light bridges are a direct result of what I saw on Ted's trailer posting and I definitely want to say thanks to him for the ideas that I borrowed? heheh took? stole? heheheh

Squaring up and evening out the length of each bridge.

Using the same piano hinge's that Ted used I cut them into strips of 6" and then attached them to the bridge after pre-drilling the holes for the screws.

After I assembled the bridges I went out bought some aluminum flashing and began to re-create exactly what I saw from Ted. I dont have deep pockets like Ted so I wasnt able to use ATP to cover the bridges. After I cut out the flashing and attached it to the bridge I just didnt like the way the cuts distorted the metal around the edges.
So I thought and thought, then I went back to square one and called my metal guy and this is what we came up with.........

The pictures really don't do it justice but basically he made me a sheet metal cover for the bridges. After he crafted them, he went back and took a special scotch-brite pad and finished the surface to look like a brushed aluminum. I was amazed when I first saw them.

I used Liquid Nails again to adhere the metal to the wood, clamping it to make a good bond and then let it set overnight to cure.


I know its hard to tell from this photo but I have installed one of the rolling carts on the left and framed up the first counter top in the nose of the trailer. I was having some camera difficulty last night so I will get that worked out and get some better pics uploaded soon.

So, this is where I currently stand at this date and time. This is where I have lived and breathed for the last two months with the exception of work and both my daughter's softball games (CRAZY!!). This is why I haven't been seen at the track.
I need to install the light bridges and wire them up, install the A/C on the roof and wire it out, and complete the counter tops.
This should bring me to race ready! I am fully planning on being at the GCS in Pine Land this month so I hope everything comes together for Nick and myself. Although he hasn't been pictured here in the trailer build he is my right hand gopher on the trailer hehehe.
While there are a number of things in this trailer that have been created in my brain, I have studied Ted and Paul's trailer builds on the forum. Not to mention everyone else's trailer that I have been able to get my head into to peek and look around. The light bridges are a direct result of what I saw on Ted's trailer posting and I definitely want to say thanks to him for the ideas that I borrowed? heheh took? stole? heheheh
Squaring up and evening out the length of each bridge.
Using the same piano hinge's that Ted used I cut them into strips of 6" and then attached them to the bridge after pre-drilling the holes for the screws.
After I assembled the bridges I went out bought some aluminum flashing and began to re-create exactly what I saw from Ted. I dont have deep pockets like Ted so I wasnt able to use ATP to cover the bridges. After I cut out the flashing and attached it to the bridge I just didnt like the way the cuts distorted the metal around the edges.
So I thought and thought, then I went back to square one and called my metal guy and this is what we came up with.........
The pictures really don't do it justice but basically he made me a sheet metal cover for the bridges. After he crafted them, he went back and took a special scotch-brite pad and finished the surface to look like a brushed aluminum. I was amazed when I first saw them.
I used Liquid Nails again to adhere the metal to the wood, clamping it to make a good bond and then let it set overnight to cure.
I know its hard to tell from this photo but I have installed one of the rolling carts on the left and framed up the first counter top in the nose of the trailer. I was having some camera difficulty last night so I will get that worked out and get some better pics uploaded soon.
So, this is where I currently stand at this date and time. This is where I have lived and breathed for the last two months with the exception of work and both my daughter's softball games (CRAZY!!). This is why I haven't been seen at the track.
I need to install the light bridges and wire them up, install the A/C on the roof and wire it out, and complete the counter tops.
This should bring me to race ready! I am fully planning on being at the GCS in Pine Land this month so I hope everything comes together for Nick and myself. Although he hasn't been pictured here in the trailer build he is my right hand gopher on the trailer hehehe.
05-25-2010, 09:31 PM
#20
Man I thought I was going to knock out a ton of stuff this past weekend, boy was I wrong.
Mother's Day was already planned, but three softball games, yard work (wife) and a truck load of mulch had other plans.
Anywho, I got back to work on the trailer Monday evening after work and got the 75% of the lights up.


I used a piece of leftover 3/8" plywood to connect the two bridges together here.

Two lights up and installed one to go on the left side!

I know its hard to tell but three lights up on the left side and all wired in ready to taste some kilowatts.
Mother's Day was already planned, but three softball games, yard work (wife) and a truck load of mulch had other plans.
Anywho, I got back to work on the trailer Monday evening after work and got the 75% of the lights up.
I used a piece of leftover 3/8" plywood to connect the two bridges together here.
Two lights up and installed one to go on the left side!
I know its hard to tell but three lights up on the left side and all wired in ready to taste some kilowatts.
05-25-2010, 09:31 PM
#21
Looking good!
I hope you used a kick stretcher on the carpet before finishing it in there, otherwise the carpet will get loose as it wears in. did you only use staples or did you glue it down as well? if it is glued then this wont be as big of a deal but it could still happen (wrinkle).
I hope you used a kick stretcher on the carpet before finishing it in there, otherwise the carpet will get loose as it wears in. did you only use staples or did you glue it down as well? if it is glued then this wont be as big of a deal but it could still happen (wrinkle).
05-25-2010, 09:34 PM
#22
Back at it again this evening,

I started the evening by cutting a hole in the roof.:

Is that suppose to look like that?

Next, I positioned the AC unit (Coleman Mach 15) over the opening.

Checking to make sure it lines up properly and is level as can be on a aluminum roof. LOL

Installed the mounting brace and Ceiling Assembly.

And what do you know I have AC!
I started the evening by cutting a hole in the roof.:
Is that suppose to look like that?
Next, I positioned the AC unit (Coleman Mach 15) over the opening.
Checking to make sure it lines up properly and is level as can be on a aluminum roof. LOL
Installed the mounting brace and Ceiling Assembly.
And what do you know I have AC!
05-25-2010, 09:35 PM
#23

WE HAVE LIGHTS and AC! Still need to hang one more light bridge and two lights on the right side but this will probably have to do until after GCS #4, I need to get a counter top up!

Funny how the family comes a runnin when the camera comes out, but when its time to hold something up for dear ole dad, all you hear is .......
<cricket sounds> <cricket sounds> <cricket sounds>
05-25-2010, 09:37 PM
#24
Looking good!
I hope you used a kick stretcher on the carpet before finishing it in there, otherwise the carpet will get loose as it wears in. did you only use staples or did you glue it down as well? if it is glued then this wont be as big of a deal but it could still happen (wrinkle).
I hope you used a kick stretcher on the carpet before finishing it in there, otherwise the carpet will get loose as it wears in. did you only use staples or did you glue it down as well? if it is glued then this wont be as big of a deal but it could still happen (wrinkle).
I didn't stretch it so we shall see how it goes.
Keep your fingers crossed!
 05-25-2010, 09:52 PM
#25
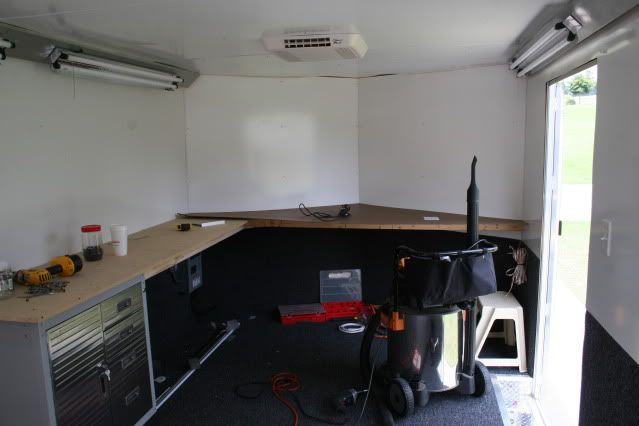
While I am not complete, I was able to get the wood down for the counter tops before the Pineland GCS. We were able to make the race and the trailer worked like a CHARM.
I can't wait to get the trailer a little more user friendly.
Here are some pics of the counter tops going in...
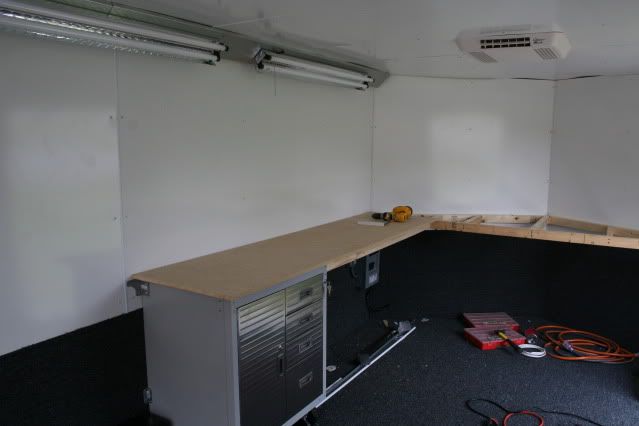
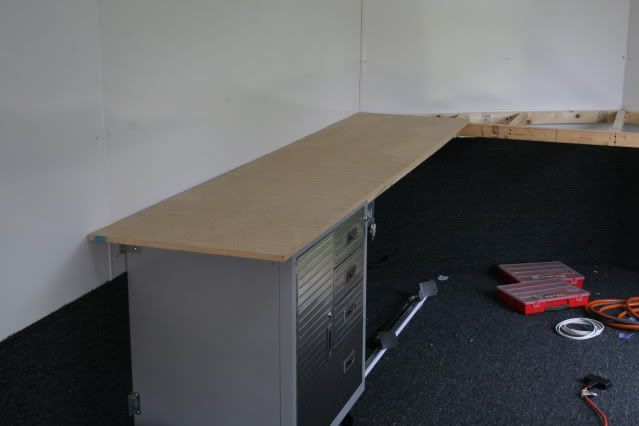
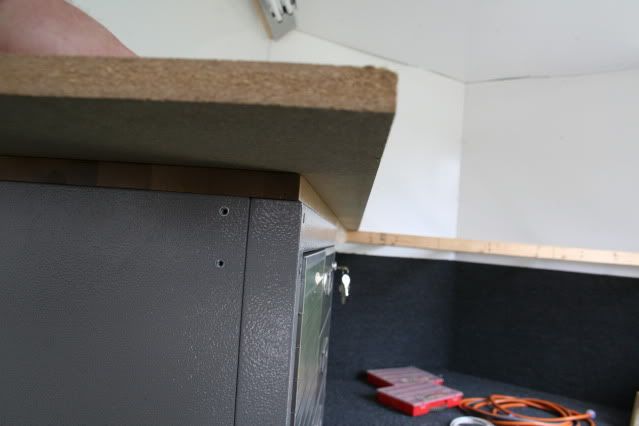
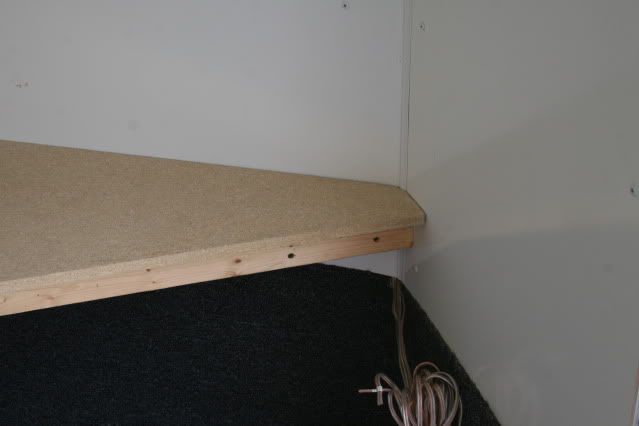
Decided to go with a 22" deep counter instead of the 24" as I think the overhang was a better fit.
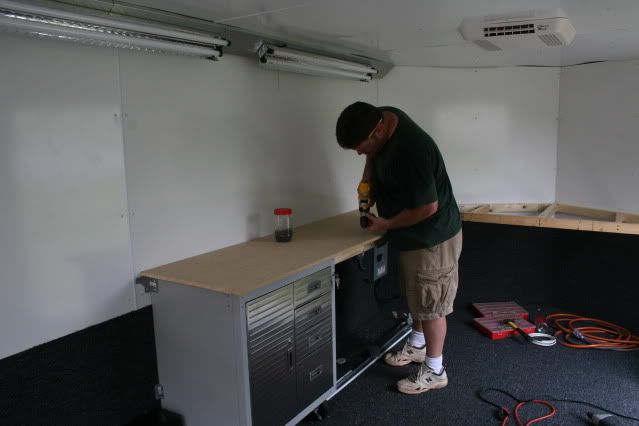
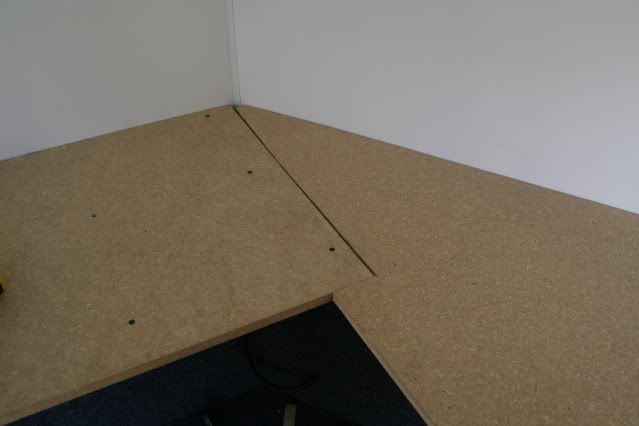
Securing the top.
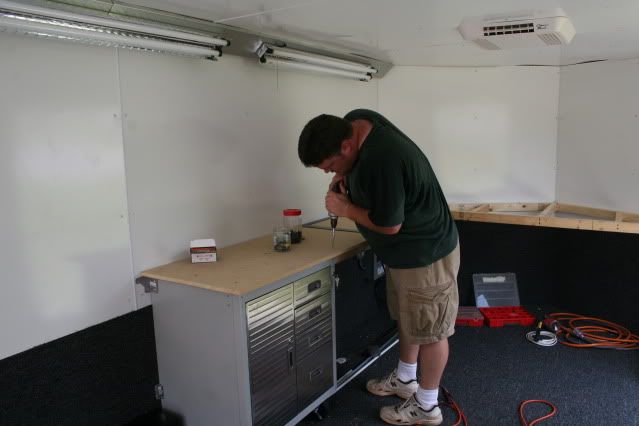
I used a spare piece of tile board as a template when I started measuring the V-nose for the counter top. This turned out to be a little tricky, but after taking some time measuring three times I was able to get it to fit pretty nice.
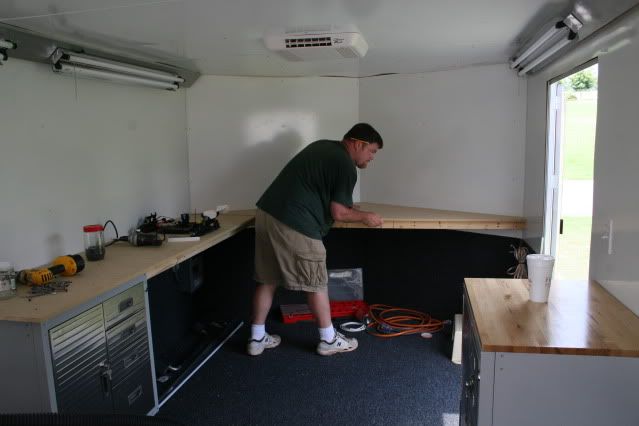
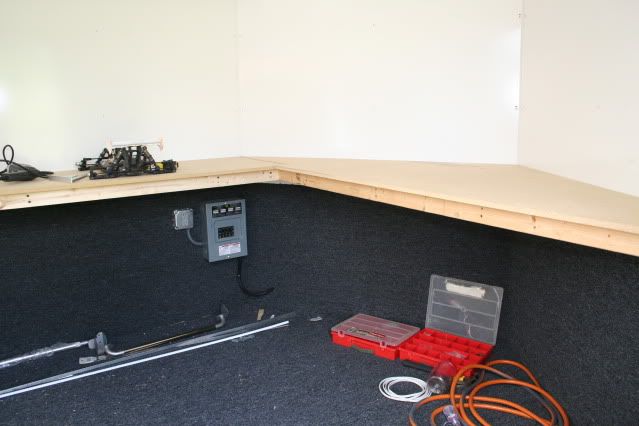
I am looking at different options of supporting the counters in the V-nose, but I think after I partition off the space for the refrigerator that may be plenty of support for the entire front of the V-nose counter.
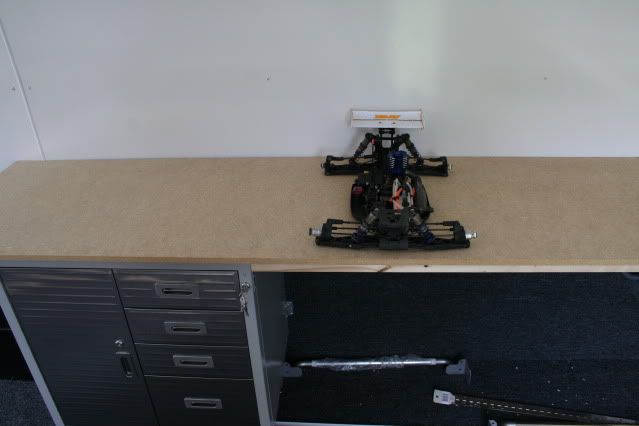
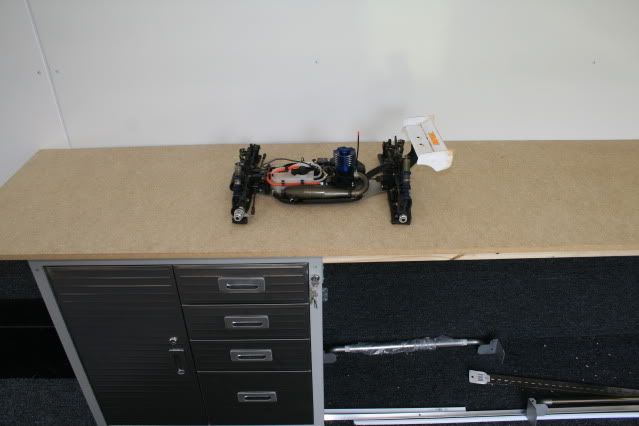
A few pics with the ole X-ray Truggy.....
I can't wait to get the trailer a little more user friendly.
Here are some pics of the counter tops going in...
Decided to go with a 22" deep counter instead of the 24" as I think the overhang was a better fit.
Securing the top.
I used a spare piece of tile board as a template when I started measuring the V-nose for the counter top. This turned out to be a little tricky, but after taking some time measuring three times I was able to get it to fit pretty nice.
I am looking at different options of supporting the counters in the V-nose, but I think after I partition off the space for the refrigerator that may be plenty of support for the entire front of the V-nose counter.
A few pics with the ole X-ray Truggy.....
05-25-2010, 09:56 PM
#26
Sounds good. i know it is a little late for this but there is a forum i am on that deals with constructing trailers for camping and stuff.. it has a wealth of knowledge for techniques and asst other tricks in building these..
http://www.mikenchell.com/forums/index.php
check it out they might be able to help ya with the ac mounting if just to reassure you
http://www.mikenchell.com/forums/index.php
check it out they might be able to help ya with the ac mounting if just to reassure you
05-26-2010, 06:15 AM
#27
Sounds good. i know it is a little late for this but there is a forum i am on that deals with constructing trailers for camping and stuff.. it has a wealth of knowledge for techniques and asst other tricks in building these..
http://www.mikenchell.com/forums/index.php
check it out they might be able to help ya with the ac mounting if just to reassure you
http://www.mikenchell.com/forums/index.php
check it out they might be able to help ya with the ac mounting if just to reassure you
