


 2Likes
3 Racing Sakura D3 CS Drift
 05-30-2013, 01:53 PM
#1876
Tech Initiate
I have the ssg lower deck and shock towers.. Just waiting for the upper and transverse kit to arrive at my LHS.
I showed my LHS the kit once it was all assembled (they hadn't seen a d3 hopped up yet) and they were stumped when I explained what was going on.
I've managed to make a small battery holder that mounts to the chassis with 2 screws and nilocks so I've kinda sorted out how to remove the battery fairly easy. I'm still not happy that I've had to remove the centre post to do it as I'm worried it will make the chassis too flexy.
I don't know if its lack of experience on my part, but I'm finding that I cannot transition the car from one direction to another without It A: completely spinning around after the first drift or B: the front end completely understeers and I just end up going straight after a drift with the wheels pointing in the direction I want to go. I can't seem to find a happy medium :S
I have stock springs front and rear, 50wt oil front and 30wt oils rear. Standard CS pulleys.
Any info would be a great help!
I have stock springs front and rear, 50wt oil front and 30wt oils rear. Standard CS pulleys.
Any info would be a great help!
Either way, the key to Result 'A' is throttle control. There are many, many things that you can do to the car's setup to alter how it behaves through transitions, but none have a greater impact than driver inputs. It's very easy to get too much momentum going on the far side of a transition by using too much throttle and/or too much steering to initiate a transition in the first place. Then of course, the natural reaction is to countersteer hard and ease off the throttle to get under control, but the result is the opposite and the car spins out. Again, there are ways to alter the behavior and widen the performance envelope, but the driver will always need to anticipate and avoid this scenario no matter the setup.
CS drifting is far more about anticipation than reaction. Control inputs have to occur well in advance of the desired result at the car. It sounds obvious enough, but it takes everyone a bit of time to actually get a handle on what it means, especially because the amount of time lag varies constantly depending on what the car is doing at any given time.
For example, when I first started with this car, I kept spinning out after transitions too. I figured that I needed more steering angle and more rear traction to catch the over-rotation, which did help to some degree. My "Aha" moment came when i realized that even though I had more steering angle to catch it, it actually tended to over-rotate faster than before. The reason was because I was being too heavy handed with the throttle through the transition and too late to get my steering back to neutral through the crossover. So the extra steering angle and traction just magnified the problem. I had to get down to the fundamentals.
I practiced a lot doing figure 8's around 2 cones in a typical garage with smooth concrete. I focused on going very slow, trying to keep the front wheels at the speed of travel and thus from losing traction, and letting the CS ratio do the work of kicking the rear out. I found that I had to initiate the transition with a gentle, momentary blip on the throttle at full CS lock about 120* before the middle of the figure 8 to get it to transition where I wanted. The slight momentary acceleration would load up the rear suspension, and the rebound would set off the transition. Once the weight transfer occurred and the transition appeared imminent, I had to gently ease off the throttle so that the rear wheel speed roughly matched the car's forward speed, while continually steering the wheels in the direction the car was traveling, even as it was rotating. Basically floating through the crossover, instead of allowing the overdriven rear to whip the tail faster. Once it crossed over, I would throttle back up to the pre-transition level, CS-ing around the other side of the 8. In a controlled manner like this, it didn't take long to train my fingers and brain to anticipate when and how much to do what to make the car do what I wanted. When done properly, it would look as though the car was swinging around the front wheels, which were just driving around the 8 without sliding. The throttle changes were so small that I could barely hear the difference.
After a few battery packs of repetition, the muscle memory set in and drifting larger areas at higher speeds became much more intuitive. The setup changes became more about changing the car to my preferences, not trying to 'fix' its inherent flaws, and there definitely are some.
Let me know whether you have a FOW and what kind of surface you drift on and I can make more specific suggestions. Spring and oil weight changes certainly have an effect here, but they are more subtle than most people expect. It is however very important with this car to ensure that you have enough down travel (droop), especially in the rear. With 10* of caster up front, the leading front wheel pushes downward into the ground (Jacking) as it turns in, thus increasing the cross-weighting on the diagonal, trailing rear wheel. This correspondingly reduces the wheel loading on the other 2 wheels; the trailing front wheel, and more importantly, the leading rear wheel. Without enough droop in the rear, the wheel loading on the leading rear wheel can approach zero and even literally be lifted off the ground. This tends to happen abruptly as the steering approaches full lock. The result is an increased tendency to spin out and to get stuck in low speed drift-lock (where you have to nearly stop to change direction). Put your car on an elevated flat surface (so you can look across the surface) at it's normal ride height. Very closely watch the rear wheel contact patches as you steer lock to lock with the controller. Watch how much the chassis rolls and how much each spring compresses, then compare the front to back. This will tell you a whole lot about what's happening when the car spins out.
 05-31-2013, 03:37 AM
#1877
Tech Addict
iTrader: (37)
caseymacgyver: that was quite possibly the best advice I've ever been given in rc! I really appreciate the help as CS drifting is totally new to me.
So far I am using a FOW. I installed it as soon as I got the car as I always used FOW's in my 50:50 drift cars.
I plan to pick up the sakura spring set over the weekend so ill have a good choice of springs to tune it a bit more.
Currently I'm drifting in my garage which is smooth concrete... But I'm also drifting outside my place which is a rough bitumen. I plan to drift on a smooth bitumen in the coming days too.
As far as the chassis with longitude battery mounting... I have only had a quick go with it and there is a major difference in how it handles. Don't know if its a good difference though lol. I'm waiting for the transverse kit to arrive at my LHS, can someone tell me how far forward the battery can be fitted to the chassis with this kit?
I'm also wondering with the centre post removed, will the battery act as a brace as it is such a snug fit between the top and bottom decks.....?
Last edited by slyts6; 05-31-2013 at 03:52 AM.
05-31-2013, 09:05 AM
#1878
Tech Regular
iTrader: (3)
caseymacgyver: that was quite possibly the best
As far as the chassis with longitude battery mounting... I have only had a quick go with it and there is a major difference in how it handles. Don't know if its a good difference though lol. I'm waiting for the transverse kit to arrive at my LHS, can someone tell me how far forward the battery can be fitted to the chassis with this kit?
I'm also wondering with the centre post removed, will the battery act as a brace as it is such a snug fit between the top and bottom decks.....?
Now that my D3 is fully hopped up, (plus the KPI mod) I like it a lot, most of the nuances have been worked out...and I am learning more and more to drive it better. Practice, practice, practice.
05-31-2013, 03:24 PM
#1879
Tech Addict
iTrader: (37)
it should definitely be part of that support since the top deck will be resting on the battery..it is a pretty snug fit. But I stuck with the optional battery holder and have been happy with the results.
Now that my D3 is fully hopped up, (plus the KPI mod) I like it a lot, most of the nuances have been worked out...and I am learning more and more to drive it better. Practice, practice, practice.
Now that my D3 is fully hopped up, (plus the KPI mod) I like it a lot, most of the nuances have been worked out...and I am learning more and more to drive it better. Practice, practice, practice.
I'm pretty sure the chassis is fine and I just need more wheel time.
05-31-2013, 03:41 PM
#1880
Tech Initiate
So far I am using a FOW. I installed it as soon as I got the car as I always used FOW's in my 50:50 drift cars.
I plan to pick up the sakura spring set over the weekend so ill have a good choice of springs to tune it a bit more.
Currently I'm drifting in my garage which is smooth concrete... But I'm also drifting outside my place which is a rough bitumen. I plan to drift on a smooth bitumen in the coming days too.
One important thing I learned about FOW's was to avoid abrupt throttle reductions while at a high steering angle, as it induced spin outs. The reason is partly due to the weight transfer forward, but also because the roll resistance of the front CVD's is significant at high angles. The car spins because the front is being slowed down while the rear has momentum and no traction. Even though the FOW is allowing the outdrives to freewheel, the front wheels act like a drag brake. I had to learn to always maintain a little bit of throttle to keep the front wheels rolling at all times and use the FOW primarily to allow the rear wheels to overdrive the front when needed. Basically, not so ON/OFF with the throttle, but always gradual.
Spot on with the spring kit. You'll get it where you want it so much faster with the proper range. I've seen so many people crank down the adjustment collars because the springs are too soft, then use the droop screws to set the ride height, then wonder why the car spins out at lock. Big time no-no. Droop allows you to control which wheels gain and lose traction as the car pitches and rolls. Proper droop requires the proper springs.
On a smooth hard surface like a garage floor, you can run things a lot stiffer since you don't have to deal with surface variations aside from a seam or crack here and there. If oversteering is the biggest issue, I'd run stiffer up front (Blue) and zero droop (Despite the above, you could crank the collar down on the stock orange springs, and use the droop screws to preload them). 50wt oil is probably fine, but won't matter much with that little travel. The stiffness will help limit weight transfer forward, and zero droop will help transfer more weight to the rear at high steering angles. For the rear, I'd keep it soft (white or green) and move the lower mount as far inboard as possible to make the rear as soft as I could without it sitting on the deck. I'd probably thicken up the oil to 50wt, even 80wt, to slow down the rebound transition kick. The droop is a little trickier here. I'd want as much as possible to keep the rear wheels on the ground no matter what, but that's only helpful if the wheel stays flat. So, I'd want to get the roll center as low as possible, then set the camber to maximize the rear left and right contact patches when the steering is at lock and the chassis is rolled (Twisted). I'd lose some straight line traction in the rear, but gain a lot more consistency in how the rear handles in a drift.
As far as the chassis with longitude battery mounting... I have only had a quick go with it and there is a major difference in how it handles. Don't know if its a good difference though lol. I'm waiting for the transverse kit to arrive at my LHS, can someone tell me how far forward the battery can be fitted to the chassis with this kit?
It may seem like having the battery further back would cause the car to spin out more due to the more rearward COG and increased rotational inertia, but that weight also increases rear traction and decreases forward weight transfer. In my experience, adding more weight to the rear gave the tail end more bite and made the car less tail happy. I think the biggest benefit of the longitudinal mounting would be to reduce side-to-side body roll.
05-31-2013, 04:27 PM
#1881
Tech Initiate
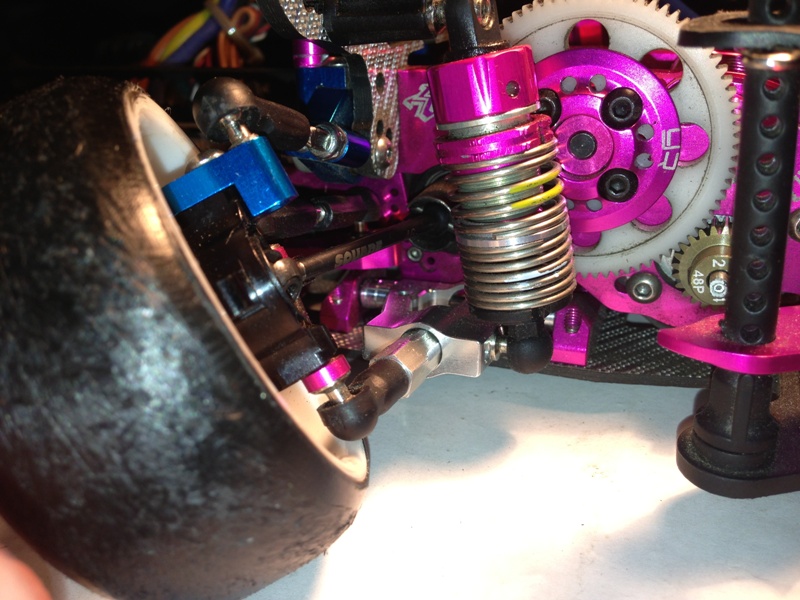
I had acquired aluminum arms from Broadtech.hk but have not tried to install them. They will fit. and will have a good amount of adjustment on them so you will be able to adjust your wheelbase (length between front and rear wheels?)
http://www.broadtech.hk/eagleshop/sh...px?id=3247V2P2
http://www.broadtech.hk/eagleshop/sh...px?id=3247V2P2
 Once I get longer dog bones in there, I'll be able to run even less total offset and get the scrub radius closer to center (= less rise/fall).
I did end up tapping a set screw on the hinge pin in the middle to lock it in place and get rid of some wiggle. Very smooth, very rigid, accurately adjustable, and highly repeatable. A perfect recommendation!
Thanks again Eunique!
 05-31-2013, 11:50 PM
#1882
Tech Addict
iTrader: (37)
These turned out to be exactly what I was looking for. Used a 3/4" 6-32 threaded hex standoff and a 12mm ball cup. The end result is completely rigid, identical left to right, has accurate track width adjustment (with spacers), and provides about 12* of caster (and/or wheelbase) adjustability with the assorted spacers provided. The wheel and shock clearance is excellent; no dremelling at all Once I get longer dog bones in there, I'll be able to run even less total offset and get the scrub radius closer to center (= less rise/fall).
I did end up tapping a set screw on the hinge pin in the middle to lock it in place and get rid of some wiggle. Very smooth, very rigid, accurately adjustable, and highly repeatable. A perfect recommendation!
Thanks again Eunique!
Once I get longer dog bones in there, I'll be able to run even less total offset and get the scrub radius closer to center (= less rise/fall).I did end up tapping a set screw on the hinge pin in the middle to lock it in place and get rid of some wiggle. Very smooth, very rigid, accurately adjustable, and highly repeatable. A perfect recommendation!
Thanks again Eunique!
That looks great! Are these custom made parts or bought from somewhere? Do you know where I can find a parts list for the kpi mod?
Talking about suspension... I noticed that there are only about 5 different springs available for the D3... Yet there are at least 9 for the zero. Would it be beneficial to buy zero shocks and the boxed spring set as opposed to the D3 springs?
06-01-2013, 08:47 AM
#1883
Tech Regular
iTrader: (3)
That looks great! Are these custom made parts or bought from somewhere? Do you know where I can find a parts list for the kpi mod?
Talking about suspension... I noticed that there are only about 5 different springs available for the D3... Yet there are at least 9 for the zero. Would it be beneficial to buy zero shocks and the boxed spring set as opposed to the D3 springs?
Talking about suspension... I noticed that there are only about 5 different springs available for the D3... Yet there are at least 9 for the zero. Would it be beneficial to buy zero shocks and the boxed spring set as opposed to the D3 springs?
The Zero shocks and springs are slightly shorter than the D3...so I think that it would not be beneficial to get the box setup for the Zero.
If you do...you will probably end up having to screw down the adjustable collars....it just might not be optimal. I ended up getting all the springs for the D3 and used those. (credit goes to Pickled for the blue and purple he uses for his setup)
06-01-2013, 10:13 AM
#1884
Tech Regular
iTrader: (3)
These turned out to be exactly what I was looking for. Used a 3/4" 6-32 threaded hex standoff and a 12mm ball cup.
I did end up tapping a set screw on the hinge pin in the middle to lock it in place and get rid of some wiggle. Very smooth, very rigid, accurately adjustable, and highly repeatable. A perfect recommendation!
Thanks again Eunique!
I did end up tapping a set screw on the hinge pin in the middle to lock it in place and get rid of some wiggle. Very smooth, very rigid, accurately adjustable, and highly repeatable. A perfect recommendation!
Thanks again Eunique!
So, you will be happy to know that I will be opening the adjustable aluminum arms and using them on my D3.
questions Caseymacgyver, where did you buy and if you have part numbers for the offset adaptor (on top of MST knuckle) and the threaded hex standoff you use on the arms?
Do I need to also puchase standard (or metric? threads look bigger) set screws which attach the ball end to the standoff?
also noticed your steering arms have thick aluminum spacers on top of the bearings...I'm assuming to further reduce the slop in the steering arms...is there anything in between the spacer and the bearings? (like another shim)?
06-01-2013, 07:34 PM
#1885

Anybody know what size bearings are need to run the SSK Driveshafts? TQ has all the replacement parts in stock to assemble the shafts but I need to know the outerbearing size.
http://www.tqrcracing.com/shop/produ....asp?p_id=4351
Also can the CF shock towers be used with the stock chassis?
http://www.tqrcracing.com/shop/produ....asp?p_id=4351
Also can the CF shock towers be used with the stock chassis?
Last edited by pettyeagles; 06-01-2013 at 08:12 PM.
06-01-2013, 10:47 PM
#1886
Tech Initiate
Anybody know what size bearings are need to run the SSK Driveshafts? TQ has all the replacement parts in stock to assemble the shafts but I need to know the outerbearing size.
http://www.tqrcracing.com/shop/produ....asp?p_id=4351
http://www.tqrcracing.com/shop/produ....asp?p_id=4351
Yes, no fitment issues at all. They will however make you want the Aluminum front bulkhead and covers, which will suddenly seem very flexy
 06-01-2013, 11:33 PM
#1888
Tech Initiate
http://www.tqrcracing.com/shop/produ....asp?p_id=5846
If I were to purchase, I'd use a metric, M3 threaded, 6mm hex standoff, about 16mm long, because I could use the provided spacers to widen it, but not narrow it. Something like, http://www.mcmaster.com/#cadinlnord/95947a048. I'd probably also order a couple of the 14mm lg. standoffs while I was at it, http://www.mcmaster.com/#cadinlnord/95947a045, and make sure to use a nice and thick M3 washer under the screw. May still need to knock down the hex points just a touch.
06-02-2013, 12:46 AM
#1889
Tech Initiate
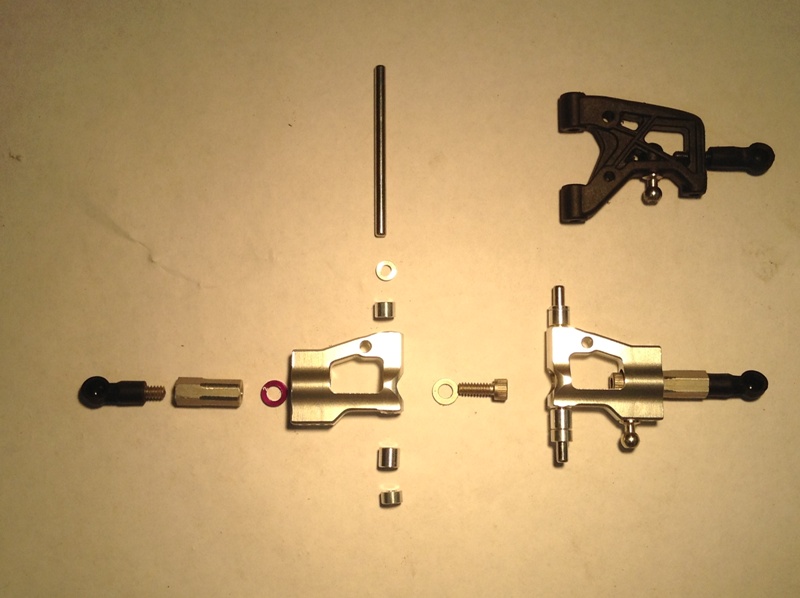
No and Yes. Specifically for the lower arms, they were an off-the-shelf set, with the lower pillow ball removed and replaced with a standard size hex standoff and ball cup. The goal here was to work out a robust solution that didn't require modification/fabrication, to reduce the potential for inaccuracy or asymmetry.
KPI is a bit of a different world from typical drifting, adding new degrees of tuneability to your steering. The key to being able to do KPI is using steering knuckles that have the ability to offset the steering axis from the wheel axis normal. MST is one of the few companies that currently offer that.
The other important key is that it requires that the C-hub be deleted, and the upper and lower arms are converted to simple ball joints, with fore/aft stability then coming from the arms themselves. There's a bit of a commitment here.
The most common method uses:
The MST aluminum steering knuckles are a bit pricey, but you won't regret it if you get them. You're not committed to KPI with the knuckles since you can always run 0*. But, once you convert to a front suspension with just an upper and lower ball floating, you'll have the ability to adjust to whatever you want. The aluminum ones are excellent quality and have short steering arms to give wider steering angles.
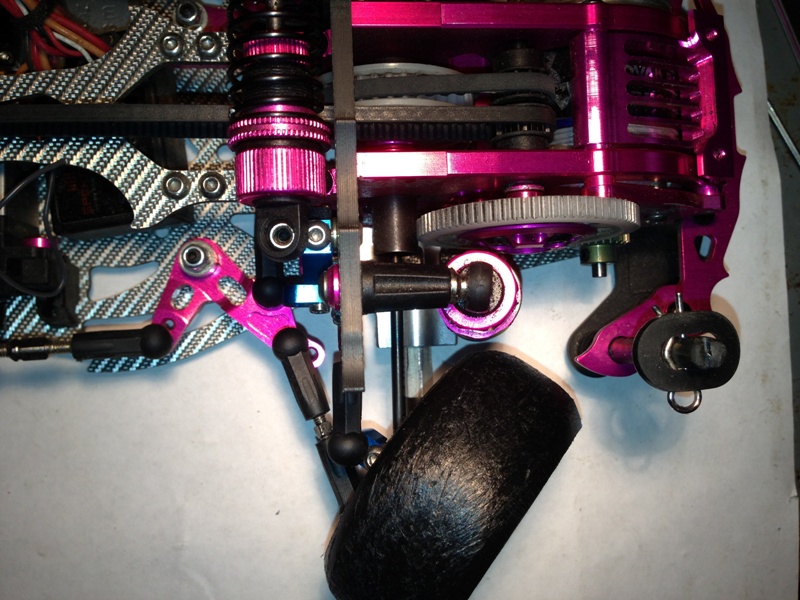
The aluminum lower arms in my pics are an add-on to the KPI mod. They replace the cutting/drilling/dremmeling of the stock lower arms. They also add the ability to adjust the caster by sliding the lower arm forward and back, since the Yokomo arm is fixed.
As Eunique said, the Zero springs will be useless to you. I know this because I accidentally ordered them at some point and they sit in a drawer. Too short and too stiff. I can say that even though there are 9 spring rates, they all have the same wire diameter (1.5mm), with only the number of turns differing among them by 0.25. So although they have more granularity, they actually cover a smaller range than the D3 springs, which have wire diameters ranging from 1.2mm - 1.4mm.
There should be 6 D3 springs (White, Green, Pink, Orange, Blue, Purple). With the number of lower damper positions available, they give a pretty decent range. The aluminum shocks are a worthwhile upgrade, but you can get 80% of the benefit for 15% of the cost by buying the machined Delrin damper pistons.
KPI is a bit of a different world from typical drifting, adding new degrees of tuneability to your steering. The key to being able to do KPI is using steering knuckles that have the ability to offset the steering axis from the wheel axis normal. MST is one of the few companies that currently offer that.
The other important key is that it requires that the C-hub be deleted, and the upper and lower arms are converted to simple ball joints, with fore/aft stability then coming from the arms themselves. There's a bit of a commitment here.
The most common method uses:
- Yokomo Type-C 'Parts' Upper Suspension Arms - Banzai hobby
- MST I PARTS-wheel hubs 210008 (Plastic) OR MST Short Arm Steering Hub, 210239 (Aluminum) - Ebay
- MST CVA wheel axle (2 PCS) 310006 - Ebay
- SQUARE Universal Shaft 46mm:OTA R31 from Broadtech.hk, Banzai, RCMart, etc...
- 2 20mm set screws
- 2 10X15X4mm bearing
The MST aluminum steering knuckles are a bit pricey, but you won't regret it if you get them. You're not committed to KPI with the knuckles since you can always run 0*. But, once you convert to a front suspension with just an upper and lower ball floating, you'll have the ability to adjust to whatever you want. The aluminum ones are excellent quality and have short steering arms to give wider steering angles.
The aluminum lower arms in my pics are an add-on to the KPI mod. They replace the cutting/drilling/dremmeling of the stock lower arms. They also add the ability to adjust the caster by sliding the lower arm forward and back, since the Yokomo arm is fixed.
There should be 6 D3 springs (White, Green, Pink, Orange, Blue, Purple). With the number of lower damper positions available, they give a pretty decent range. The aluminum shocks are a worthwhile upgrade, but you can get 80% of the benefit for 15% of the cost by buying the machined Delrin damper pistons.
06-02-2013, 07:47 PM
#1890
I'm loving this chassis more and more. I replaced the rear 22t pulley with an 18t and it makes the car much easier to do long drifts. It still has enough CS with the 10.5 to run on the tightest of tracks. The best of both worlds!!! I'm still having some slop issues in the steering even with the aluminum steering rack. Seems like there is a lot of play on the side where the servo linkage attaches. It needs some shims in between the bearing and the bottom of the rack.