


 22Likes
Tekno RC EB48.3 Thread
 12-19-2016 | 12:20 PM
#2686
Tech Master
Joined: Oct 2014
Posts: 1,167
From: Maine
If your at the point where your going to do a complete tear down for next season, after a season long abuse. Maybe not. Then again, it may still make sense if you haven't heavily abused it (raced 2-3 times a week all summer long, plus some bashing)
The nice thing about the .4, is that yes, it has alot of new redesigned stuff. But close to have of the updates are putting in all the option parts for the .3 into the base .4 package. Along with some pretty smart changes along the way.
Yes, I can't wait to add one.
 12-19-2016 | 09:59 PM
#2687

Okay this kit is killing me... I stripped another screw just trying to back it out of the rear D-block and I have no idea how to get it out. It's ALL the way in. Anyone have any tips? I'm just really bummed out that once again I've got to stop the build due to a bad screw. Using MIP drivers as well.
*facepalm*
*facepalm*
 12-20-2016 | 07:14 AM
#2689
Tech Master
Joined: Oct 2014
Posts: 1,167
From: Maine
Okay this kit is killing me... I stripped another screw just trying to back it out of the rear D-block and I have no idea how to get it out. It's ALL the way in. Anyone have any tips? I'm just really bummed out that once again I've got to stop the build due to a bad screw. Using MIP drivers as well.
*facepalm*
*facepalm*
12-20-2016 | 07:25 AM
#2690
My only option when I did that was a dremel. If your lucky you can make a deep enough slot. I've also drilled the head out. and one time used the dremel enough that it made the head brittle. That one ended up with some cuts in the block to make it come off, but it was middle of the season, and I still run the block.
 thanks man
12-20-2016 | 07:32 AM
thanks man
12-20-2016 | 07:32 AM
#2691
Tech Fanatic
iTrader: (2)
Joined: May 2013
Posts: 855
From: Kingsport, TN (Still SC tho)
Okay this kit is killing me... I stripped another screw just trying to back it out of the rear D-block and I have no idea how to get it out. It's ALL the way in. Anyone have any tips? I'm just really bummed out that once again I've got to stop the build due to a bad screw. Using MIP drivers as well.
*facepalm*
*facepalm*
Some people have replaced these with the 2.5mm driver cap head screws (3mm by 40mm). They probably won't fit flush, but should work and be easier to install and remove.
12-20-2016 | 08:08 AM
#2692
Get a set of small metric grabits from Sears or a hardware store (I don't believe that is the name brand for Sears, etc., but they should know what you are talking about).
Some people have replaced these with the 2.5mm driver cap head screws (3mm by 40mm). They probably won't fit flush, but should work and be easier to install and remove.
Some people have replaced these with the 2.5mm driver cap head screws (3mm by 40mm). They probably won't fit flush, but should work and be easier to install and remove.
12-20-2016 | 08:17 AM
#2694
Joined: Dec 2011
Posts: 3,808
From: Texas
Drill it. Grab a bit that is slightly narrower than the screw head. Once you drill down a little ways, the head will pop off. Then you can just pull the d-block off and grab the remaining end of the screw with a pair of pliers to un-screw it. I've had to do that a couple of times on mine.
12-20-2016 | 08:21 AM
#2695
Drill it. Grab a bit that is slightly narrower than the screw head. Once you drill down a little ways, the head will pop off. Then you can just pull the d-block off and grab the remaining end of the screw with a pair of pliers to un-screw it. I've had to do that a couple of times on mine.
12-20-2016 | 08:59 AM
#2697
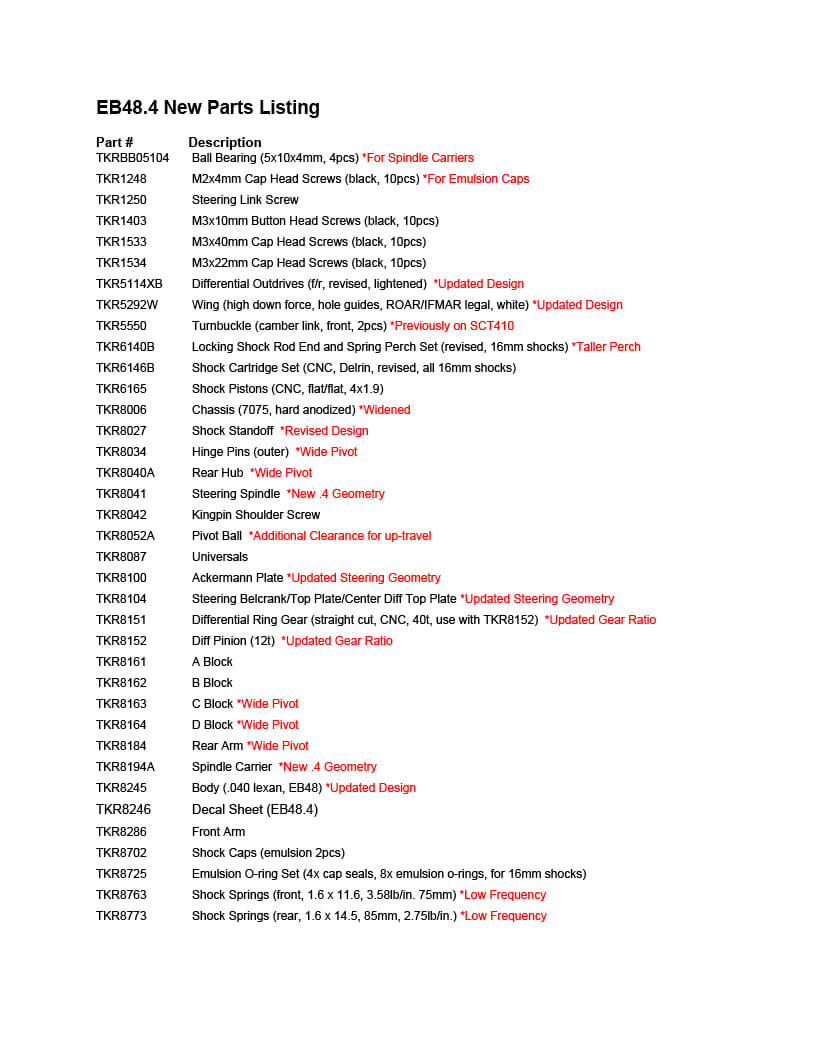
new car is coming with cap screws for that area with new hingepin blocks. Glad to see tekno updated that. I'll probably take out the long flat heads here and just put the caps in for my SCT410.3 as even though mine haven't stripped, just feels like a matter of time. Probably why the last car I got in had a bunch of extras for those screws.
12-20-2016 | 09:02 AM
#2698
Joined: Jan 2003
Posts: 8,616
From: New Jersey
going to a taller internal gear ratio should make the power delivery smoother to the ground. This change should allow for less wheel spin when the grip levels aren't high. Keep in mind that historically the NB and EB share the same drive train, so this will be magnified with a Nitro Motor, assuming that carries over. ( )
)
The standard 18-19 gearing for a 1900KV motor will shift to the 16-17 range. Remember as always, run a few min under race conditions and then temp your motor. Don't run 10 min and discover it's at 200 degrees. Do 3-4, temp it. Then let it cool and try 6-8. Extended it again to 8-10. Remember to let it cool in between runs and always simulate race conditions (charged pack, drive like you would race, not bash, etc.)
I haven't gotten a .4 yet, but everything everyone has told me is very positive.
) The standard 18-19 gearing for a 1900KV motor will shift to the 16-17 range. Remember as always, run a few min under race conditions and then temp your motor. Don't run 10 min and discover it's at 200 degrees. Do 3-4, temp it. Then let it cool and try 6-8. Extended it again to 8-10. Remember to let it cool in between runs and always simulate race conditions (charged pack, drive like you would race, not bash, etc.)
I haven't gotten a .4 yet, but everything everyone has told me is very positive.