


 12Likes
New Schumacher KF2

 07-29-2016, 08:27 AM - Wikipost
|
|||
|
|||

 11-22-2016, 03:46 AM
#1082
Well I do have the sway bar just cause I needed a bump up for shipping from Amain. lol
I'll have to think if when I changed to the alum camber block did I start to have my problems. I do have 4mm of spacers under that camber block to raise it back to where the stock carbon block would have had the ball studs. But I'll switch it back. Maybe it could now be the spacing between ball studs left to right. They do get wider between carbon and alum.
This Friday will be the next test.
11-22-2016, 06:43 AM
#1083

Well I do have the sway bar just cause I needed a bump up for shipping from Amain. lol
I'll have to think if when I changed to the alum camber block did I start to have my problems. I do have 4mm of spacers under that camber block to raise it back to where the stock carbon block would have had the ball studs. But I'll switch it back. Maybe it could now be the spacing between ball studs left to right. They do get wider between carbon and alum.
This Friday will be the next test.
I'll have to think if when I changed to the alum camber block did I start to have my problems. I do have 4mm of spacers under that camber block to raise it back to where the stock carbon block would have had the ball studs. But I'll switch it back. Maybe it could now be the spacing between ball studs left to right. They do get wider between carbon and alum.
This Friday will be the next test.
11-22-2016, 06:49 AM
#1084
I finally got to mount up the Slipper eliminator from RC Madness and it saves quite a bit over stock. Look for yourself.
By switching only that and trimming / cleaning up my wiring, I went from 1640g to 1580g. My goal is to get to 1540. I still have to add a fan though, so realistically I need to drop about 80-100g to net out around 1540.
Keep in mind that I still am running the Alum chassis too. Switching to the Carbon should save probably 40-50g alone
11-22-2016, 07:47 AM
#1085
I think right now I am using the #2, so I a assuming that means 2deg? I'll change out the camber link first, test, then swap to the #1 bit.
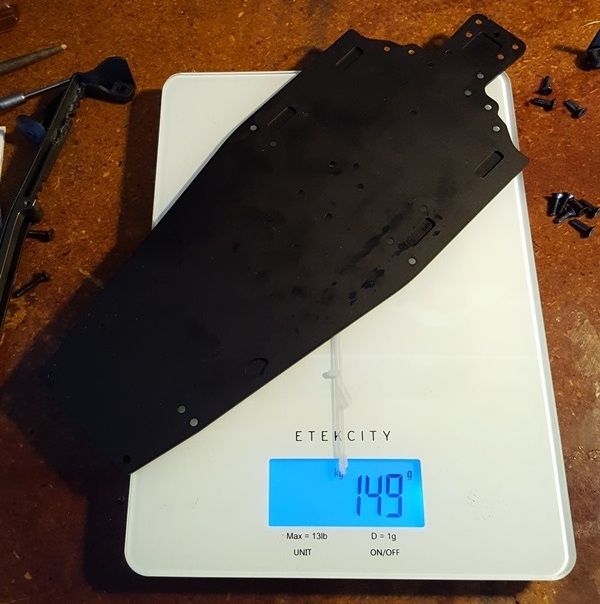
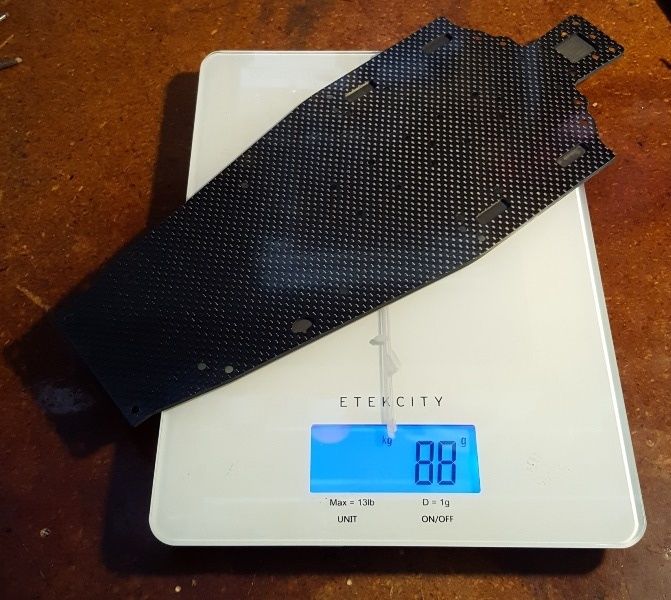
Btw, here is the difference between the aluminum chassis and the +7mm carbon chassis
Aluminum - 149g vs Carbon - 88g = 61g savings.
I am sure it is a slight more with the standard carbon chassis.
Btw, here is the difference between the aluminum chassis and the +7mm carbon chassis
Aluminum - 149g vs Carbon - 88g = 61g savings.
I am sure it is a slight more with the standard carbon chassis.
11-22-2016, 10:40 AM
#1086
it's not 'degree's. It goes by measurement from hole to hole. 2 Dink is the middle size and is 38.0mm hole to hole. This is the standard starting point and most widely used. The only other setting I've seen used was 33.5 (1 Dink)
The Alum doesn't have that option (42.5 and 33.5) which is why it's not widely used.
The Alum doesn't have that option (42.5 and 33.5) which is why it's not widely used.
11-22-2016, 10:47 AM
#1087
I meant degrees in the ainti-squat inserts, not the camber links.
11-22-2016, 12:04 PM
#1088
DOH!!!!!!
I feel dumb
yes, the number represents how many degrees of anti-squat you are running.
My suggestion is use the 1 insert, go run 5 clean laps and get your lap times. Then run the 3 insert and repeat. This will allow you to see the effect that Anti Squat has on your car and on the clock. I say go from 1 to 3 so it's a bigger jump and should make the effect that it has easier to see.
You can repeat the process with 1 and 2 to see which is better for you.
11-22-2016, 03:44 PM
#1089
Ok, I was at #2 for the anti squat inserts. Installed #1.
Carbon control link installed with 3mm spacers on ball studs per manual.
Come on Friday, get here!
Carbon control link installed with 3mm spacers on ball studs per manual.
Come on Friday, get here!
11-23-2016, 12:19 AM
#1091
Tech Rookie
Next things to do are to start adding weight around the very back of the chassis or even the rear brace. Take anything you can out of the front and if you haven't already flip the front bones.
I find it easier to get the weight back with less overall weight in the low grip layout.
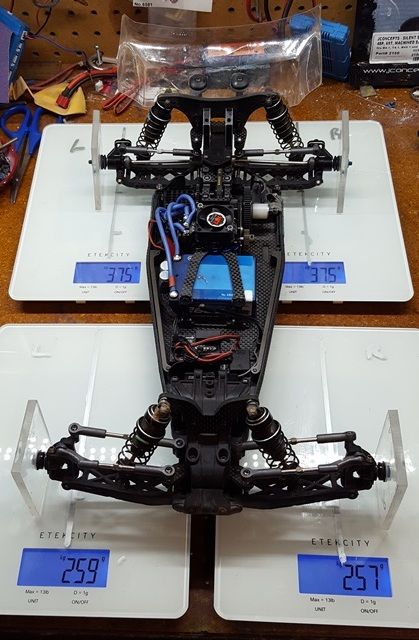
Also in the photo looks like your rear shocks are on the outer hole on the bone, that makes the rear pretty stiff and could cause it to break loose in turns.
11-23-2016, 06:20 AM
#1092
11-23-2016, 06:43 AM
#1093
If you're struggling for traction you need to look at your weight distribution, 59 rear is quite low. I'm surprised your only at 59 looking at your layout with the rear bones reversed and the ESC at the back.
Next things to do are to start adding weight around the very back of the chassis or even the rear brace. Take anything you can out of the front and if you haven't already flip the front bones.
I find it easier to get the weight back with less overall weight in the low grip layout.
Also in the photo looks like your rear shocks are on the outer hole on the bone, that makes the rear pretty stiff and could cause it to break loose in turns.
I can possibly move the receiver back along but not by much. Outside of that, I don't know what else there would be to move. I do have a full servo in there and not a shorty.
Do you mean flip the front arms like you can with the rear? Does that push the front wheels further forward? It looks like they come out pretty parallel, not like the rear that are offset.
Btw, the plastic plates that are mounted to the axles are each tared on their prospective scales before being added to the car, so they have no bearing on the weight of the car.
Last edited by Azzkikin; 11-23-2016 at 07:24 AM.
11-23-2016, 10:25 AM
#1094
Tech Rookie
Okay that makes sense, I usually measure with the wheels on, pros and cons of each way. For sure your reading would be further back with the wheels on, the rears being heavier.
Flipping the front bones makes about 2mm difference to wheel base, flipping them will help with rear traction. If you want traction, you need the rear bones flipped too, this is a huge change, about 8mm wheel base. I don�t think it drives as smooth with them flipped, but it�s a big help with traction.
Flipping the front bones makes about 2mm difference to wheel base, flipping them will help with rear traction. If you want traction, you need the rear bones flipped too, this is a huge change, about 8mm wheel base. I don�t think it drives as smooth with them flipped, but it�s a big help with traction.