


 3Likes
Basher BSR BZ-222 1/10 2WD thread
 11-17-2014, 05:33 PM
#91

 11-17-2014, 07:48 PM
#92
Tech Regular
My BZ-222 kit came today, so I measured a bunch of things. First the rear tires: on the left are some slightly worn Pro-Line Holeshots on TLR 22 rims, and on the right are the BZ-222 rears. They're the same dimensions and offset, so any buggy rear (B4.x, TLR 22 or 22-4 etc) will work:

The BZ rubber has pins about the same size as the Holeshots... just half as many of them and a pattern of small bars to make up for it. The rubber is slightly harder than the Pro-Lines but still felt good... but the BZ foams are much softer.
Here's the tires from the back. This is a bit of an optical illusion: the BZ rim is the same offset... however because the BZ rim is dished in from the outside it appears the webbing is shallower (and it is): but the hex is in the same place. The rear rims are mounted with a standard 7mm flanged M4 locknut.

Speaking of locknuts: here's the BZ front (left) and rear (right) wheel nuts. The fronts are 5.5mm nuts like you'd find mounting your shocks!
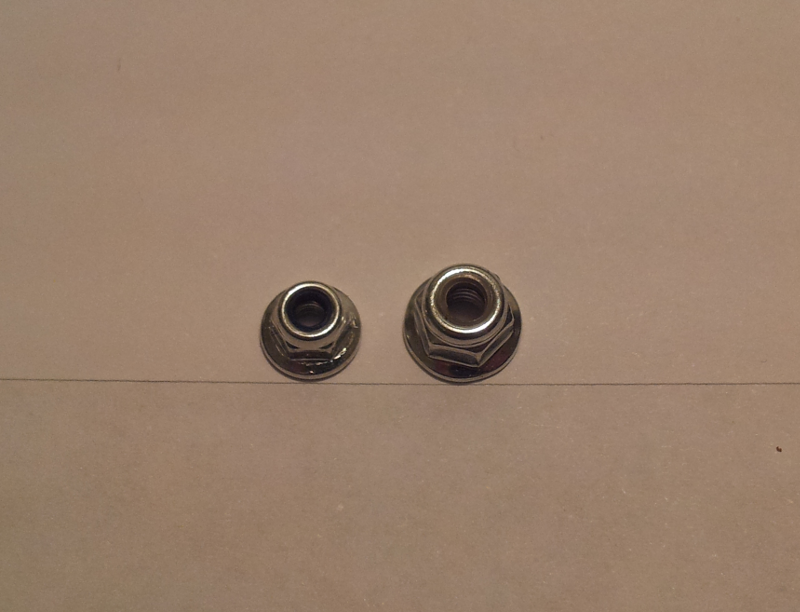
How do they mount a front tire with a regular-sized hole in it? The plastic hex has a small lip on it larger than the screw that the wheelnut attaches to. There's not really a front axle: it's the plastic 12mm hex that also forms a sleeve within the front bearings... then a screw goes down the middle of that sleeve+hex and pops out the end. I don't have a 22 anymore to check... but I wouldn't be surprised if a 22 front hex/axle drops right in if you have 9.8mm hex rims to recycle

Speaking of the front tires... they are wider than standard 2wd (i.e. TLR 22) rims, but the rubber compound is the same as the back (acceptably soft.. but the foam is too soft). Here's ribs on a 22 front rim (left), AKA rebars on a 22-4 front rim (or D413 front), and the BZ-222 front. The BZ is the same width as 4wd buggy fronts (i.e. 22-4 or D413) and has the 12mm hex.

BUT when you look at the back of the tires... you'll notice the BZ has deeper ribs. They're about 5mm wider!

You can see the difference on the car: here's the BZ stock tire: see the gap between the end of the ball-end at the steering arm and the tire:
Here's the same picture with the 22-4 front rim. It looks like the ball-end is rubbing... and it's close... but the ball is lower down within the rim so there's clearance.

So if you put BZ-222 front rims on a regular 4wd buggy the rubber would fit perfectly... but the rims are 5mm wider per side... so the front of the buggy would be 1cm wider.
- BUT -
I measured the width of the front and back of the BZ-222 (from the outside of the tires with the car at arms-level ride height)... and the front of the car is 1cm wider than the rear.
So, if you put regular 12mm hex 4wd buggy rims on the BZ-222, like those made for a D413 or 22-4... the front and rear of the BZ-222 would be the same width.
Strange, no?
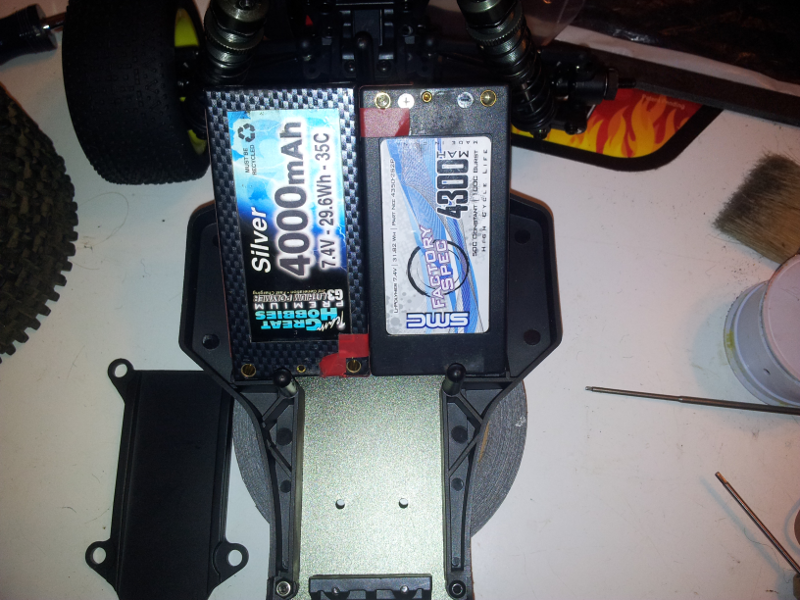
As for batteries... a shorty has lots of room to fit sideways. The top cover will keep it in the car, but you'd want foam to keep it centered.
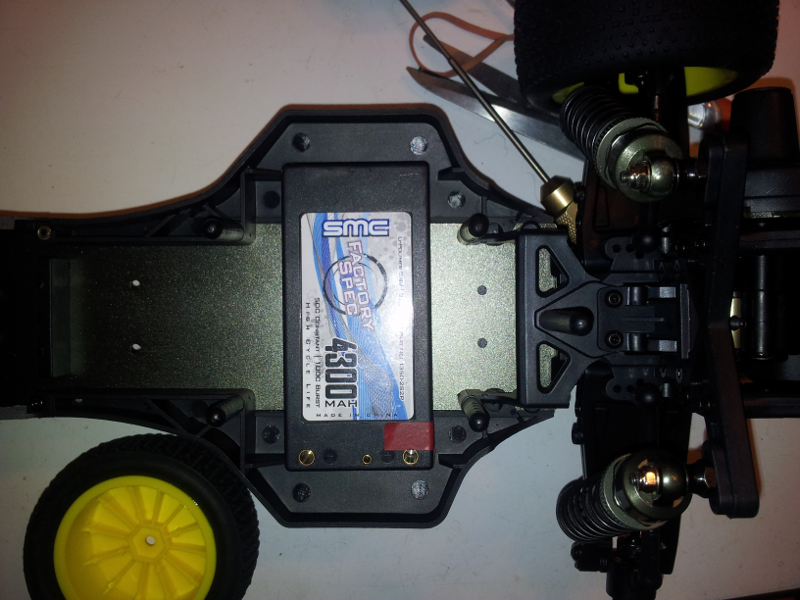
Stick packs have tons of room: there's an extra 25mm in there - presumably so a full stick fits even in mid-motor config, without a shorty servo.
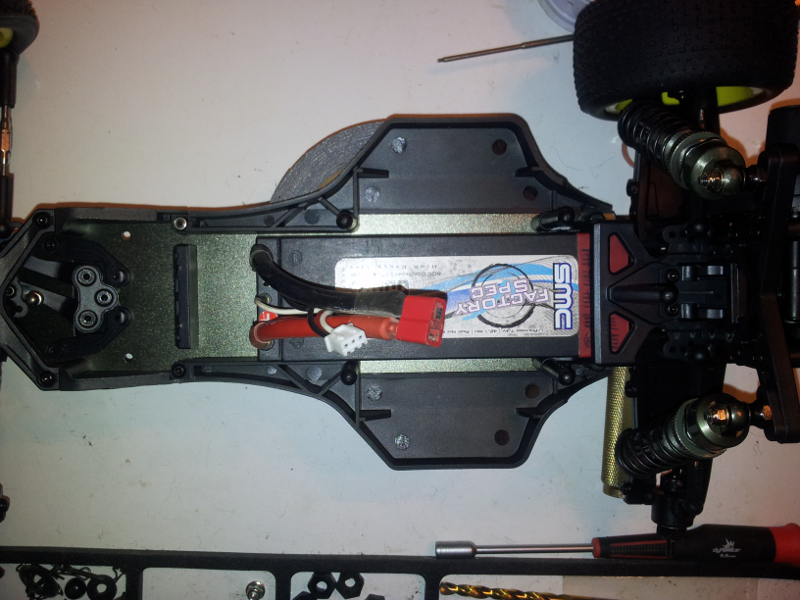
And, I believe saddles fit too. Here I put 2 shorties side-by to prove it's wide enough... but I don't have a set to test. However I saw saddles that are 69mm long online... and I measured it: 69mm would fit. The battery layout in the BZ-222 is pretty clever!
Next, suspension. Although the front hingepin brace is plastic... the arms and front bulkhead feel sturdy: tougher than what I remember from my 22 of B4.1 - but I guess the first hit will tell us for sure. The shock towers both have 3 holes to mount on top... but the front and rear arms only have 2 lower positions.
The shocks are OK. They have 6-hole 12mm pistons but there's a bit of wiggle room in the barrel (i.e. a 12.5mm piston may fit a bit better). Very little stiction and it looks like you can fit standard oring or xrings. One thing I didn't expect: there's no bladders! There's a rubber oring at the bottom of the thread at the top of the shock but the caps are straight aluminum with no seal. Go look at the manual if you don't believe me - no bladders shown - emulsion it is then!
The springs have a 17mm internal diameter: the same as what's on my D413. My 22 and Durango springs are 16mm... but they still fit if you give them a twist to seat properly on the top and bottom collars. Lengths are an exact match for my 22 springs:
Stock BZ-222 front on left, random 22 front on right
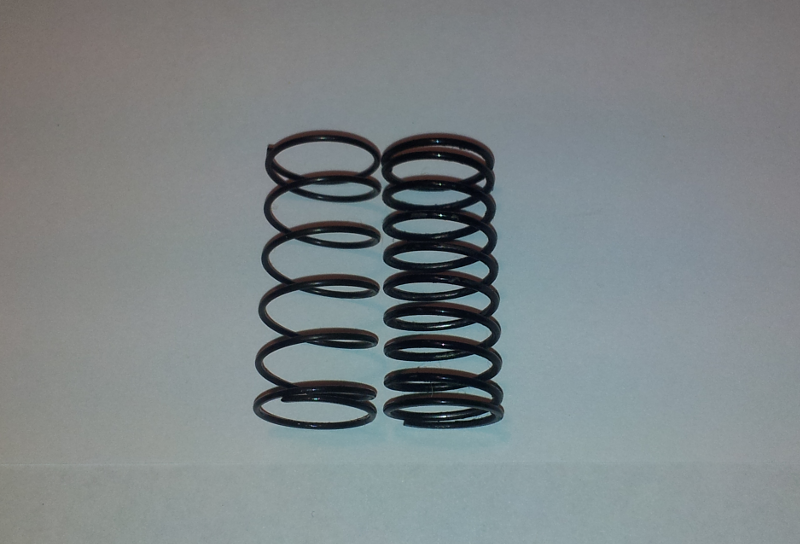
Stock BZ-222 rear on left, random 22 front on right
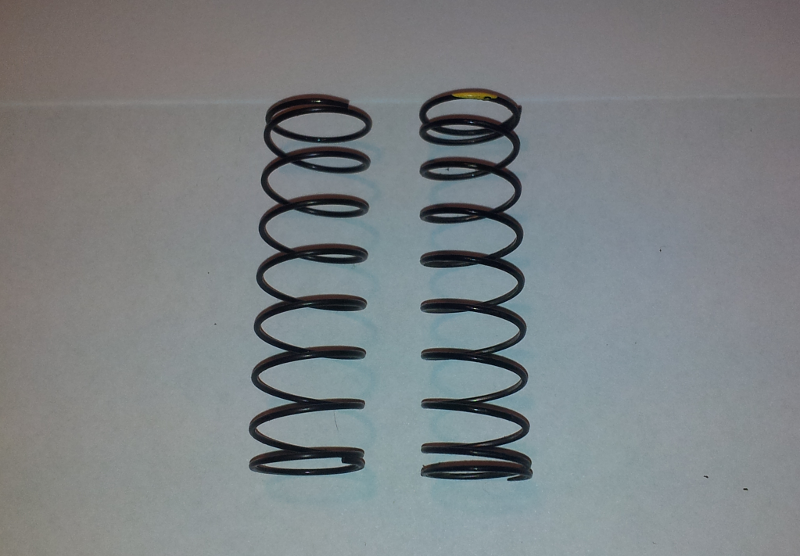
Finally as proof, here's 22 buggy springs on BZ-222 bodies. The fit is tighter than stock, but the springs didn't rub (17mm internal width would still be better). The length is perfect to give you room to fiddle with preload:

The front shocks are 82mm long and the rears are 95 (center to center at the mount points). The shock ends are thick and screwed in deep: you could unscrew them to easily add a couple mm if you needed it. The shock retainer cups are also deep around the ends and at the shock: I'd be surprised if they fell off.
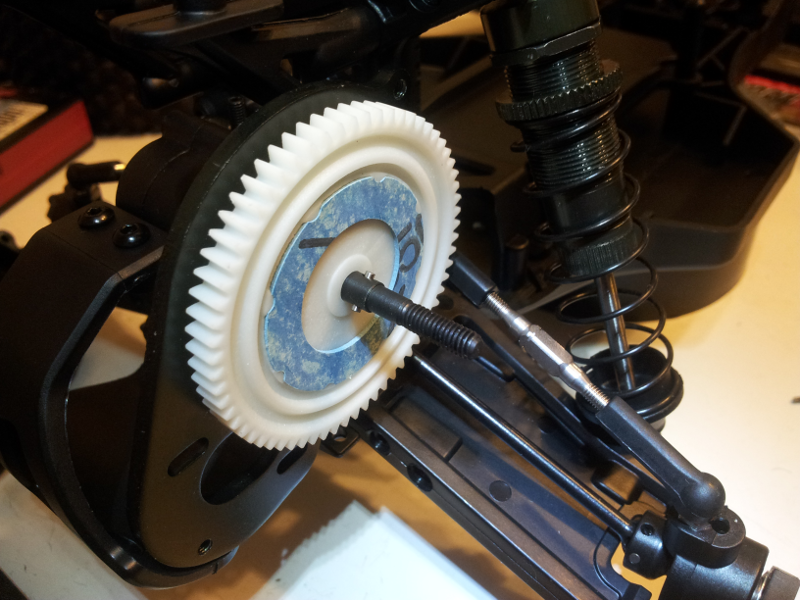
Next, the transmission. It comes with a massive 32p 64t spur. Here it is beside a 93t 48p spur from a SC10 2wd:
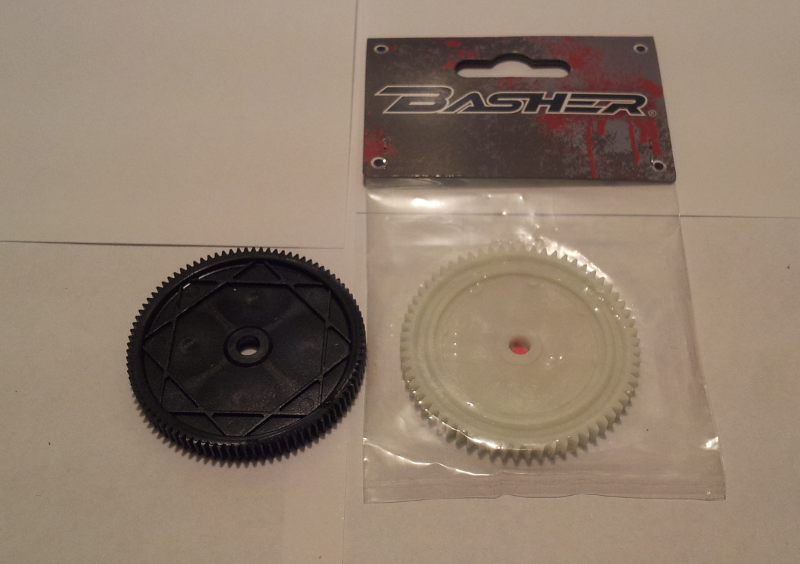
And on the car:
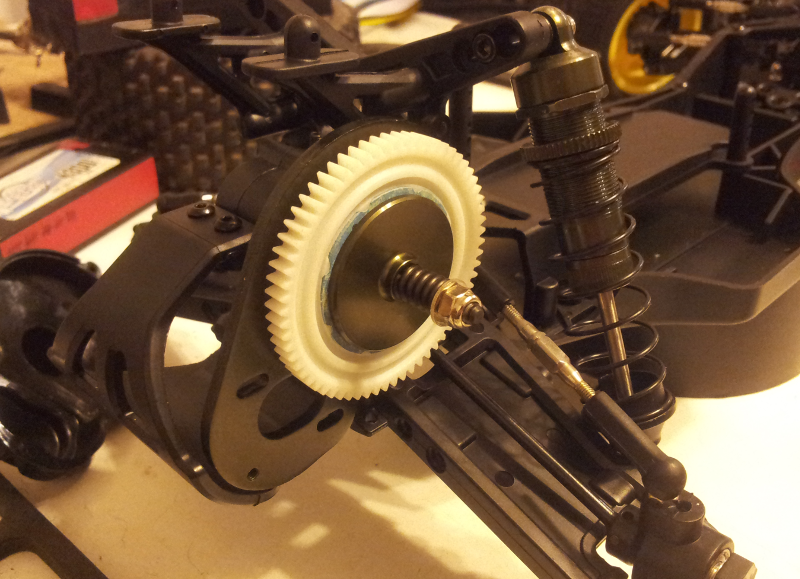
The spur assembly looks bog-standard... but it doesn't rely on flat-spots on the shaft to keep the discs from spinning: instead there are tiny pins that each disc keys into. If you lose them you're stuck: they're smaller than axle pins... and they don't stick very far out. I know it's a metal pin in a metal slipper disc.. but those baby pins are going to be under a lot of strain. The nut that pinches the spring is beefy: a regular M4/7mm wheelnut!
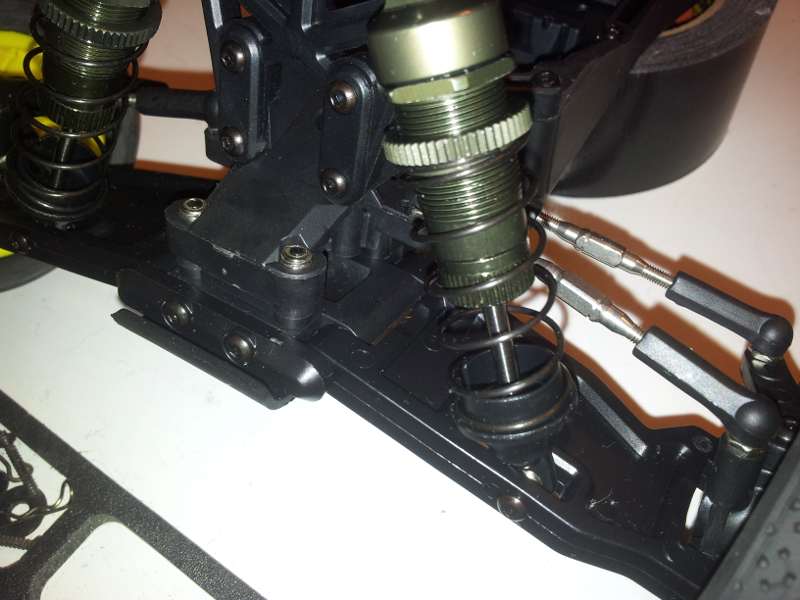
Now the belt drive! There's a tiny access port on the front of the transmission (when in rear-motor): you can pull out 2 screws and pop it off (see the white lettering on the belt). The hole is large enough you can get your finger in there and poke at it to feel the belt tension. The belt is wider than I would have thought:
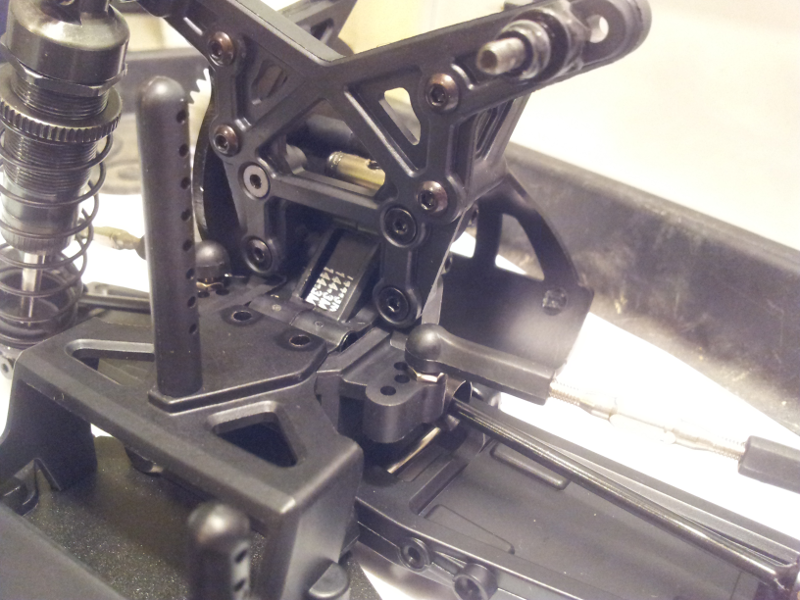
How do you adjust the tension? There's a slightly C-shaped assembly that slides in a curved slot molded into both sides of the transmission. At the top of the C is a pin with a grub screw going through it, with the screw pointing down at the top of the tranny. As you screw the screw down through the top pin (pushing on the tranny)... the entire C assembly slides upwards along the sides of the tranny. At the bottom of the C the screws actually go in through the sides of the case to hold a tensioner roller.

It's hard to describe in pictures: when you see it move it makes sense. In the photo above I left a screwdriver pointing down into the grub screw so you can tell where it is. Imagine as you screw the screw in it pulls that bent-looking metal bar up through a curved groove... and the bottom screw in that bar is traveling through a short slot to pull the tension pully up too. (so there are screws going in though slots in both sides of the transmission... but the slots are short enough the metal bar completely covers them)
You don't have to adjust the screw very far to feel a tension difference in the belt.
That's all I have time to post today. Final couple notes:
The BZ rubber has pins about the same size as the Holeshots... just half as many of them and a pattern of small bars to make up for it. The rubber is slightly harder than the Pro-Lines but still felt good... but the BZ foams are much softer.
Here's the tires from the back. This is a bit of an optical illusion: the BZ rim is the same offset... however because the BZ rim is dished in from the outside it appears the webbing is shallower (and it is): but the hex is in the same place. The rear rims are mounted with a standard 7mm flanged M4 locknut.
Speaking of locknuts: here's the BZ front (left) and rear (right) wheel nuts. The fronts are 5.5mm nuts like you'd find mounting your shocks!
How do they mount a front tire with a regular-sized hole in it? The plastic hex has a small lip on it larger than the screw that the wheelnut attaches to. There's not really a front axle: it's the plastic 12mm hex that also forms a sleeve within the front bearings... then a screw goes down the middle of that sleeve+hex and pops out the end. I don't have a 22 anymore to check... but I wouldn't be surprised if a 22 front hex/axle drops right in if you have 9.8mm hex rims to recycle
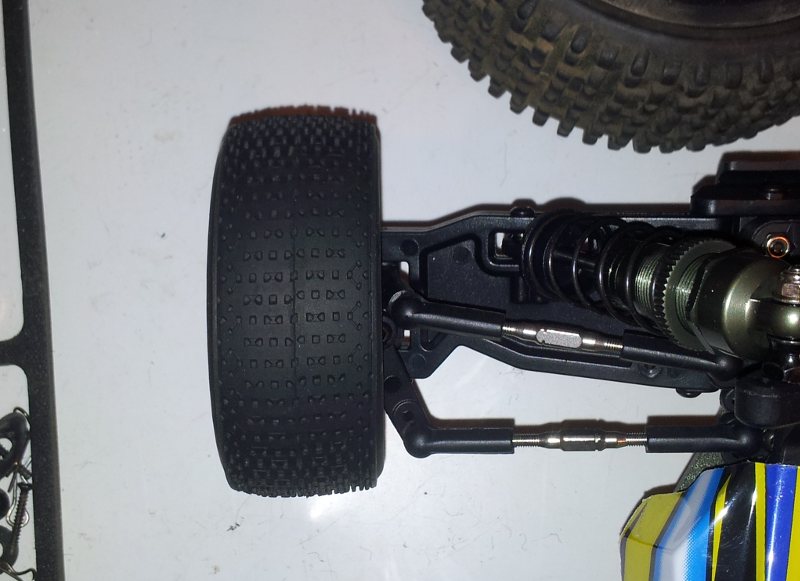
Speaking of the front tires... they are wider than standard 2wd (i.e. TLR 22) rims, but the rubber compound is the same as the back (acceptably soft.. but the foam is too soft). Here's ribs on a 22 front rim (left), AKA rebars on a 22-4 front rim (or D413 front), and the BZ-222 front. The BZ is the same width as 4wd buggy fronts (i.e. 22-4 or D413) and has the 12mm hex.
BUT when you look at the back of the tires... you'll notice the BZ has deeper ribs. They're about 5mm wider!
You can see the difference on the car: here's the BZ stock tire: see the gap between the end of the ball-end at the steering arm and the tire:
Here's the same picture with the 22-4 front rim. It looks like the ball-end is rubbing... and it's close... but the ball is lower down within the rim so there's clearance.
So if you put BZ-222 front rims on a regular 4wd buggy the rubber would fit perfectly... but the rims are 5mm wider per side... so the front of the buggy would be 1cm wider.
- BUT -
I measured the width of the front and back of the BZ-222 (from the outside of the tires with the car at arms-level ride height)... and the front of the car is 1cm wider than the rear.
So, if you put regular 12mm hex 4wd buggy rims on the BZ-222, like those made for a D413 or 22-4... the front and rear of the BZ-222 would be the same width.
Strange, no?
As for batteries... a shorty has lots of room to fit sideways. The top cover will keep it in the car, but you'd want foam to keep it centered.
Stick packs have tons of room: there's an extra 25mm in there - presumably so a full stick fits even in mid-motor config, without a shorty servo.
And, I believe saddles fit too. Here I put 2 shorties side-by to prove it's wide enough... but I don't have a set to test. However I saw saddles that are 69mm long online... and I measured it: 69mm would fit. The battery layout in the BZ-222 is pretty clever!
Next, suspension. Although the front hingepin brace is plastic... the arms and front bulkhead feel sturdy: tougher than what I remember from my 22 of B4.1 - but I guess the first hit will tell us for sure. The shock towers both have 3 holes to mount on top... but the front and rear arms only have 2 lower positions.
The shocks are OK. They have 6-hole 12mm pistons but there's a bit of wiggle room in the barrel (i.e. a 12.5mm piston may fit a bit better). Very little stiction and it looks like you can fit standard oring or xrings. One thing I didn't expect: there's no bladders! There's a rubber oring at the bottom of the thread at the top of the shock but the caps are straight aluminum with no seal. Go look at the manual if you don't believe me - no bladders shown - emulsion it is then!
The springs have a 17mm internal diameter: the same as what's on my D413. My 22 and Durango springs are 16mm... but they still fit if you give them a twist to seat properly on the top and bottom collars. Lengths are an exact match for my 22 springs:
Stock BZ-222 front on left, random 22 front on right
Stock BZ-222 rear on left, random 22 front on right
Finally as proof, here's 22 buggy springs on BZ-222 bodies. The fit is tighter than stock, but the springs didn't rub (17mm internal width would still be better). The length is perfect to give you room to fiddle with preload:
The front shocks are 82mm long and the rears are 95 (center to center at the mount points). The shock ends are thick and screwed in deep: you could unscrew them to easily add a couple mm if you needed it. The shock retainer cups are also deep around the ends and at the shock: I'd be surprised if they fell off.
Next, the transmission. It comes with a massive 32p 64t spur. Here it is beside a 93t 48p spur from a SC10 2wd:
And on the car:
The spur assembly looks bog-standard... but it doesn't rely on flat-spots on the shaft to keep the discs from spinning: instead there are tiny pins that each disc keys into. If you lose them you're stuck: they're smaller than axle pins... and they don't stick very far out. I know it's a metal pin in a metal slipper disc.. but those baby pins are going to be under a lot of strain. The nut that pinches the spring is beefy: a regular M4/7mm wheelnut!
Now the belt drive! There's a tiny access port on the front of the transmission (when in rear-motor): you can pull out 2 screws and pop it off (see the white lettering on the belt). The hole is large enough you can get your finger in there and poke at it to feel the belt tension. The belt is wider than I would have thought:
How do you adjust the tension? There's a slightly C-shaped assembly that slides in a curved slot molded into both sides of the transmission. At the top of the C is a pin with a grub screw going through it, with the screw pointing down at the top of the tranny. As you screw the screw down through the top pin (pushing on the tranny)... the entire C assembly slides upwards along the sides of the tranny. At the bottom of the C the screws actually go in through the sides of the case to hold a tensioner roller.
It's hard to describe in pictures: when you see it move it makes sense. In the photo above I left a screwdriver pointing down into the grub screw so you can tell where it is. Imagine as you screw the screw in it pulls that bent-looking metal bar up through a curved groove... and the bottom screw in that bar is traveling through a short slot to pull the tension pully up too. (so there are screws going in though slots in both sides of the transmission... but the slots are short enough the metal bar completely covers them)
You don't have to adjust the screw very far to feel a tension difference in the belt.
That's all I have time to post today. Final couple notes:
- The transmission felt smooth but had more friction than I expected. Maybe the belt and rest of it needs to break in
- The ball cups seem to limit travel a tiny bit: if they rotate too far up or down they're close to popping off. They aren't recessed under the cups on the tierod side like you see on Losi ends.
- The tierods have grooves stamped in them (so you can align them all and know what way to turn any of them on your car to make the rods longer or shorter)... but... they were assembled in random directions. You can flip the rods around to fix this.
Last edited by PetRock; 11-17-2014 at 08:00 PM.
11-17-2014, 08:19 PM
#93
I guess i must have gotten the only tires with my kit that had no foams....lol
11-17-2014, 10:11 PM
#94
Great informative post PetRock!
11-18-2014, 09:49 AM
#95
Tech Initiate
Thank you PetRock for that great post. Lots of info and the time you took to put that together is appreciated!
11-19-2014, 04:51 AM
#96
Well I think it is still too early to tell on the 222. The first buyers have only had it a week. The Vandal has known issues, but is still a decent buggy, not great but decent.
Is there a reason you are only selecting buggies from HobbyKing or are you open to other brands?
Oh and also what is your definition of pure fun? Bashing? Speed runs? Modifiying? What terrain are you mostly going to run on as well?
Is there a reason you are only selecting buggies from HobbyKing or are you open to other brands?
Oh and also what is your definition of pure fun? Bashing? Speed runs? Modifiying? What terrain are you mostly going to run on as well?
I'm selecting from HK because i wan't to spend the less possible in an off road (i already spend very much for racing with on road 1/10).
With pure fun i mean driving in a little track like this one:
i.img ur.com/kbzTMmB.jpg
(remove the space)
(It's near the on road track) and occasionally i will use it in a little mountain bike track with jumps (normal terrain)
 11-19-2014, 06:13 AM
#98
I would say the rear suspension blocks in titanium would be a must upgrade. A few guys have broke the rear suspension block pretty quick. After that the standard arms, hubs, steer knuckles and bell crank assembly.
11-19-2014, 06:19 AM
#99
So does the spur set up not let you change to losi or associated 48p Spurs?
11-19-2014, 06:36 AM
#101
Tech Regular
I haven't driven enough to break anything yet: but I'm heading to a carpet track this weekend and indoor-offroad/carpet is hard on RCs: any crash means hitting something made of concrete or wood. There's still not a lot of durability reports about the BZ-222 yet: because many of the metal hopups are $20+... I would have bought just that front brace... and added $20 in the common plastic spares to my cart.
I'm willing to break very cheap plastic parts a few times before I commit to a metal hopup - that way I know it's a weakness and not just my crappy driving
11-19-2014, 06:41 AM
#102
11-19-2014, 06:45 AM
#103
Tech Regular
Yup - I mounted an AE SC10 spur and slipper pads and it fit just fine: but that's the old non-VTS traditional slipper setup. If I had to do it again today... I'd put on the 22 spur and pads because you can buy those parts anywhere.
11-19-2014, 06:51 AM
#104
I would highly recommend getting the rcshox garodisc slipper pads at some point if you use the associated or losi spur. The garodisc pads have a very linear feel on the slipping action and they dont glaze easy so you can run a looser slipper if needed.
11-19-2014, 06:52 AM
#105
Would anybody be interested in a 2 stg piston for these shocks?