


 3Likes
Hobby Pro USA PR S1 2wd Buggy ALL NEW
 06-06-2014, 03:44 PM
#1306

So My kit was just delivered by UPS and I was pleased to have received the car so quickly. Sadly, the tool kit I also ordered and was told was thrown in
the box was not in the box. What the dilly? :/
I just called up and got no answer so I left a message. Hopefully someone calls me back soon.
My wife just laughed because nothing I ever order ever comes 100% correct. It's so bad I'll go to a steak house and order a flank steak and get spaghetti!
It's that bad, no LOL.
 06-06-2014, 05:59 PM
#1307
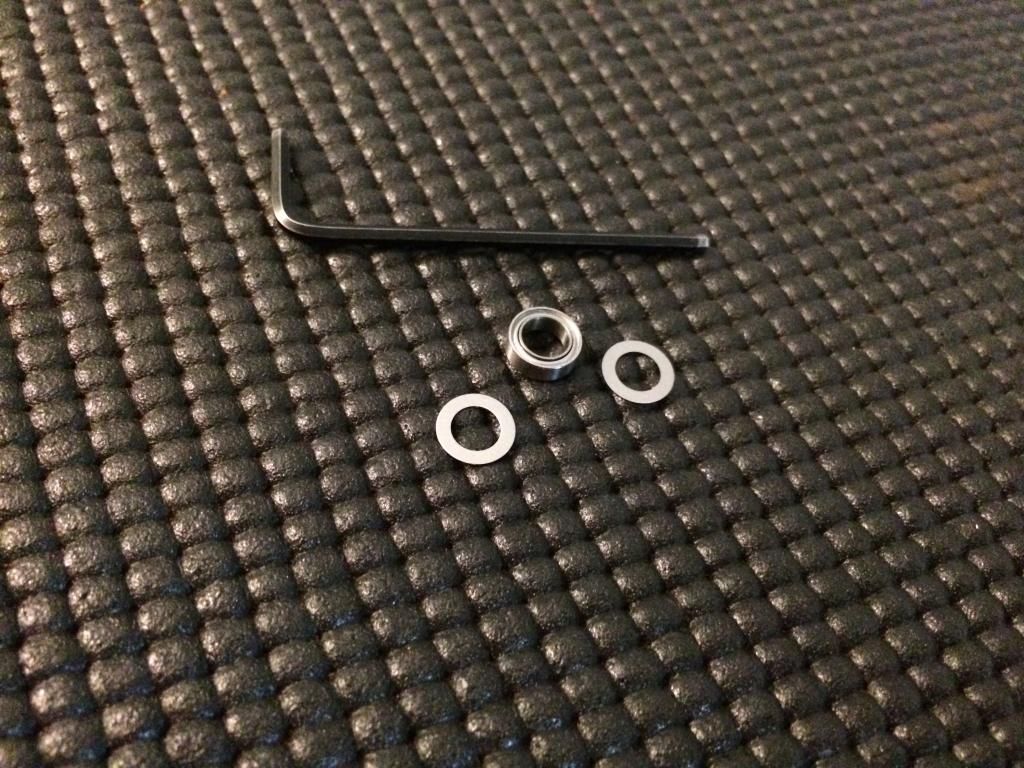
Ok so right away there's something I have that's not listed in the manual. In the very first bag is the bell crank system with the bearings and the mounting studs. In this bag there are 2 thin washers that seem to be to cover the bearings but I'm not sure if it goes on top or not, though that's what I'm leaning towards.
If anyone can help me here is really appreciate it so I can boogie with the rest of the build. Thanks.
Here's a pic for reference:
If anyone can help me here is really appreciate it so I can boogie with the rest of the build. Thanks.
Here's a pic for reference:
06-06-2014, 07:16 PM
#1309
Ok so right away there's something I have that's not listed in the manual. In the very first bag is the bell crank system with the bearings and the mounting studs. In this bag there are 2 thin washers that seem to be to cover the bearings but I'm not sure if it goes on top or not, though that's what I'm leaning towards.
If anyone can help me here is really appreciate it so I can boogie with the rest of the build. Thanks.
Here's a pic for reference:
If anyone can help me here is really appreciate it so I can boogie with the rest of the build. Thanks.
Here's a pic for reference:
06-06-2014, 10:49 PM
#1310
Thanks for the reply but that's where I realized the had to go once I put the top brace on. However, being the stickler that I am for perfection I didn't like how much upward travel the bell Francis had once all was tightened down, and I bowed the one on the servo save slightly and bent the left one I to a slight v in the center with the sides up a tad to leave the cranks with absolute no play whatsoever whilst still exhibiting free movement.
I take my time on my builds because I look for little areas where I can make little improvements like this and place added touches wherever possible to spruce up the look even more. My son heard me speaking to my anodizer this afternoon and when he heard I was thinking of going slime green he said Nnnnnooooooooo!!! He's a fanatic of red and told me he'd be sad if I changed the hot red parts to any other color. I guess it's staying red. Lol
I've been RC-ing for a very long time and the build quality is one of the best I've ever come across and I've but a lot of brand's products. The plastics are reeeeally similar to Durango with a bit less rigidity to them which is Durango's week point. Some of the flash on some of the parts I wish were in better locations so as to allow for easier clean up with an X-acto, but nothing major.
Since I didn't get my new tools, my fingers are sore from using my old worn out ones which resulted in having to use my fingers way too much to start threads into the plastics. I also find the studs a bit impressive and the cups snap solidly onto them so the test now will be durability since I run on a rather large 1/10 track that accommodates 1/8 quite comfortably and also run on a huge 1/8 scale track which we refer to as the 1/10 killer. Usually the end of the night is culminated with a "another victim". Lol
Anyhow, anyone at Hobby Pro, please check your voicemail and get back to me.
Thanks.
06-07-2014, 09:42 AM
#1313
It was shipped via USPS if I used UPS it would have been 100$ plus for brokerage no doubt!! lol
I actually have been running the PRS1 for about 3 years now, even had one before HP started selling them.. love the car fast and durable! I love that HP has taken this chassis to the next level and is constantly finding ways to improve on it.
I am a the only one locally that runs this car, I love being different..
I actually have been running the PRS1 for about 3 years now, even had one before HP started selling them..
love the car fast and durable! I love that HP has taken this chassis to the next level and is constantly finding ways to improve on it.I am a the only one locally that runs this car, I love being different..
06-07-2014, 12:49 PM
#1314
Ok I'm building my prs1 2014 and the build is going together fairly well. But now I have a problem with the shocks. When I built up the shocks there is a lot of slop in the shock shafts. The orings and spacers in the bottom shock seal jump up and down when I slide the shaft up and down. I have built the shock according to the manual with the 2 thin white washers top and bottom, 2 clear o-rings and 1 white 3mm bushings. There is so much play something has to be wrong. I have built hundreds of shocks and I have never encountered this issue on new shocks. Can someone shed some light on this.
Ah well.
06-08-2014, 05:06 AM
#1315
06-08-2014, 08:07 AM
#1316
Well on mine the excessive play is just too much and oil actually seeps out. On top of that the shocks have that little bit of free play which at the ends of the arms translates to about 3/16 of free travel.
It's just not right and I won't run it like this because it's wrong. Makes no sense to have a car with such precision everywhere else to have this significant area of free play. Gigs point of the lower assemblies on shocks is to fit tightly so that when you tighten down the cap pressure is applied to the O-rings to cause them to swell outward to creat a firm seal. Without this there is no seal, which is why oil seeps out on mine. On top if that I soaked my O-rings in Dow55 overnight to allow them to swell a bit more for a perfect seal on all my shocks as I've always done on all my cars and when I tighten down the lower caps the flanged washer doesn't even reach the end of the cap.
I'll wait to hear from Andrew because this just isn't right and I don't intend to run this car however.
06-08-2014, 09:08 AM
#1318
I realize that and i will wait patiently. What I won't do is exercise impatience and half ass anything. The quality and robustness of this kit has thoroughly impressed me more than any other kit I've ever built. I just want it to be at its max when I'm finally healed enough to go to the track.
06-08-2014, 08:02 PM
#1319
I just started working on my PRS1 buggy again, New TORO TS120 esc, 8.5 tenshock motor, 3mm motor plate, rear weight and CF battery holder

06-09-2014, 12:45 PM
#1320
Tech Rookie
Well on mine the excessive play is just too much and oil actually seeps out. On top of that the shocks have that little bit of free play which at the ends of the arms translates to about 3/16 of free travel.
It's just not right and I won't run it like this because it's wrong. Makes no sense to have a car with such precision everywhere else to have this significant area of free play. Gigs point of the lower assemblies on shocks is to fit tightly so that when you tighten down the cap pressure is applied to the O-rings to cause them to swell outward to creat a firm seal. Without this there is no seal, which is why oil seeps out on mine. On top if that I soaked my O-rings in Dow55 overnight to allow them to swell a bit more for a perfect seal on all my shocks as I've always done on all my cars and when I tighten down the lower caps the flanged washer doesn't even reach the end of the cap.
I'll wait to hear from Andrew because this just isn't right and I don't intend to run this car however.
It's just not right and I won't run it like this because it's wrong. Makes no sense to have a car with such precision everywhere else to have this significant area of free play. Gigs point of the lower assemblies on shocks is to fit tightly so that when you tighten down the cap pressure is applied to the O-rings to cause them to swell outward to creat a firm seal. Without this there is no seal, which is why oil seeps out on mine. On top if that I soaked my O-rings in Dow55 overnight to allow them to swell a bit more for a perfect seal on all my shocks as I've always done on all my cars and when I tighten down the lower caps the flanged washer doesn't even reach the end of the cap.
I'll wait to hear from Andrew because this just isn't right and I don't intend to run this car however.