


 10Likes
TLR TEN-SCTE 2.0 Kit Thread
 03-16-2013, 01:28 AM
#2026
I finally got my kit yesterday and I was able to support my local shop, Yeah! Lol ! Ok I put together the 1st differential and it is butter smooth. Just like B main said buy Mip wrenches if you don�t already have them ( I personally wouldn�t attempt to put together any kit with the included hardware, I�m still using my MIP wrenches from 1996).
I did take the advice of others on here and pre-thread the diff cases before I put the diff together just because it only took me 1 minute longer to do it this way. I think the theory is when the diff is empty (aka no fluid you can hold it vertical and horizontally to make sure your diff screw is going in perfect vs. when its full of fluid and you have to keep it upright. I�ll keep you posted on the center and rear diff to follow but I don�t expect any problems. This kit is 1st class and as far as I�m concerned LOSI has stepped up their kit game big time. It�s so funny how the instructions have changed since 1996 when I bought my 1st RC10B2. The kits have gone from a paragraph on each segment to pictures, LMAO
What an awesome kit, I can�t wait to drive it. B main and I are going to go tear up IERC or lake pegs, whatever comes 1st BRAP Brap
B main I'm running same electronics as you (RX8/XE4000) what pinion should I start off with 1st? The XE4000 I just picked up so its new to me�
I was waiting for the PRO4HD but at 200 bucks OMG

 03-16-2013, 01:56 AM
#2027

I am looking to trade a 10 run old Tekin 4600 for a 4000 or 550 can motor if anyone has one new or darn close to it. To my suprise this motor has been coming off the track below 143 at the highest at 6 and a half minutes. I just mainly run indoor and dont need a 4600. Thanks and sorry for the thread bomb.
03-16-2013, 02:06 AM
#2028
At least give me the option to remove it instead of making me buy a box or a cowl.
03-16-2013, 05:33 AM
#2029
I was looking at the coolest truck the other day. I think it was called the SLASH and it had the coolest reciever box on it LOLOLOLOL
Sorry I couldn't resist
I have a really stupid sense of humor some times
Sorry I couldn't resist
I have a really stupid sense of humor some times
Last edited by Jellis; 03-16-2013 at 11:07 AM.
 03-16-2013, 11:26 AM
#2034
Tech Regular
If your screw heads are not flush with the chassis it could simply be that the parts are not seated correctly. I noticed this with the front trans assembly. I had the screws flush but as I kept assembling I noticed that the front screw heads pooked out more and more. The problem is the tounge on the front bumper, it actually raises the trans up as you slide it in. The plastic diff housing should be seated flush with the kick up of the chassis and the section that goes through the chassis should be flush with the bottom of the chassis. I had to grind the thickness and sides of the bumper tounge to finally get the front diff assembly to fit properly. I mean I had to remove a lot of material, I bet I took 5 degrees of kick up out of the thing.
03-16-2013, 12:43 PM
#2035
metric and sae have a different taper depending on which is used..Hopefully they werent thinking about switching to metric and angles for countersink is off.
03-16-2013, 01:14 PM
#2036
Hey everyone, I'm just gonna throw in my two cents here. I typically drive the Durango DESC410R course truck. I've been looking into switching to the Losey, especially now that the 2.0 has arrived. At my local track, we have several people running the 1.0 with the MIP kit and a few others who just built, and were racing there 2.0 kits. My fellow racers let me drive both one of the 1.0 MIP conversion kits along with one of the stock set up SCTE 2.0. For reference, the current track record in for 4WD short course is an 18.4 second lap (set by me with my DESC410). On my 10th lap of driving the 1.0 with the MIP kit I turned an 18.41, And was consistently in the mid 18.5's. I then drove the stock set up 2.0 which I've the same motor and ESC combo as both my truck and the 1.0. Unfortunately, the 2.0 was all over the place. It felt like I was driving on an ice skating rink compared to the MIP converted 1.0. The truck did have excellent stability and more front end steering then the MIP truck, but the lack of traction in general comparatively to the MIP truck was no contest. I could t get below a 19.7 sec lap time with the 2.0. Now, I'm not sure if that was due to the fact that the stock set up is not anywhere close to what my track would require or what, but a direct comparison of the MIP converted truck and the 2.0 was a big difference, mainly in traction, with the 2.0 not sticking to the track anywhere. Now, I understand there are a lot of unknown elements here, especially with it not being my own truck, but I was pretty set on buying one of these new 2.0 trucks, until I drove one and realize that it was going to take a lot of massaging to get it to handle as I would expect.
03-16-2013, 01:27 PM
#2037
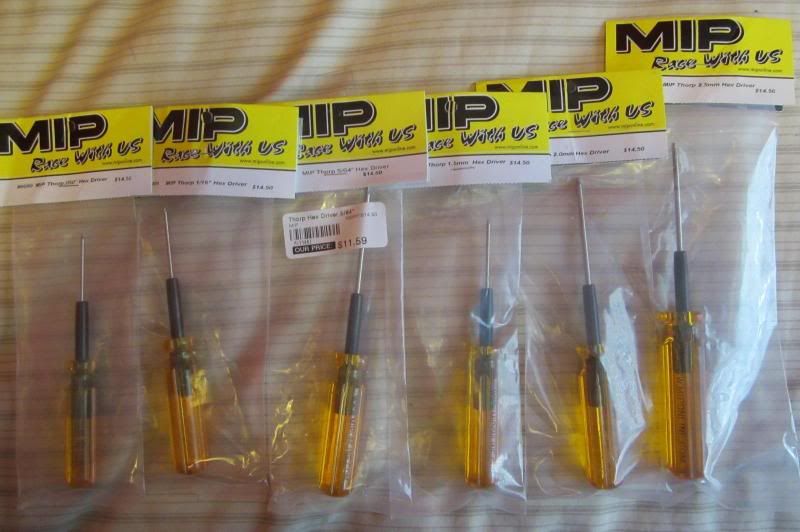
I have built several RC kits before and I only used the L hex wrenches from the hardware store. I would be able to complete the kit builds, but my fingers would hurt after a while. Now, I have invested a little bit of money to buy the proper tools, since I have 3 kits that are waiting for me to start and finish. I have one TLR 22SCT kit and two TLR Ten-SCTE 2.0 kits. I will certainly enjoy the builds better, using my brand new MIP Thorp hex wrenches. I only have six of them thus far, but I don't usually use the other sizes. I bought the 1.5mm, 2.0mm, 2.5mm, .050, 1/16", and 5/64".
03-16-2013, 01:33 PM
#2038
Sixfeetdeep,
If you loved the 1.0 mip i would say just buy it. Keep in mind diff and tire setups will make a big difference not to mention camber/caster and suspension spring, piston, and shock weight. Since you have the fastest recorded lap at your track I'm sure you already know all of that.
I'm super pumped about the 2.0, going back to the awesome build now
03-16-2013, 01:35 PM
#2039
Best tool purchase ever for the money, you will not regret it!
I have built several RC kits before and I only used the L hex wrenches from the hardware store. I would be able to complete the kit builds, but my fingers would hurt after a while. Now, I have invested a little bit of money to buy the proper tools, since I have 3 kits that are waiting for me to start and finish. I have one TLR 22SCT kit and two TLR Ten-SCTE 2.0 kits. I will certainly enjoy the builds better, using my brand new MIP Thorp hex wrenches. I only have six of them thus far, but I don't usually use the other sizes. I bought the 1.5mm, 2.0mm, 2.5mm, .050, 1/16", and 5/64".
03-16-2013, 01:57 PM
#2040
Do the lower shock caps screw on all the way to bottom out on the shoulder of the shock body ?
I didn't want to thread them down, seemed to me like they were made to accomadate a shock boot ?
Also the front shocks at the top seem to loosely mount on the post.
A few things I noticed, instructions are basically pictures only, some screws could have used a larger allen wrench, lower shock caps,(must be designed for boots) cvd's tiny pins, rear diff out puts have plastic insert thingys PITA, gold nuts, battery size adjustment not quick change, front top plate needs the spacer.
The shocks are nice quality, & diffs went together just fine. The quality of the screws could have been better, comes with grease, loctite, fluids & tools needed.