Go Back  R/C Tech Forums > General Forums > Electric Off-Road
Tekno RC EB48.3 Thread >

Tekno RC EB48.3 Thread

Community
Wiki Posts
Search
Like Tree22Likes

Tekno RC EB48.3 Thread

    Hide Wikipost
Old 03-13-2017, 12:03 AM   -   Wikipost
R/C Tech ForumsThread Wiki: Tekno RC EB48.3 Thread
Please read: This is a community-maintained wiki post containing the most important information from this thread. You may edit the Wiki once you have been a member for 90 days and have made 90 posts.
 
Last edit by: MattDub
Welcome to the EB48.3 Wiki


What option parts should I consider buying with a new kit?
None are required but we recommend the following:

Springs:
Low Grip Track:
TKR8772 – Yellow Low Frequency Rear Springs and TKR8762 – Grey Low Frequency Front Springs

Low to Medium Grip Track:
TKR8773 – Orange Low Frequency Rear Springs and TKR8763 – Black Low Frequency Front Springs

Medium to High Grip Track:
TKR8774 - Red Low Frequency Rear Springs and TKR8764 - Pink Low Frequency Front Springs

TKR5199B – HRC Rear Hubs (L/R, CV or uni, EB/NB/ET/NT48/48.3) - Improves stability of the rear on mid to corner exit. Able to be on power earlier on corner exit.

TKR6146 - CNC Delrin Shock Cartridge Set

TiNi Shock Shafts
-TKR6017T (front)
-TKR6061T (rear)

This car is very durable. Here are the spare parts that I recommend you keep on hand:
TKR5020 – Hinge Pins (inner, front/rear)
TKR6061T – Rear Shock Shafts w/ TiNi Coating and TKR6017T – Front Shock Shafts w/ TiNi Coating
TKR5286 – Front Suspension Arms and TKR5184 – Rear Suspension Arms
TKR5194 – Spindle Carriers
TKR6009 – Shock O-Ring and Bladder Set (for 2 shocks)

Tips and Tricks

List of Vehicle Setup Adjustments and Build Tips can be found here. There are several videos and articles detailing the building of shocks, diffs, camber links, etc.

Page 3 Step K-3
Put the screw in upside down so that the head of the screw is in the hex spot that's molded into the spindle. This will aid in clearance in full droop / full steering.

Page 12 Step I-2
Use no less than 4 shims on the steering spindle to limit steering throw. I actually just use one 2mm ball stud washer from my 10th scale stuff since each shim is .5mm.

Setup Sheets:
Setup sheets for all Tekno RC vehicles can be found here.

Warranty Policy:
Tekno RC is the only company in the industry that will give 50% off of parts if returned to them using the General Warranty return policy found on their website. The parts can be lightly used or completely abused, as long as the part is still being produced it's covered!

Piston Drills:
Some of our setups recommend using pistons that are enlarged. For instance 4x1.9 or 3x2.0. To drill the pistons we recommend the following:
GMK Supply Piston Drill Set
16PC Metric Bit Set Metric Sizes 2.00 to 3.00 MM.

Print Wikipost

Thread Tools
 
Search this Thread
 
Old 07-29-2015, 04:28 PM
  #136  
Tech Adept
iTrader: (5)
 
Join Date: Apr 2014
Location: Canberra
Posts: 146
Trader Rating: 5 (100%+)
Default

Originally Posted by coombes
hey rav were did you race with it what stock oil did you used and diff oils mate so you say it worth getting one now since they fix the rear end lose and all
I was running at Liverpool. All oil's were stock (5/5/5 and 400/450? shock oil is from memory).

I never really found the rear to be a problem with the old car after I took out the centre and rear brace.
revhead145 is offline  
Old 07-29-2015, 09:46 PM
  #137  
Tech Master
iTrader: (6)
 
Join Date: Feb 2015
Posts: 1,061
Trader Rating: 6 (100%+)
Default

how does that work I thought you need to used them for the car
coombes is offline  
Old 07-30-2015, 04:51 AM
  #138  
MOE
Tech Regular
iTrader: (14)
 
MOE's Avatar
 
Join Date: Nov 2009
Location: Nolanville, TX
Posts: 353
Trader Rating: 14 (100%+)
Default

I never run the rear brace, and sometimes I take out the center too. It provides a little more flex in the chassis = more grip.
MOE is offline  
Old 07-30-2015, 04:59 AM
  #139  
Tech Master
iTrader: (6)
 
Join Date: Feb 2015
Posts: 1,061
Trader Rating: 6 (100%+)
Default

oh I see so same thing go to the sct410 if you want more grip to am I right
coombes is offline  
Old 07-30-2015, 06:26 AM
  #140  
MOE
Tech Regular
iTrader: (14)
 
MOE's Avatar
 
Join Date: Nov 2009
Location: Nolanville, TX
Posts: 353
Trader Rating: 14 (100%+)
Default

Yes
MOE is offline  
Old 07-30-2015, 09:54 AM
  #141  
Tech Fanatic
iTrader: (2)
 
Join Date: May 2013
Location: Kingsport, TN (Still SC tho)
Posts: 855
Trader Rating: 2 (100%+)
Default Serpent Comparison

Has anyone driven the Eb48 vs the Serpent 811e? If so, can you tell me how they compare?

Thanks.
qstorm777 is offline  
Old 07-30-2015, 03:12 PM
  #142  
Tech Master
iTrader: (6)
 
Join Date: Feb 2015
Posts: 1,061
Trader Rating: 6 (100%+)
Default

thanks moe any think you change since you got yours
coombes is offline  
Old 07-31-2015, 01:00 PM
  #143  
Tech Adept
iTrader: (5)
 
Join Date: Mar 2015
Posts: 138
Trader Rating: 5 (100%+)
Default

Just finished my build and was doing pre-checks before first run in the garage and noticed binding in the steering. I noticed the steering turnbuckle screw was sticking out about 2mm or so from the nut and rubbing on the A-arm. Both sides were having this problem. I ended up taking the screws out and dremeling them down about 2mm and the problem was solved but just curious if maybe i did something wrong or others have experienced the same thing. I did use the 4 washers directly under the screw like the manual instructed, if i would have used 5 it might not have been an issue, but again, the manual only called for 4 on each side. I took it for a test driver afterwards and it's super smooth, powerful, and balanced. I do find the body a bit of a tight fit, but I guess that's probably fairly common for buggies.
HoldDaMayo is offline  
Old 07-31-2015, 03:28 PM
  #144  
Tech Adept
iTrader: (5)
 
Join Date: Apr 2014
Location: Canberra
Posts: 146
Trader Rating: 5 (100%+)
Default

Originally Posted by HoldDaMayo
Just finished my build and was doing pre-checks before first run in the garage and noticed binding in the steering. I noticed the steering turnbuckle screw was sticking out about 2mm or so from the nut and rubbing on the A-arm. Both sides were having this problem. I ended up taking the screws out and dremeling them down about 2mm and the problem was solved but just curious if maybe i did something wrong or others have experienced the same thing. I did use the 4 washers directly under the screw like the manual instructed, if i would have used 5 it might not have been an issue, but again, the manual only called for 4 on each side. I took it for a test driver afterwards and it's super smooth, powerful, and balanced. I do find the body a bit of a tight fit, but I guess that's probably fairly common for buggies.
I had the same problem and a friend also had the same problem. It only occurs at full droop. I just took to them with the Dremel. I did the same for the screw on the servo horn or it scratches the body.
revhead145 is offline  
Old 07-31-2015, 03:56 PM
  #145  
Tech Adept
iTrader: (5)
 
Join Date: Mar 2015
Posts: 138
Trader Rating: 5 (100%+)
Default

Originally Posted by revhead145
I had the same problem and a friend also had the same problem. It only occurs at full droop. I just took to them with the Dremel. I did the same for the screw on the servo horn or it scratches the body.
yeah, i actually put a rubber tube spacer on the screw that holds the front body mount and raised it up about 5-6mm maybe, so it gives me just a smidge more clearance for everything and still looks stock.
HoldDaMayo is offline  
Old 07-31-2015, 06:38 PM
  #146  
Tech Adept
iTrader: (2)
 
Join Date: Apr 2015
Location: wellington, Ohio
Posts: 167
Trader Rating: 2 (100%+)
Default


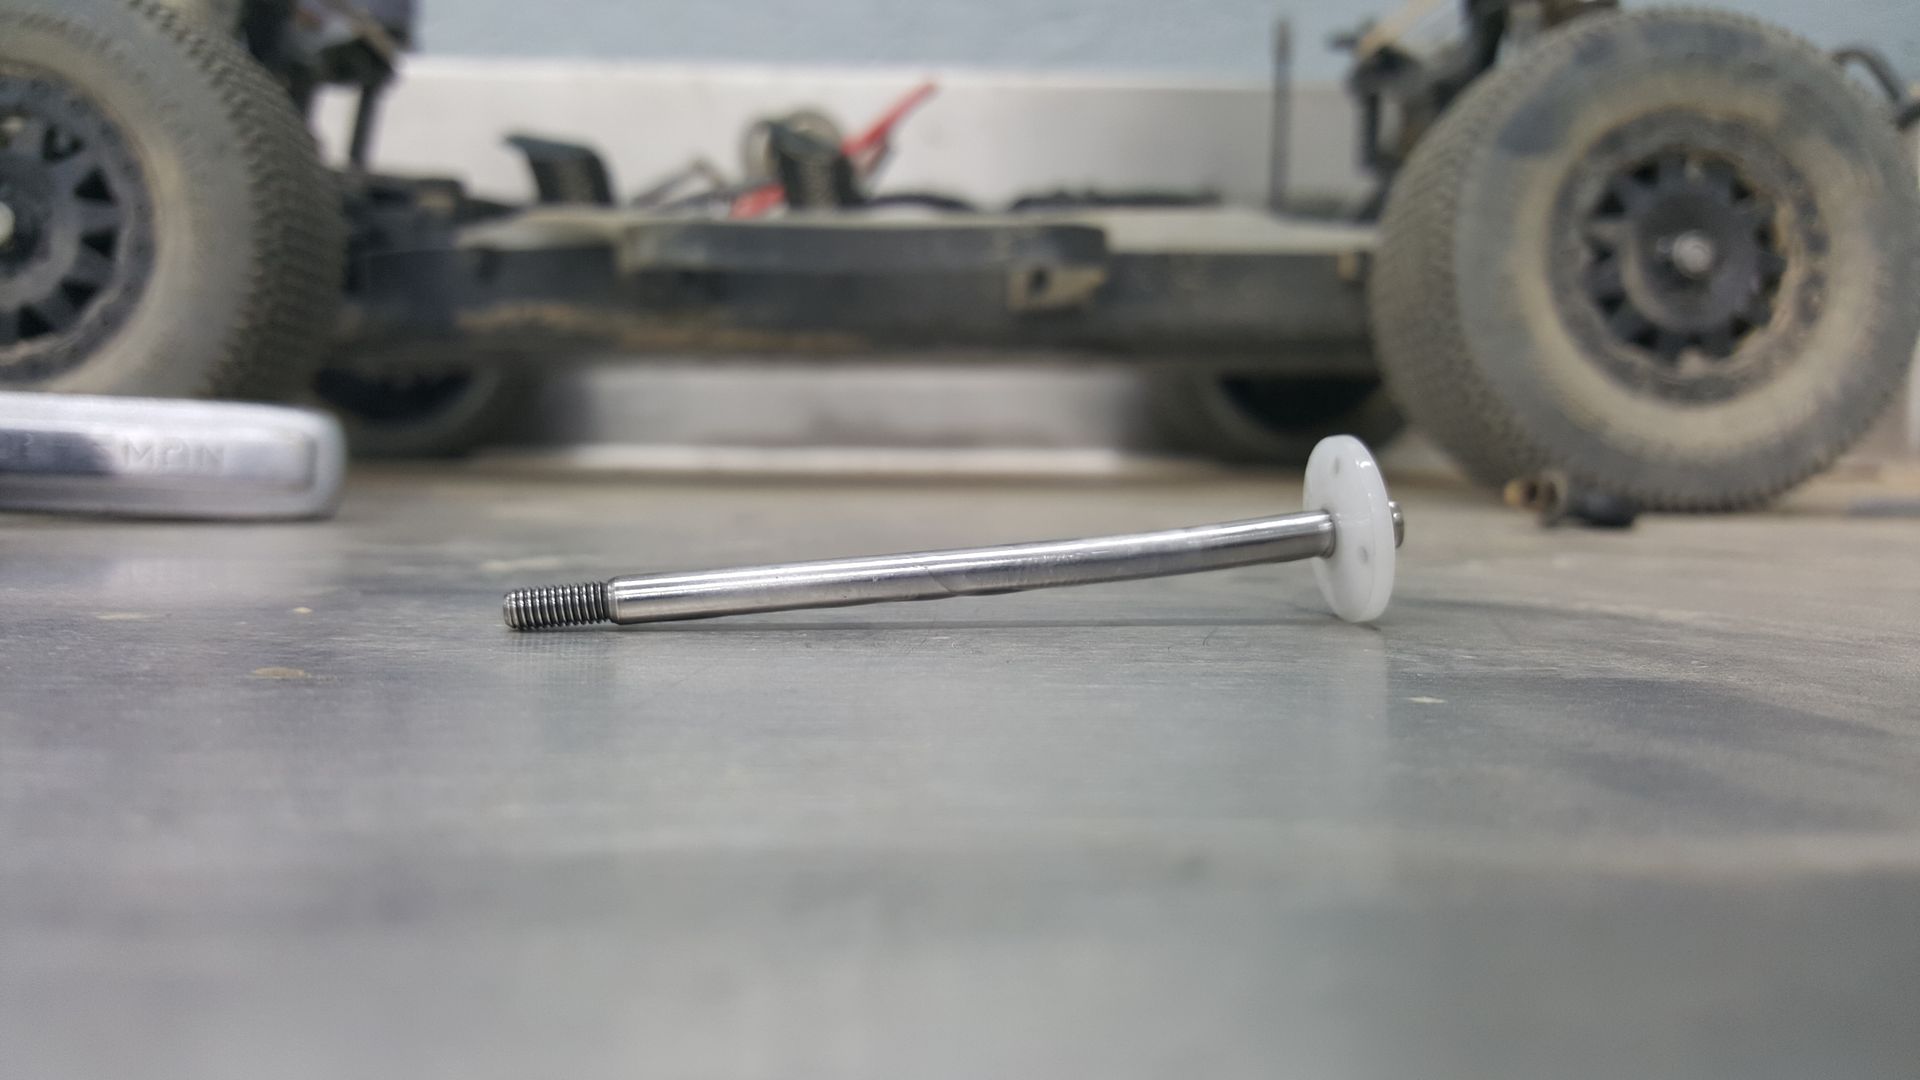
Somehow bent my rear shock shaft. Not sure how..
Riflebuilder is offline  
Old 07-31-2015, 07:55 PM
  #147  
Tech Master
iTrader: (8)
 
Jpm1's Avatar
 
Join Date: Sep 2010
Posts: 1,395
Trader Rating: 8 (100%+)
Default

Originally Posted by Riflebuilder


Somehow bent my rear shock shaft. Not sure how..
Piston is upside down aswell, sucks about the shafts though!
Jpm1 is offline  
Old 07-31-2015, 08:53 PM
  #148  
Tech Elite
iTrader: (21)
 
Join Date: Dec 2011
Location: Texas
Posts: 3,782
Trader Rating: 21 (100%+)
Default

Originally Posted by HoldDaMayo
Just finished my build and was doing pre-checks before first run in the garage and noticed binding in the steering. I noticed the steering turnbuckle screw was sticking out about 2mm or so from the nut and rubbing on the A-arm. Both sides were having this problem. I ended up taking the screws out and dremeling them down about 2mm and the problem was solved but just curious if maybe i did something wrong or others have experienced the same thing. I did use the 4 washers directly under the screw like the manual instructed, if i would have used 5 it might not have been an issue, but again, the manual only called for 4 on each side. I took it for a test driver afterwards and it's super smooth, powerful, and balanced. I do find the body a bit of a tight fit, but I guess that's probably fairly common for buggies.
Same here. I found a shorter screw and just used one washer.
MX304 is offline  
Old 08-01-2015, 07:27 AM
  #149  
Tech Master
iTrader: (33)
 
Join Date: May 2003
Location: Greenville, SC
Posts: 1,486
Trader Rating: 33 (100%+)
Default

Originally Posted by HoldDaMayo
Just finished my build and was doing pre-checks before first run in the garage and noticed binding in the steering. I noticed the steering turnbuckle screw was sticking out about 2mm or so from the nut and rubbing on the A-arm. Both sides were having this problem. I ended up taking the screws out and dremeling them down about 2mm and the problem was solved but just curious if maybe i did something wrong or others have experienced the same thing. I did use the 4 washers directly under the screw like the manual instructed, if i would have used 5 it might not have been an issue, but again, the manual only called for 4 on each side. I took it for a test driver afterwards and it's super smooth, powerful, and balanced. I do find the body a bit of a tight fit, but I guess that's probably fairly common for buggies.
Originally Posted by revhead145
I had the same problem and a friend also had the same problem. It only occurs at full droop. I just took to them with the Dremel. I did the same for the screw on the servo horn or it scratches the body.
Originally Posted by MX304
Same here. I found a shorter screw and just used one washer.
Correct, this only happens at full droop. If you see signs of it dragging while running the vehicle, you can do the tips above. If you only see it on the bench, I wouldn't be too concerned. This has been around since the original kit and typically is not an issue. Take a little material off the screw, remove washers and shorter screw (if that doesn't change your setup geometry), etc. I just make a slightly run of a dremmel across that section of the arm.
RokleM is offline  
Old 08-01-2015, 08:34 AM
  #150  
CAR
Tech Addict
 
Join Date: Dec 2004
Location: Wisconsin
Posts: 540
Default

Originally Posted by RokleM
Correct, this only happens at full droop. If you see signs of it dragging while running the vehicle, you can do the tips above. If you only see it on the bench, I wouldn't be too concerned. This has been around since the original kit and typically is not an issue. Take a little material off the screw, remove washers and shorter screw (if that doesn't change your setup geometry), etc. I just make a slightly run of a dremmel across that section of the arm.
Just turn the bolt around and be done with it.
CAR is offline  


Contact Us - Archive - Advertising - Cookie Policy - Privacy Statement - Terms of Service -

Copyright © 2024 MH Sub I, LLC dba Internet Brands. All rights reserved. Use of this site indicates your consent to the Terms of Use.