


T's Kyosho GT2 project - 56 mm motor
 05-02-2015, 03:00 PM
#31
Thanks! The motor was discontinued and Hobbyking blew them out last year for $10.
Another little update, stuff is starting to converge: got the CD top-plate and ESC done. The Mamba XL2 was modded a bit according to Lizard's ideas (clamping brackets) and should be a bit more robust now. Added 4x680uF caps (on top of existing 2480 uF, for total of 5200 uF) for bigger sparks and used some silicone gasket maker to improved IPX rating .
.
Still need to do some wiring, but couldn't wait to see the wheels finally turning. Tr�ed to drive it slowly in the living room and with gearing this absurd (rollout= 4.94 inch/motor revolution ) there is obviously some of the Mamba typical stuttering at start-up, but it wasn't half as bad as I thought (feared) it would be. Have to play a bit with the Castle link settings still to see what works best. Start Power is at high now, but after a slight stutter, that makes it take off with a bit of a bang, quite abruptly .
Kv measured with the Castle link at normal (10�?) timing is 972, so 8% higher than what the gearing calculations were based on. With the 49/36 gearing, that yields a no-load wheel-speed of 162 and 189 km/h @ 3.7 V/cell, for 6S and 7S respectively; so on 7S, I think it should be able to clock 100 mph true speed with the current gearing.
Anyway, some pics:


Added a little CF plate underneath ESC to prevent flexing of the plastic tray that, together with the foamie, is intended to keep the brainboard in place.

Home-made CD top plate and ESC clamping brackets installed, both will serve as fan mounts.

Soldering on cap bank and external BEC leads, in case I want to use that - still not very amused by soldering 8 AWG wires.

Et voila!

Clamping brackets serve as mount for the 60x60x15 mm 24V fan. Made 5 mm spacers from some scrap alu tube.

Current status. Next step: wiring!
Another little update, stuff is starting to converge: got the CD top-plate and ESC done. The Mamba XL2 was modded a bit according to Lizard's ideas (clamping brackets) and should be a bit more robust now. Added 4x680uF caps (on top of existing 2480 uF, for total of 5200 uF) for bigger sparks and used some silicone gasket maker to improved IPX rating
.Still need to do some wiring, but couldn't wait to see the wheels finally turning. Tr�ed to drive it slowly in the living room and with gearing this absurd (rollout= 4.94 inch/motor revolution
) there is obviously some of the Mamba typical stuttering at start-up, but it wasn't half as bad as I thought (feared) it would be. Have to play a bit with the Castle link settings still to see what works best. Start Power is at high now, but after a slight stutter, that makes it take off with a bit of a bang, quite abruptly .Kv measured with the Castle link at normal (10�?) timing is 972, so 8% higher than what the gearing calculations were based on. With the 49/36 gearing, that yields a no-load wheel-speed of 162 and 189 km/h @ 3.7 V/cell, for 6S and 7S respectively; so on 7S, I think it should be able to clock 100 mph true speed with the current gearing.
Anyway, some pics:
Added a little CF plate underneath ESC to prevent flexing of the plastic tray that, together with the foamie, is intended to keep the brainboard in place.
Home-made CD top plate and ESC clamping brackets installed, both will serve as fan mounts.
Soldering on cap bank and external BEC leads, in case I want to use that - still not very amused by soldering 8 AWG wires.
Et voila!
Clamping brackets serve as mount for the 60x60x15 mm 24V fan. Made 5 mm spacers from some scrap alu tube.
Current status. Next step: wiring!
Last edited by Dr_T; 05-02-2015 at 03:14 PM.
 05-03-2015, 03:57 AM
#32
Tech Initiate
Haven't looked inside here for a while. Wow, a lot of progress
The body seems to fit perfectly, nice find. Although everything on the car is heavily modded, it looks almost 'stock-like', very well done.
Really interested if the Mamba XL2 will hold up and how good the cooling will work. You've surely done everything there is to make it happy. If it dies on you, we have the evidence that it's crap
Regarding the de-anodized parts: You can get them more shiny when wiping them off directly (really directly, max. 2 seconds later) after taking them out of the bath. If you wait a few seconds too long that black/dark stuff will stick and the only way to get it off is by polishing the parts. Oh, and be careful with threads and bearing seats, they might't become too lose after de-anodizing...
What will be the ready to run weight?
05-05-2015, 12:22 PM
#33
Thanks, that's a very nice compliment, much appreciated! Wiring worked out nicely, but body seems to be turning out to be a bit more ghetto-like though  .
.
Weight of the car is 3920 g now, without battery. The 5 Ah 6S and 7S Turnigy HD batteries are 880 g and 1025 g respectively, so that's 4800 g (6S) and 4945 g (7S) total. It's a bit heavier than I'd hoped, but still ~400-550 g less than my truggy and less than half the rotating mass on the wheels. Really curious how that motor will hold up. After some bench tests, it actually seems to run cooler at no load than the TP4070. No idea if that says anything about loaded performance already. Did you use yours already Lizard?
Was the first time I tried that deanodizing. Different types of alu appear to react very differently. Some parts become darkly oxidized very quickly and others just stay bright, no matter how long you leave it. I actually like the dirty oxidized look of the shock parts and the wheel-nuts, gives it a bit of a 'rat-bike' appearance. Wanted to have the front top-plate like that too, but it just stayed bright bare alu, without dark oxidation, so I'll keep on the black anodized one.
Everything's wired up now. I'm running the 24 V fans off a balance lead extension, so I can just swap between 6S and 7S easily. This way also prevents the internal BEC of the XL2 from putting power on the fans when using the Castle link. Something that seems to cause potential issues: http://www.offroad-cult.org/Board/lo...40.html#289268. The UBEC is connected to the ESC battery leads, but it has a power switch, so it can be turned off when using the Castle link. With hindsight I should have just gotten a HV servo, and power it from the balance leads as well, in order to avoid the whole need of an external BEC.
I probably should also just have routed both ESC battery leads through the middle of the car, instead of on each side of the ESC. Had some issues fitting the body now and tried shaping it a bit to accomodate the wires with a hot tea-spoon. Result is not the prettiest, but it works and with some matte black paint it might not look too bad.


27V

All band-aids in place

Making room for the wires

Shock tower with integrated ram-air intake


 ... I think I should start playing with this outside
.Weight of the car is 3920 g now, without battery. The 5 Ah 6S and 7S Turnigy HD batteries are 880 g and 1025 g respectively, so that's 4800 g (6S) and 4945 g (7S) total. It's a bit heavier than I'd hoped, but still ~400-550 g less than my truggy and less than half the rotating mass on the wheels. Really curious how that motor will hold up. After some bench tests, it actually seems to run cooler at no load than the TP4070. No idea if that says anything about loaded performance already. Did you use yours already Lizard?
Was the first time I tried that deanodizing. Different types of alu appear to react very differently. Some parts become darkly oxidized very quickly and others just stay bright, no matter how long you leave it. I actually like the dirty oxidized look of the shock parts and the wheel-nuts, gives it a bit of a 'rat-bike' appearance. Wanted to have the front top-plate like that too, but it just stayed bright bare alu, without dark oxidation, so I'll keep on the black anodized one.
Everything's wired up now. I'm running the 24 V fans off a balance lead extension, so I can just swap between 6S and 7S easily. This way also prevents the internal BEC of the XL2 from putting power on the fans when using the Castle link. Something that seems to cause potential issues: http://www.offroad-cult.org/Board/lo...40.html#289268. The UBEC is connected to the ESC battery leads, but it has a power switch, so it can be turned off when using the Castle link. With hindsight I should have just gotten a HV servo, and power it from the balance leads as well, in order to avoid the whole need of an external BEC.
I probably should also just have routed both ESC battery leads through the middle of the car, instead of on each side of the ESC. Had some issues fitting the body now and tried shaping it a bit to accomodate the wires with a hot tea-spoon
. Result is not the prettiest, but it works and with some matte black paint it might not look too bad.27V
All band-aids in place
Making room for the wires
Shock tower with integrated ram-air intake
... I think I should start playing with this outside
05-06-2015, 08:22 AM
#34
Tech Initiate
Wow, that's heavy.
With the de-anodizing I had the same experience, some types of aluminum become black, some don't. It's really a matter of seconds when wiping the black stuff off. But Rat-look is also very nice I think. Maybe get a Proline rat rod body for it
Could it be the lower kv (and thus higher winding resistance resulting in lower current and power) that causes the motor to run cooler unloaded? Since an unloaded motor doesn't generate any mechanical energy (torque), all the energy must be converted to heat.
Haha, I also once tried accelerating on my tiled floor, I can tell you burnt rubber is not easy to remove
Edit:Oops, forgot one thing No, haven't run the XO-1 yet.
With the de-anodizing I had the same experience, some types of aluminum become black, some don't. It's really a matter of seconds when wiping the black stuff off. But Rat-look is also very nice I think. Maybe get a Proline rat rod body for it
Could it be the lower kv (and thus higher winding resistance resulting in lower current and power) that causes the motor to run cooler unloaded? Since an unloaded motor doesn't generate any mechanical energy (torque), all the energy must be converted to heat.
Haha, I also once tried accelerating on my tiled floor, I can tell you burnt rubber is not easy to remove
Edit:Oops, forgot one thing
No, haven't run the XO-1 yet.
Last edited by rodizio; 05-06-2015 at 12:01 PM.
05-06-2015, 12:57 PM
#35
I had to use sand-paper to get that rubber off the wood .
Hmm, curious if lower kv motors should always have lower Io^2 * Rm then... just checked with some sample specs of the TP motors, but there wasn't a very consistent trend in that. Then again, their specs are usually full of typos anyway.
.Hmm, curious if lower kv motors should always have lower Io^2 * Rm then... just checked with some sample specs of the TP motors, but there wasn't a very consistent trend in that. Then again, their specs are usually full of typos anyway
.
05-07-2015, 07:30 AM
#36
No more cleaning the living-room floor: took it out for a little test-drive today (6S only, don't have a 7S charger yet  ), was fun!
Unfortunately it started raining shortly when I just started. I waited it out and continued when it was dry again, but the road was damp then and traction not so good. Wasn't looking for record speeds yet, just wanted to see if everything's working in order. Was amazed to see on the GPS I did actually get it up to 134 km/h (83 mph) on wet road, without trying to be really fast. With some good conditions and some more practice/confidence, this thing will be a blast.
Motor temp went up to 60�C max, ESC was 43�C inside, according to the the log. Peak Current draw was only little over 120 A with Torque control set at 4.5. Hard to tell yet how that setting works on dry road; on wet road I couldn't tell any limiting and was still sliding all over the place, as to be expected. Peak RPM was a bit higher than expected: higher than the nominal Voltage no-load RPM... if I should take Hobbyking's motor specs seriously (900kv @ 6S max = 20k RPM max) that might cause some problems when wanting to try 7S... Not sure what a realistic max RPM for this motor (rotor) should be. Anyone ideas? - Maybe I should just gear up .
The XL2 also logs ripple Voltage; max ripple at this test (120 A peaks) was 1.42V, which is 5.7% of the pack Voltage; according to Castle, that's good battery performance for the 5.0 Ah regular (40C) Turnigy pack I used: http://www.rc-monster.com/forum/show...2&postcount=11
Also shot some video, have to still check if it's of any use and then edit, will post later. Body and wings are still on the to-do list. White rear wing was borrowed froim my truggy, final version will be black, body also (matte of course). Front wing I still have to give some thought. I think I don't need a whole lot of front downforce, so I'm thinking a simple lexan 1/10 ST or trimmed down buggy wing might do.


), was fun! Unfortunately it started raining shortly when I just started. I waited it out and continued when it was dry again, but the road was damp then and traction not so good. Wasn't looking for record speeds yet, just wanted to see if everything's working in order. Was amazed to see on the GPS I did actually get it up to 134 km/h (83 mph) on wet road, without trying to be really fast. With some good conditions and some more practice/confidence, this thing will be a blast
.Motor temp went up to 60�C max, ESC was 43�C inside, according to the the log. Peak Current draw was only little over 120 A with Torque control set at 4.5. Hard to tell yet how that setting works on dry road; on wet road I couldn't tell any limiting and was still sliding all over the place, as to be expected
. Peak RPM was a bit higher than expected: higher than the nominal Voltage no-load RPM... if I should take Hobbyking's motor specs seriously (900kv @ 6S max = 20k RPM max) that might cause some problems when wanting to try 7S... Not sure what a realistic max RPM for this motor (rotor) should be. Anyone ideas? - Maybe I should just gear up .The XL2 also logs ripple Voltage; max ripple at this test (120 A peaks) was 1.42V, which is 5.7% of the pack Voltage; according to Castle, that's good battery performance for the 5.0 Ah regular (40C) Turnigy pack I used: http://www.rc-monster.com/forum/show...2&postcount=11
Also shot some video, have to still check if it's of any use and then edit, will post later. Body and wings are still on the to-do list. White rear wing was borrowed froim my truggy, final version will be black, body also (matte of course
). Front wing I still have to give some thought. I think I don't need a whole lot of front downforce, so I'm thinking a simple lexan 1/10 ST or trimmed down buggy wing might do.
05-07-2015, 10:37 AM
#37
Video's uploading, should be there shortly. It's a bit lengthy and boring, but that's what test-drives are; at least it's proof the 5682 motor and abnormal gearing works and is not a hoax .
Skip to 3:24 for low-speed Mamba XL2 cogging test.
.Skip to 3:24 for low-speed Mamba XL2 cogging test.
| + YouTube Video | |
05-08-2015, 05:10 AM
#38


Reducing the size of the XL2
49T pinion

134kh?
Keep up the good work!
49T that is somewhat the tooth i will be using on the never ending story
 05-09-2015, 07:37 AM
#39
Thanks! Looking forward to your Mugen .
For anyone interested, I just saw this. Maybe I should get some slicks on black rims... and rain tires!

.For anyone interested, I just saw this. Maybe I should get some slicks on black rims... and rain tires!
05-13-2015, 06:53 AM
#40
Tech Initiate
I had to use sand-paper to get that rubber off the wood .
Hmm, curious if lower kv motors should always have lower Io^2 * Rm then... just checked with some sample specs of the TP motors, but there wasn't a very consistent trend in that. Then again, their specs are usually full of typos anyway.
.Hmm, curious if lower kv motors should always have lower Io^2 * Rm then... just checked with some sample specs of the TP motors, but there wasn't a very consistent trend in that. Then again, their specs are usually full of typos anyway
.About the resistance, I am not sure how it is "counted" in regards to Y or delta wiring. If I remember correctly, with delta wiring, there is only one "coil" per phase in the circuit, with Y there are two in series. Maybe that's where the differences come from?
What makes me wonder a little is the ripple. It's not high, but considering you have a lot of capacitors on it and ran it not too hard that sounds quite a lot to me?
Maybe try to connect the Caps directly to the PCB of the ESC, right where the battery cables are solded to get them nearer to the FETs? Would make it smaller and "cleaner" also. But not sure if there is enough space there or if it can be done without cutting a lot of plastic.
Regarding buggy body vs. onroad body:
I would be interested to see the difference in handling and topspeed etc.
My theory is, that a buggy body creates less drag and less lift, so it should be better. But there are the exposed a-arms wheels and shocktowers, not sure how much drag that creates in comparison to an onbaord body where all that is under the body. Only real-life 'data' I have is: With the speedometer on the front, my Slash is about 3-5kph slower.
Oh and another question: Have you ever captured some data (maybe I overlooked it?) with 10Hz logging and then zoomed in so that you can see what happens in 100ms intervals? I'm interested in very short current spikes, that (I think) occur in some situations when wheels leave the ground and then get contact again or when you accelerate hard from a standstill and the ESC hasn't yet determined the exact position of the rotor yet etc.
05-13-2015, 02:41 PM
#41
I usually log at 10 Hz, as I'm also mostly interested in transients and don't run long anyway. I attached the log of the test-drive, feel free to check it out. I had to change extension to .pdf for the forum to swallow it; rename to .csv and you can check it with the Castle graph viewer.
What I find weird is that the logs show peak motor RPM to be ~25k, which would translate to about 1090 kv @ 100-120 A load. Have to test a bit more to see what's going on. If that's really the case, I might not try 7S on this motor. In the zoomed part below, you can see the motor RPM going from 0-25k in 0.8 s; and that 25k motor RPM corresponds to ~188 km/h wheel-speed... seems impossible.
I'll monitor the ripple; I know having the caps closest to the PCB would be the best, but I did not have the guts to solder on the board. Those big 8 AWG wires always make me put way more heat in then I want and with Castle using that lead-free solder stuff for their solderings, I was too scared messing things up and compromised for what it is now (yeah, I know, compromises are for sissies).
I think a car with a good, well designed GT body should have less overall (so car + body) drag than the same car with a buggy body, as wheels and towers are nicely covered, but that is a very narrow optimum in terms of attitude (angle relative to airflow). Small increases in pitch will expose so much surface area under the body (and bumper with a lot of leverage -long arm- with respect to cg) it will only generate more pitch-up moment and eventually too much lift, which I think is the primary cause for blow-overs. I think with the buggy bodies we might sacrifice some top-speed because of higher drag, but we gain a greater attitude range for which it will be stable - that's why I want to try the boggy body (that, and the fact I'm not much into scale looks anyway). In addition, I think a cut-down buggy wing might also give some more directional stability than the typical GT body/spoiler combo. Anyway, that's my theory, have to see still how it all works out .

What I find weird is that the logs show peak motor RPM to be ~25k, which would translate to about 1090 kv @ 100-120 A load. Have to test a bit more to see what's going on. If that's really the case, I might not try 7S on this motor. In the zoomed part below, you can see the motor RPM going from 0-25k in 0.8 s; and that 25k motor RPM corresponds to ~188 km/h wheel-speed... seems impossible.
I'll monitor the ripple; I know having the caps closest to the PCB would be the best, but I did not have the guts to solder on the board. Those big 8 AWG wires always make me put way more heat in then I want and with Castle using that lead-free solder stuff for their solderings, I was too scared messing things up and compromised for what it is now (yeah, I know, compromises are for sissies
).I think a car with a good, well designed GT body should have less overall (so car + body) drag than the same car with a buggy body, as wheels and towers are nicely covered, but that is a very narrow optimum in terms of attitude (angle relative to airflow). Small increases in pitch will expose so much surface area under the body (and bumper with a lot of leverage -long arm- with respect to cg) it will only generate more pitch-up moment and eventually too much lift, which I think is the primary cause for blow-overs. I think with the buggy bodies we might sacrifice some top-speed because of higher drag, but we gain a greater attitude range for which it will be stable - that's why I want to try the boggy body (that, and the fact I'm not much into scale looks anyway
). In addition, I think a cut-down buggy wing might also give some more directional stability than the typical GT body/spoiler combo. Anyway, that's my theory, have to see still how it all works out .
05-14-2015, 12:29 AM
#42
This is also an interesting pass. Seems like it almost takes a second for the ESC to lock commutation after throttle going through neutral. Then with smooth throttle build-up, according to the ESC, the motor revs up gradually from 0 to ~24600 RPM (with this gearing 185 km/h, 115 mph wheel-speed) in 3.3 seconds at 21.5 V, pulling 110 A. 24600 RPM / 21.5 V =1144 kv.

05-28-2015, 01:58 PM
#43
I couldn't resist getting the slicks . Sneak peak:

. Sneak peak:
06-15-2015, 08:13 AM
#44
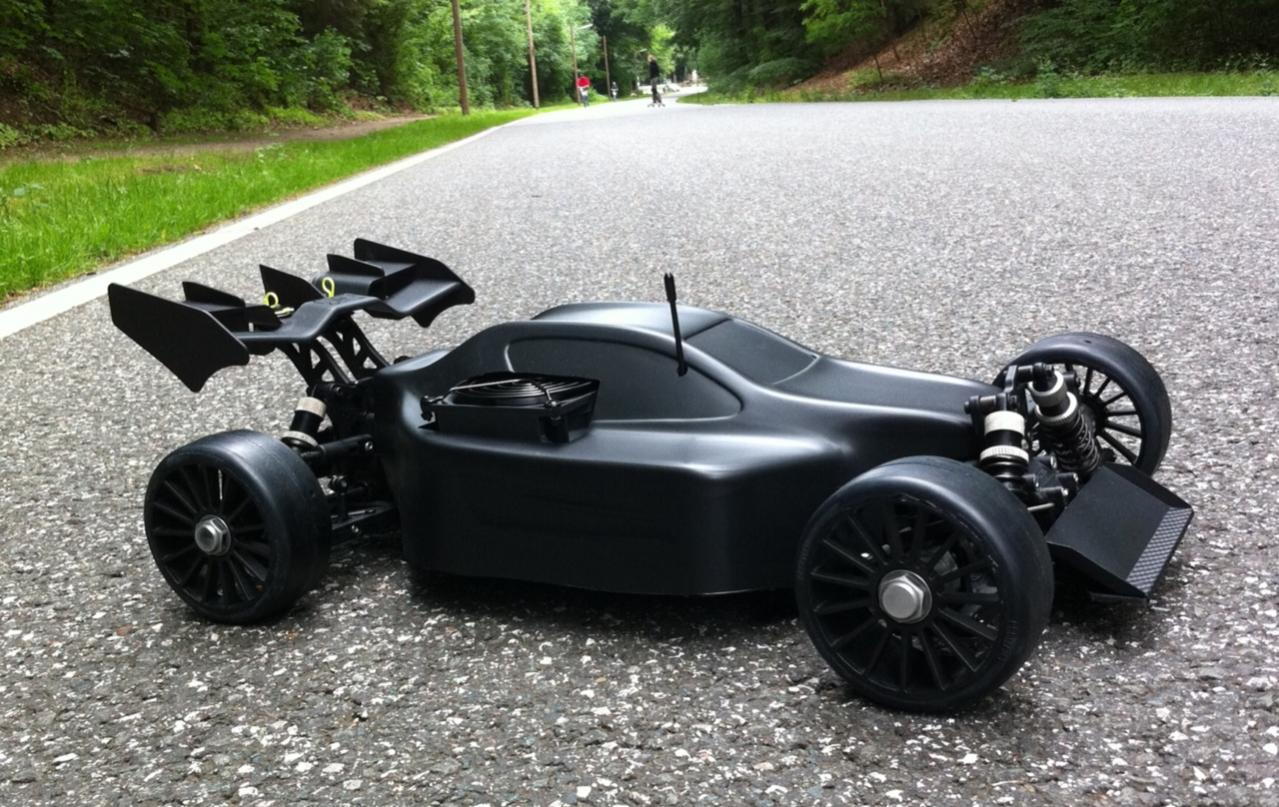
Got some good news and some bad news... The good news is I finally finished the wings and body, and I think it looks pretty good. So on that note... Batmobile's finally finished . Front wing seems to work good so far, have to do some more driving to know more.
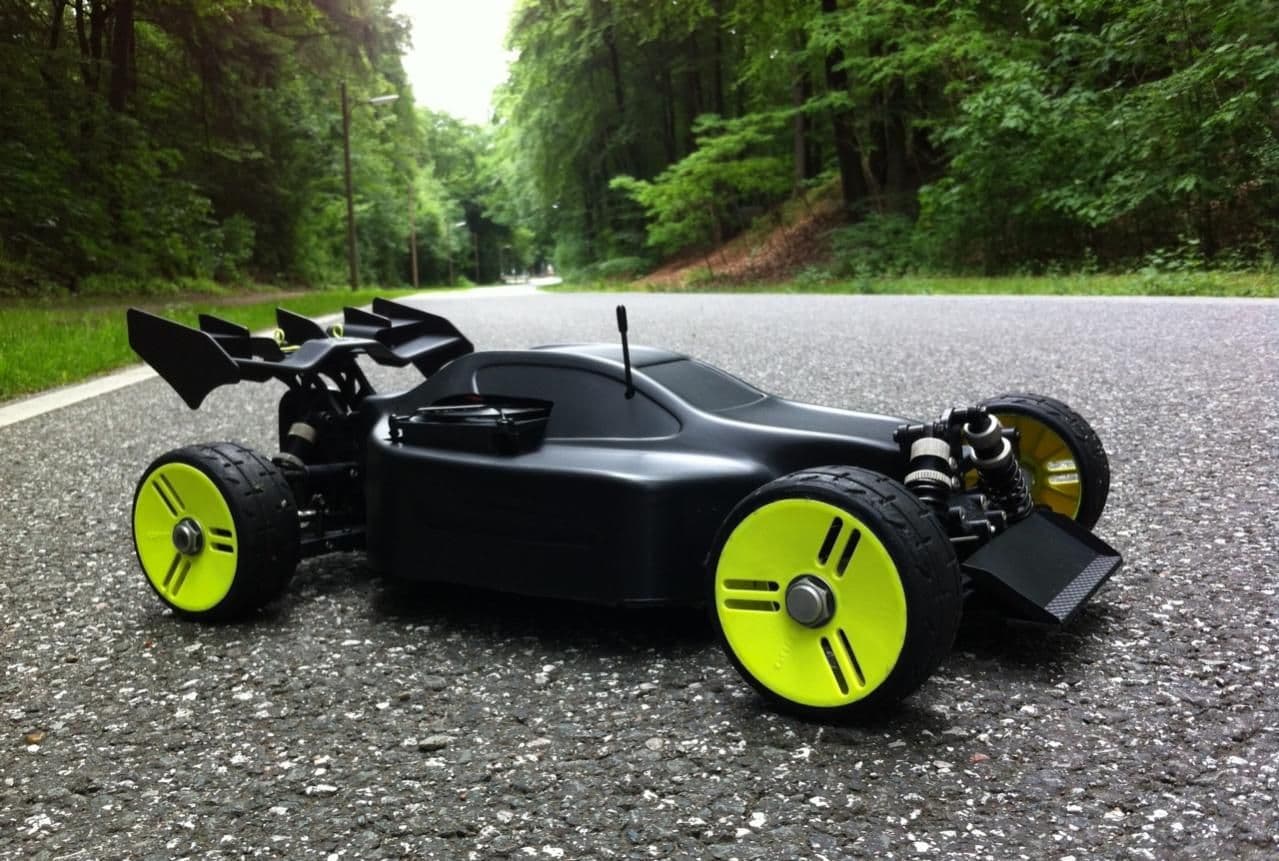
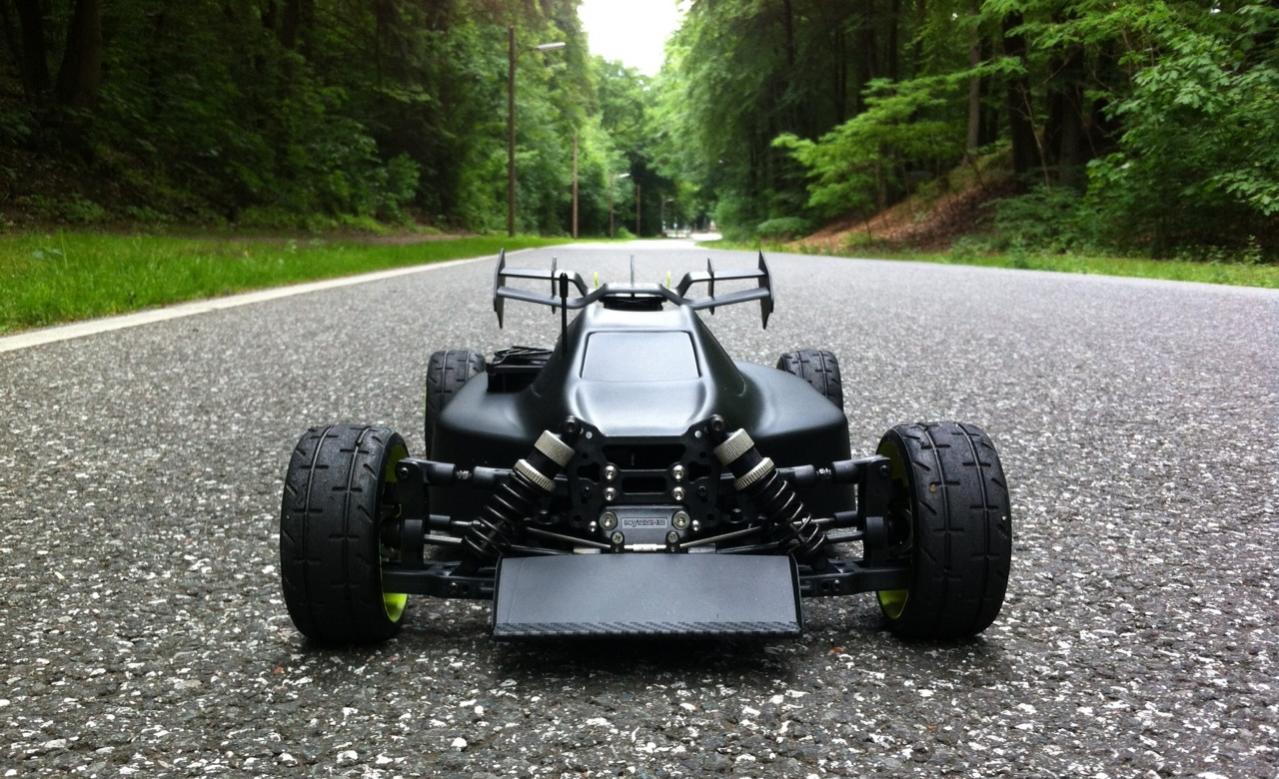


However... the bad news is: Thejc was right with his concerns about the Turnigy 5682 motor quality... I cremated it already... . I guess when Hobbyking is blowing off stuff for peanuts, there's probably a very good reason for it. In all fairness though, the motor was only rated for 106A, so I guess it was to be expected. I thought I could get away with it with some good cooling, but the winding resistance appears just to be too high, causing them to heat up too quickly. On a positive note, it means I'll be looking for a nice replacement motor. Have to check out the options a bit. More on that later.

Also tried the new GRP slicks, and as Lizard already mentioned in his 1717 Slash thread at RCM, they're less grippy than the originals... The rubber already feels less sticky and it seems they wear down differently too, the slicks appear to stay smoother (pic below is both S5 compound, used on same surface, same conditions). A bit bummed GRP doesn't mention differences in compounds in their specs. I emailed them last week about it to check, but no reply yet.

. Front wing seems to work good so far, have to do some more driving to know more.However... the bad news is: Thejc was right with his concerns about the Turnigy 5682 motor quality... I cremated it already...
. I guess when Hobbyking is blowing off stuff for peanuts, there's probably a very good reason for it. In all fairness though, the motor was only rated for 106A, so I guess it was to be expected. I thought I could get away with it with some good cooling, but the winding resistance appears just to be too high, causing them to heat up too quickly. On a positive note, it means I'll be looking for a nice replacement motor. Have to check out the options a bit. More on that later.Also tried the new GRP slicks, and as Lizard already mentioned in his 1717 Slash thread at RCM, they're less grippy than the originals... The rubber already feels less sticky and it seems they wear down differently too, the slicks appear to stay smoother (pic below is both S5 compound, used on same surface, same conditions). A bit bummed GRP doesn't mention differences in compounds in their specs. I emailed them last week about it to check, but no reply yet.
06-15-2015, 02:03 PM
#45
nice build ya got here...not gonna act like i know ya or nothin...but seems that we are crossing paths again..im kinda workin on somethin like yours !!!!brb!!!