Go Back  R/C Tech Forums > General Forums > Electric Off-Road
Xray XB2 2WD Buggy Thread >

Xray XB2 2WD Buggy Thread

Like Tree333Likes

Xray XB2 2WD Buggy Thread

    Hide Wikipost
Old 05-04-2019, 06:44 PM   -   Wikipost
R/C Tech ForumsThread Wiki: Xray XB2 2WD Buggy Thread
Please read: This is a community-maintained wiki post containing the most important information from this thread. You may edit the Wiki once you have been a member for 90 days and have made 90 posts.
 
Last edit by: dgrobe2112
Instruction manuals: (C/O BentKa)

Xray XB2 Carpet Edition Instruction Manual
http://www.teamxray.com/xb2/2016/dow...ual_v2_low.pdf

Xray XB2 Dirt Edition Instruction Manual
http://www.teamxray.com/xb2/2016/dow...w.pdf?update=2

BentKa: Carpet Edition 4 gear to 3 gear laydown conversion parts:
  • Gearbox #323014
  • Motorplate #324012
  • 36T idler gear #324236
  • Brace for waterfall #324031


Socket: Bodies Available:

Xray has two OEM bodies, the .75mm and the .50mm light weight:
light weight: https://www.amainhobbies.com/xray-xb...329701/p492942

OEM .75mm: https://www.amainhobbies.com/xray-0....329700/p477762

Also, I've fitted the yz2 body, both the light and regular fit fine, just make your own cut lines:
https://www.amainhobbies.com/yokomo-...z2-101/p417674


[i] J Concepts S2 Body [i]


Penguin Racing makes a high grip body that fits the DE and CE:
http://www.ebay.com/itm/X-Ray-Xb2-Hi...oAAOSw1S9WewHV


Socket: Wheel fitment:

According to some, you'll require different offset rear hexes to use B5M wheels. According to my Hudy setup board, B5M wheels are the same offset. I measured the overall width of the car with XB2 wheels, and then again with B5M wheels, same measurement.

On the front, B5M wheels were 1.5mm wider. Xray offers hexes to reduce width -.75 on each side, or you could spend 3-5 minutes and sand your OEM hexes down .75mm.

edit by dgrobe2112
here are the hubs for losi and AE

for AE Front 365354 -0.75
for Losi rear 365358 +3.00 (4 stripe)
for AE rear 365359 +3.75 (5 stripe) or add 1.5mm carbon avid spacers


Socket: Flex and the XB2:

Flex screws are as follows:

Plastic bulkhead between motor and waterfall. Can remove screw in chassis, or remove bulkhead altogether.

Waterfall has 4 screws, can remove the inner two or outer two. IIRC, removing the inner two provides more flex, and thus more bite.

Removing the battery brace. This gives a tremendous amount of flex on the middle of the car, and can sometimes be inconsistent. I do this for outdoor racing on low bite. I like the feel over the 4 gear in 17.5 racing, since the 4 gear will take some snap away off the corner.

Rear C block - has inner and outer screws. I haven't played with this, as it's a crucial pivot point of the car.

Medium arms and towers -> I don't believe the carpet car has the rear medium tower available, however the DE DOES have an optional hard part. I think the hard parts are more consistent, especially when it gets hot (90+ degrees F). However, the medium parts do NOT break unless you're severely talented. They also don't wear out.


Socket: Avid/Schelle Slipper mod:

Credit to WillS, Matt Trimmings, and myself for figuring this out months ago.

Parts you'll need:

B5M V2 3gear compatible top shaft.
TKO Special 5x13x5 bear OR 5x13x6 bearing Either can work. This replaces the spur side bearing on the top shaft.
5mm shims, same shims used in 1/8th scale clutch bells. Look for protek .1mm and .2mm kit.
Avid or Schelle b5m top shaft kit, with spur gears of your choosing. (DE can't handle a 69, the CE can)

Shimming: You'll need to install the bearing in the front portion of the removable piece for the shaft. Make sure the bearing is pushed all the way in. With the TKO bearing, you'll need to shim approximately 1.4mm on the front side of the top shaft. Roughly .3-.5mm with the other bearing. This is a "feel" and tolerance setting. I urge you to watch videos about setting clutch bell play in 1/8th scale to get an idea of what yield you want for end play. Too tight, it'll eat bearings.

Outside of trans case: Use Avid/Schelle top shaft spacer plus .2mm shim to offset slipper from motor plate perfectly. Install slipper as instructed, and use Avid/Schelle spring and XB2 slipper nut.

- NEW - Schelle now sells Xb2 Topshafts. They include a spacer, so no need for shims in gearbox, and comes with the smaller bearing. Both methods work.

Socket: Yokomo Differential or MIP pucks:

Credit to: WillS for figuring out pucks, and as well fitting the Losi 22 diff with the same mods.

Parts needed: Yokomo Bmax2 or YZ2 complete diff OR Mip PUCKS outdrives
Xb2 diff gear
Bmax2 V3 Worlds rear dog bones, or Bmax 2 pucks dog bones
You'll use XB2 axles, and will require no other mods for the axles or dog bones.
You'll need .2mm outdrive/diff shims. Shim approximately .5mm on each side of the diff, behind the bearings. The top portion of the transmission is what "sets" the diff in place, not the bottom half. A little play back and forth is fine, the stock diff has some play from the factory.

dgrobe2112: CE to DE conversion:
along with the parts needed.. you MUST have these following hardware, or it wont work

https://www.teamxray.com/xb2/2016/do...conversion.pdf

(3) XRAY 902340 M3x40 button head screws. these are the screws that mount the motor mount to the tranny
(4) XRAY 903322 M3x22 counter sunk screws. these are for the rear diff case, to mount to the chassis. i think i used some M3x18 and they worked ok.

Socket: Best method for setting up the XB2 ball diff:

The XB2 diff is stellar when setup correctly. The spring is too short and soft, allowing the diff to slip. You'll need to glue the rings to the outdrives with just a drop of CA, then add a 1mm shim between the spring and the outdrive. This preloads the spring and stops the diff from slipping so easily.

OR, you can run the AE diff spring, which is both slightly longer, and stiffer. The overwhelming issue is the stock spring allows the nut to bottom out on the outdrive before the diff is tight enough.

This shim:
https://www.amainhobbies.com/xray-al...a303122/p12070

This diff spring (don't need a shim, then.)

https://www.teamassociated.com/parts...thrust_spring/

Functional Aftermarket parts: (Not just bling!)

Servo Horn: (The B5M sized horns are too short to get full throw)
https://www.amainhobbies.com/protek-...800-bk/p273496


Socket: Exotek has a full suite of parts, some bling, some not. Here's a list (all fit DE and CE, unless otherwise noted):

Titanium front axles: http://www.exotekracing.com/xb2-titanium-front-axles-2/

Rear Hanger, HD (Adds 4 grams): http://www.exotekracing.com/xb2-rear...75-heavy-duty/

Brass C block, 18 grams added: http://www.exotekracing.com/xb2-rear...-brass-weight/

Alloy front camber mount: http://www.exotekracing.com/xb2-fron...er-mount-7075/

Carbon Fiber Chassis: http://www.exotekracing.com/xb2-carb...m-plate-2-5mm/

Alloy rear hubs:http://www.exotekracing.com/xb2-allo...ub-set-2-7075/

Alloy servo mounts, allow for use of LP servo:http://www.exotekracing.com/xb2-xb4-...-alloy-1-pair/

Titanium shock mounts: http://www.exotekracing.com/xb2-xb4-...shock-posts-2/

Slipper Eliminator: http://www.exotekracing.com/xb2-direct-spur-mount/
Xray eliminator is #324100

dgrobe2112: 2016-2017 new 3 gear laydown
Gearbox #323014
Motor plate #324012
36T idler gear #324236
Brace for waterfall #324031

dgrobe2112: Xray Spring Rate Conversion:
front C WHT
368174 2 str 0.65-0.85 3.71-4.85

358184 2 dot 0.65 3.71
368185 3 dot 0.72 4.11
368186 4 dot 0.80 4.57


Rear
368273 2 str 0.35-0.45 2.00-2.57

368284 1 Dot 0.35 2.00
368285 2 Dot 0.40 2.28
368286 3 Dot 0.45 2.57
368287 4 Dot 0.50 2.86

Print Wikipost

Old 02-21-2016, 06:36 PM
  #1561  
Tech Champion
iTrader: (515)
 
Join Date: Oct 2009
Location: Antelope Valley, CA
Posts: 5,090
Trader Rating: 515 (100%+)
Default

I ran an XB2 on a high bite clay track with Primes and it was really good. The only way to describe is it very precise and locked in.
QDRHRSE is offline  
Old 02-21-2016, 07:11 PM
  #1562  
Tech Regular
 
Poppin Fresh's Avatar
 
Join Date: Jun 2008
Location: NY NY
Posts: 342
Default

Originally Posted by punkracer24
You can use Proline wheels for the AE car. To get the correct width you need to run -.75 front hexes and for the rear you can either stick with stock (3 stripe) or go up to 4 stripe rear hexes.


It is good to note that the xray wheels are a little softer so in the right situations they will help produce better traction.
Thanks for the reply. I also noticed that my rear droop isn't much compared to my AE B5M buggies. What are you guys doing to increase droop aside from removing the shims inside the shock bodies? Is this intended by Xray for the carpet edition, or will the dirt version have similar rear droop?
Poppin Fresh is offline  
Old 02-21-2016, 07:38 PM
  #1563  
Tech Champion
iTrader: (515)
 
Join Date: Oct 2009
Location: Antelope Valley, CA
Posts: 5,090
Trader Rating: 515 (100%+)
Default

Even on high bite clay you need to take a little droop out to help keep the car from traction rolling. The dirt car will probably be a little different in that respect.
QDRHRSE is offline  
Old 02-21-2016, 08:57 PM
  #1564  
Tech Regular
iTrader: (29)
 
Join Date: Apr 2013
Posts: 336
Trader Rating: 29 (100%+)
Default

anyone having problem that the buggy pulls to the left on power then pulls to the right under braking, 3 of us xrays having the same issue, i had mines put on the setup tool and the left rear has more toe than the right, double checked i have identical left and right pills, its not a big pull but noticable
blacktop20valve is offline  
Old 02-21-2016, 10:07 PM
  #1565  
Tech Elite
iTrader: (14)
 
gticlay's Avatar
 
Join Date: Jan 2011
Posts: 2,105
Trader Rating: 14 (100%+)
Default

Originally Posted by blacktop20valve
anyone having problem that the buggy pulls to the left on power then pulls to the right under braking, 3 of us xrays having the same issue, i had mines put on the setup tool and the left rear has more toe than the right, double checked i have identical left and right pills, its not a big pull but noticable
Make sure all your screws are tight. It can seem like they are in the hard plastic when they aren't.
gticlay is offline  
Old 02-21-2016, 11:49 PM
  #1566  
Tech Master
iTrader: (15)
 
Join Date: Jun 2013
Location: Savannah, Ga
Posts: 1,326
Trader Rating: 15 (100%+)
Default

Originally Posted by blacktop20valve
anyone having problem that the buggy pulls to the left on power then pulls to the right under braking, 3 of us xrays having the same issue, i had mines put on the setup tool and the left rear has more toe than the right, double checked i have identical left and right pills, its not a big pull but noticable
I actually noticed that yesterday, not severe by any means, but it was there. I kept trying to adjust my steering subtrim lol.
fivepointnine is offline  
Old 02-22-2016, 02:19 AM
  #1567  
Tech Elite
iTrader: (141)
 
hacker's Avatar
 
Join Date: Mar 2009
Location: Vic, Australia
Posts: 3,140
Trader Rating: 141 (100%+)
Default

It wouldn't be the first time the rear hangers are inaccurate!

Xray need to optimize their manufacturing techniques
hacker is offline  
Old 02-22-2016, 03:42 AM
  #1568  
Tech Rookie
 
Join Date: Oct 2015
Posts: 19
Default

Originally Posted by speed90
Supposedly the dirt cars on on the boat right now. A fellow racer called and that was the answer he was given.
yeah, that's the answer I was given 2 or 3 weeks ago... im starting to think maybe they are actually on a row boat!
Mr Gadget is offline  
Old 02-22-2016, 04:29 AM
  #1569  
Tech Master
Thread Starter
 
BentKa's Avatar
 
Join Date: Aug 2011
Location: Norway
Posts: 1,380
Default


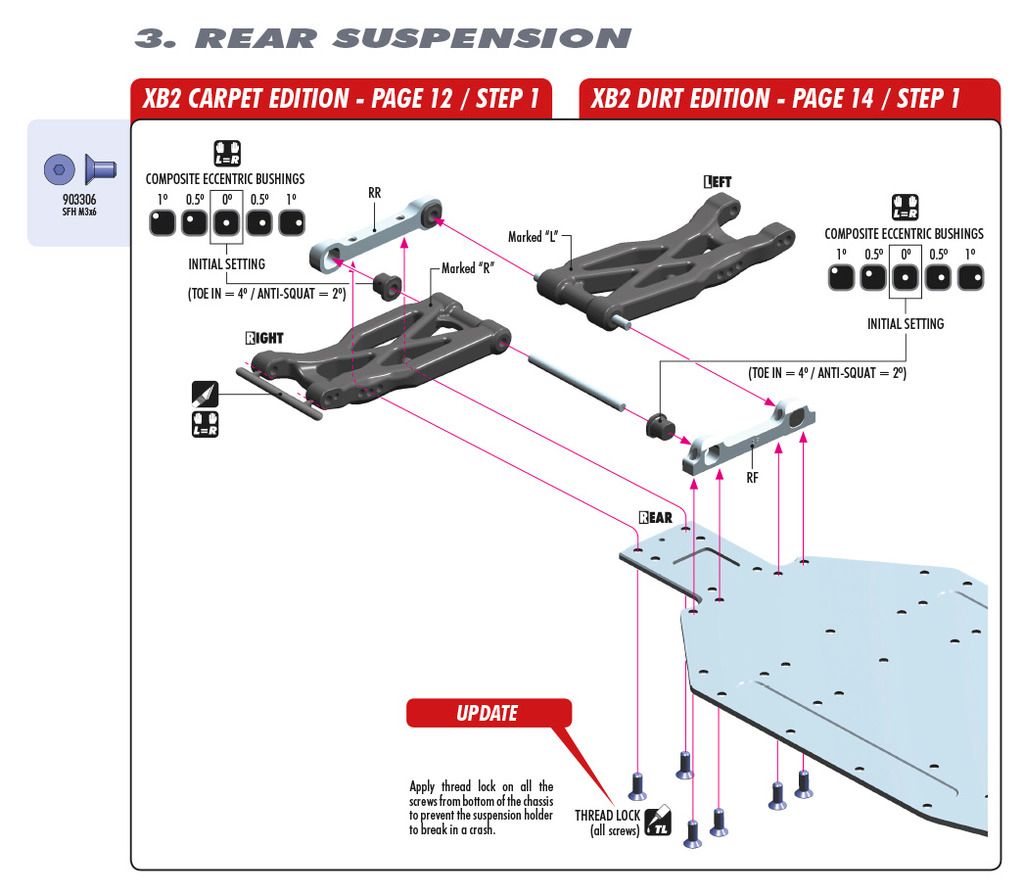
The XB2 Instruction Manual update includes important information to add threadlock on the screws that mount the suspension holders from bottom of the chassis.

Bent
BentKa is offline  
Old 02-22-2016, 04:45 AM
  #1570  
Tech Elite
iTrader: (14)
 
Lonestar's Avatar
 
Join Date: Oct 2001
Location: Switzerland
Posts: 3,039
Trader Rating: 14 (100%+)
Default

Originally Posted by blacktop20valve
anyone having problem that the buggy pulls to the left on power then pulls to the right under braking, 3 of us xrays having the same issue, i had mines put on the setup tool and the left rear has more toe than the right, double checked i have identical left and right pills, its not a big pull but noticable
bringing Juraj's worst nightmares from the xb4 back to the surface...
Lonestar is offline  
Old 02-22-2016, 05:21 AM
  #1571  
Tech Master
iTrader: (15)
 
Join Date: Jun 2013
Location: Savannah, Ga
Posts: 1,326
Trader Rating: 15 (100%+)
Default

Originally Posted by Lonestar
bringing Juraj's worst nightmares from the xb4 back to the surface...
Wasnt it the '14 or '15 that had the same issue?
fivepointnine is offline  
Old 02-22-2016, 05:47 AM
  #1572  
Tech Master
Thread Starter
 
BentKa's Avatar
 
Join Date: Aug 2011
Location: Norway
Posts: 1,380
Default


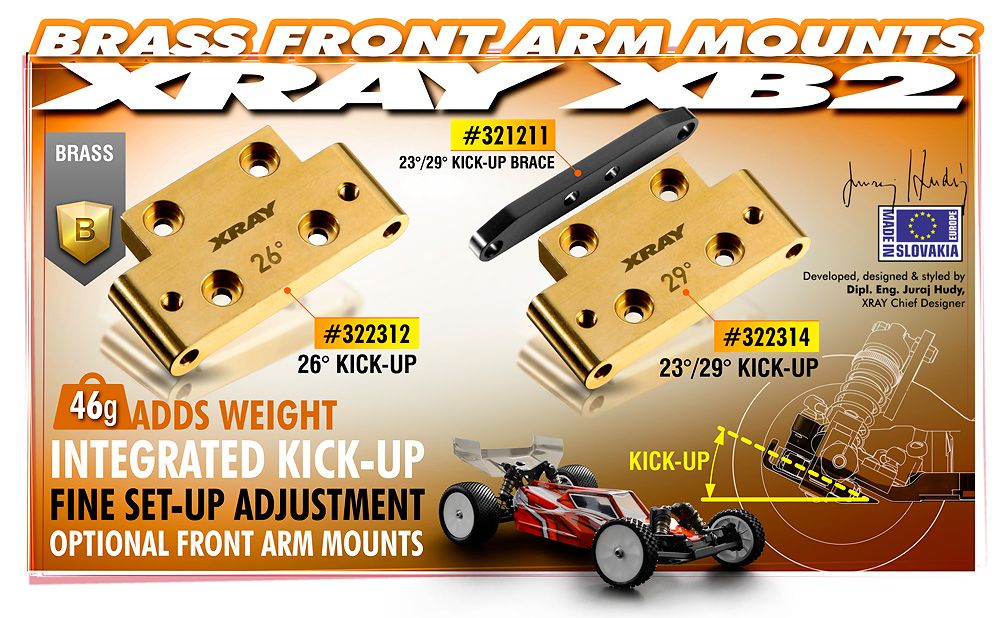
#322312 Brass 46g Front Lower Arm Mount 26° Kick-Up
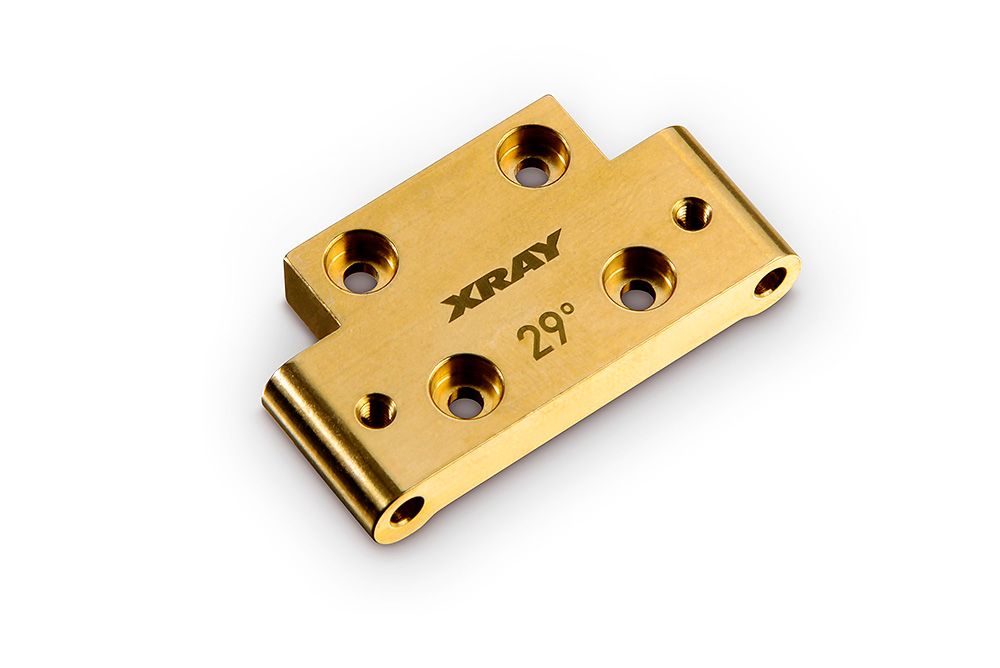
#322314 Brass 46g Front Lower Arm Mount 23°/29° Kick-Up


• Optional front lower arm mounts
• Integrated kick-up
• Fine set-up adjustment
• Add weight


Optional brass front lower arm mounts with different kick-up angles integrated. Brass lower arm mounts add more weight in front which results in less weight transfer and increased on-power steering compared to standard composite front lower arm mount.


Optional mount #302314 with integrated 23°/29° kick-up angle must be used together with #321211 Alu Front Lower Arm Mount 23°/29° Kick-Up Brace - 7075 T6.

Bent
BentKa is offline  
Old 02-22-2016, 07:12 AM
  #1573  
Tech Fanatic
iTrader: (6)
 
macdude's Avatar
 
Join Date: Feb 2010
Posts: 968
Trader Rating: 6 (100%+)
Default

First outing with car and all I can say is it's dialed. Kit setup is a little off. But that was easily fixed. Turns in hard and responds very well in and out of the corner. Tight carpet pretty high grip with foam tires. Like driving a pan car with jumps.
macdude is offline  
Old 02-22-2016, 07:42 AM
  #1574  
Tech Addict
iTrader: (7)
 
Join Date: Dec 2011
Posts: 535
Trader Rating: 7 (100%+)
Default

Which screws need tighten for pulling. I have it too. Not bad but a bit
rekim is offline  
Old 02-22-2016, 08:26 AM
  #1575  
Tech Master
iTrader: (15)
 
Join Date: Jun 2013
Location: Savannah, Ga
Posts: 1,326
Trader Rating: 15 (100%+)
Default

Originally Posted by rekim
Which screws need tighten for pulling. I have it too. Not bad but a bit
I just checked every screw on the back of my buggy. I found that the ones that hold the lower transmission housing on (rear ones) were actually a bit lose. I used a quality driver (MIP) and was able to tighten them up considerably more.
fivepointnine is offline  

Thread Tools
Search this Thread

Contact Us - Archive - Advertising - Cookie Policy - Privacy Statement - Terms of Service -

Copyright © 2024 MH Sub I, LLC dba Internet Brands. All rights reserved. Use of this site indicates your consent to the Terms of Use.