


Team Magic E4 Thread
 10-11-2012, 10:54 PM
#4096

alright. my solidworks skills arent quite up to yodogs snuff but here is what im working on.
I want to maintain compatability with stock lipos which really doesnt give me any more room to move componentry around.
Basically, i want more room for mounting the lipo without having to cut up the car as we have had to.
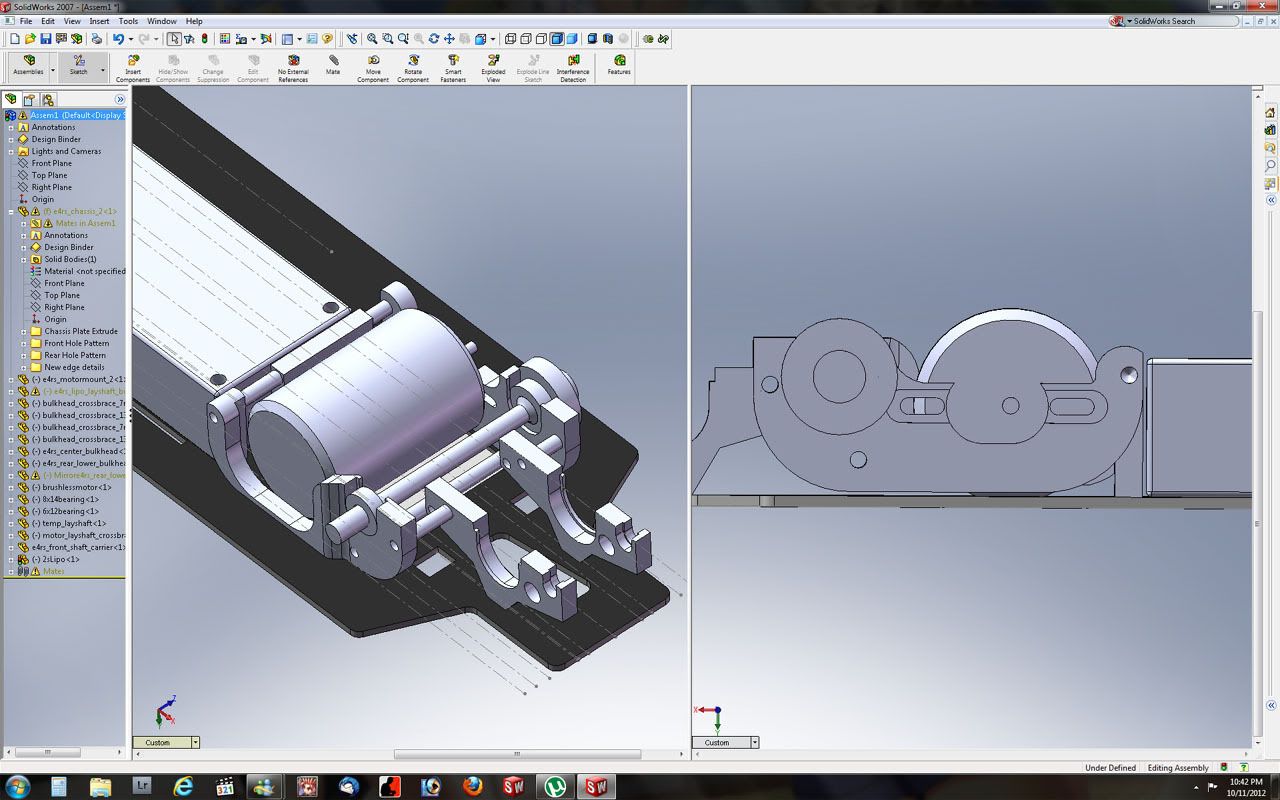
this is a very rough block up of how i might do this. The battery hole will go away. ill leave slits for users to use strap tape, or lipo blocks which ive yet to look at.
the motor mount and layshaft mount will be replaced with new ones that will have an xray style so you can install/remove the motor vertically without removing any of the chassis parts.
under the motor and the new bulkheads the chassis will be hogged out to .5 mm in an even pattern in the middle to maintain the same amount of material left/right. the new motor mounts and motor will be suspended in this pocket by a center bulkhead and a set of crossbars whcih will mate to a new topdeck that connects in the middle.
there is also a new crossbar just under the layshaft to add strength.
i cant really imagine moving the steering. using exclusivly shorty lipos you could, but the front shaft really gets in the way. id have to move it backward and change out to different belts. the single bellcrank seems to work fine with enough bumpsteer spacers on the steering blocks.
definitely not a polished drawing, just wanted to sketch it out and see if everything would fit while still allowing adjustability.
I want to maintain compatability with stock lipos which really doesnt give me any more room to move componentry around.
Basically, i want more room for mounting the lipo without having to cut up the car as we have had to.
this is a very rough block up of how i might do this. The battery hole will go away. ill leave slits for users to use strap tape, or lipo blocks which ive yet to look at.
the motor mount and layshaft mount will be replaced with new ones that will have an xray style so you can install/remove the motor vertically without removing any of the chassis parts.
under the motor and the new bulkheads the chassis will be hogged out to .5 mm in an even pattern in the middle to maintain the same amount of material left/right. the new motor mounts and motor will be suspended in this pocket by a center bulkhead and a set of crossbars whcih will mate to a new topdeck that connects in the middle.
there is also a new crossbar just under the layshaft to add strength.
i cant really imagine moving the steering. using exclusivly shorty lipos you could, but the front shaft really gets in the way. id have to move it backward and change out to different belts. the single bellcrank seems to work fine with enough bumpsteer spacers on the steering blocks.
definitely not a polished drawing, just wanted to sketch it out and see if everything would fit while still allowing adjustability.
 10-12-2012, 07:13 AM
#4098
Tech Apprentice
iTrader: (15)
I really like the new design. It would address the flex issue as well as the motor mount and what you call the big ass battery hole. Why bother milling out the center of the chassis? Just make the battery slide out the side (after removing the belt). I personally hate strapping tape, so the lipo blocks would be great. Redesigned side belt tensioner that won't interfere with the battery removal would be nice.
10-12-2012, 07:21 AM
#4099
ill take a look at some kind of mechanical retention for the battery once i refine the motor pod setup.
hogging out the motor plate area just allows the motor to sit at stock height and allows the bulkheads to flex without hitting the chassis plate. i wont be reducing the thickness for the battery. wouldnt really work to help the flex unless i take material from the entire chassis equally.
hogging out the motor plate area just allows the motor to sit at stock height and allows the bulkheads to flex without hitting the chassis plate. i wont be reducing the thickness for the battery. wouldnt really work to help the flex unless i take material from the entire chassis equally.
10-14-2012, 11:29 PM
#4100
busy weekend with racing and family crap. had to reformat my desktop which i was putting off for a while.
did a little cleaning up of new layout. still not sure if i want to cut out as much material from the chassis plate or not. its in there for the time being but i might reduce the square as i somewhat doubt this pod is going to flex a lot. this should sort out the flex though as all the mounting positions to the main chassis and top deck will be symetrical.

did a little cleaning up of new layout. still not sure if i want to cut out as much material from the chassis plate or not. its in there for the time being but i might reduce the square as i somewhat doubt this pod is going to flex a lot. this should sort out the flex though as all the mounting positions to the main chassis and top deck will be symetrical.
10-19-2012, 03:14 PM
#4101
hey guys, quick q....i just picked up a used e4 rs that was barely used and i had to replace the front belt and pulley. the new belt seem too tight that i had to take off the front belt tensioner...is this how they were out of the box ? it should break in with use right ? any suggestions ? thanks
10-20-2012, 10:41 AM
#4102
hey guys, quick q....i just picked up a used e4 rs that was barely used and i had to replace the front belt and pulley. the new belt seem too tight that i had to take off the front belt tensioner...is this how they were out of the box ? it should break in with use right ? any suggestions ? thanks
10-20-2012, 11:29 AM
#4103
oh shyte lol, i didn't even think of there being different size pullies for it lol. I took my front belt tensioner off but there really should be a better place for the side belt tension. i can crank that thing all the way down and it will stick skip teeth under breaking or hard corner exit.
10-20-2012, 10:50 PM
#4104
the pully is an 18 tooth
10-28-2012, 08:37 AM
#4106
Tech Apprentice
iTrader: (15)
Can anyone play with the software? Can it be downloaded? Also: do either of you have any experience with a pin router? I'm thinking of making one with the pin on top and the router underneath to play with a couple of designs.
10-29-2012, 07:45 AM
#4107
There are maybe something for Linux based machines. I for one have no experience with a pin router. I use a CNC tabletop router machine which is great for making 2.5D parts.
11-01-2012, 10:15 PM
#4108
So, baught a new to me, but still 2 year old video card a couple weeks ago. been training vrc, going to saturday indoor racers and getting addicted to guildwars 2 now that i have something that can play it.
came from a Geforce 7900GT which was madly overclocked and modified.. but was never really compatible with windows 7 ha. HD5850 i got for really cheap is much much better.
i really need a new pc, but rc kinda killed that this year; buying a WGT and NT1, and now replacing my radio and all rxs ha.
but.. getting back to my Lipo/brushless conversion of my E4, a little progress has been made.
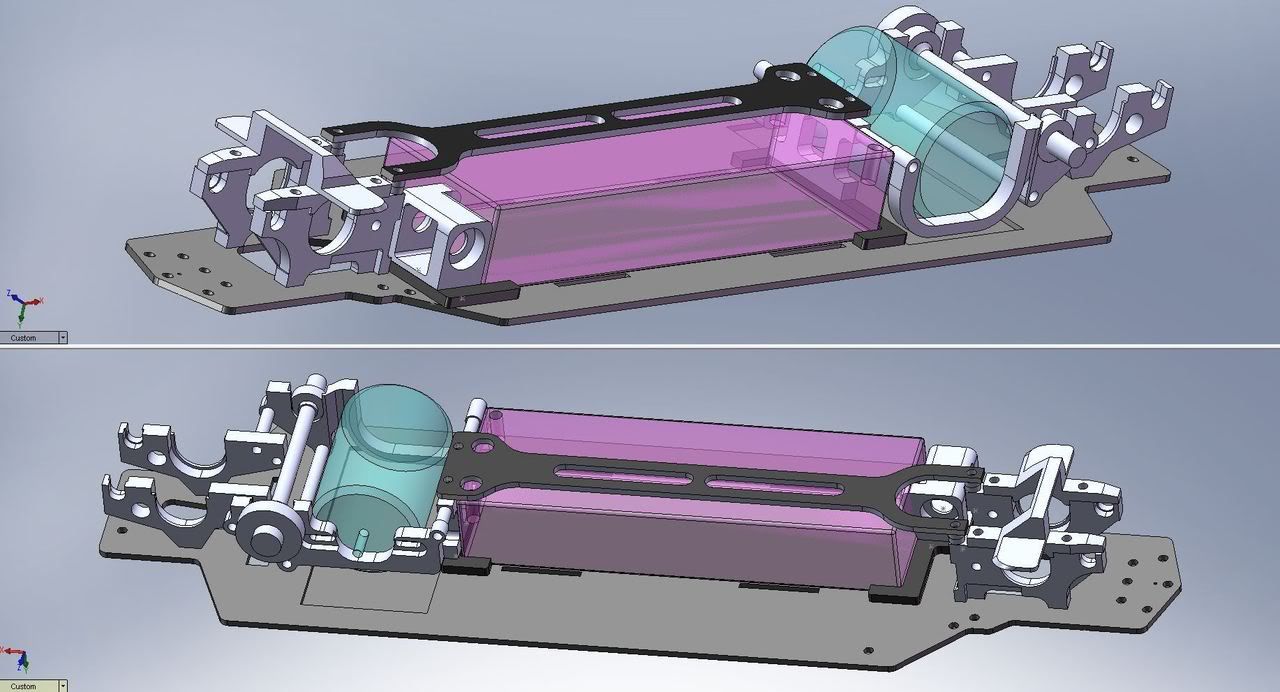
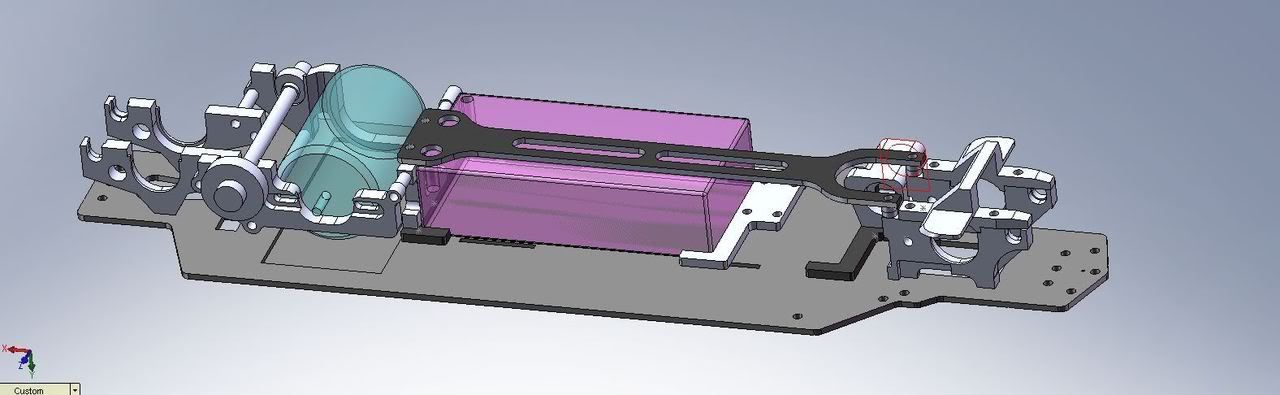
I will include carbon fiber lipo blocks that mount under the center bulkhead, and under the front shaft carrier. the carrier still needs to be trimmed to allow room for the full size lipo, though if its simple enough to machine, i might make one of those too if there is enough interest in conversion kits.
the front lipo block can be optionally removed from the forward position and moved backward to allow shorty packs to fit in the rear ward position. an optional shim can take place of the rear lipo block, and will allow the rear lipo block to shift forward to allow the shorty pack to move for and aft.
I also want to work out how to allow shorty packs to work transverse. on racks with slow speed, sharp corners, more roll is beneficial. I would accomplish this by lenthening the body of the side belt pullys allowing the full 96mm of the chassis for the battery. this would require more lipo blocks to be made, so i think it would be optional.
here is where im at now. i can machine most of the parts now. the layshaft side bulkhead will give me some grief but working on it.
not bad for my first cad experience at all!
came from a Geforce 7900GT which was madly overclocked and modified.. but was never really compatible with windows 7 ha. HD5850 i got for really cheap is much much better.
i really need a new pc, but rc kinda killed that this year; buying a WGT and NT1, and now replacing my radio and all rxs ha.
but.. getting back to my Lipo/brushless conversion of my E4, a little progress has been made.
I will include carbon fiber lipo blocks that mount under the center bulkhead, and under the front shaft carrier. the carrier still needs to be trimmed to allow room for the full size lipo, though if its simple enough to machine, i might make one of those too if there is enough interest in conversion kits.
the front lipo block can be optionally removed from the forward position and moved backward to allow shorty packs to fit in the rear ward position. an optional shim can take place of the rear lipo block, and will allow the rear lipo block to shift forward to allow the shorty pack to move for and aft.
I also want to work out how to allow shorty packs to work transverse. on racks with slow speed, sharp corners, more roll is beneficial. I would accomplish this by lenthening the body of the side belt pullys allowing the full 96mm of the chassis for the battery. this would require more lipo blocks to be made, so i think it would be optional.
here is where im at now. i can machine most of the parts now. the layshaft side bulkhead will give me some grief but working on it.
not bad for my first cad experience at all!
11-01-2012, 10:16 PM
#4109
So, baught a new to me, but still 2 year old video card a couple weeks ago. been training vrc, going to saturday indoor racers and getting addicted to guildwars 2 now that i have something that can play it.
came from a Geforce 7900GT which was madly overclocked and modified.. but was never really compatible with windows 7 ha. HD5850 i got for really cheap is much much better.
i really need a new pc, but rc kinda killed that this year; buying a WGT and NT1, and now replacing my radio and all rxs ha.
but.. getting back to my Lipo/brushless conversion of my E4, a little progress has been made.
I will include carbon fiber lipo blocks that mount under the center bulkhead, and under the front shaft carrier. the carrier still needs to be trimmed to allow room for the full size lipo, though if its simple enough to machine, i might make one of those too if there is enough interest in conversion kits.
the front lipo block can be optionally removed from the forward position and moved backward to allow shorty packs to fit in the rear ward position. an optional shim can take place of the rear lipo block, and will allow the rear lipo block to shift forward to allow the shorty pack to move for and aft.
I also want to work out how to allow shorty packs to work transverse. on racks with slow speed, sharp corners, more roll is beneficial. I would accomplish this by lenthening the body of the side belt pullys allowing the full 96mm of the chassis for the battery. this would require more lipo blocks to be made, so i think it would be optional.
here is where im at now. i can machine most of the parts now. the layshaft side bulkhead will give me some grief but working on it.
not bad for my first cad experience at all!
11-04-2012, 04:26 PM
#4110
question. are the RS2 suspesion parts compatible? importantly, Chubs.
i broke one within minutes on carpet and wondering if there anything stronger i could use. i have a set of kfactory hubs but didnt get the bearings with them. seems they use a non standard bearing size =(
i broke one within minutes on carpet and wondering if there anything stronger i could use. i have a set of kfactory hubs but didnt get the bearings with them. seems they use a non standard bearing size =(