


CC01 fest
 04-14-2013, 04:37 PM
#1
It's a CC01 fest!
I build a little off road course in the backyard, and turns out it's pretty easy for the 2.2's. The 1.9's on the other hand have much more of a challenge getting around and it's a ton of fun wheeling them around. I have a fleet of CC01's in various states of construction, and since spring is here, it's time to get them up and running. Plan is to get a few rigs up and running here, and do a couple of different builds, from mild to wild. The goal is to build them up without spending another dime!
Here's what I'm starting with for the first build..only the F150 on the left is a runner at the moment.

Decided to take the Jeep body and the green Pajero chassis and start the "mild" build. Chassis was already modded a bit with a mini body lift, modded lower links that need work, and to my suprise, an RC4WD GRU that I didn't remember putting in there at all.

Decided to start in the back. Saw a mod somewhere where someone shimmed the rear axle with a pair of bushings. Tried it, and it works like a charm! Will be adding this to each of my builds.

Next, wanted to do something about the lower links. Seen a ton of ways to do it, and wasn't sure which way to go, just knew I wanted to relocate the links from the bottom of the axle...was fabbing a bracket from scratch and it dawned on me that I was reinventing the wheel. Took the stock lowers, popped the ball out and press fit in a plastic shim. Using a screw to keep it all aligned, I epoxied the lower link to the axle. I used "Plastic Weld" - never heard of it before, but seems to work very well. After it set overnight, I made
some aluminum reinforcement plates for the bottom that moved the lower link to just in front of the axle.


Triple walled brass tube bent up into a truss for the top.

Mocked up..

And painted up and installed. Had to keep the 5mm ball links at the bottom as the TRX ball ends I was going to use limited flex...geometry worked out perfect, was worried about the little upper links, but no axle steer at all and just enough downtravel for a CC chassis. Still have to sleeve the links though.

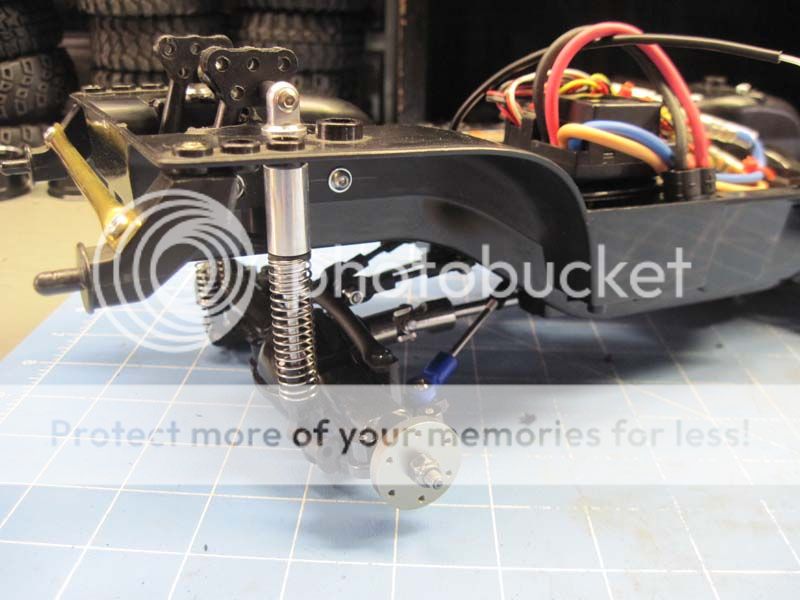
Wasn't happy with the rear shocks, so hacked up an old CR01 trans mount and bolted it inside the chassis. Cut some holes in the chassis and used some TLT shocks. Get a little over an inch of direct rear wheel travel with this set-up.

Now for the tricky part. I hate how the jeep body sits on the CC chassis. The front wheel tucks too far back into the wheelwell imo.

So took off the lower arm mount and hacked off 10mm at the back. That takes some structure off, so I CA'd some styrene in there to beef it back up. I mounted the arms and used the pieces I cut off up front as a spacer.

Worked out pretty well. I had to trim the C's a bit, add adjustable uppers and swap the lower shock mount for a ball end as it bound up, but looks like it's going to work out ok.

Only issue is I'll have to trim the front fender a bit. Not even sure what that indent was for, but it's going to have to go.

Much better!

and the chassis as it sits. Looks like it has a lot of rake, but I tweaked the body mounts so it sits fairly level (ish)

Front completely clears, though the rear still needs some trimming...quite a bit of it.

More madness to come
I build a little off road course in the backyard, and turns out it's pretty easy for the 2.2's. The 1.9's on the other hand have much more of a challenge getting around and it's a ton of fun wheeling them around. I have a fleet of CC01's in various states of construction, and since spring is here, it's time to get them up and running. Plan is to get a few rigs up and running here, and do a couple of different builds, from mild to wild. The goal is to build them up without spending another dime!
Here's what I'm starting with for the first build..only the F150 on the left is a runner at the moment.

Decided to take the Jeep body and the green Pajero chassis and start the "mild" build. Chassis was already modded a bit with a mini body lift, modded lower links that need work, and to my suprise, an RC4WD GRU that I didn't remember putting in there at all.

Decided to start in the back. Saw a mod somewhere where someone shimmed the rear axle with a pair of bushings. Tried it, and it works like a charm! Will be adding this to each of my builds.

Next, wanted to do something about the lower links. Seen a ton of ways to do it, and wasn't sure which way to go, just knew I wanted to relocate the links from the bottom of the axle...was fabbing a bracket from scratch and it dawned on me that I was reinventing the wheel. Took the stock lowers, popped the ball out and press fit in a plastic shim. Using a screw to keep it all aligned, I epoxied the lower link to the axle. I used "Plastic Weld" - never heard of it before, but seems to work very well. After it set overnight, I made
some aluminum reinforcement plates for the bottom that moved the lower link to just in front of the axle.


Triple walled brass tube bent up into a truss for the top.

Mocked up..

And painted up and installed. Had to keep the 5mm ball links at the bottom as the TRX ball ends I was going to use limited flex...geometry worked out perfect, was worried about the little upper links, but no axle steer at all and just enough downtravel for a CC chassis. Still have to sleeve the links though.

Wasn't happy with the rear shocks, so hacked up an old CR01 trans mount and bolted it inside the chassis. Cut some holes in the chassis and used some TLT shocks. Get a little over an inch of direct rear wheel travel with this set-up.


Now for the tricky part. I hate how the jeep body sits on the CC chassis. The front wheel tucks too far back into the wheelwell imo.

So took off the lower arm mount and hacked off 10mm at the back. That takes some structure off, so I CA'd some styrene in there to beef it back up. I mounted the arms and used the pieces I cut off up front as a spacer.

Worked out pretty well. I had to trim the C's a bit, add adjustable uppers and swap the lower shock mount for a ball end as it bound up, but looks like it's going to work out ok.

Only issue is I'll have to trim the front fender a bit. Not even sure what that indent was for, but it's going to have to go.

Much better!

and the chassis as it sits. Looks like it has a lot of rake, but I tweaked the body mounts so it sits fairly level (ish)

Front completely clears, though the rear still needs some trimming...quite a bit of it.

More madness to come
Last edited by OSRC; 04-29-2013 at 07:53 PM.
 04-18-2013, 07:09 PM
#2
Made a little progress.
Bodywork has begun, nothing fancy - sticking with a mostly stock look for this one. Trimmed the steps off the sides, clearanced the rear fenders a bit for the tires and cleaned up the bumper. Work in progress.

Trimmed out the front fenders to clear the tires as well, and since removing the fenders takes away some of the chassis rigidity, fabbed a cross brace for the suspension.

Bodywork has begun, nothing fancy - sticking with a mostly stock look for this one. Trimmed the steps off the sides, clearanced the rear fenders a bit for the tires and cleaned up the bumper. Work in progress.
Trimmed out the front fenders to clear the tires as well, and since removing the fenders takes away some of the chassis rigidity, fabbed a cross brace for the suspension.
04-21-2013, 08:34 AM
#3
more progress..
Turns out moving the arms forward 1cm is a lot more work than I thought.
I picked up some universals (Eracing Pro? Rebranded GPM?) and they totally don't fit. They are a bit wider than the dogbones right at the Chub, and they rub terribly. Can't get more than 20 deg. steering, so they are not going to work. I wet back to the dogbones and went to work clearancing the hubs. I took a lot of plastic off for clearance, so I got out the epoxy and some 1.5mm styrene and reinforced them. Pretty strong, time will tell if they hold up ok. If not, some aluminum hubs will have to go on.

Total steering with the universals. Uh-oh.

Reinforced hubs


Painted and mounted. No more rubbing and full steering lock.

Started working on paint and some details. Roof will be black once the tan has set for a few days. Added a bit of detail to the front bumper. Modding a PL winch so it only looks 1/2 cheesy and a little bull bar. WIP of course.

Turns out moving the arms forward 1cm is a lot more work than I thought.
I picked up some universals (Eracing Pro? Rebranded GPM?) and they totally don't fit. They are a bit wider than the dogbones right at the Chub, and they rub terribly. Can't get more than 20 deg. steering, so they are not going to work. I wet back to the dogbones and went to work clearancing the hubs. I took a lot of plastic off for clearance, so I got out the epoxy and some 1.5mm styrene and reinforced them. Pretty strong, time will tell if they hold up ok. If not, some aluminum hubs will have to go on.
Total steering with the universals. Uh-oh.
Reinforced hubs
Painted and mounted. No more rubbing and full steering lock.
Started working on paint and some details. Roof will be black once the tan has set for a few days. Added a bit of detail to the front bumper. Modding a PL winch so it only looks 1/2 cheesy and a little bull bar. WIP of course.
04-29-2013, 07:53 PM
#4
1 down, 3 more to go (Found enough parts to build a 5th chassis, heaven help me, but I am going to get all of these running). Mild build is done...going for a stock jeep look, with a little more capability than the stock chassis can offer. Think it's there. Didn't go crazy with details, just tried to finish it off nice and clean. Runs a 4:1 GRU and a 65t motor on 2S...going to have a nice scale speed.
Unfortunately, it's pouring out so some bench shots will have to do

Pushing out the front wheels was totally worth the effort.


And of course, mandatory flex shot.

and on to build #2 - WILD! Goal here is to push the boundaries of the CC chassis.... This chassis was pretty hacked up from the PO, so I had no qualms about hacking it further.
Chassis got a major haircut:

Front skid shaved down and TL01B arms added:

Front and rear suspension..rear axle is shimmed, and a 3 point truss added. Needed a little more strength here then the Jeep so went with a stronger design here. Spacers added to match the front track. It's pretty close, may have to tweak it a bit.

More to come.
Unfortunately, it's pouring out so some bench shots will have to do
Pushing out the front wheels was totally worth the effort.
And of course, mandatory flex shot.
and on to build #2 - WILD! Goal here is to push the boundaries of the CC chassis.... This chassis was pretty hacked up from the PO, so I had no qualms about hacking it further.
Chassis got a major haircut:
Front skid shaved down and TL01B arms added:
Front and rear suspension..rear axle is shimmed, and a 3 point truss added. Needed a little more strength here then the Jeep so went with a stronger design here. Spacers added to match the front track. It's pretty close, may have to tweak it a bit.
More to come.
04-30-2013, 09:58 AM
#5
That looks great, loving the build so far.
Keep it coming, will stay tuned
Keep it coming, will stay tuned
05-03-2013, 07:54 PM
#6
fantastic read. I seriously can not wait to get a cc01.
05-11-2013, 09:19 AM
#7
Put on a set of 2.2's and there was no way they were going to clear. So I clearanced out the wheelwells. It was a total pain in the backside, but I think it came out ok.
Hacked off the rear of the wells. Kinda tricky as it's close to the gearbox cover.

A little plastic weld and some styrene later...tried to follow the contours of the chassis as much as possible. Looks a little rough, will spray the chassis black later to blend it all together. Have to cut and fill the battery hole as well, and I'l touch it all up then.


From the top compared to a stock chassis. Much narrower now - should clear up to about a 5" tire now at full lock.

Time to work on the bottom. Did a bunch of dremeling and fab work this morning. Wanted to get rid of the driveshaft hanging down, and get as much of a flat bottom as possible.
A Highlift chassis steering block was a perfect fit.


Now that I had room, fabbed up a set of skids for the bottom. The drivehshaft cover will be welded on later.


Hacked off the rear of the wells. Kinda tricky as it's close to the gearbox cover.
A little plastic weld and some styrene later...tried to follow the contours of the chassis as much as possible. Looks a little rough, will spray the chassis black later to blend it all together. Have to cut and fill the battery hole as well, and I'l touch it all up then.
From the top compared to a stock chassis. Much narrower now - should clear up to about a 5" tire now at full lock.
Time to work on the bottom. Did a bunch of dremeling and fab work this morning. Wanted to get rid of the driveshaft hanging down, and get as much of a flat bottom as possible.
A Highlift chassis steering block was a perfect fit.
Now that I had room, fabbed up a set of skids for the bottom. The drivehshaft cover will be welded on later.
05-21-2013, 07:50 PM
#8
Been waiting for a pile of parts...got all in but one. Bunch of aluminum goodies for the front and 2 set of Junfac shocks.
Wahoo!

Wild Dagger arms, TA02 knuckles and C's, and 103mm shocks. I looked high and low for a body to fit this rig,and found a pretty good one that I thought might work. Of course, that didn't work out at all, so I picked up a Buggy Champ body with fingers crossed and started hacking. Think it'll work with some serious mods. Good to keep it in the family too.
All mocked up really, just getting a feel for it. Liking it so far! Still waiting on a few odds and ends so I can assemble it for real and get busy with suspension mounts and body work.

Wahoo!
Wild Dagger arms, TA02 knuckles and C's, and 103mm shocks. I looked high and low for a body to fit this rig,and found a pretty good one that I thought might work. Of course, that didn't work out at all, so I picked up a Buggy Champ body with fingers crossed and started hacking. Think it'll work with some serious mods. Good to keep it in the family too.
All mocked up really, just getting a feel for it. Liking it so far! Still waiting on a few odds and ends so I can assemble it for real and get busy with suspension mounts and body work.
06-05-2013, 06:34 PM
#10
Doesn't look like much, but got the drivetrain, steering, and front suspension on finally. 35t motor though an HPI GRU, and a 19t pinion. Some Axial shock hoops left over from my Honcho worked out perfect, though not sure if they are going to stay or not. Still working on shocks, not 100% sure what I want to do yet.

08-15-2013, 02:41 PM
#11
Is this still in progress?
09-23-2013, 05:55 AM
#13
Rolling along...
Rear suspension and driveline installed.


Front almost done...

Using a set of old school 2.2 moabs for now, very subject to change.

Have to fine tune the camber yet..

Pretty decent steering as well, clearancing the chassis was a must.

Mandatory flex shot

Rear suspension and driveline installed.
Front almost done...
Using a set of old school 2.2 moabs for now, very subject to change.
Have to fine tune the camber yet..
Pretty decent steering as well, clearancing the chassis was a must.
Mandatory flex shot
Currently Active Users Viewing This Thread: 1 (0 members and 1 guests)
